Yes! 2.5% of total is pretty low. I'd be surprised if this alone is the source of your "severe load" warnings, but I'm not sure how that metric is calculated.
There's a thread with chatter about some ongoing issues with severe load randomly showing up. I'd suggest checking there to see if any of the issues being investigated there might be relevant.
I’ll keep poking around. I did all the updates and still the same severe load alerts. Only thought of this driver because it’s significantly higher than any of the others.
The Hubitat folks told me that a driver or app has to go over 33% of total time in order to trigger the extra load warning for an individual app. But ultimately it all adds up across all drivers, and I'm not sure what specifically triggers the severe load warning at a hub level.
The chatter in that thread was that there was perhaps an underlying issue that was triggering the warning, so just being up to date might not have that fixed yet. My mind went to that thread because your issues cropped up in a similar timeline. It could be a coincidence though.
What do you have your refresh interval set to on the AC virtual device?
It is likely not straightforward. You could try to get an integration based on that MrCool library to work with HomeAssistant or some other controller and then mirror that in to Hubitat. Or you could port it to be natively running on Hubitat (which is what I did with the midea integration).
I also don't know whether anyone else here may have found a path for bringing MrCool systems into Hubitat. You might consider creating a new thread to ask for any tips on that, since it might get lost in this thread.
Hey, tomw! First off, thank you SO MUCH for making this driver! I'm using it with my three Senville Aura units. I believe they're just rebranded Midea Excel Series (DHMAHB).
I'd love to be able to access these features through the driver:
Louver Direction (the NetHome Plus app allows you to select the vertical and horizontal direction of the air output from the unit)
Gear (this allows you to select how much power the unit uses and I'd like to be able to set it automatically during peak electric pricing times)
Horizontal & Vertical Swing
All of these features are currently available in the NetHome Plus app, so I'm hoping you would be able to add them to the driver. Thanks for considering it! And thanks again for making such an awesome driver. I'm now using Habitat to schedule everything the units do!
Thanks for the feedback and requests. I'm glad it is working for you.
I found another project that seems to show how to set the vertical and horizontal swing directions. Can you explain the difference between that and the louver direction that you described?
I don't see any reference to the "gear" setting. Is it possible that it could be known by another name? Or else, could you describe more about what that does? Is it a different setting on the AC unit, or is it just limiting the available settings somehow (disallowing certain temperatures or fan speeds, perhaps?).
Thanks for replying! I tried to attach some screenshots from the NetHome Plus app, but the forum won’t let me.
Air Direction - This sets specific positions of the horizontal and vertical air output louvers. There are five positions for “up and down” and five for “back and forth”. This is different from “swing”. Swing is when the louvers continuously move back and forth. (Direction is misspelled as Deriction in the NetHome Plus app)
Gear - This allows you to limit the power of the unit to either 50% or 75% of capacity.
I need to see if the device sends a response that reflects those updates.
Will you please try this:
Enable debug logging on the virtual device and save the device.
Open the Logs window in Hubitat in a separate tab and leave it open.
Go to the app (your screenshots above) and set the 75% setting. Then set the 50% setting.
Then set the direction to a different setting from its current state. Then set it again to a different setting.
Then PM me the logs with commentary about what settings you changed and in which order. I'm looking to see if multiple responses with different values for those settings came through.
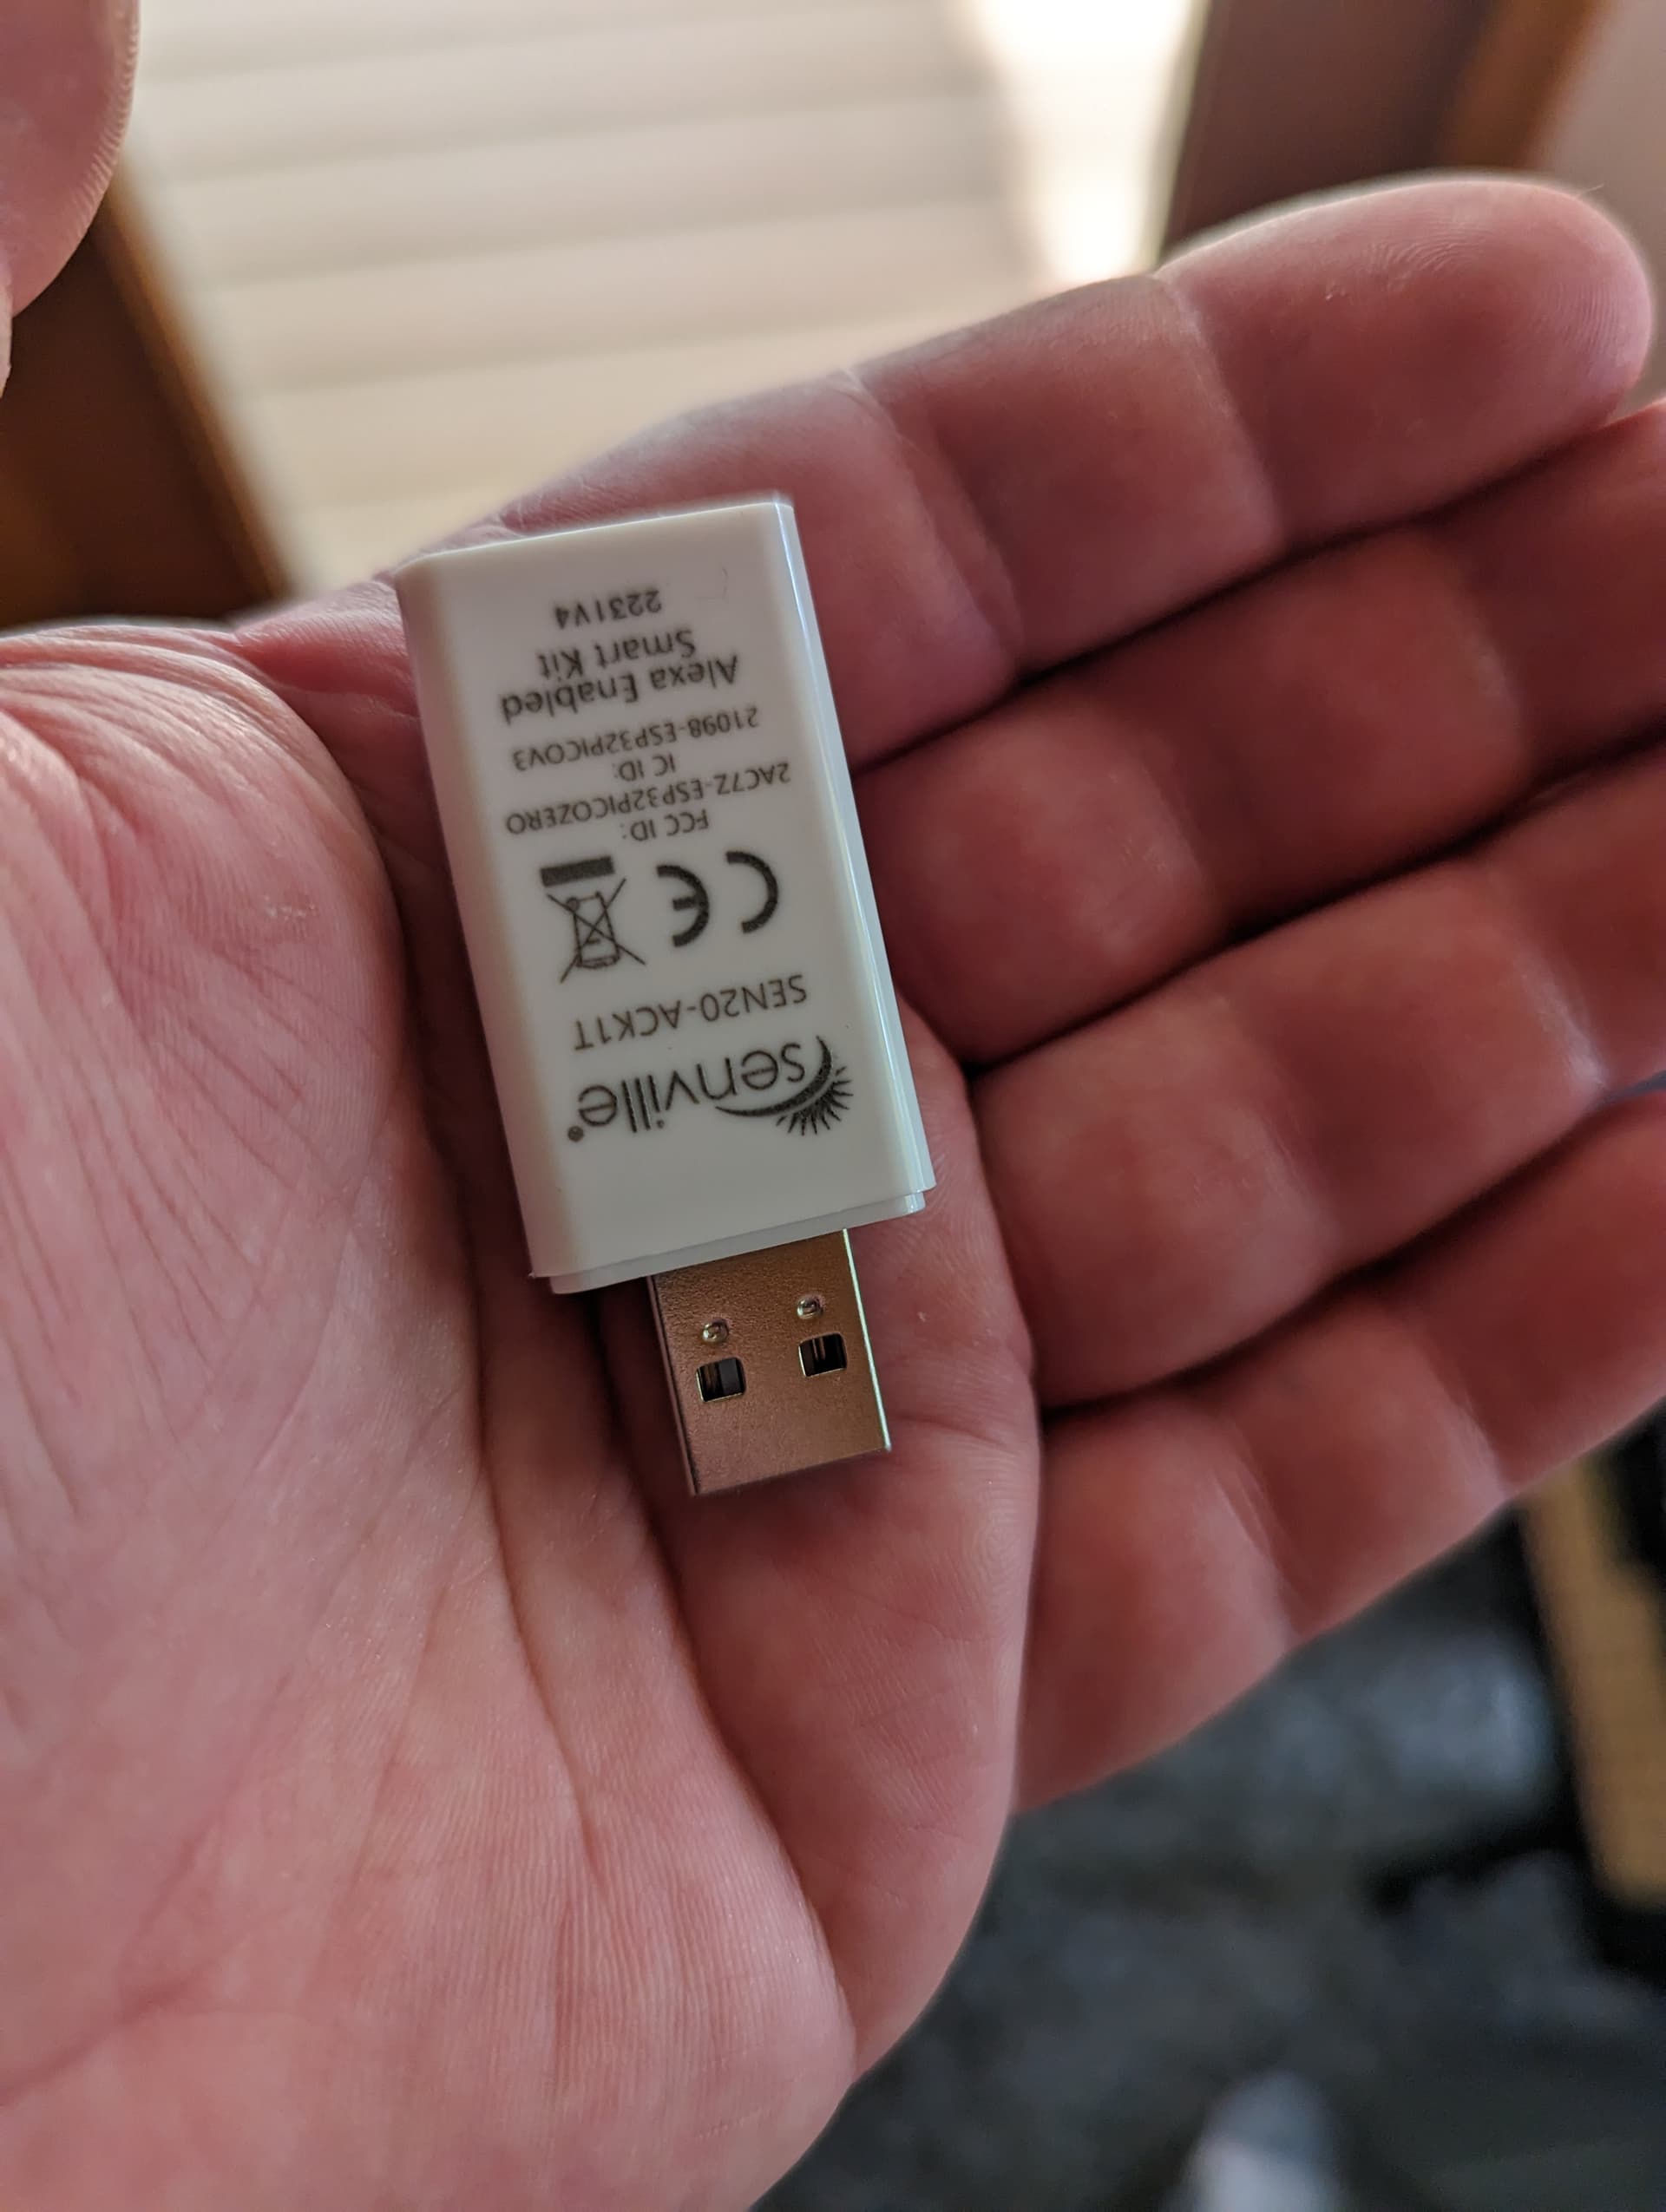
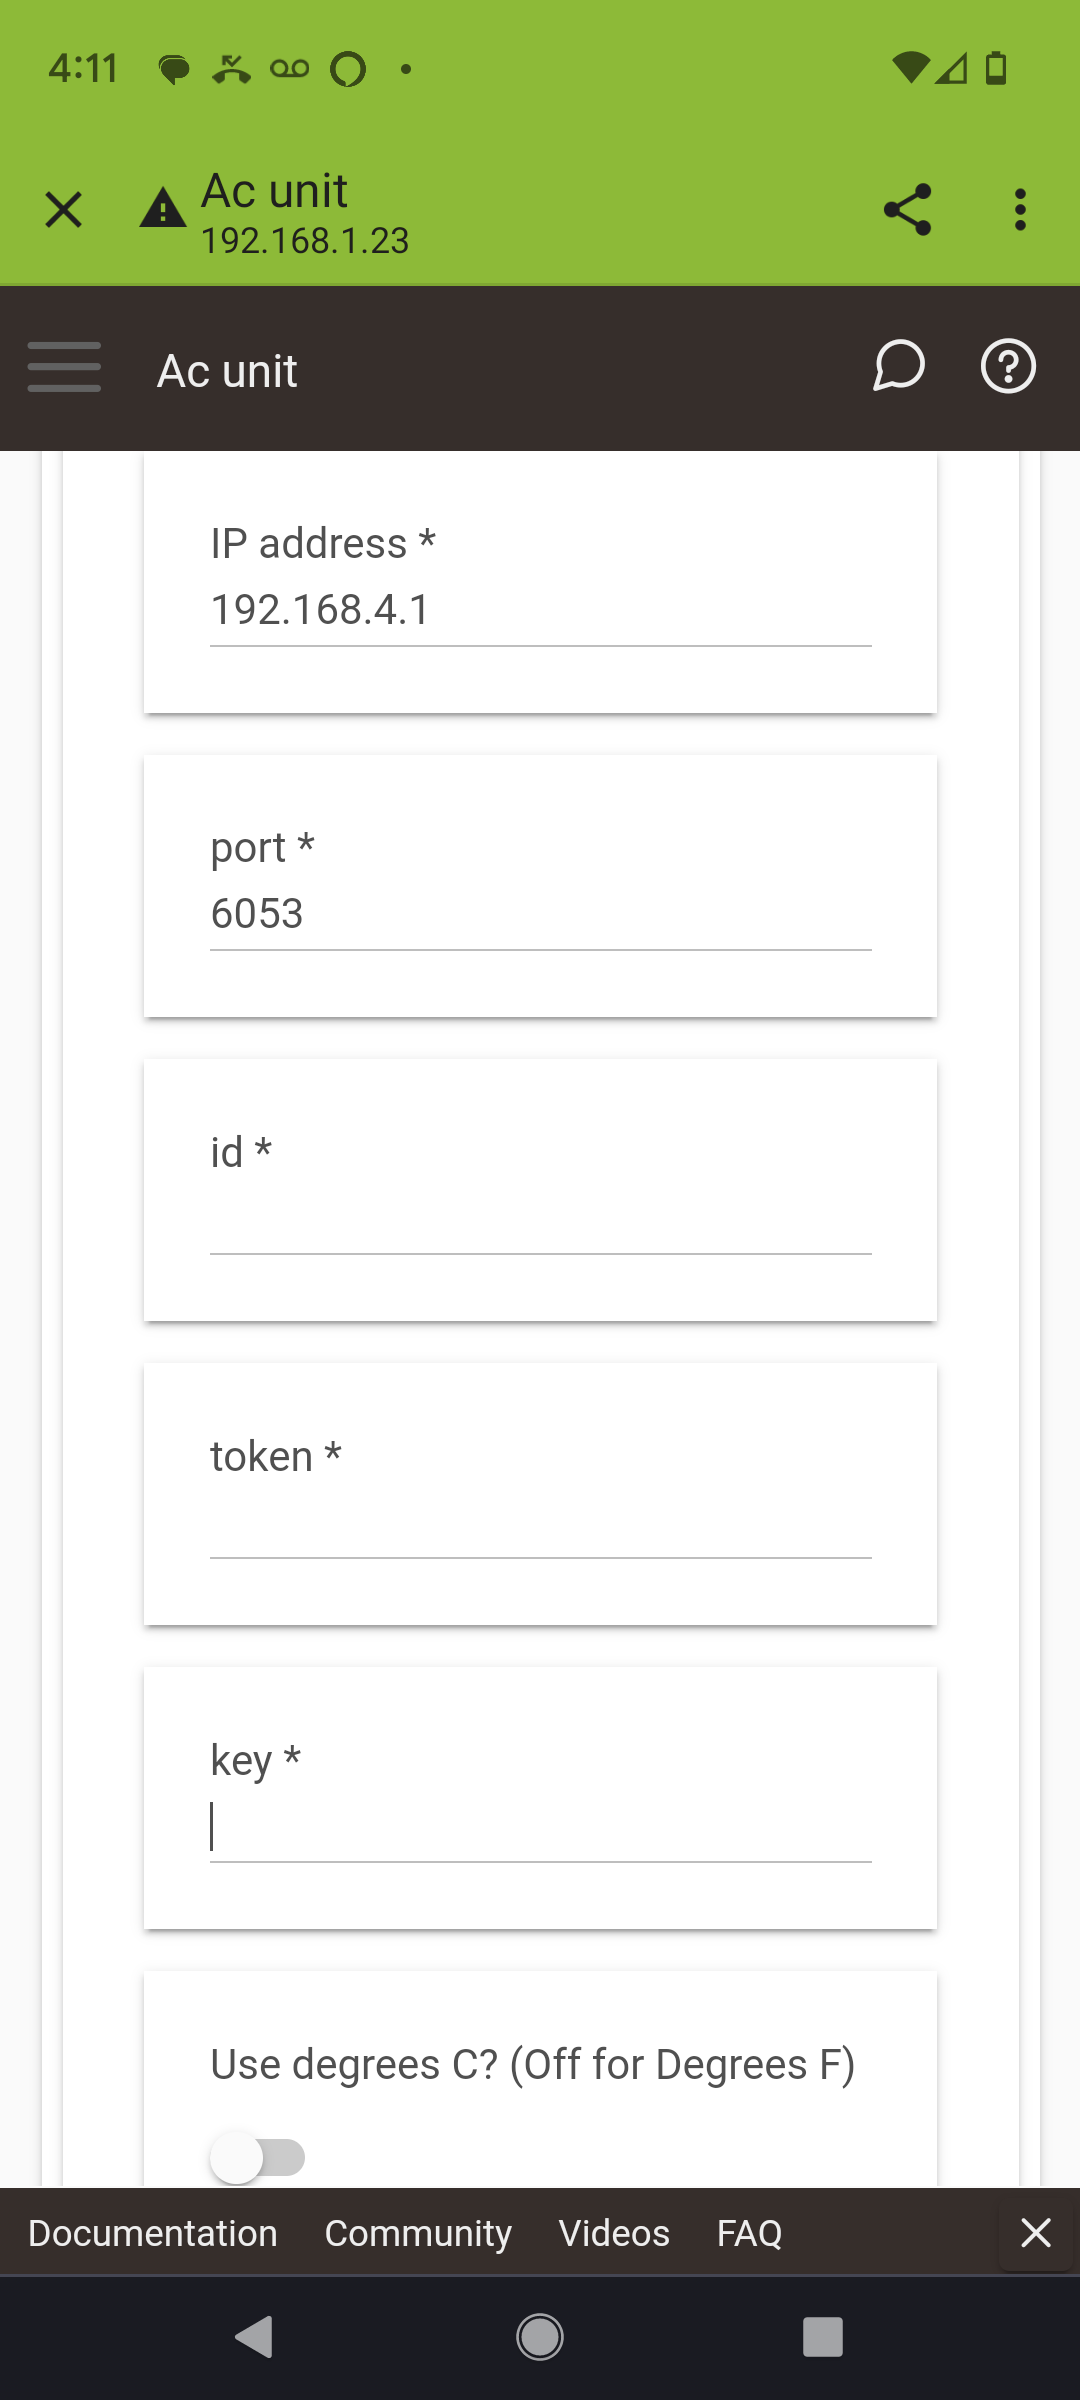
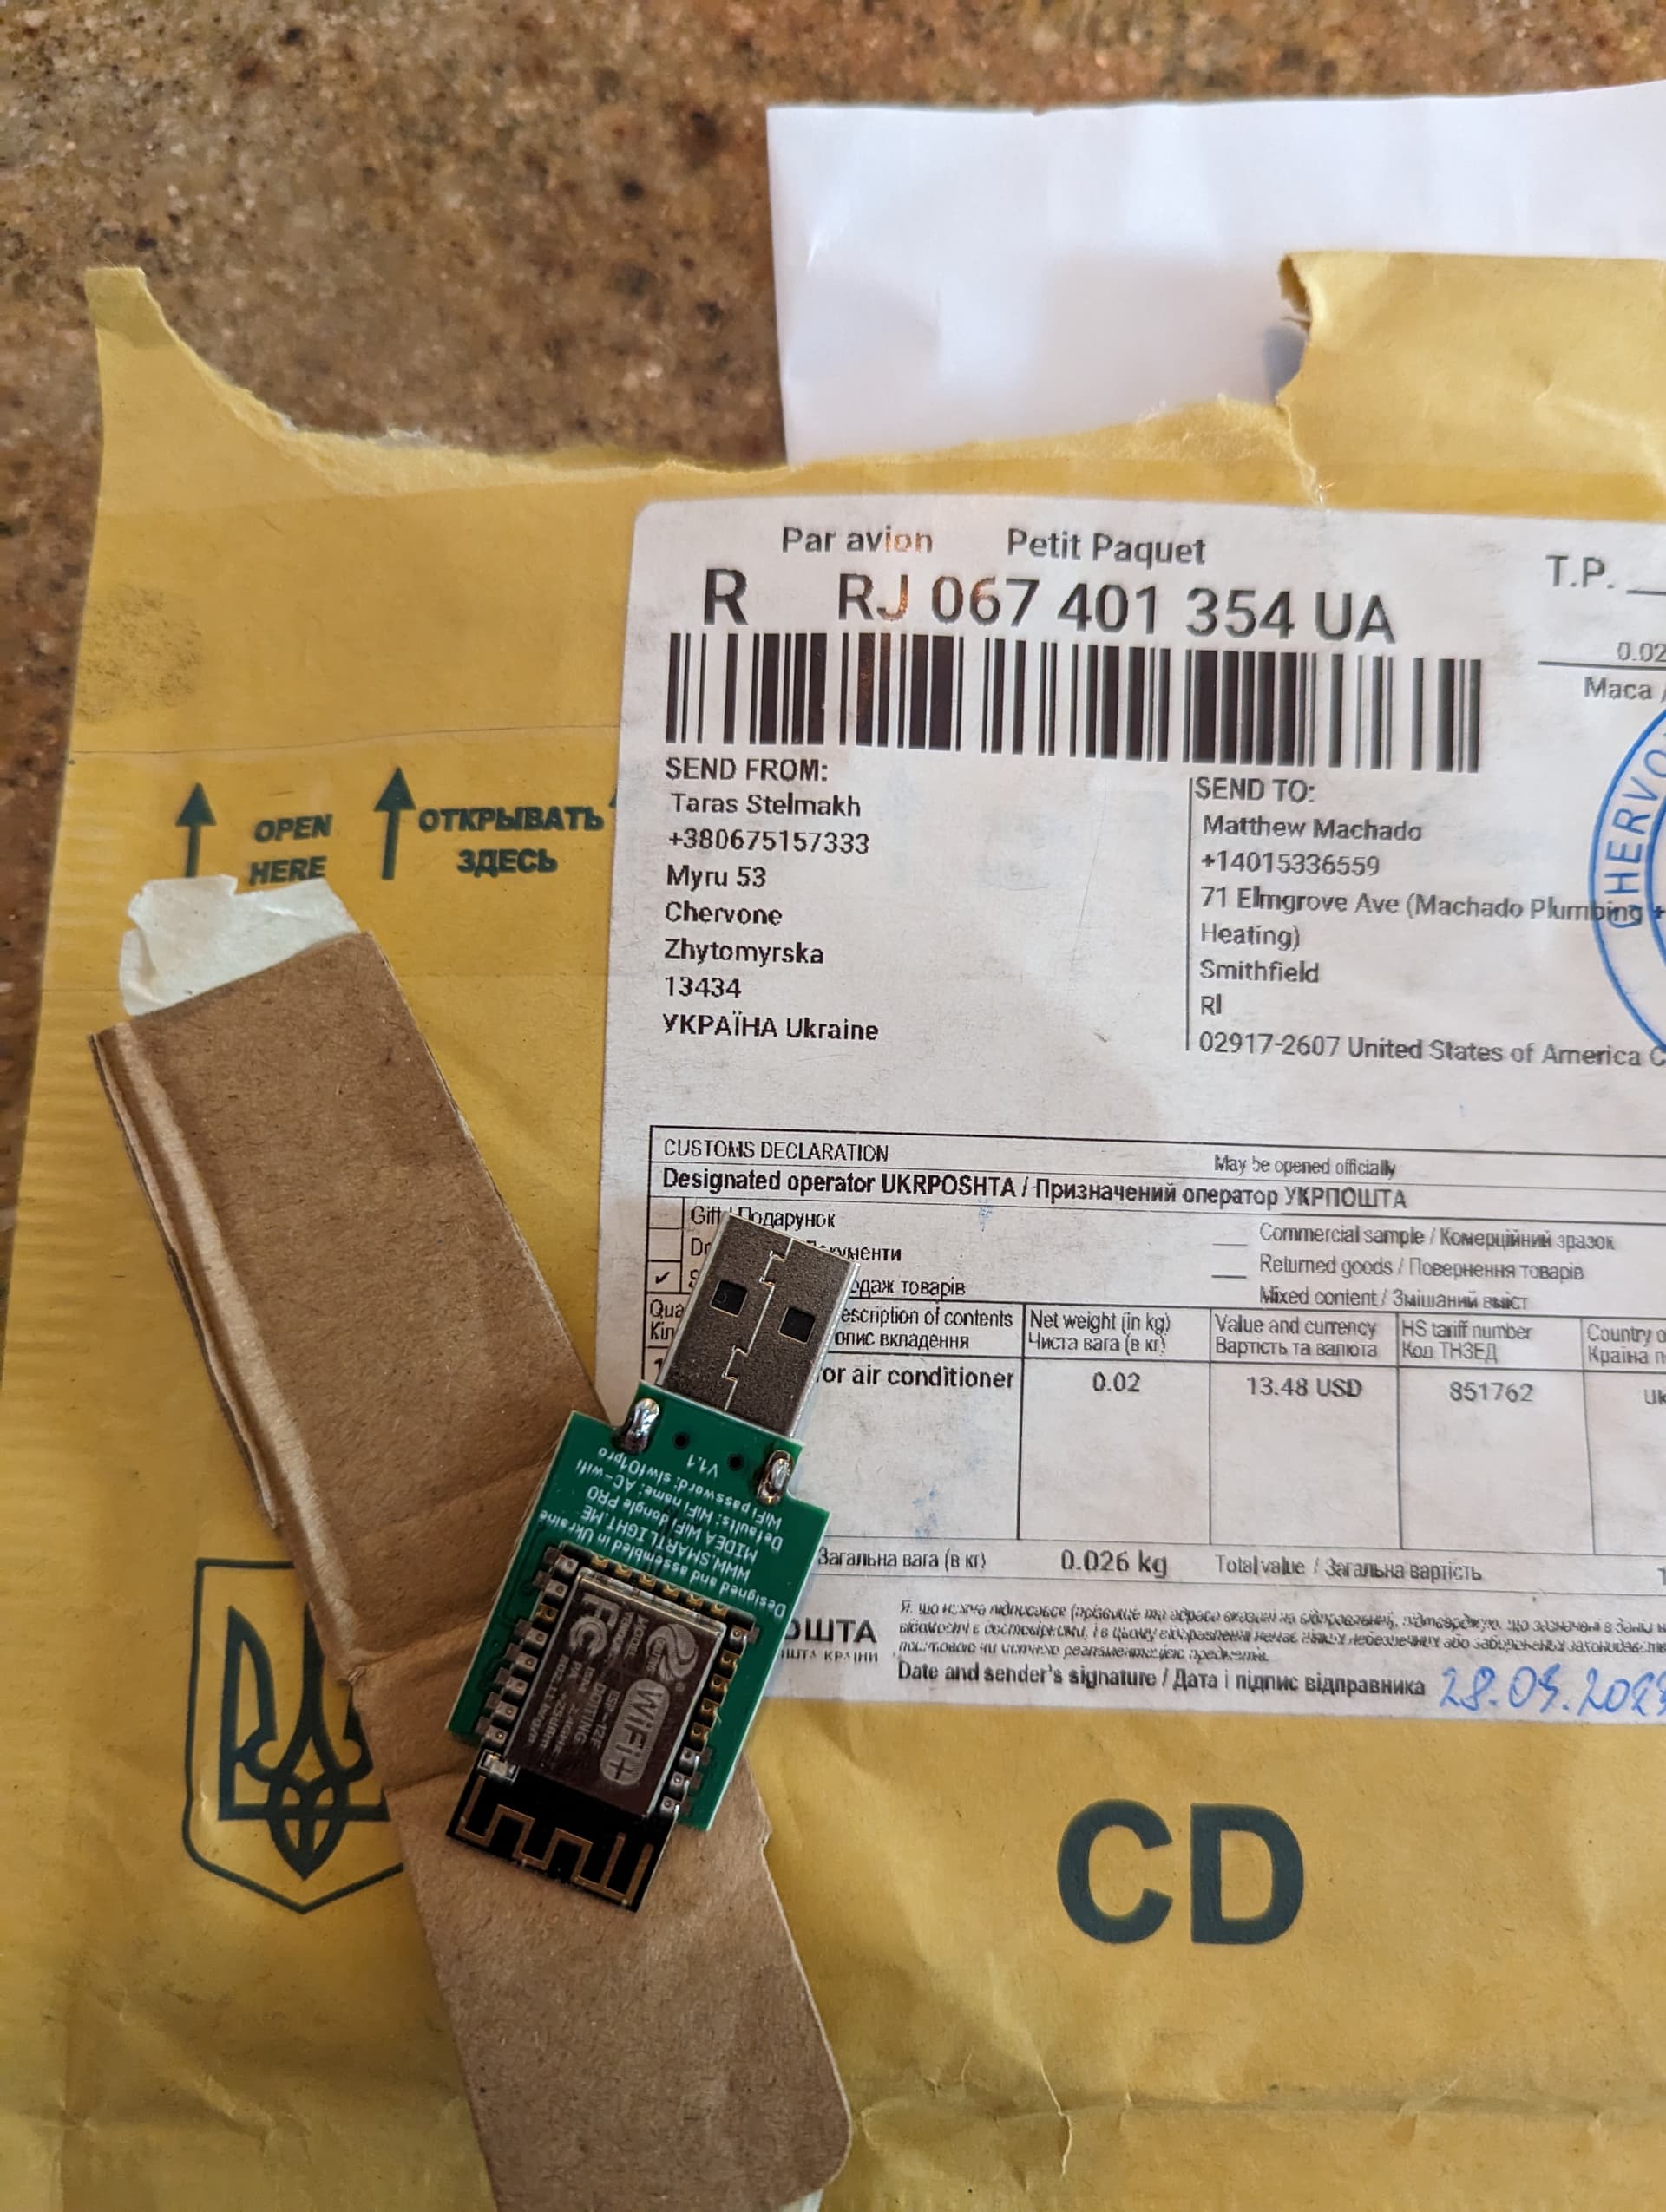
I bought this USB dongle from Smartlight.Me out of Ukraine. It's supposed to allow local control of the Midea units but I'm confused as to what to enter in some of the fields in this driver.
I had it working via Alexa but ideally I'd like a Hubitat device so I can control it via ActionTiles.
I can't vouch for that dongle, but to check if it will work with my integration you need to first try the midea-discover utility that I describe in the readme for my integration.
I see. I missed that whole section about needing python and all that. I thought it was a plug and play driver. I apologize.
I don't have the means to discover the information as I barely know what python is.
The dongle is based on ESPhome if that makes any sense. I was actually able to install it in the mini split and connect to it pretty easily via a web interface. Bummer. I waited like 2 months for that dongle.
Thank you for you're work. Maybe in the future I'll explore it again if something easier doesn't come around.
You can totally do it! Don't be scared away by the Python requirement.
Earlier in this thread, another user detailed some trial and error (and a little bit of frustration) getting this to work. Give this a look and I encourage you to dive in and give it a try. A lot of folks in this thread could help with any pointers if you get stuck.
I have a brand new in the the box Canakit Pi4 in the basement. I'm going with the idea. I'm getting an HDMI cable and a keyboard to set it up for this python thingy. I just don't have the time to dedicate to it right now.
This works most of the time since I rarely get 2 consecutive timeouts.
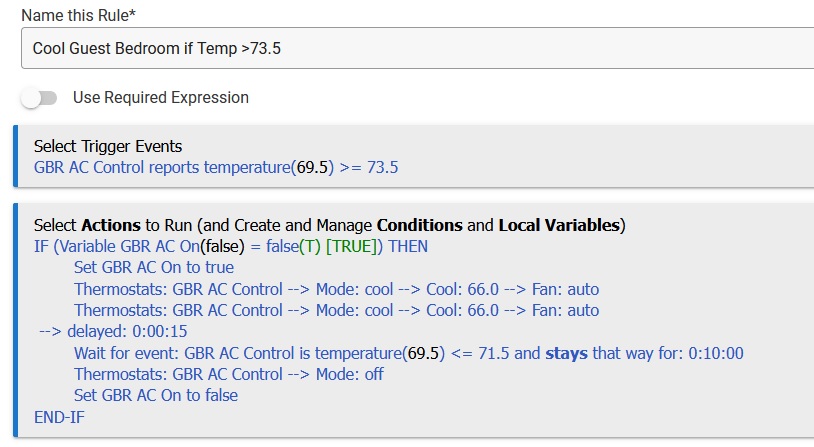
I see in the Device there is " * thermostatOperatingState : on ", however I cannot find where to use that as a conditional test.
I do have a couple of questions:
Can you publish a version for people where the 4s wait in your Groovy file is larger (or can I just modify the file)?
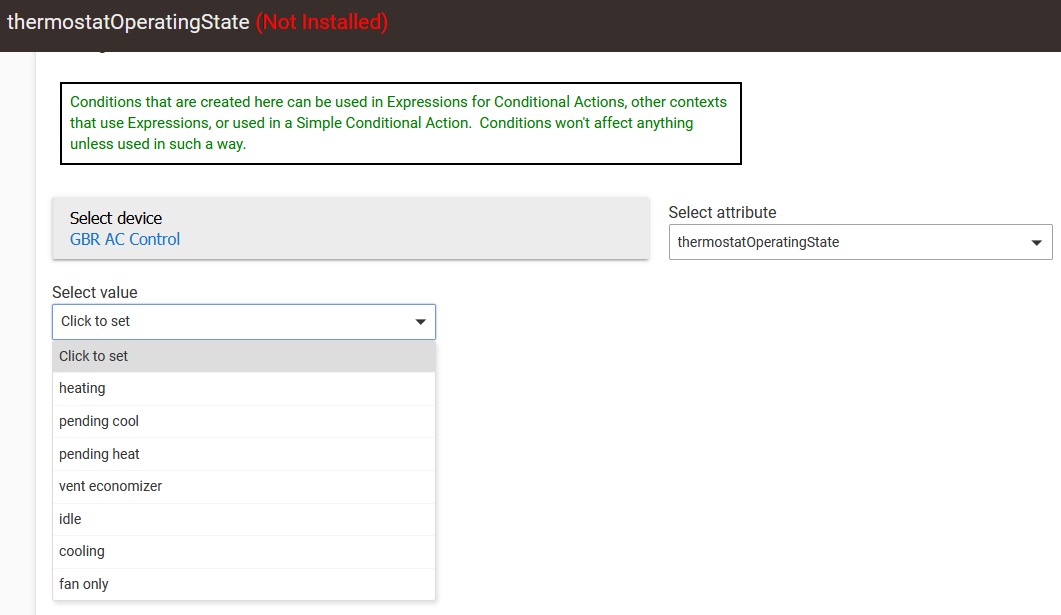
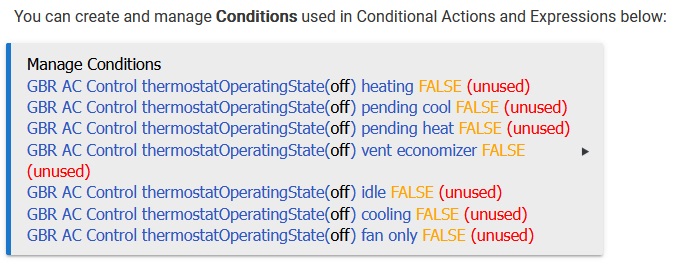
Is there a way to use the " * thermostatOperatingState : on? When I check in the custom attributes, this is all I see in thermostatOpratingState(and ALL items identify as "false" when evaluated):
I experimented with lengthening this with other users that have seen the intermittent timeout that you saw. In my experience, it appeared that no length of the timeout would help with those failed refreshes.
My guess it that for whatever reason the A/C just never responded to the command, and in fact 4s was an overkill timeout that may as well have been "forever" if the command was correctly recognized by the A/C (as it would typically be much faster than that in replying). Retries are the best way to enhance reliability, as you already said.
There does not appear to be a way to override the default values for thermostatOperatingState in Rule Machine, unless @bravenel could educate us otherwise. I tried attributes in the style used elsewhere (specifically supportedThermostatOperatingStates and supportedThermostatStates), but they did not affect the options in Rule Machine.