I'm not exactly sure of your problem, but I had issues with the msmart install because of a bad internet connection. While it looked like it installed properly, I had to give it another try or two with pip3 to get it successfully installed.
Two other thoughts, It's been a few weeks, so I cant remember for sure, but I think I needed to reboot prior to running midea-discover. The only other thing I can think of is that the directory that pip installs software is not in your $PATH (it's possible that the $PATH for python doesn't get added until a reboot). I don't know enough about python or pip to guide you, but if a reboot and/or a reinstall doesn't help, there should be instructions out there to get that done.
Looking back at my bash history, I see a line for sudo pip3 install --upgrade setuptools followed by a reboot, followed by what looked to be a successful run of midea-discover. I don't recall where I got the info to upgrade the setuptools, but if a reboot doesn't work, maybe try that?
I'm going to try the whole process over again on a different rpi & see if I can provide any more insight.
@jasonp9@tomw
OK, I had some success on my end and it seemed that it was due to the PATH, and a reboot resolved it.
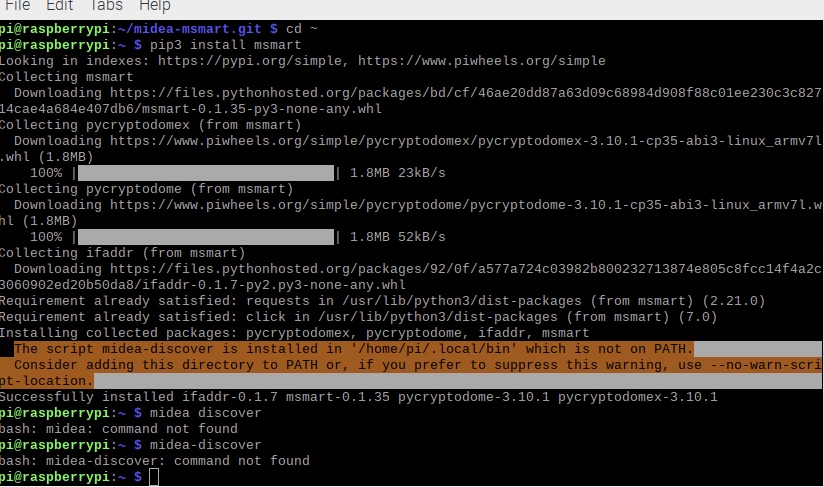
The first rpi i installed this on was the 'lite' version of buster, and I had to install the python environment myself. I just retried on the desktop version of buster & python was already installed. pip3 succesfully installed msmart on the first try, but with the warning seen here:
midea-discover did not run until after a reboot, I assume that python added the proper $PATH entry during reboot, because midea-discover ran on the first try afterwards.
I don’t see that error in your output, but give a reboot a try & see if it works.
Working Great @tomw ! Going to work on somehow integrating it with my thermostat to go on when my thermostat is set to cool and hopefully have the temp mirror the thermostat as well. Thanks again!
I had to be sure to check every single option in the advanced setup portion. Once done, reboot.
Then I did the pip3 install-msmart command from a command prompt window. It appeared to install. Reboot again.
From there, it all went downhill. The package (apparently) was there somewhere but errored out when you tried to run it. It said it was installed when trying to reinstall msmart. But even after playing around with windows PATH editing, and multiple reboots, I kept getting errors upon trying to run the midea-discover command. That midea-discover command might work in a Linux environment, but Windows profusely complained that it wasn't a valid command. And rightly so, there is no exe, bat, or whatever to let windows know what to do.
I did do pip3 install --upgrade setuptools, as a troubleshooting step somewhere here, but not sure that was needed. Reboot yet again if you install this.
The msmart package apparently installs in your users, xxxx, appdata, roaming, python, pythonxx, scripts folder. Browse to that location. I believe that appdata is hidden by default in windows. I always have the setting where I can see all files (view hidden items) on by default, but you might have to do that step here to even find the correct folder.
Now you should be able to see the midea-discover.exe file. However, you cannot run it like a normal windows exe (of course). You have to use Windows Powershell. Powershell should be easy as you just go File, open powershell, in the navigation window. Once you get the powershell window, you can type midea-discover.exe, press the enter key, and you should get the desired output.
I probably left something out here, but it is all a blur at this point. You might be able to skip some of these steps.
And can I just say, my patience for command line wanes by the minute as I get older. There is so much weird crap you have to do, and hours of reading stuff online just to install or do one stupid thing with all this stuff. UGH. This took hours of time and reading so many blog posts, forums, and stack overflow posts that it actually gave me a migraine trying to interpret all these things that could be wrong by the errors I was getting. No wonder Linux has less than a 1% adoption rate. And no wonder people use Alexa instead of doing all this awful crap.
Ugh, that sounds like a slog. FWIW, a lot of the challenges you described were Windows-imposed. It's still a chore on Linux or macOS, but all of the special directories and different terminals stuff is all Windows.
Anyway, glad you finally got to the finish line with the prerequisite other tool. Did you have better luck with my driver?
Still in the early stages of testing, but it seems to have taken the token, key, and all that without issue. And it appears to be controlling the A/C in the few minutes I have had to mess with things.
So I would call the driver a success. The driver itself was the easiest step in the whole process!
Thank you for doing the hard work of running this on windows and describing the process. I know that sucked, but hopefully you'll help someone out there.
FWIW, my mac is down right now so I had to resort to this little $45 RPI4 I had sitting around doing nothing to get mine working.
This is the very reason I use Hubitat vs Home Assistant. The device and user support that's out there for HA is terrific, but their reliance on having to use yaml and json to set up almost anything has cost me quite a large percentage of the few remaining hairs I have on the top of my head. There is a learning curve for Hubitat too, but it's minuscule in comparison to HA. HE did it right by creating a UI for all automation operations.
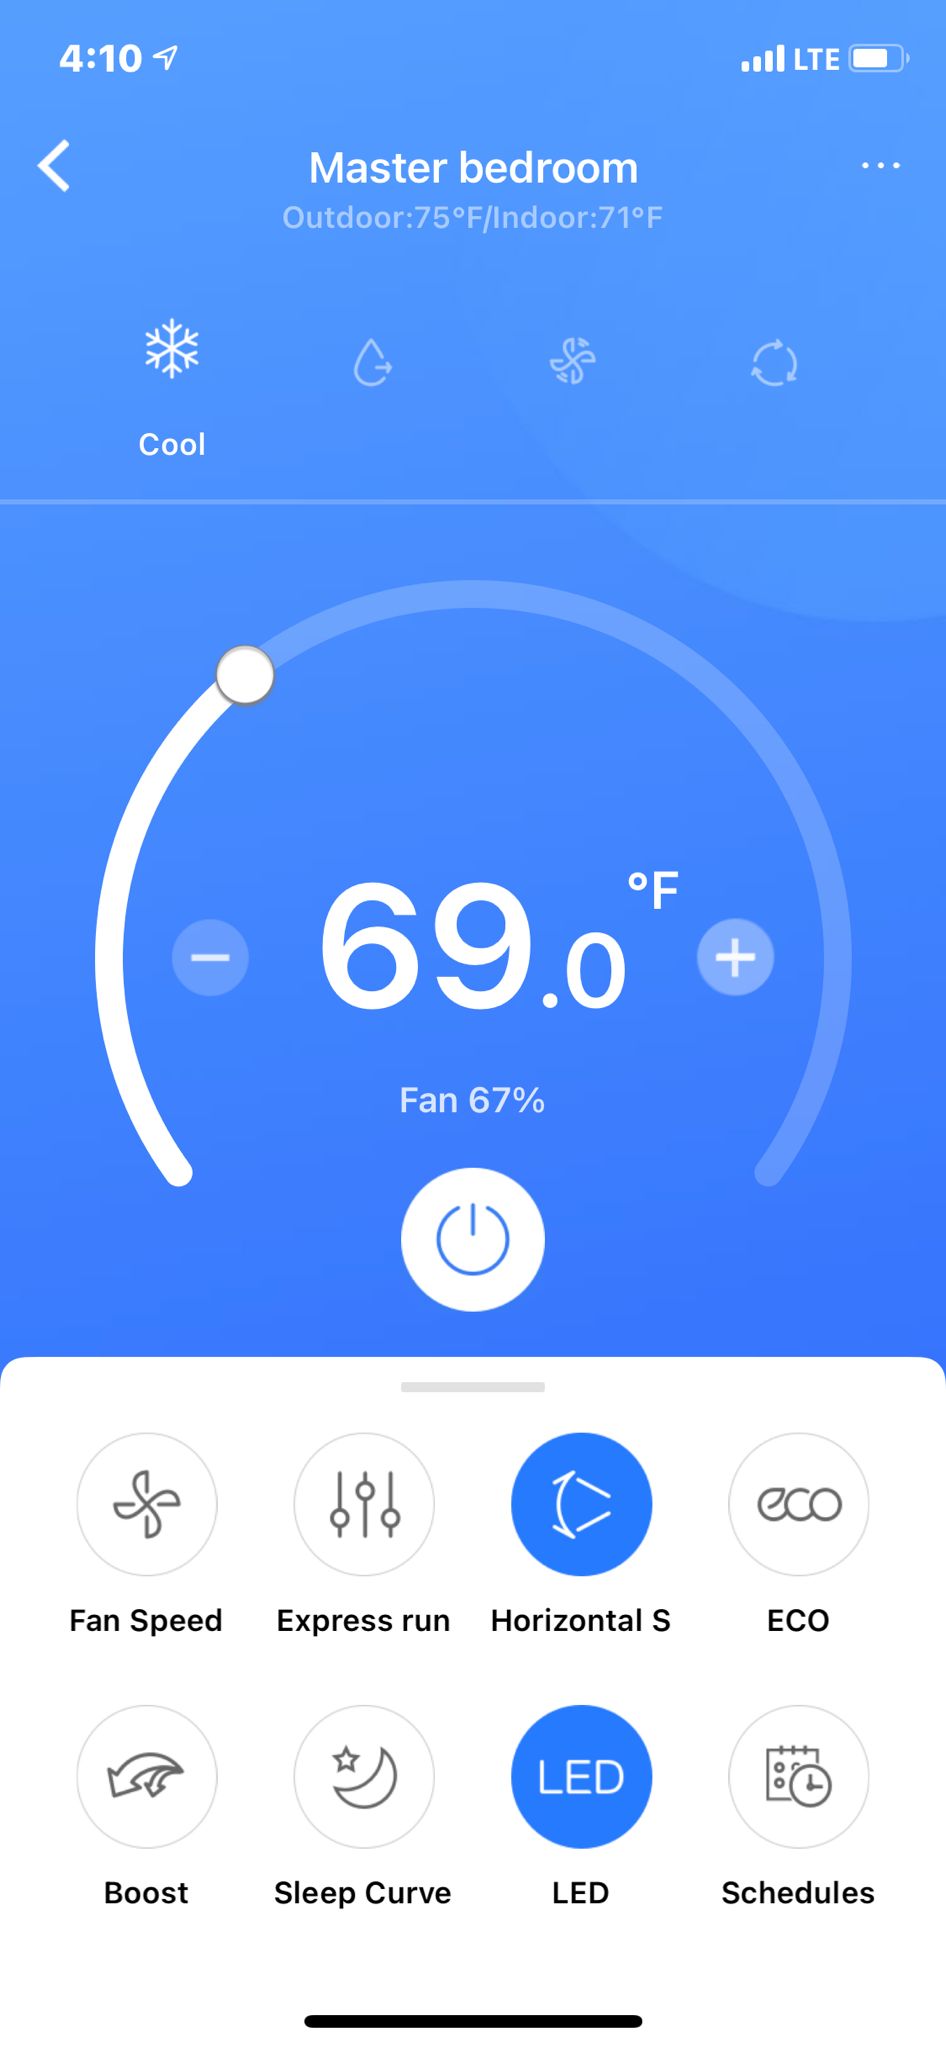
Can you explain the difference between what you described as a "temperature number" and a setpoint? I would have assumed they are the same thing. The way this works is that you can setCoolingSetpoint or setHeatingSetpoint (which are equivalent and set the target temperature for the unit). After that, you can set fan modes and the like.
I see "eco" mode in the component that I referenced, but not "boost". Are they distinct settings, or is "not eco" the same as "boost"? I can add eco as a custom command pretty easily, but I'm not sure what to do with boost.
The fan speed is an interesting one. There are some translations (full = 100, high = 80) that make me wonder if the unit will just accept a % for fan speed for that parameter. If I make a version that includes that will you test it out on your unit?
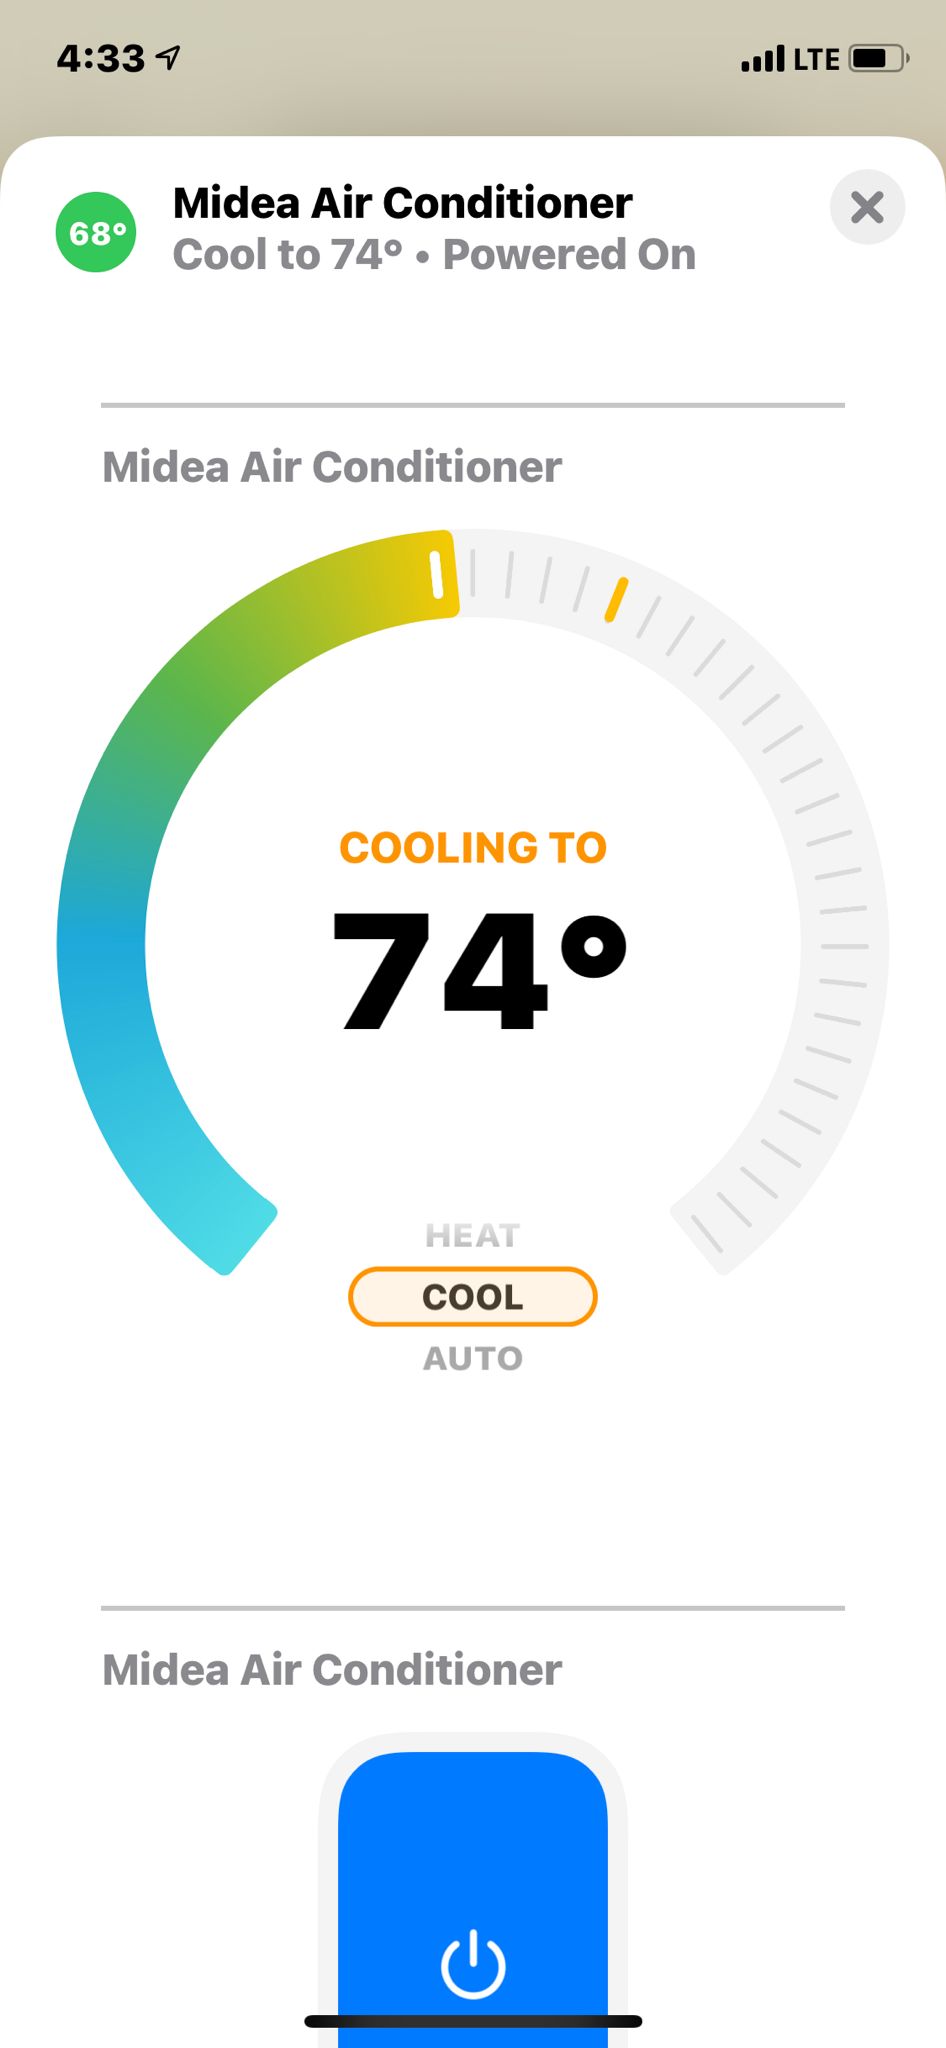
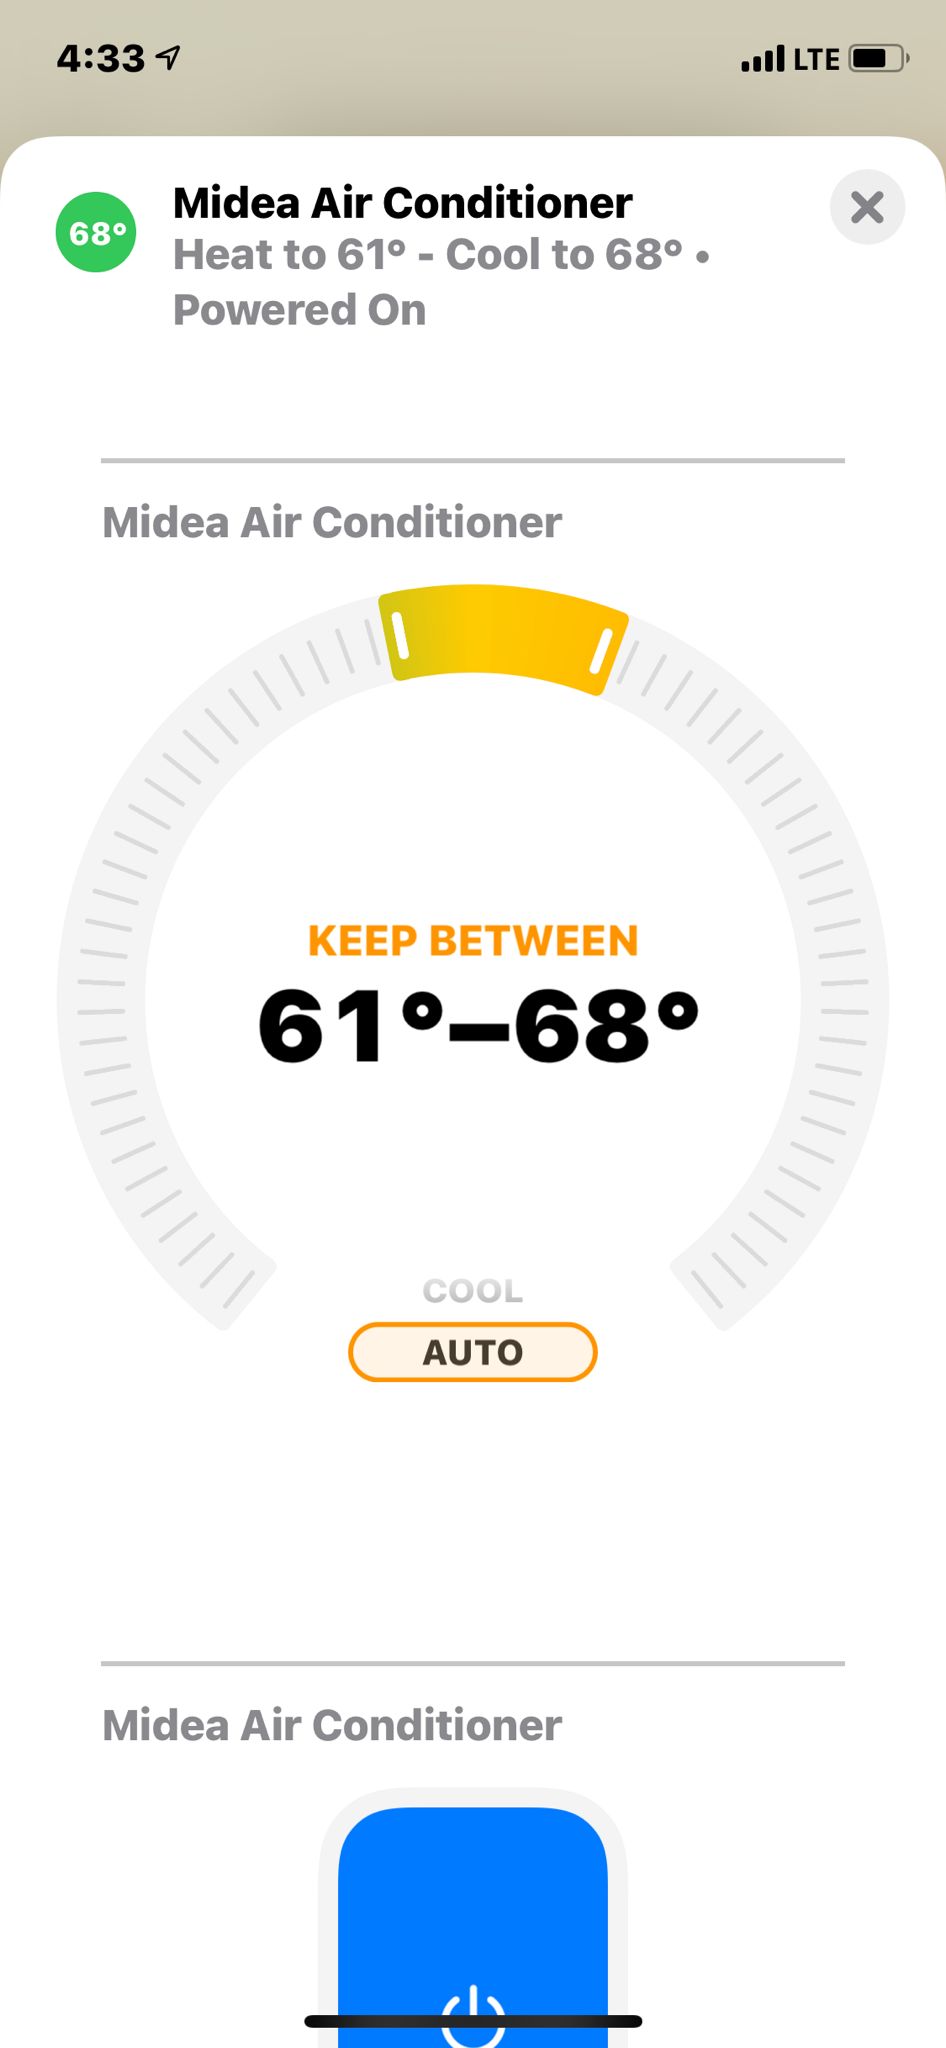
So, when it is setup, the device requires you to enter a range in order to set the temp. When displaying the window unit through homebridge to Homekit app, the Home app attempts to display a slider for the "auto" setting, and requires me to set a range, rather than a simple temp number.
The more I think about it, the issue seems to be due to "heat" not existing in my unit. The slider requires me to set a heating setpoint and cooling setpoint, but since there is no heat function, it just errors out.
Basically, since the unit is expecting a single number to be entered under the auto screen slider, it simply cannot handle the heating setpoint+cooling setpoint, and does not know what to do. The unit does not respond, and after setting the two points on the slider wheel (or manually in the device page in HE) the unit reverts back to the previous setting a few seconds later.
The mode "cool" works perfectly. It is just auto that seems to have the issue. I dont really know the difference between "auto" and "cool" to be honest, in a unit that only cools.
OK, thanks for explaining. I'm going to hit you up via PM so we can exchange some logs and try to figure out what is going on. It still isn't exactly clear to me at which level the app that you posted is interacting with my driver on Hubitat.
Hello Tom, your driver is working OK for the most part. Thanks for the hard work on this. There are a couple quirks though.
There no OFF on the dashboard thermostat tile. But it is there and works in the settings page. See first screenshot below.
When using Fahrenheit, the increments on the dashboard tile are weird. Instead of going up 1 degree, it goes up in odd steps or lands on odd numbers or sometimes doesn't change at all when you try to increase or decrease temp. It almost is like the C to F conversion is off a bit, or it isn't rounding or something. So it might go something like 70.2, 70.6, 70.8, and then change on the next click when it hits 71.x... If you change the dashboard to only change in 1.0 steps, it still displays some odd decimal number that isn't really relevant. I don't think my unit accepts decimal point numbers, and I don't think it is necessary to use or display the decimal at all when using Fahrenheit scale. See second screenshot below.
Now for the odd one. My MAC address changes. There are apparently two MAC addresses in this unit or something? It flips back and forth between 30-xx-xx-xx-xx-6C at IP 192.168.0.125 and OE-xx-xx-xx-xx-6C at IP 192.168.0.120. I cannot figure out a pattern for this, it just seems to occasionally flip over to the new IP and MAC. I have an address reservation for both in the router, and to make your driver work I need to just change the IP to the other one. So weird. Not sure why it would have two MAC addresses?
I checked in a change that adds "off" to supportedThermostatModes (thanks for testing @neonturbo).
This version, 0.9.1, also has some improvements to Fahrenheit setpoints based on what @jasonp9 and @neonturbo were seeing, but there's a good chance it's still not quite right. I included it in this version to try to get more feedback and clues about what may be going wrong.
@neonturbo, on your alternating MAC addresses, I'm not sure. Is it possible that your unit has both 2GHz and 5GHz interfaces and is jumping between those based on your network conditions? Total shot in the dark with that idea...