Anyone that's going to try this hack, I have a few notes to help. It was easy, but also a bit challenging at the same time.
Equipment:
You're going to want an iron that doesn't get too hot. Mine is 25W. Too hot and you risk delaminating the traces from the board. It's coated, but can still be damaged if you get it too hot.
You will definitely need a fine tip on your iron. I have a very small chisel tip on my soldering iron and it was almost too big.
Something like this one is going to be too big.
This one is more what you need for the job.
If you're young you probably won't have a problem, but I couldn't do this without magnification. I used to work in the print industry so I used a 15X loupe, but a typical handheld magnifying glass is probably enough.
Disassembly:
In the video, he uses an Olfa knife, and that's probably OK if you know exactly where the clips are or you've taken it apart a dozen times like he has. I used a nylon spudger. Handy tool to have around if you don't have any.
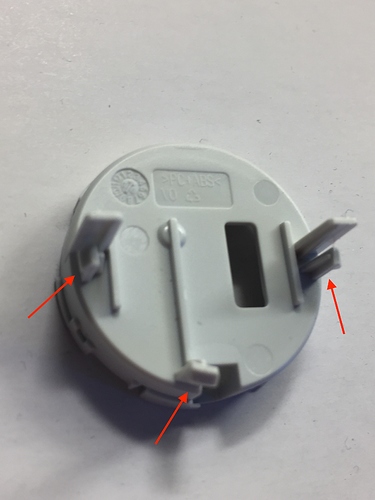
Here are the clip locations. Looking at the bottom with the positive battery contact toward you, and the detector facing away from you, one clip is going to be just to the right of the opening where the positive battery contact is. The other two are in the center, on the left and right.
Soldering:
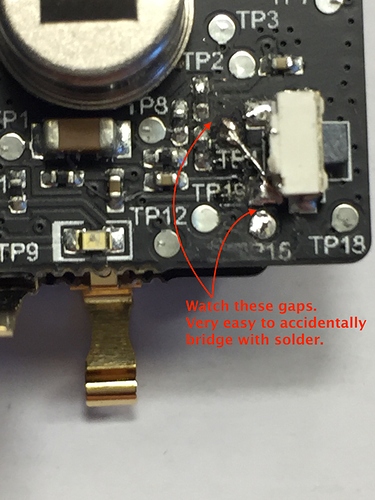
Be careful when soldering the wire, that you don't accidentally bridge TP4 to one of the surface mount components next to it, or TP15 to the paring/reset button. I would NOT suggest using flux remover afterward. It may damage these cheap boards. Just be as quick and careful as you can so you don't get too much flux build-up.


