@bobbles and @Royski thanks for confirming. That is a shame. I guess that also helps the battery last so long.
I’m wondering if the window the rule running to update lux on motion in the global variable and the rule to evaluate the global variable and other conditions is big enough to use the correct updated lux variable before lights come on if real room brightness is low enough to start with 
Lol that’s tight. But worth a try! I will order one and see how it goes. Thanks for your help
1 Like
I'm sure you'll find a use for it, if not quick enough 
1 Like
1 Like
I'm not sure if this helps you or not but here goes.
I have Hue and Fibaro Motion Sensors in a bedroom pointed towards the window. It's not used often.
I then use cobras average all app to write the lux level to a virtual lux sensor.
I use the virtual lux sensor for the lux value in my lighting rules.
I have a virtual switch that turns on at Sunset and Off At Sunrise.
This switch then disables the average Lux app when turned on.
This means that if the bedroom light comes on between Sunset and Sunrise it will not affect the virtual lux sensor.
Not sure if this is something you can use but I'm more than happy to post if you wish.
@bobbles thank you. I tried that about a month ago from your threads on another page and you helped out greatly with questions. Since then I’ve migrated that lux recording to a global variable and simplified the process instead of the Average All device. And by recording each room individually into their own variable I can account for scenarios such as the curtains being shut in a bedroom and not wanting those lights to come on because I have individual room control 
1 Like
From my Xiaomi device driver thread.
However, if you're handy with a soldering iron (or 4B pencil!) and not afraid to open up the Aqara Motion Sensor, there is "hack" to put it permanently in "test mode", which means it checks for motion every 3-5 seconds & sends lux reports if motion is detected:
I haven't tried this, but the person who "discovered" it says it doesn't seem to majorly impact battery life. Honestly, I think I should have tried doing this ages ago, because it's a total win-win hardware modification.
Just keep in mind: Even with the hardware modification, a lux report is only sent when motion is detected. But with the higher frequency of motion detection, a "correct" lux reading can be obtained after an automation has turned on lights in a room.
3 Likes
Wow @veeceeoh many thanks for that info! It sounds great for turning the sensor into a super sensor - i think I would be doing that as waiting 50 minutes for lux change after motion has stopped and the light is off is a bit too much of a gap.
The chicken and egg situation with the rules is the right way round for what I want to do so thanks for clarifying that.
With these sensors, is there a blind window after motion detection before the sensor can detect the next set of motion?
60 seconds
So simple. I watched that video the first time you posted, but never did the mod for some reason. That's going to be perfect for the front door. Won't matter for me if the battery life is affected because I'm going to convert it to be powered by a 3v supply anyway.
That’s a shame. It’s zero seconds on hue sensor. I guess that means on a 1 minute rule to switch off bulbs, if you catch it wrong the light could stay on for 1 minute 59. Lol and the inverse, 1 second if motion stops occurring at 59 seconds
I doubt hue is 0 seconds. Must be some delay. Can't be detecting constantly and have battery life like that.
You can do the mod or have someone you know that can solder do it for you. I just did it. Heating the soldering Iron took the longest. I'm just about to test. I'll post pics shortly because I have a few notes for anyone that wants to try this.
1 Like
Works exactly as he said.
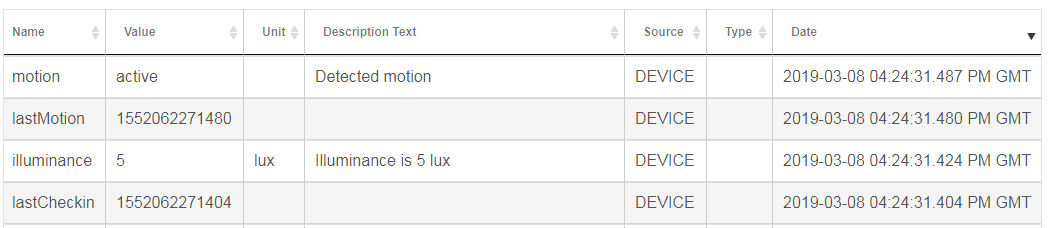
| motion | active | Detected motion | DEVICE | 2019-03-08 05:22:22.113 PM EST | ||
|---|---|---|---|---|---|---|
| lastMotion | 1552083742020 | DEVICE | 2019-03-08 05:22:22.020 PM EST | |||
| lastCheckin | 1552083741907 | DEVICE | 2019-03-08 05:22:21.907 PM EST | |||
| motion | active | Detected motion | DEVICE | 2019-03-08 05:22:16.308 PM EST | ||
| lastMotion | 1552083736295 | DEVICE | 2019-03-08 05:22:16.295 PM EST | |||
| lastCheckin | 1552083736258 | DEVICE | 2019-03-08 05:22:16.258 PM EST | |||
| motion | active | Detected motion | DEVICE | 2019-03-08 05:22:11.053 PM EST | ||
| lastMotion | 1552083731025 | DEVICE | 2019-03-08 05:22:11.025 PM EST | |||
| lastCheckin | 1552083730948 | DEVICE | 2019-03-08 05:22:10.948 PM EST | |||
| motion | active | Detected motion | DEVICE | 2019-03-08 05:22:05.923 PM EST |
1 Like
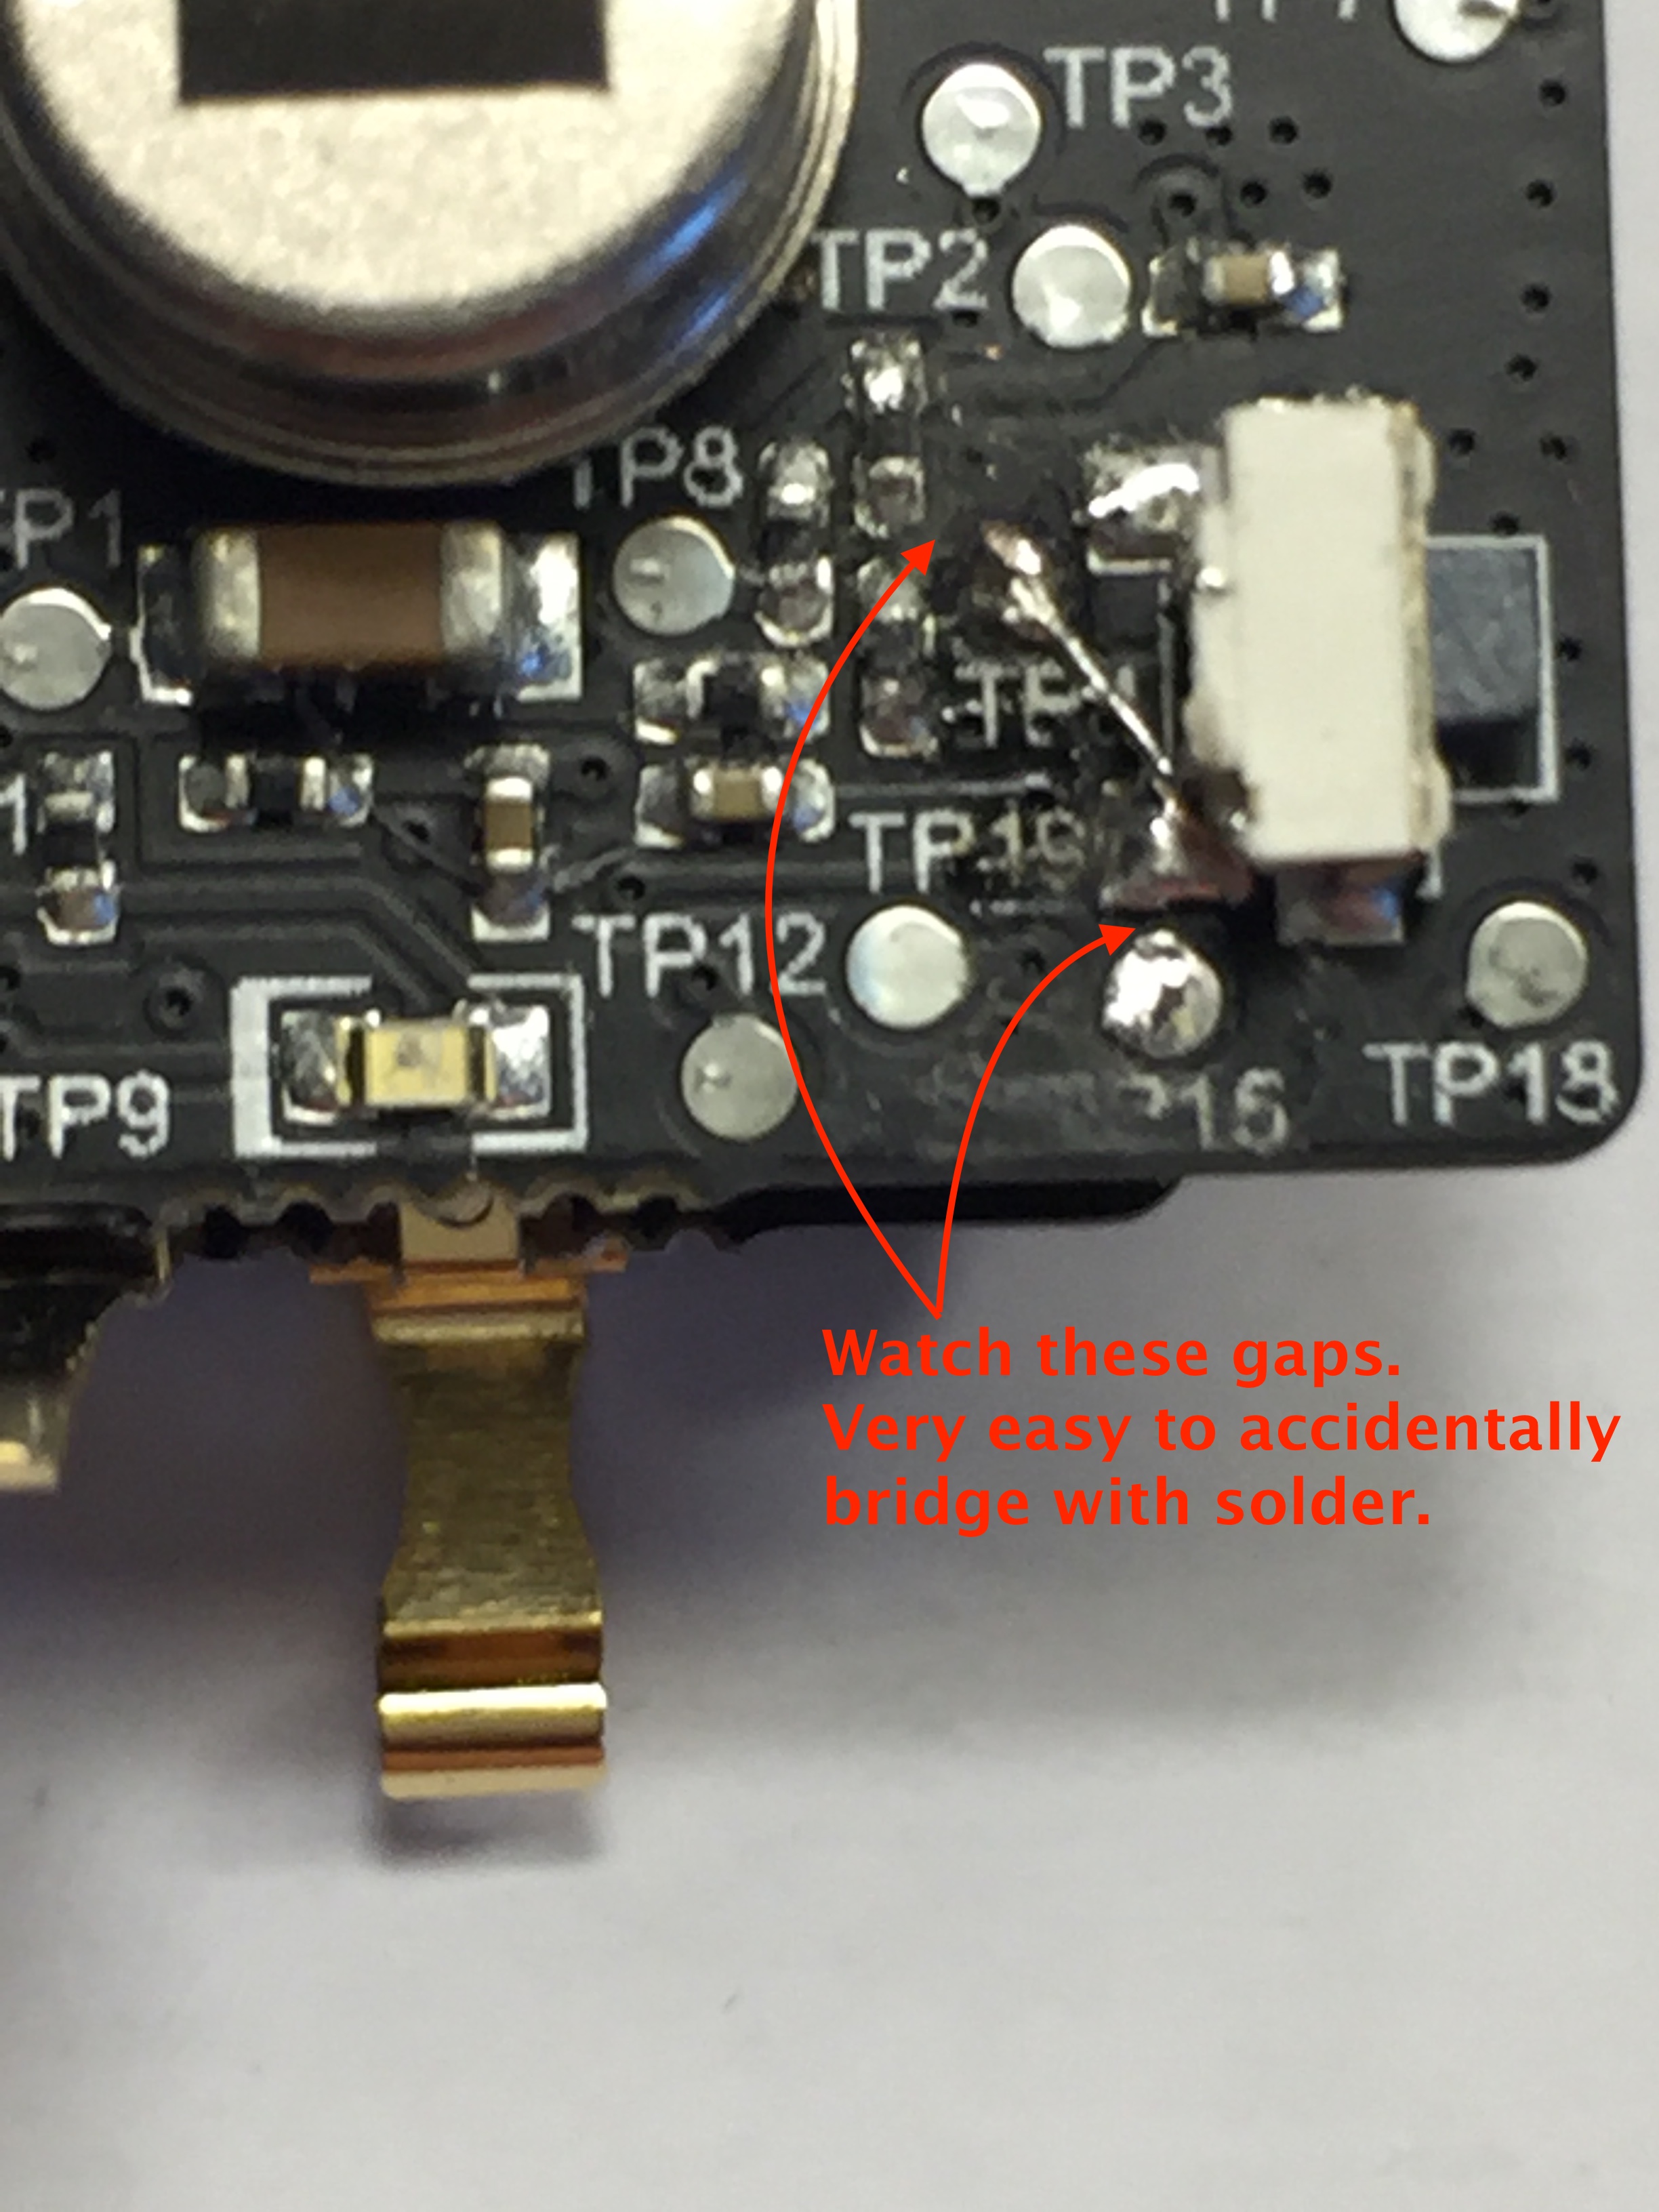
Anyone that's going to try this hack, I have a few notes to help. It was easy, but also a bit challenging at the same time.
Equipment:
You're going to want an iron that doesn't get too hot. Mine is 25W. Too hot and you risk delaminating the traces from the board. It's coated, but can still be damaged if you get it too hot.
You will definitely need a fine tip on your iron. I have a very small chisel tip on my soldering iron and it was almost too big.
Something like this one is going to be too big.
This one is more what you need for the job.
If you're young you probably won't have a problem, but I couldn't do this without magnification. I used to work in the print industry so I used a 15X loupe, but a typical handheld magnifying glass is probably enough.
Disassembly:
In the video, he uses an Olfa knife, and that's probably OK if you know exactly where the clips are or you've taken it apart a dozen times like he has. I used a nylon spudger. Handy tool to have around if you don't have any.
Here are the clip locations. Looking at the bottom with the positive battery contact toward you, and the detector facing away from you, one clip is going to be just to the right of the opening where the positive battery contact is. The other two are in the center, on the left and right.
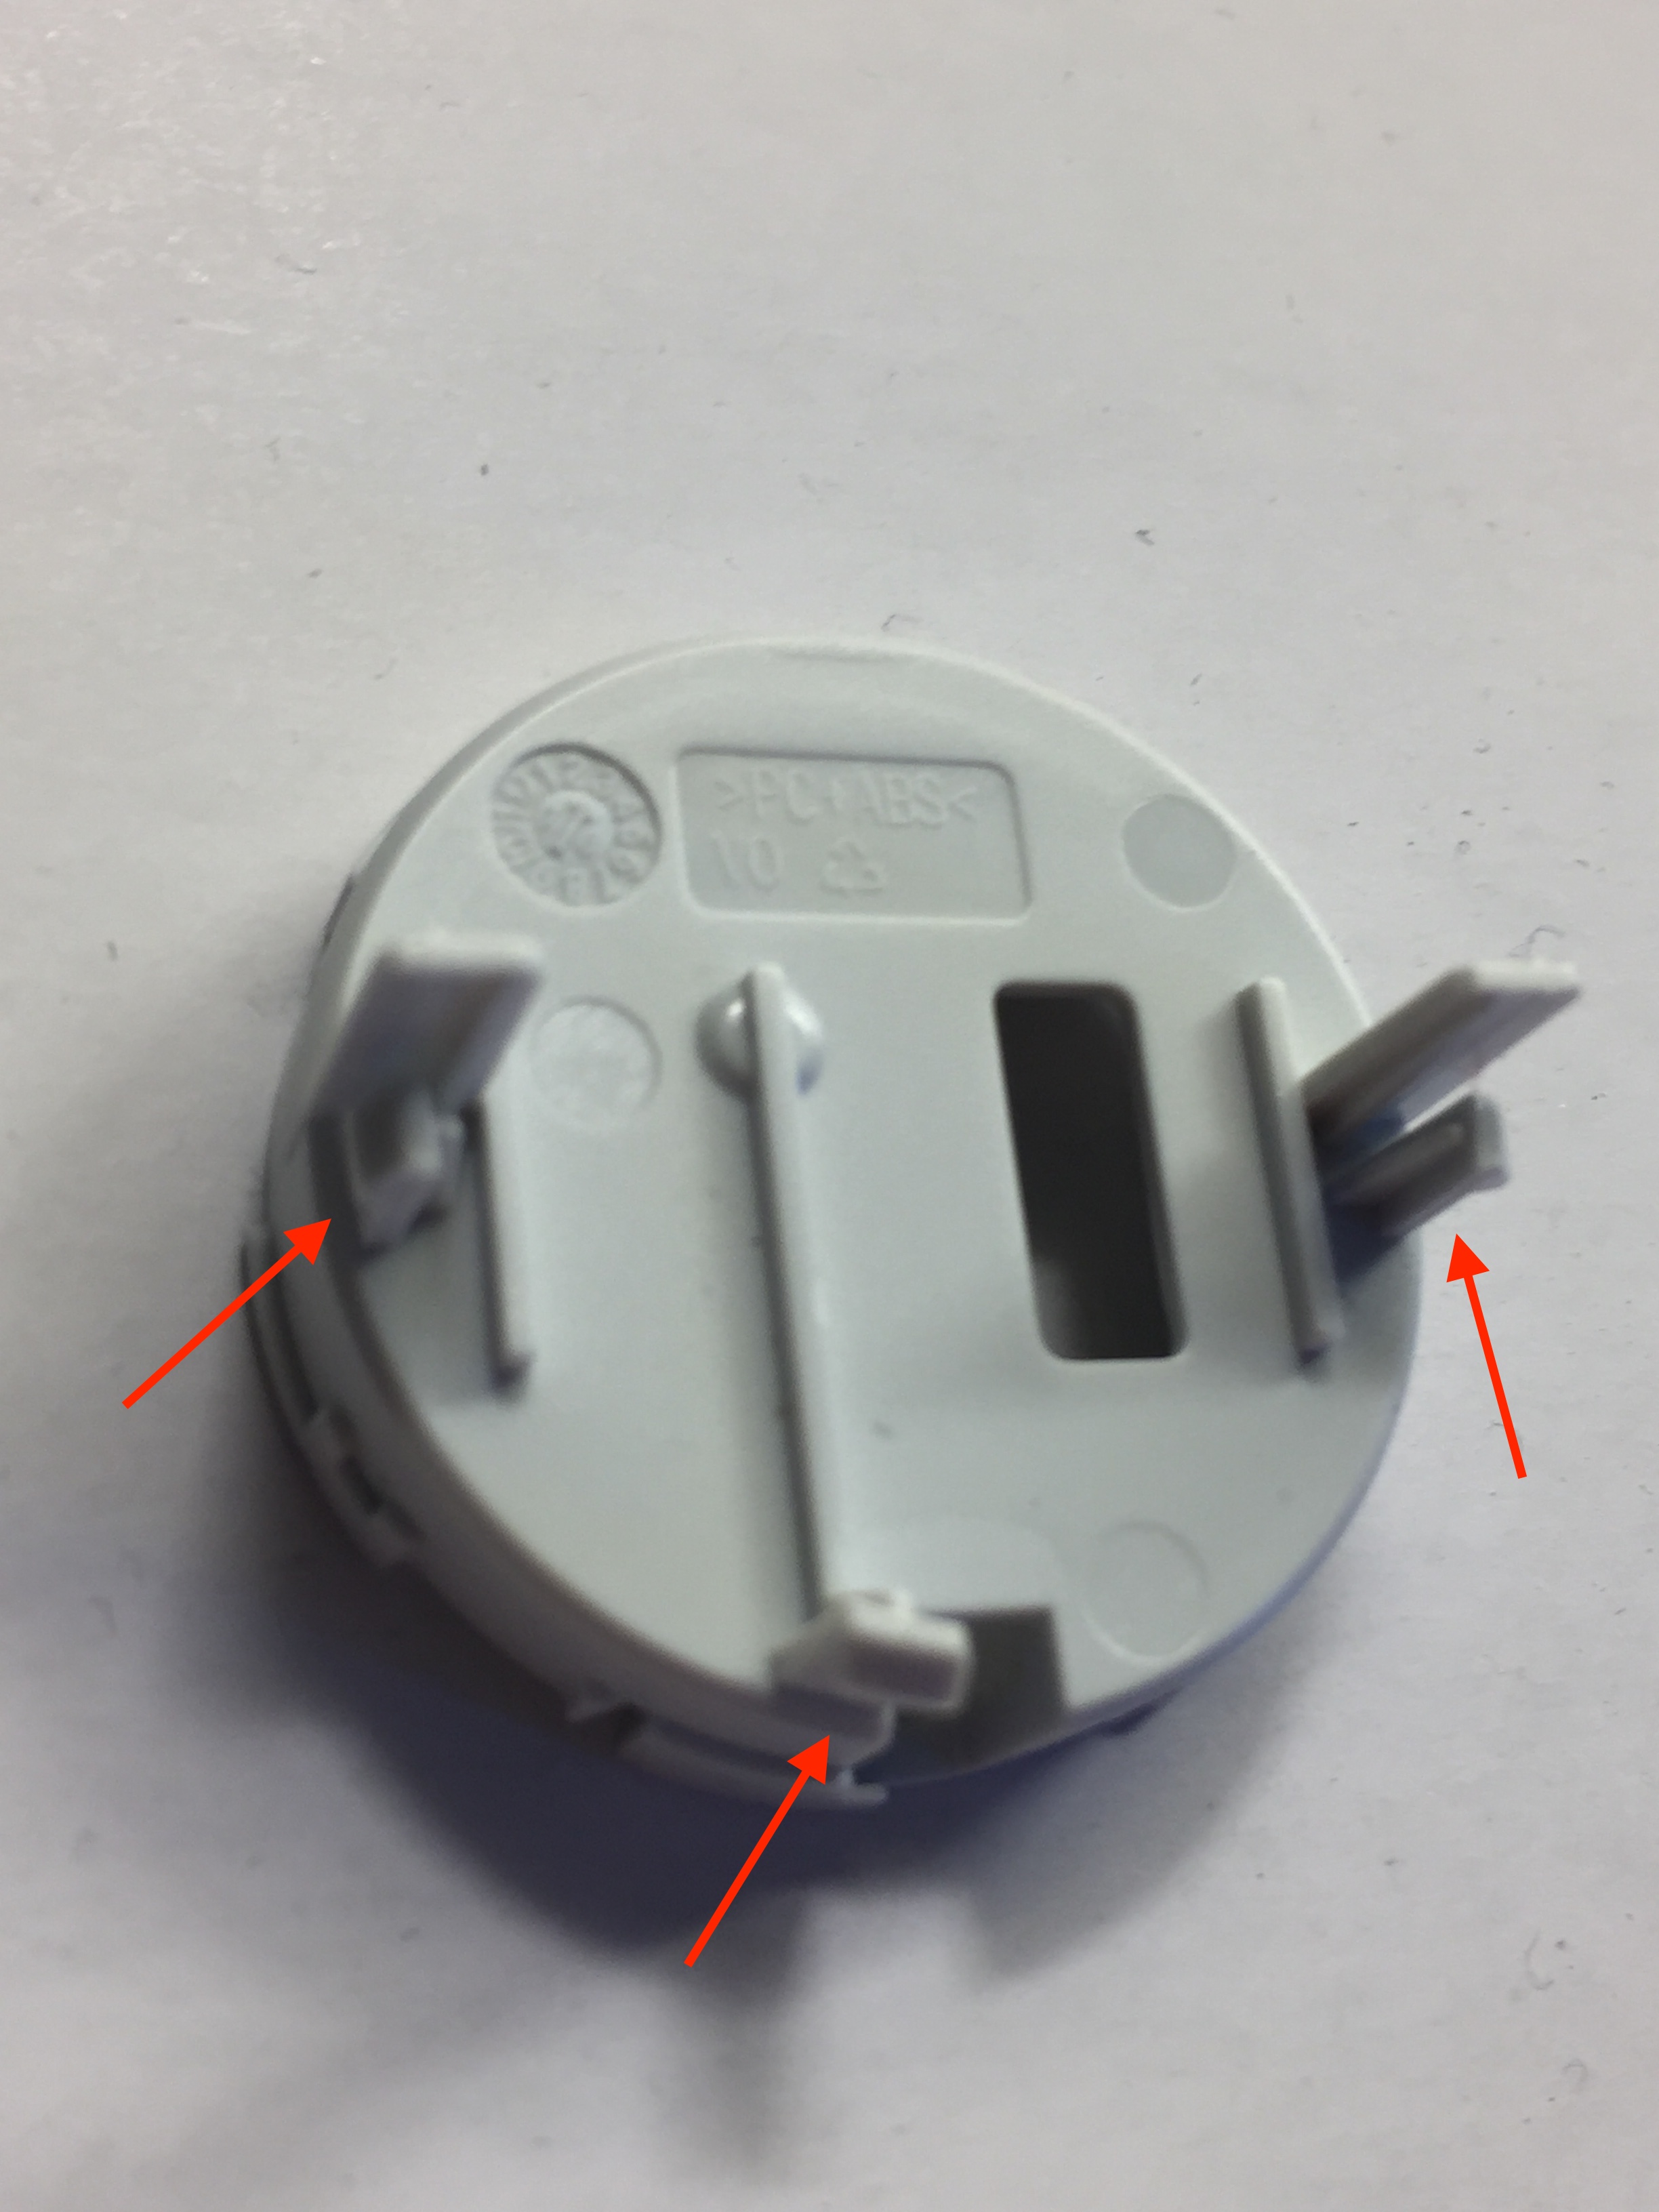
Soldering:
Be careful when soldering the wire, that you don't accidentally bridge TP4 to one of the surface mount components next to it, or TP15 to the paring/reset button. I would NOT suggest using flux remover afterward. It may damage these cheap boards. Just be as quick and careful as you can so you don't get too much flux build-up.
5 Likes
This topic was automatically closed 365 days after the last reply. New replies are no longer allowed.

