HubDuino RFID project

First off all - Very BIG Thanks to @ogiewon for the HubDuino Project.
I went through reading enormous amount of related pages and almost
succeeded with creating a demo project before starting to modify things.
Here where I am now.
Arduino 1.8.16 Tools (latest) and all required libraries are installed and functional.
The processor board is ESP8266 Nodemcu V3
For the example Arduino Sketch "ST_Anything_Button_ESP8266WiFi.ino" is used.
Only required network related fields are modified.
Sketch successfully compiled and uploaded to the ESP8266 board.

And router indicates board is connected to the WiFi network:
image

I guess, the Arduino part is successful.

For the Hubitat integration am using my spare C-5 with latest 2.2.9.146 SW.
The required drivers are installed on the HE:

And main HubDuino Parent Ethernet Device is configured:

However no child devices were created and HE Log shows an errors:

What I am missing or doing wrong?

Final project will be RDID reader.
I am using RC522 RFID Reader board but maybe will replace it with something better.
Separate Arduino project with ESP8266 + RC522 connected boards already
tested successfully.
Any advice how to merge HubDuino and RC522 projects will be highly appreciated.
Also if somebody knows better RFID/NFC reader I will switch to it right away.

Thank you all in advanced,

  • Vitaliy

UPDATE.
I forgot to update Hubitat IP and Port in Arduino sketch.
After I fixed this ESP shows it received a "Refresh" command from HE.
Timeout in the HE Log disappeared but Java Error is still there.
Still no any child devices were created.

Did you set the correct Hub port number in the sketch? It should be 39501 for Hubitat. The sketch might default to 39500 which is the SmartThings hub port number. Also set the Hubitat hub IP address in the sketch.

Edit: from looking at the Arduino debug output above, it appears you still need to update the lines of code in the sketch for the Hub IP address and Port number. The ones shown above are the defaults from the example sketch.

At the beginning I did miss IP and Port settings for the HE but
already corrected this. HE log for the Timeout disappeared but
Java error is still there. And still no child devices were created.

The Java error is a result of the parse() command never being called, so it is just a symptom of the real issue which is that your ESP8266 is not sending data to your Hubitat hub.

Make sure you have the correct IP address in the sketch for your Hubitat hub.

Oh yes, the IP was a problem.
I have 2 hubs: main C-7 and spare C-5
For this project I am using C-5 but entered the IP for main C-7.

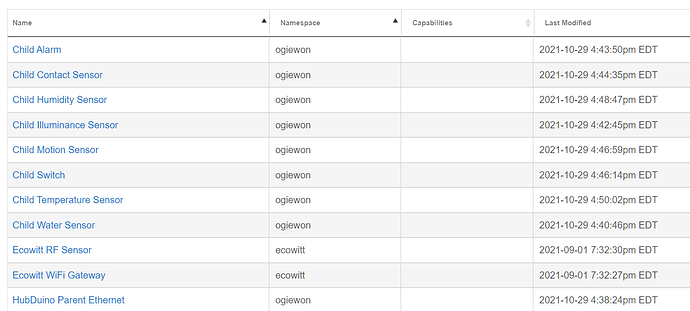
Now two child devices are created:

I guess, 8 devices should be created and Sketch is actually sending data for all 8 sensors.
From the sketch next sensors should be created. Right?
//Polling Sensors
static st::PS_Illuminance sensor1(F("illuminance"), 120, 0, PIN_ILLUMINANCE, 0, 1024, 0, 1000);
static st::PS_TemperatureHumidity sensor2(F("temphumid"), 120, 10, PIN_TEMPERATUREHUMIDITY, st::PS_TemperatureHumidity::DHT22);
static st::PS_Water sensor3(F("water"), 60, 20, PIN_WATER, 200);

//Interrupt Sensors
static st::IS_Motion sensor4(F("motion"), PIN_MOTION, HIGH, false);
static st::IS_Contact sensor5(F("contact"), PIN_CONTACT, LOW, true);
static st::IS_Button sensor6(F("button:1"), PIN_BUTTON1);
static st::IS_Button sensor7(F("button:2"), PIN_BUTTON2);

//Executors
static st::EX_Switch executor1(F("switch"), PIN_SWITCH, LOW, true);
static st::EX_Alarm executor2(F("alarm"), PIN_ALARM, LOW, true);

I did not install ALL drivers but only I think is relevant to this specific sketch:
image

Am I missing some drivers?

Anyway, things are now working almost as expected.
Now it will be fun to merge HubDuino Sketch and RC522 Sketch.
I am not a SW developer but I will try.

Thank you very much for your very quick responses and big help.

UPDATE
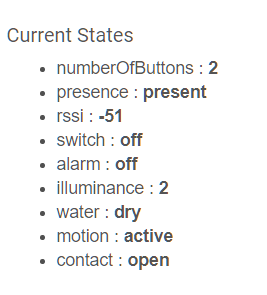
Interesting, when I am clicking on the "Refresh" button
all child sensors reported their status:
image
but there is still only 2 child devices.

Experts (@ogiewon) please help me with the final integration step(s) for
my HubDuino-RFID project.
I got two main pieces (HubDuino and RC522 RFID Reader) working in the
same Arduino sketch (sketch is attached).
For the HubDuino I need to define and initialized an appropriate sensor(s)
(I am guessing about "Virtual Button") and sent an appropriate command
to the Hubitat when RFID Reader detects a valid or invalid ID Card.
Hubitat needs to see 2 Triggers:

  • one for the failed RFID UID attempt
    Replace this string:
    // Send Failed Attempt Trigger to Hubitat

  • one for the successful attempt (this one should be called after line-280)
    Replace this string:
    // Send Successful Attempt Trigger to Hubitat

Both places are at the end of Skatch.

Thank you in advanced,

  • Vitaliy

Here is Arduino sketch:

//******************************************************************************************
//  File: ST_Anything_Buttons_ESP8266WiFi.ino
//  Authors: Dan G Ogorchock & Daniel J Ogorchock (Father and Son)
//
//  Summary:  This Arduino Sketch, along with the ST_Anything library and the revised SmartThings 
//            library, demonstrates the ability of one NodeMCU ESP8266 to 
//            implement a multi input/output custom device for integration with Hubitat.
//            The ST_Anything library takes care of all of the work to schedule device updates
//            as well as all communications with the NodeMCU ESP8266's WiFi.
//
//            ST_Anything_Buttons implements the following Hubitat Capabilities as a demo of what
//            is possible with a single NodeMCU ESP8266
//            - 7 x Button devices (sends "pushed" if held for less than 0.750 second, else sends "held")
//    
//  Change History:
//
//    Date        Who            What
//    ----        ---            ----
//    2020-09-30  Dan & Daniel   Original Creation
//
//******************************************************************************************

//******************************************************************************************
// RC522 RFID Reader Settings
//******************************************************************************************

#include <deprecated.h>
#include <MFRC522.h>
#include <MFRC522Extended.h>
#include <require_cpp11.h>

#include <SPI.h>

// Define RGB LED Control Pins
#define LED_R           D0 
#define LED_G           D3 
#define LED_B           D4 

#define RST_PIN         D1         // Configurable, see typical pin layout above
#define SS_PIN          D2         // Configurable, see typical pin layout above

MFRC522 mfrc522(SS_PIN, RST_PIN);  // Create MFRC522 instance

// Valid RFID UID
unsigned int RFID_OK[4] = {0x81,0x99,0x83,0x20};

//******************************************************************************************
// SmartThings Library for ESP8266WiFi
//******************************************************************************************
#include <SmartThingsESP8266WiFi.h>

//******************************************************************************************
// ST_Anything Library 
//******************************************************************************************
#include <Constants.h>       //Constants.h is designed to be modified by the end user to adjust behavior of the ST_Anything library
#include <Device.h>          //Generic Device Class, inherited by Sensor and Executor classes
#include <Sensor.h>          //Generic Sensor Class, typically provides data to ST Cloud (e.g. Temperature, Motion, etc...)
#include <Executor.h>        //Generic Executor Class, typically receives data from ST Cloud (e.g. Switch)
#include <InterruptSensor.h> //Generic Interrupt "Sensor" Class, waits for change of state on digital input 
#include <PollingSensor.h>   //Generic Polling "Sensor" Class, polls Arduino pins periodically
#include <Everything.h>      //Master Brain of ST_Anything library that ties everything together and performs ST Shield communications

#include <IS_Button.h>       //Implements an Interrupt Sensor (IS) to monitor the status of a digital input pin for button presses

//*************************************************************************************************
// NodeMCU v1.0 ESP8266-12e Pin Definitions (makes it much easier as these match the board markings)
// DO NOT UNCOMMENT THESE LINES - for reference only
//*************************************************************************************************
//#define LED_BUILTIN 16
//#define BUILTIN_LED 16
//
//#define D0 16  //no internal pullup resistor
//#define D1  5
//#define D2  4
//#define D3  0  //must not be pulled low during power on/reset, toggles value during boot
//#define D4  2  //must not be pulled low during power on/reset, toggles value during boot
//#define D5 14
//#define D6 12
//#define D7 13
//#define D8 15  //must not be pulled high during power on/reset

//******************************************************************************************
//Define which Arduino Pins will be used for each device
//******************************************************************************************

//#define PIN_BUTTON_1              D1  //Hubitat Capabilities - Pushable Button/Holdable Button/Releasable Button (Normally Open!)

//******************************************************************************************
//ESP8266 WiFi Information
//******************************************************************************************
String str_ssid     = "SBFL_24_20";                             //  <---You must edit this line!
String str_password = "";                    //  <---You must edit this line!
IPAddress ip(192, 168, 20, 98);       //Device IP Address       //  <---You must edit this line!
IPAddress gateway(192, 168, 20, 1);   //Router gateway          //  <---You must edit this line!
IPAddress subnet(255, 255, 255, 0);   //LAN subnet mask         //  <---You must edit this line!
IPAddress dnsserver(192, 168, 20, 1); //DNS server              //  <---You must edit this line!
const unsigned int serverPort = 8090; // port to run the http server on

// Hubitat Hub Information
IPAddress hubIp(192, 168, 20, 90);    // Hubitat hub ip         //  <---You must edit this line!
const unsigned int hubPort = 39501;   // Hubitat hub port

//******************************************************************************************
//st::Everything::callOnMsgSend() optional callback routine.  This is a sniffer to monitor 
//    data being sent to ST.  This allows a user to act on data changes locally within the 
//    Arduino sktech.
//******************************************************************************************
void callback(const String &msg)
{
//  Serial.print(F("ST_Anything Callback: Sniffed data = "));
//  Serial.println(msg);
  
  //TODO:  Add local logic here to take action when a device's value/state is changed
  
  //Masquerade as the ThingShield to send data to the Arduino, as if from the ST Cloud (uncomment and edit following line)
  //st::receiveSmartString("Put your command here!");  //use same strings that the Device Handler would send
}

//******************************************************************************************
// Arduino Setup() routine
//******************************************************************************************
void setup()
{
  //******************************************************************************************
  // RC522 RFID Reader Settings
  //******************************************************************************************

  // set LED Control Pins as output:
  pinMode(LED_R, OUTPUT);
  pinMode(LED_G, OUTPUT);
  pinMode(LED_B, OUTPUT);

  // Turn Off all LEDs
  digitalWrite(LED_R, LOW);
  digitalWrite(LED_G, LOW);
  digitalWrite(LED_B, LOW);

  //Serial.begin(9600);   // Initialize serial communications with the PC
  SPI.begin();          // Init SPI bus
  mfrc522.PCD_Init();   // Init MFRC522
  //mfrc522.PCD_DumpVersionToSerial();  // Show details of PCD - MFRC522 Card Reader details
  //Serial.println(F("Scan PICC to see UID, SAK, type, and data blocks..."));

  //******************************************************************************************
  // HubDuino Settings
  //******************************************************************************************
  //  Declare each Device that is attached to the Arduino
  //  Notes: - For each device, there is typically a corresponding "tile" defined in your 
  //           SmartThings Device Hanlder Groovy code, except when using new COMPOSITE Device Handler
  //         - For details on each device's constructor arguments below, please refer to the 
  //           corresponding header (.h) and program (.cpp) files.
  //         - The name assigned to each device (1st argument below) must match the Groovy
  //           Device Handler names.  (Note: "temphumid" below is the exception to this rule
  //           as the DHT sensors produce both "temperature" and "humidity".  Data from that
  //           particular sensor is sent to the ST Hub in two separate updates, one for 
  //           "temperature" and one for "humidity")
  //         - The new Composite Device Handler is comprised of a Parent DH and various Child
  //           DH's.  The names used below MUST not be changed for the Automatic Creation of
  //           child devices to work properly.  Simply increment the number by +1 for each duplicate
  //           device (e.g. contact1, contact2, contact3, etc...)  You can rename the Child Devices
  //           to match your specific use case in the ST Phone Application.
  //******************************************************************************************
  //Polling Sensors
  
  //Interrupt Sensors 
  //static st::IS_Button              sensor1(F("button1"), PIN_BUTTON_1, 750, LOW, true, 500);

  //Special sensors/executors (uses portions of both polling and executor classes)
  
  //Executors
  
  //*****************************************************************************
  //  Configure debug print output from each main class 
  //  -Note: Set these to "false" if using Hardware Serial on pins 0 & 1
  //         to prevent communication conflicts with the ST Shield communications
  //*****************************************************************************
  st::Everything::debug=true;
  st::Executor::debug=true;
  st::Device::debug=true;
  st::PollingSensor::debug=true;
  st::InterruptSensor::debug=true;

  //*****************************************************************************
  //Initialize the "Everything" Class
  //*****************************************************************************

  //Initialize the optional local callback routine (safe to comment out if not desired)
  st::Everything::callOnMsgSend = callback;
  
  //Create the SmartThings ESP8266WiFi Communications Object
    //STATIC IP Assignment - Recommended
    st::Everything::SmartThing = new st::SmartThingsESP8266WiFi(str_ssid, str_password, ip, gateway, subnet, dnsserver, serverPort, hubIp, hubPort, st::receiveSmartString, "OfficeESP");
 
    //DHCP IP Assigment - Must set your router's DHCP server to provice a static IP address for this device's MAC address
    //st::Everything::SmartThing = new st::SmartThingsESP8266WiFi(str_ssid, str_password, serverPort, hubIp, hubPort, st::receiveSmartString);

  //Run the Everything class' init() routine which establishes WiFi communications with SmartThings Hub
  st::Everything::init();
  
  //*****************************************************************************
  //Add each sensor to the "Everything" Class
  //*****************************************************************************
  // st::Everything::addSensor(&sensor1);
    
  //*****************************************************************************
  //Add each executor to the "Everything" Class
  //*****************************************************************************
    
  //*****************************************************************************
  //Initialize each of the devices which were added to the Everything Class
  //*****************************************************************************
  st::Everything::initDevices();
}

//******************************************************************************************
//Arduino Loop() routine
//******************************************************************************************
void loop()
{
  //*****************************************************************************
  // CR522 Reader Logic
  //*****************************************************************************

  // Reset the loop if no new card present on the sensor/reader. This saves the entire process when idle.
  if ( ! mfrc522.PICC_IsNewCardPresent()) {
    return;
  }

  // Select one of the cards
  if ( ! mfrc522.PICC_ReadCardSerial()) {
    return;
  }
    Serial.print(F(": Card UID:"));
    dump_byte_array(mfrc522.uid.uidByte, mfrc522.uid.size);
    Serial.println();
    Serial.print(F("PICC type: "));
    MFRC522::PICC_Type piccType = mfrc522.PICC_GetType(mfrc522.uid.sak);
    Serial.println(mfrc522.PICC_GetTypeName(piccType));

    // Halt PICC
    mfrc522.PICC_HaltA();
    // Stop encryption on PCD
    mfrc522.PCD_StopCrypto1();

    // Compare Card UID with Valid ID
    compare_byte_array(mfrc522.uid.uidByte, mfrc522.uid.size);

    delay(200);

    digitalWrite(LED_G, LOW);  
    digitalWrite(LED_R, LOW);

  //*****************************************************************************
  //Execute the Everything run method which takes care of "Everything"
  //*****************************************************************************
  st::Everything::run();
}

/**
 * Helper routine to dump a byte array as hex values to Serial.
 */
void dump_byte_array(byte *buffer, byte bufferSize) {
  for (byte i = 0; i < bufferSize; i++) {
    Serial.print(buffer[i] < 0x10 ? " 0" : " ");
    Serial.print(buffer[i], HEX);
  }
}

/**
 * Helper routine to compare Card IDs.
 */
void compare_byte_array(byte *buffer, byte bufferSize) {
  for (byte i = 0; i < bufferSize; i++) {
    if (buffer[i] != RFID_OK[i]) {
      digitalWrite(LED_G, LOW);  
      digitalWrite(LED_R, HIGH);

     // Send  Failed Attempt Trigger to Hubitat

      return;  
    }
    digitalWrite(LED_G, HIGH);  
    digitalWrite(LED_R, LOW);
   
   // Send  Successful Attempt Trigger to Hubitat
  
   }
}

Please edit your post so that the code is included as a code block, not just normal text. It is much too hard read otherwise.

I am sorry, I am trying to do this but cannot get it right.

Highlight the text by selecting it, and then click this button </>.

I must be completely stupid but as soon as I am clicking on anything
the highlighted text simply disappears.

Did Google search. But whatever WIKI tells to do does not work either

Looks like I finally did it (I hope, in a right way).

1 Like

Yes, much better. So exactly what do you want to have happen for your two cases (failure and success)? Do you want to send a Button1 Pushed event for Success, and Button1 Held event for false?

Then use these two events in whatever Hubitat Apps are appropriate?

I want HE to be triggered by this two events.
Ideally I would prefer to have a State Variable (for now only two states defined) as
a Trigger or whatever Trigger Event plus State Variable.
But for the beginning 2 separate Triggers will be OK.

Yes.
For the beginning I am planning to unlock my apartment door lock.
(I have August Lock already in place).

Looking at your code, I don't see how two events can be used. The RFID code executes every pass through the loop() routine. Thus, the 'failed' event would be triggered continuously, except in the 'success' case where an RFID tag is actually read. Immediately thereafter, the 'failed' case would start being called continuously again. The hub really isn't designed to handle a flood of network packets coming in at a rate of 5 times per second, which is what I believe would happen. Thus, I commented out the code I added for the 'failed' case. Good luck with your project!

//******************************************************************************************
//  File: ST_Anything_Buttons_ESP8266WiFi.ino
//  Authors: Dan G Ogorchock & Daniel J Ogorchock (Father and Son)
//
//  Summary:  This Arduino Sketch, along with the ST_Anything library and the revised SmartThings 
//            library, demonstrates the ability of one NodeMCU ESP8266 to 
//            implement a multi input/output custom device for integration with Hubitat.
//            The ST_Anything library takes care of all of the work to schedule device updates
//            as well as all communications with the NodeMCU ESP8266's WiFi.
//
//            ST_Anything_Buttons implements the following Hubitat Capabilities as a demo of what
//            is possible with a single NodeMCU ESP8266
//            - 7 x Button devices (sends "pushed" if held for less than 0.750 second, else sends "held")
//    
//  Change History:
//
//    Date        Who            What
//    ----        ---            ----
//    2020-09-30  Dan & Daniel   Original Creation
//
//******************************************************************************************

//******************************************************************************************
// RC522 RFID Reader Settings
//******************************************************************************************

#include <deprecated.h>
#include <MFRC522.h>
#include <MFRC522Extended.h>
#include <require_cpp11.h>

#include <SPI.h>

// Define RGB LED Control Pins
#define LED_R           D0 
#define LED_G           D3 
#define LED_B           D4 

#define RST_PIN         D1         // Configurable, see typical pin layout above
#define SS_PIN          D2         // Configurable, see typical pin layout above

MFRC522 mfrc522(SS_PIN, RST_PIN);  // Create MFRC522 instance

// Valid RFID UID
unsigned int RFID_OK[4] = {0x81,0x99,0x83,0x20};

//******************************************************************************************
// SmartThings Library for ESP8266WiFi
//******************************************************************************************
#include <SmartThingsESP8266WiFi.h>

//******************************************************************************************
// ST_Anything Library 
//******************************************************************************************
#include <Constants.h>       //Constants.h is designed to be modified by the end user to adjust behavior of the ST_Anything library
#include <Device.h>          //Generic Device Class, inherited by Sensor and Executor classes
#include <Sensor.h>          //Generic Sensor Class, typically provides data to ST Cloud (e.g. Temperature, Motion, etc...)
#include <Executor.h>        //Generic Executor Class, typically receives data from ST Cloud (e.g. Switch)
#include <InterruptSensor.h> //Generic Interrupt "Sensor" Class, waits for change of state on digital input 
#include <PollingSensor.h>   //Generic Polling "Sensor" Class, polls Arduino pins periodically
#include <Everything.h>      //Master Brain of ST_Anything library that ties everything together and performs ST Shield communications

#include <IS_Button.h>       //Implements an Interrupt Sensor (IS) to monitor the status of a digital input pin for button presses

//*************************************************************************************************
// NodeMCU v1.0 ESP8266-12e Pin Definitions (makes it much easier as these match the board markings)
// DO NOT UNCOMMENT THESE LINES - for reference only
//*************************************************************************************************
//#define LED_BUILTIN 16
//#define BUILTIN_LED 16
//
//#define D0 16  //no internal pullup resistor
//#define D1  5
//#define D2  4
//#define D3  0  //must not be pulled low during power on/reset, toggles value during boot
//#define D4  2  //must not be pulled low during power on/reset, toggles value during boot
//#define D5 14
//#define D6 12
//#define D7 13
//#define D8 15  //must not be pulled high during power on/reset

//******************************************************************************************
//Define which Arduino Pins will be used for each device
//******************************************************************************************

//#define PIN_BUTTON_1              D1  //Hubitat Capabilities - Pushable Button/Holdable Button/Releasable Button (Normally Open!)

//******************************************************************************************
//ESP8266 WiFi Information
//******************************************************************************************
String str_ssid     = "SBFL_24_20";                             //  <---You must edit this line!
String str_password = "It is a BIG secret!";                    //  <---You must edit this line!
IPAddress ip(192, 168, 20, 98);       //Device IP Address       //  <---You must edit this line!
IPAddress gateway(192, 168, 20, 1);   //Router gateway          //  <---You must edit this line!
IPAddress subnet(255, 255, 255, 0);   //LAN subnet mask         //  <---You must edit this line!
IPAddress dnsserver(192, 168, 20, 1); //DNS server              //  <---You must edit this line!
const unsigned int serverPort = 8090; // port to run the http server on

// Hubitat Hub Information
IPAddress hubIp(192, 168, 20, 90);    // Hubitat hub ip         //  <---You must edit this line!
const unsigned int hubPort = 39501;   // Hubitat hub port

//******************************************************************************************
//st::Everything::callOnMsgSend() optional callback routine.  This is a sniffer to monitor 
//    data being sent to ST.  This allows a user to act on data changes locally within the 
//    Arduino sktech.
//******************************************************************************************
void callback(const String &msg)
{
//  Serial.print(F("ST_Anything Callback: Sniffed data = "));
//  Serial.println(msg);
  
  //TODO:  Add local logic here to take action when a device's value/state is changed
  
  //Masquerade as the ThingShield to send data to the Arduino, as if from the ST Cloud (uncomment and edit following line)
  //st::receiveSmartString("Put your command here!");  //use same strings that the Device Handler would send
}

//******************************************************************************************
// Arduino Setup() routine
//******************************************************************************************
void setup()
{
  //******************************************************************************************
  // RC522 RFID Reader Settings
  //******************************************************************************************

  // set LED Control Pins as output:
  pinMode(LED_R, OUTPUT);
  pinMode(LED_G, OUTPUT);
  pinMode(LED_B, OUTPUT);

  // Turn Off all LEDs
  digitalWrite(LED_R, LOW);
  digitalWrite(LED_G, LOW);
  digitalWrite(LED_B, LOW);

  //Serial.begin(9600);   // Initialize serial communications with the PC
  SPI.begin();          // Init SPI bus
  mfrc522.PCD_Init();   // Init MFRC522
  //mfrc522.PCD_DumpVersionToSerial();  // Show details of PCD - MFRC522 Card Reader details
  //Serial.println(F("Scan PICC to see UID, SAK, type, and data blocks..."));

  //******************************************************************************************
  // HubDuino Settings
  //******************************************************************************************
  //  Declare each Device that is attached to the Arduino
  //  Notes: - For each device, there is typically a corresponding "tile" defined in your 
  //           SmartThings Device Hanlder Groovy code, except when using new COMPOSITE Device Handler
  //         - For details on each device's constructor arguments below, please refer to the 
  //           corresponding header (.h) and program (.cpp) files.
  //         - The name assigned to each device (1st argument below) must match the Groovy
  //           Device Handler names.  (Note: "temphumid" below is the exception to this rule
  //           as the DHT sensors produce both "temperature" and "humidity".  Data from that
  //           particular sensor is sent to the ST Hub in two separate updates, one for 
  //           "temperature" and one for "humidity")
  //         - The new Composite Device Handler is comprised of a Parent DH and various Child
  //           DH's.  The names used below MUST not be changed for the Automatic Creation of
  //           child devices to work properly.  Simply increment the number by +1 for each duplicate
  //           device (e.g. contact1, contact2, contact3, etc...)  You can rename the Child Devices
  //           to match your specific use case in the ST Phone Application.
  //******************************************************************************************
  //Polling Sensors
  
  //Interrupt Sensors 
  //static st::IS_Button              sensor1(F("button1"), PIN_BUTTON_1, 750, LOW, true, 500);

  //Special sensors/executors (uses portions of both polling and executor classes)
  
  //Executors
  
  //*****************************************************************************
  //  Configure debug print output from each main class 
  //  -Note: Set these to "false" if using Hardware Serial on pins 0 & 1
  //         to prevent communication conflicts with the ST Shield communications
  //*****************************************************************************
  st::Everything::debug=true;
  st::Executor::debug=true;
  st::Device::debug=true;
  st::PollingSensor::debug=true;
  st::InterruptSensor::debug=true;

  //*****************************************************************************
  //Initialize the "Everything" Class
  //*****************************************************************************

  //Initialize the optional local callback routine (safe to comment out if not desired)
  st::Everything::callOnMsgSend = callback;
  
  //Create the SmartThings ESP8266WiFi Communications Object
    //STATIC IP Assignment - Recommended
    st::Everything::SmartThing = new st::SmartThingsESP8266WiFi(str_ssid, str_password, ip, gateway, subnet, dnsserver, serverPort, hubIp, hubPort, st::receiveSmartString, "OfficeESP");
 
    //DHCP IP Assigment - Must set your router's DHCP server to provice a static IP address for this device's MAC address
    //st::Everything::SmartThing = new st::SmartThingsESP8266WiFi(str_ssid, str_password, serverPort, hubIp, hubPort, st::receiveSmartString);

  //Run the Everything class' init() routine which establishes WiFi communications with SmartThings Hub
  st::Everything::init();
  
  //*****************************************************************************
  //Add each sensor to the "Everything" Class
  //*****************************************************************************
  // st::Everything::addSensor(&sensor1);
    
  //*****************************************************************************
  //Add each executor to the "Everything" Class
  //*****************************************************************************
    
  //*****************************************************************************
  //Initialize each of the devices which were added to the Everything Class
  //*****************************************************************************
  st::Everything::initDevices();
}

//******************************************************************************************
//Arduino Loop() routine
//******************************************************************************************
void loop()
{
  //*****************************************************************************
  // CR522 Reader Logic
  //*****************************************************************************

  // Reset the loop if no new card present on the sensor/reader. This saves the entire process when idle.
  if ( ! mfrc522.PICC_IsNewCardPresent()) {
    return;
  }

  // Select one of the cards
  if ( ! mfrc522.PICC_ReadCardSerial()) {
    return;
  }
    Serial.print(F(": Card UID:"));
    dump_byte_array(mfrc522.uid.uidByte, mfrc522.uid.size);
    Serial.println();
    Serial.print(F("PICC type: "));
    MFRC522::PICC_Type piccType = mfrc522.PICC_GetType(mfrc522.uid.sak);
    Serial.println(mfrc522.PICC_GetTypeName(piccType));

    // Halt PICC
    mfrc522.PICC_HaltA();
    // Stop encryption on PCD
    mfrc522.PCD_StopCrypto1();

    // Compare Card UID with Valid ID
    compare_byte_array(mfrc522.uid.uidByte, mfrc522.uid.size);

    delay(200);

    digitalWrite(LED_G, LOW);  
    digitalWrite(LED_R, LOW);

  //*****************************************************************************
  //Execute the Everything run method which takes care of "Everything"
  //*****************************************************************************
  st::Everything::run();
}

/**
 * Helper routine to dump a byte array as hex values to Serial.
 */
void dump_byte_array(byte *buffer, byte bufferSize) {
  for (byte i = 0; i < bufferSize; i++) {
    Serial.print(buffer[i] < 0x10 ? " 0" : " ");
    Serial.print(buffer[i], HEX);
  }
}

/**
 * Helper routine to compare Card IDs.
 */
void compare_byte_array(byte *buffer, byte bufferSize) {
  for (byte i = 0; i < bufferSize; i++) {
    if (buffer[i] != RFID_OK[i]) {
      digitalWrite(LED_G, LOW);  
      digitalWrite(LED_R, HIGH);

     // Send  Failed Attempt Trigger to Hubitat

     // Commented out as it would otherwise flood the Hubitat Hub with useless events
     // in rapid succession every time through the loop() routine
     //String msg = "button1 held";
     //st::Everything::sendSmartString(msg);
     
     return;  
    }
    digitalWrite(LED_G, HIGH);  
    digitalWrite(LED_R, LOW);
   
    // Send Successful Attempt Trigger to Hubitat
    String msg = "button1 pushed";
    st::Everything::sendSmartString(msg);
  
  }
}


First off all - very BIG Thank you for your very quick response and help.
I will test HE Triggers shortly.

Yes, RFID code executes in a loop. But there are two loop barkers right at the beginning
of the loop.

This one check for the NEW ID Card presents. And brakes the loop if there is no card at all
or the same card is still on the reader.

// Reset the loop if no new card present on the sensor/reader. This saves the entire process when idle.
if ( ! mfrc522.PICC_IsNewCardPresent()) {
return;
}

And this one brakes the loop if unsupported card is present.
// Select one of the cards
if ( ! mfrc522.PICC_ReadCardSerial()) {
return;
}

As a result the entire loop executes only once for each card read attempt.
The correspondent to the event LED (Red for fail, Green for success) blinks
only once.

I update my Arduino sketch with "sendSmartString" for both failing and successful
card read attempts. For each event the entire loop executes only once.
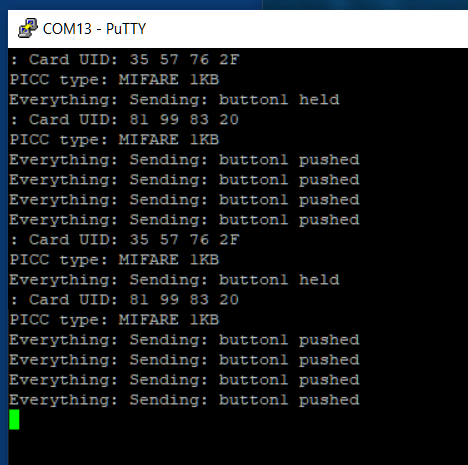
And Hubitat gets both events successfully.

Message "button1 held" (failing read) sends 1 time as expected
but message "button1 pushed" (successful read) sends 4 times.
image

Since "Card UID:" and "PICC type:" reported only once for each event
it looks like HubDuino is sending successful event 4 times.
Do you have an idea why?

Sorry, I am not familiar with the RFID code. The issue is happening in the code that was added, not the HubDuino code. Perhaps the card is actually being read multiple times? Just a guess.

I am sorry to say this, but I am almost 100% sure the problem is in HubDuino
I added blinking Blue LED in a first loop brake "if" and 5 sec delay at the end of the loop:

void loop()
{
  //*****************************************************************************
  // CR522 Reader Logic
  //*****************************************************************************

  // Reset the loop if no new card present on the sensor/reader. This saves the entire process when idle.
  if ( ! mfrc522.PICC_IsNewCardPresent()) {
    if (LED_B_State == LOW) {
      LED_B_State = HIGH;
    } else {
      LED_B_State = LOW;
    }
    digitalWrite(LED_B, LED_B_State);
    delay(100);
    return;
  }

  // Select one of the cards
  if ( ! mfrc522.PICC_ReadCardSerial()) {
    return;
  }
    Serial.print(F(": Card UID:"));
    dump_byte_array(mfrc522.uid.uidByte, mfrc522.uid.size);
    Serial.println();
    Serial.print(F("PICC type: "));
    MFRC522::PICC_Type piccType = mfrc522.PICC_GetType(mfrc522.uid.sak);
    Serial.println(mfrc522.PICC_GetTypeName(piccType));

    // Halt PICC
    mfrc522.PICC_HaltA();
    // Stop encryption on PCD
    mfrc522.PCD_StopCrypto1();

    // Compare Card UID with Valid ID
    compare_byte_array(mfrc522.uid.uidByte, mfrc522.uid.size);

    delay(2000);

    digitalWrite(LED_G, LOW);  
    digitalWrite(LED_R, LOW);

  //*****************************************************************************
  //Execute the Everything run method which takes care of "Everything"
  //*****************************************************************************
  st::Everything::run();

  delay(5000);
}

During this 5 sec delay (Blue LED is not blinking, Red and Greem LEDs are off
indicating loop is actually stopped) HubDuino routine

  //*****************************************************************************
  //Execute the Everything run method which takes care of "Everything"
  //*****************************************************************************
  st::Everything::run();

is sending message for the "successful' read 4 times.
This is very consistent behavior 100% reproducible.

Is this some sort of Interrupt Driven multitasking?
Otherwise how the "delay" and "st::Everything::run();" could be executed
at the same time?

No, there is no interrupt driven scheduling at work here. In general, having delay() statements is a really bad idea, as the Everything::run() needs to execute continuously, as that is also what services the WiFi. Use a millis() based timer instead of a delay statement.

Your own debug showed the section of code being called 4 times for the ‘success’ portion of the RFID code, right? If so, that would seem to explain why it is sending data 4 times to Hubitat.

1 Like

Serial Console (PuTTY) connected to the ESP8266 shows "success" message was sent
4 times. And sure, HE received this message 4 times also.
There is no special portion for the "success" or "fail" conditions.
The entire loop is exactly the same. There is an "if" statement witch compares two
buffers. One buffer is a defined good 4 bytes code. and second buffer what was
received from the ID Card. If buffers are equal it is a "success", but if not equal then
this is "fail". in case of "fail".
In case of "fail" msg = "button1 held". This message ALWAYS sends once.
In case of "success" msg = "button1 pushed". This message ALWAYS sends 4 times.
Here is a buffers comparison function:

/**
 * Helper routine to compare Card IDs.
 */
void compare_byte_array(byte *buffer, byte bufferSize) {
  for (byte i = 0; i < bufferSize; i++) {
    if (buffer[i] != RFID_OK[i]) {
      digitalWrite(LED_G, LOW);  
      digitalWrite(LED_R, HIGH);

      // Send Failed Read Attempt to the Hubitat
      String msg = "button1 held";
      st::Everything::sendSmartString(msg);

      return;  
    }
    digitalWrite(LED_G, HIGH);  
    digitalWrite(LED_R, LOW);

    // Send Failed Read Attempt to the Hubitat
    String msg = "button1 pushed";
    st::Everything::sendSmartString(msg);
  }
}
This function also toggles Red or Green LEDs.
The correspondent LED always blinks only once.

I guess, I discovered some sort of bug in HubDuino.

Anyway, I am very happy with the results and outcome.
I can filter out 3 extra messages in Hubitat.
This is very consistent behavior and not too bad.
But bug is better to be fixed.
I know, HubDuino was very well debugged and it is very stable.
I will try to deeper debug this loop code in question just to make sure
RFID code did not introduce this problem.

And once again, Thank You very much for the very nice HubDuino project!