How to send a http PUT with xml data

I'm trying (but failing) to send a http PUT via some means to an NVR connected IP camera. I need this so that I can automate the switching of scenes on the camera from an existing lux sensor I have connected to Hubitat. The reason I want to do this is that the Auto Day/Night setting of the camera does not allow for different gain settings (forced to 100 and unadjustable), shutter speeds etc when in Auto mode. Setting the scenes allows everything to be adjusted to suit.

I'm stuck on how I can send this command to the camera. In Rule Machine I can send xml, but RM only supports POST and GET so that isn't working. I've added the http switch driver by @ogiewon as I could've just used one virtual switch with that driver per mode. Although I can use that to send a PUT, it won't allow me to send XML.

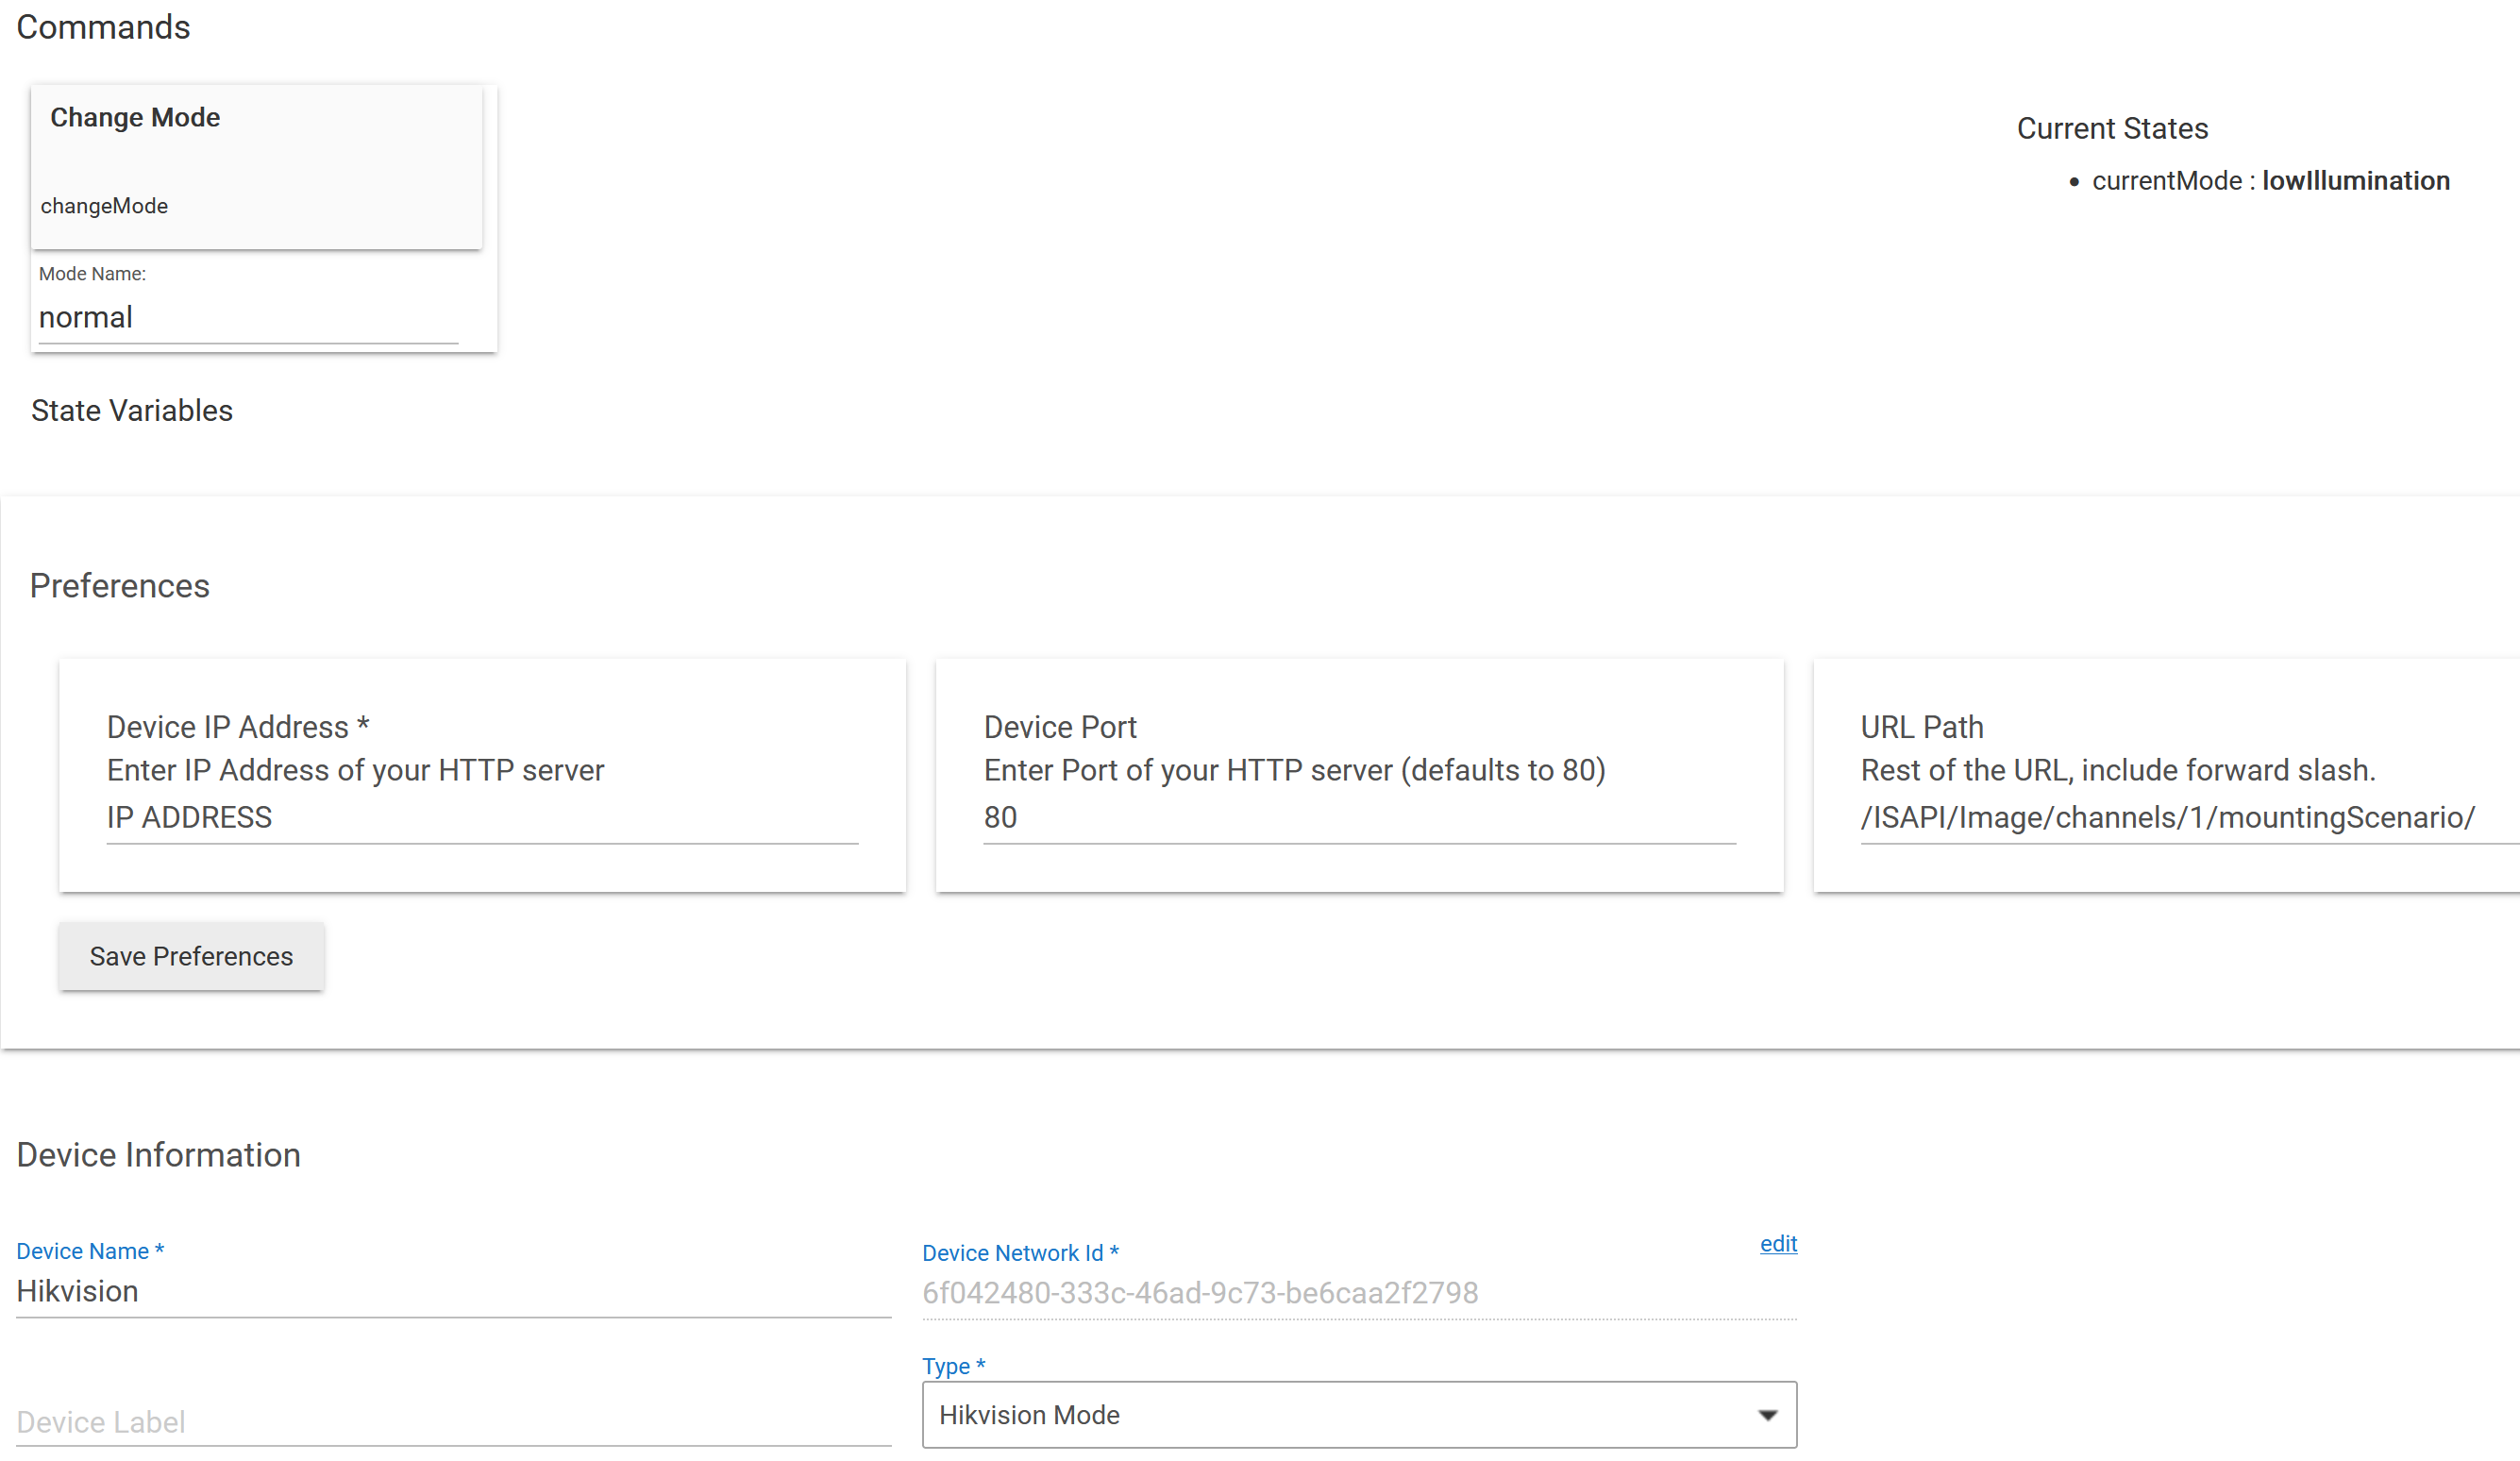
I've downloaded and messed around with postman to find the setting that I need to change and I can manually do that with the url:

http://IP_Address:http_port/ISAPI/Image/channels/1/mountingScenario/

and sending the following xml in the body:

<?xml version="1.0" encoding="UTF-8"?>
<MountingScenario version="2.0" xmlns="http://www.hikvision.com/ver20/XMLSchema">
    <mode>lowIllumination</mode>
</MountingScenario>

I can then just alter the <mode> to the scene that I want to switch to - normal, lowIllumination, backlight, custom1, custom2 etc

Any ideas how I can send the above from Hubitat? I can't code and it's taken me a few hours just to find the correct url and xml to send but would like to get this working. Any assistance appreciated.

I've also tried node red but can't get it to work there either

The MarkupBuilder class should get you going. I haven’t worked with XMLs in years or with Hubitat but here is an article describing how to use it.

Totally beyond me unfortunately

Here is an example in my code.

            bodyParm = '{"email": "'+settings.goveeEmail+'", "password": "'+settings.goveePassword+'"}'
            logger("appButtonHandler(): bodyparm to be passed:  ${bodyParm}", 'error')
            def params = [
                uri   : 'https://community-api.govee.com',
                path  : '/os/v1/login',
                headers: ['Content-Type': 'application/json'],
                body: bodyParm
            ]
            logger("appButtonHandler(): parms to be passed:  ${params}", 'error')
            try {
                httpPost(params) { resp ->
                    logger("appButtonHandler(): response is ${resp.data}", 'error')
                    status = resp.data.status
                    msg = resp.data.message
                    logger("appButtonHandler(): status is ${status}: Message ${msg}", 'error')
                    if (status == 200) {
                        logger("appButtonHandler(): response is ${resp.data}", 'error')
                        logger("appButtonHandler(): token is ${state.goveeHomeToken} and expires at ${state.goveeHomeExpiry}", 'error')
                    } else {
                        logger("appButtonHandler(): Login failed check error above and correct", 'info')
                    }
                }
                } catch (groovyx.net.http.HttpResponseException e) {
                    logger("appButtonHandler(): Error: e.statusCode ${e.statusCode}", 'error')
                    logger("appButtonHandler(): ${e}", 'error')

                return 'unknown'
            }

In this example the parm "bodyParm" would be your xml string and then you would populate the rest of the URL fields kind of like below.

            bodyParm = '<?xml version="1.0" encoding="UTF-8"?> <MountingScenario version="2.0" xmlns="http://www.hikvision.com/ver20/XMLSchema"> <mode>lowIllumination</mode> </MountingScenario>'
            logger("appButtonHandler(): bodyparm to be passed:  ${bodyParm}", 'error')
            def params = [
                uri   : 'IP_Address:http_port',
                path  : '/ISAPI/Image/channels/1/mountingScenario',
                headers: ['Content-Type': 'application/json'],
                body: bodyParm
            ]
            logger("appButtonHandler(): parms to be passed:  ${params}", 'error')
            try {
                httpPut(params) { resp ->
                    logger("appButtonHandler(): response is ${resp.data}", 'error')
                    status = resp.data.status
                    msg = resp.data.message
                    logger("appButtonHandler(): status is ${status}: Message ${msg}", 'error')
                    if (status == 200) {
                        logger("appButtonHandler(): response is ${resp.data}", 'error')
                        logger("appButtonHandler(): token is ${state.goveeHomeToken} and expires at ${state.goveeHomeExpiry}", 'error')
                    } else {
                        logger("appButtonHandler(): Login failed check error above and correct", 'info')
                    }
                }
                } catch (groovyx.net.http.HttpResponseException e) {
                    logger("appButtonHandler(): Error: e.statusCode ${e.statusCode}", 'error')
                    logger("appButtonHandler(): ${e}", 'error')

                return 'unknown'
            }

Let me know if that helped ya.

OK I quickly edited @ogiewon's HTTP switch and hopefully this will work:

As you can see there is a Change Mode command where you enter the mode to change it too. It will then log an event to confirm the current mode. Set the preferences to your camera's IP, port, and the patch is what you had entered in the OP but have a preference in case you need to change it. I hard coded this to a PUT given your original request.

I don't have these cameras so no way to test but hopefully this will work. You should be able to leverage this in Rule Machine by selecting the capability of sensor, selecting this device and then you can use a custom action to change mode as appropriate.

/**
 *  Hikvision Mode
 *
 *  Copyright 2018 Daniel Ogorchock
 *
 *  Licensed under the Apache License, Version 2.0 (the "License"); you may not use this file except
 *  in compliance with the License. You may obtain a copy of the License at:
 *
 *      http://www.apache.org/licenses/LICENSE-2.0
 *
 *  Unless required by applicable law or agreed to in writing, software distributed under the License is distributed
 *  on an "AS IS" BASIS, WITHOUT WARRANTIES OR CONDITIONS OF ANY KIND, either express or implied. See the License
 *  for the specific language governing permissions and limitations under the License.
 *
 *  Change History:
 *
 *    Date        Who            What
 *    ----        ---            ----
 *    2018-02-18  Dan Ogorchock  Original Creation
 *    2023-07-14  ritchierich    Modified driver to change Hikvision camera modes
 *
 * 
 */
metadata {
	definition (name: "Hikvision Mode", namespace: "HubitatCommunity", author: "ritchierich") {
        capability "Sensor"
        attribute "currentMode", "string"
        command "changeMode", ["Mode Name"]
	}

	preferences {
		input(name: "deviceIP", type: "string", title:"Device IP Address", description: "Enter IP Address of your HTTP server", required: true, displayDuringSetup: true)
		input(name: "devicePort", type: "string", title:"Device Port", description: "Enter Port of your HTTP server (defaults to 80)", defaultValue: "80", required: false, displayDuringSetup: true)
		input(name: "devicePath", type: "string", title:"URL Path", description: "Rest of the URL, include forward slash.", defaultValue: "/ISAPI/Image/channels/1/mountingScenario/", displayDuringSetup: true)
	}
}

def parse(String description) {
	log.debug(description)
}

def changeMode(String modeName) {
	def localDevicePort = (devicePort==null) ? "80" : devicePort
	def path = devicePath 
	def body = '<?xml version="1.0" encoding="UTF-8"?><MountingScenario version="2.0" xmlns="http://www.hikvision.com/ver20/XMLSchema"><mode>' + modeName + '</mode></MountingScenario>'
	def headers = [:] 
    headers.put("HOST", "${deviceIP}:${localDevicePort}")

	try {
		def hubAction = new hubitat.device.HubAction(
			method: "PUT",
			path: path,
			body: body,
			headers: headers
			)
		//log.debug hubAction
        sendEvent(name: "currentMode", value: "${modeName}")
		return hubAction
	}
	catch (Exception e) {
        log.debug "runCmd hit exception ${e} on ${hubAction}"
	}  
}
3 Likes

Wow - @ritchierich thanks so much, I’ll take a look. After a lot of messing around I managed to get something working late last night in node-red. While that will work, it would be easier to manage if I can keep the setup within Hubitat so this is preferable.

I have a test camera setup, so I’ll have a play and report back - thanks again.

1 Like

I couldn't get it working unfortunately. I think the node-red route may be the way to go despite a little extra work.

A lot of the issues I had in node-red revolved around authentication. Using a http request node, I had to drop the security level of the camera from Digest to Basic to get it to work at all. The Hikvision Ultimate node palette got around that with the ability to use Digest and pasting the xml code in directly. The post here NR http request details the problems. It took 10 hours on and off blindly clicking around to get it working!

Here's one suggestion: Try using ChatGPT to write the Hubitat app or driver code. I've heard that ChatGPT is good for this type of work, and I've used it with some success in writing a Hubitat driver for my WiFi Outlet. It will actually write usable code for you (for the most part), but at least it will give you different ideas to try. If the coding it generates creates an error when you run it, you can send that error message to ChatGPT and it will write a slightly different code to try. Just an idea.

1 Like

@cohoman - it rustled this up - who knows? It's pretty mind blowing really!

Certainly! Here's an example of a Groovy driver for Hubitat that creates a momentary switch device and sends XML code to an IP camera using digest authentication. It also includes preference boxes for the IP address, HTTP port, username, and password. Please note that you may need to modify the code to fit your specific camera's requirements.

metadata {
    definition(name: "IP Camera Momentary Switch", namespace: "yournamespace", author: "yourname") {
        capability "Momentary"
        command "sendXmlToCamera"
        
        preferences {
            input("ipAddress", "text", title: "IP Address", description: "Enter the IP address of the camera", required: true)
            input("httpPort", "number", title: "HTTP Port", description: "Enter the HTTP port of the camera", defaultValue: 80, required: true)
            input("username", "text", title: "Username", description: "Enter the username for digest authentication", required: true)
            input("password", "password", title: "Password", description: "Enter the password for digest authentication", required: true)
        }
    }
}

def installed() {
    // Initialize any required configuration or setup here
}

def updated() {
    // Handle any configuration changes here
}

def sendXmlToCamera() {
    def ip = settings.ipAddress
    def port = settings.httpPort
    def username = settings.username
    def password = settings.password
    
    def xmlCode = "<your-xml-code-here>"
    
    def headers = [
        'Authorization': getDigestAuthHeader(ip, port, username, password),
        'Content-Type': 'application/xml'
    ]
    
    def params = [
        uri: "http://${ip}:${port}/path/to/your/api",
        headers: headers,
        body: xmlCode
    ]
    
    try {
        httpPost(params) { response ->
            if (response.status == 200) {
                log.debug "XML code sent successfully to the camera."
            } else {
                log.error "Failed to send XML code to the camera. Response status: ${response.status}"
            }
        }
    } catch (Exception e) {
        log.error "Error sending XML code to the camera: ${e.message}"
    }
}

private String getDigestAuthHeader(String ip, int port, String username, String password) {
    def digestAuth = new groovyx.net.http.HTTPBuilder("http://${ip}:${port}")
    def auth = digestAuth.auth.digest(username, password)
    return auth.getHeaderValue()
}

To use this driver, follow these steps:

  1. Log in to your Hubitat dashboard.
  2. Go to "Drivers Code" and click on "New Driver".
  3. Paste the above code into the code editor.
  4. Click on "Save" and then "Publish".
  5. Go to "Devices" and click on "Add Virtual Device".
  6. Enter a name for the device and select the driver you just created.
  7. Click on "Save" and the device will be created.
  8. On the device page, you will see the momentary switch button. Clicking on it will trigger the sendXmlToCamera command, which will send the XML code to the configured IP camera using digest authentication.

Make sure to replace <your-xml-code-here> with the actual XML code you want to send to the camera, and adjust the API endpoint (/path/to/your/api) accordingly based on the camera's API documentation.

Please note that this code provides a basic implementation and may need to be modified based on your specific camera's requirements.

If this is causing a problem for Node-Red it could also impact the httpPut idea in the driver. You may need to add a new header value(s) to pass along the auth values as well.

1 Like

What didn't work, out of curiosity? Was it an authentication issue or some other kind of error response from the server?

Pretty amazing that it put that together, but sadly it won't work because HTTPBuilder can't be used directly on Hubitat. But the fact that it's a good starting point is pretty cool.

You can calculate the digest auth header manually if needed -- for example if they use a non-standard format or if you need it in a different channel than HTTP (i.e. you need to get the header terms from an HTTP response but then use it to authenticate a websocket connection to the device). I have done this step in a couple of my integrations.

But if it is purely HTTP, you might get past having to calculate it manually by changing the URL/uri to be http://{username}:{password}@{ipAddress}:{port}/{the actual path}

2 Likes

Sorry, didnt realized it requires authentication so that will definitely prevent it from working.

1 Like

Hello... Have you found something that works for you yet? Just wondering because I'm in the same boat, just now migrating from Vera to HE and trying to develop a driver for virtual devices that can GET/PUT XML "files" to/from my Hikvision cameras to control a few features and trigger alarms so I can get notifications from the camera too when events on HE happen.

After reviewing this post, and trying out the coded generated by AI, which is really cool, I discovered that won't work on HE because it's using the HTTPBuilder class to provide the Digest authentication method, which HE Groovy doesn't allow in their code.

To get past that, I reconfigured my cameras to accept Basic authentication and included that in my headers, using a Base64 encoded value for "userid:password", like this:

def headers = [:] 
headers.put("HOST", "${deviceIP}:${port}")
headers.put("Authorization", "Basic ${strCred})
headers.put("Content-Type", "application/xml; charset=UTF-8")

This is supported by both httpGet/Put and HubAction methods.

So that got my me logged in and able to GET data. Now I just need to figure out how to build and parse the XML messages. Groovy is doing strange things with my xml "strings" so I'm trying figure that out and will create a new topic for it if needed. First, I have to check out XMLSlurper.

So let me know if you've something good to share... Thanks!

sorry... i meant to address this to John, the original poster. I'm new to this so please bear with me!

Have you tried the inbuilt Hikvision driver?

@TomS - I’m using node-red and that works great. There are several Hikvision palletes available. I have one specifically for text overlay - I’m using that to display the current external temperature and my alarm system status (linked to an outdoor sensor and virtual switch in Hubitat). For modes there’s an xml node that you can paste in what you need to switch image mode or whatever else you want to do. At the moment I’ve got that linked to a time node, but will map image modes to lux level at some point.

The node-red solution works with digest authentication. Also it allows commands to be sent to cameras that are connected directly to the NVR PoE ports using the NVR IP address with the camera virtual host port (650xx). When I’m home later I’ll add some further details to this post if you’re interested.

That works solely for receiving alarm events from cameras. The events cannot be received if the cameras are connected to the NVR PoE ports; it only works when the cameras are connected to the same local network as Hubitat.

1 Like

Yes, it seems Node Red is the "go to" solution for a lot of peeps when it comes to dealing with all kinds of stuff. I'm sure it's great, but I took one look and saw another big learning curve, in addition to the one I'm on now (and thoroughly enjoying) learning all about HE customization.

Plus, NR would be another cog in the wheel, another system to deal with, and, I don't have any old pie laying around... :slight_smile: Sorta wish I did. Because I may be forced there or elsewhere, unless I can get access to the HTTPBuilder class and methods in HE for my driver, which is unlikely but I'm going to request it. To build any good driver for Hikvision will requires full support for sending/receiving Content Type XML.

So what's happening in my driver is this, when I pass the string variable containing my XML data to the PUT method, all of the structure is removed, leaving only the values of the objects in the body of the message sent to the camera. The camera receives the message and the server side software promptly rejects it, with an error status and message back. Why and where it's doing this conversion is beyond me.

On the upside, I am able to receive XML from the camera in response to GET requests, which is automatically presented in GPathResult format, making it super easy to grab what I need with dot notation, e.g. response.data.MotionDetection.enabled.text().

So I don't get it, why make it so easy on the inbound side, but not provide methods that make it super easy on the outbound side?

The other thing is, these operations I want to perform took about 10 lines of code each in a Vera scene to pull of, using curl and local disk files. Oh, to have such luxury back!

So I'm going to open up a new post on this topic in a day or two and include a link to my driver code on github so anyone can have a look. I'm also going to install Groovy on Windows and do some testing with HTTPBuilder there to prove my suspicions.

Wish me luck and catch you later!
Tom

How are you verifying this?

The Logs page in Hubitat will cause the XML tags to be invisible because of how it is rendered in the view. You have to double-escape the XML string if you want it to show up correctly in the Logs. I use this: groovy.xml.XmlUtil.escapeXml(xmlString)

It would be really weird if the data on the wire is actually wrong (which you might verify with a tool like Wireshark or pcap).

You should be able to POST or PUT a string directly by declaring it like this:
def body ="<volume>${intVolumeLevel.toString()}</volume>"
httpPost(uri, body)

Thanks but I just had a major breakthrough moments ago. All I had to do was put "requestContentType: application/xml" in the parameters map passed to httpput and bingo, the xml string i pass in the body parm is left untouched and sent. Bingo.

As an ex IT pro with 40 years of "data processing and programming experience", it always comes down to this.... rtfm! Yep, it was right there in the doc, that parameter for the httpput command. Explains the conversion to GPathResult too, and I could disable that if I want. No way! So for me, this problem is closed! I can now send/receive xml to/from my cameras all night long!

2 Likes