Does anyone know whether Rule Machine can send arrays in JSON and, if so, how to format the JSON body in RM?
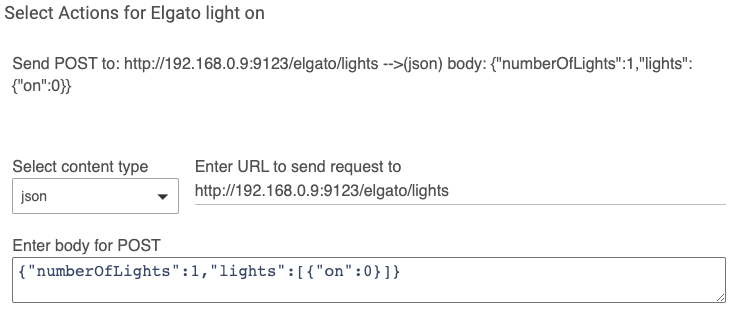
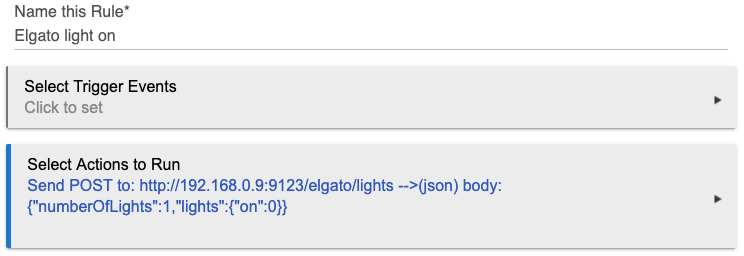
I'm trying to control an Elgato Key Light using Hubitat. The JSON message for turning on a light is {"lights":[{"on":0}], "numberOfLights":1 }. However, Rule Machine deletes the '[' and ']' array symbols, reducing the JSON message to {"lights":{"on":0}, "numberOfLights":1 }. The Elgato API requires an array for the lights field, even if there's only one light, preventing RM from controlling the light.
I really need to break down and dig into RM (so take this with a huge grain of salt), but have you tried creating the JSON array in a string variable and using that to construct the message? Another thing that might work is to put a “\” before the brackets; ie.
Thanks for your suggestions. These are good ideas but they don't work unfortunately:
RM doesn't interpret backslash as an escape character, so instead it passes the '' to the JSON body while still filtering out the square brackets: [info](http://192.168.0.2/installedapp/configure/2716)Action: Send POST to: http://192.168.0.9:9123/elgato/lights -->(json) body: {"numberOfLights":1,"lights":\{"on":0}\}
RM also doesn't seem to recognize variables in the JSON body, as it sent the variable name in the JSON body: [info](http://192.168.0.2/installedapp/configure/2716)Action: Send POST to: http://192.168.0.9:9123/elgato/lights -->(json) body: %JSON_message%
Any other ideas from folk, or is this a bug in RM?
After much tinkering, the issue appears to be an HTTP incompatibility between the device and HE, as the former only accepts PUT requests while the latter appears to only offer POST for sending HTTP. The HE/Node-RED integration solved this for me.
I have a Elgato Keylights as well and recently purchased HE. Are you able to provide me a guide on what you did start to finish to control your EK with HE? Also, are you able to control it via voice command through Google Home or Alexa by any chance?
Copy my flow (link above) and import it to Node-RED
Follow the instructions on my flow summary to set up the light and connect it to Hubitat
Yes. Add the Amazon Echo skill (built-in HE app) to your Hubitat. Share to Alexa the virtual color bulb you created in step 6 above. You can then control on/off, brightness and color temperature with your voice.
Let me know how you get on or if you have further questions.
I'll give this a shot. Don't need the lights controlled 27/7. Just when my pc is on. So when I'm ready to record a video or live stream, I can tell Google to "Active Studio mode" and it will Dim my basement lights, Turn on my EK, turn on other switches, etc...
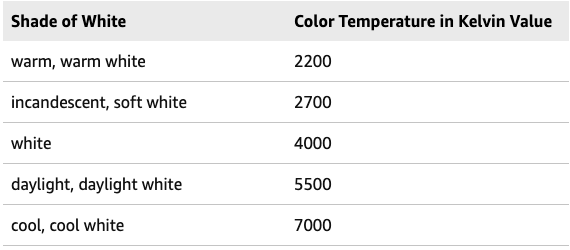
On Alexa, you can set color temperature intuitively via color name. E.g. "Alexa, set the [light name] to soft white." Alexa recognizes the following color temperature names:
That will make your project much simpler, as the only time consuming step in my guide above is setting up a RPi. Instructions for installing Node-RED on a PC are here: Running on Windows : Node-RED