Hi all, I made this ceiling light work with the help from @markus. Also I have paired a few Opple buttons with markus' drivers. No it may look stupid but I don't know how to let the light change color. Maybe I was expecting an option like with start raising/lowering dimmer level with button held and stop changing at button release. Any suggestions? Rik
Are you trying to change the color of the bulbs via the (physical) button, or are you just wondering how to do it in the first place? To change it manually from the device page (and maybe test that your bulb actually works as expected with these commands), you may want to at least test the commands from the device page first. Relevant commands are:
- Color:
setHue(which shade of color: red, orange, yellow, green, etc.; with default settings, this ranges from 0-100 where both extremes are red),setSaturation(0-100, where 0 is basically white and 100 is the most saturated version of the color/hue), andsetLevel(dim/brightness level). Or use thesetColorcommand that can do all three of these at once and lets you choose a color via the color picker in the UI (note some oddities on the screen vs. how the device will respond--you won't get gray/black on the bulb, just less bright colors/whites). - Color temperature:
setColorTemperaturewill take a CT value in Kelvin, where 2700 or 3000 are typical values for "warm" (incandescent-ish, yellow-ish) light and 4000 and above will start to appear cool/blue-er to most people. Different bulbs have different min/max ranges here, but many default to around 2700K.
If those commands work as expected, then you can create an automation with your buttons to control the light as desired. (There's nothing for color or CT like the startLevelChange and stopLevelChange commands that make the "start raising/lowering dimmer level"-type actions work for dimmers/levels, so you'll have to specify a specific color/CT. You might be able to get something like this by creating a Scene Transition in Groups and Scenes, but I haven't tried.) The Button Controller app or Rule Machine with a "Button Device" (not "Button") trigger would be a good place to start. The other piece you'll need to know is what events your buttons generate on Hubitat for what real-world events, but that should be easy enough to figure out if you don't already know.
Actually this is the answer to my question. Thanks @bertabcd1234. When I let the light and button (both Aqara Opple) as is from factory I can change CT in this way so now I just lost that function. That's a pity!
It would nice to have this functionality added
Yep indeed. But since we don't have that possibility at the moment I was thinking about changing in steps. Light goes from 2700 to 5700 appr. So in steps o 500K makes six different levels. Could use left button for 500 down and right for 500 up. How do I achieve that? @bertabcd1234 do you have an idea?
In general, use a rule, assign a variable to the current color temperature, add 500 to thar variable, then do a "Set Color Temperature" action with that variable for the value (you do need a variable, as you can't directly reference an existing attribute in an action otherwise). Probably also add some checks so you get back within your desired range if above or below. I don't have anything set up like that but could try a quick demo if you aren't familiar with Rule Machine. I do know you'll need that (or a custom app), as Button Controller lacks a couple features you'd need. But with a "Button Device" trigger in RM, they're nearly identical otherwise.
That would be nice. I can't say I'm not familiar wit RM at all but things like making a variable confuses me. Maybe a simple how to?
Sure! If you're not familiar with the RM UI, I suppose a screenshot of the finished rule wouldn't be too much help since part of the task is getting there, so I'll suggest a couple things that might help first.
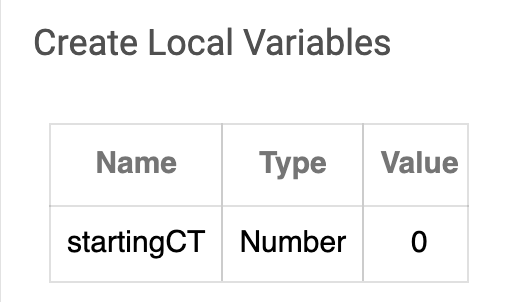
First, you'll have to create a local (or global, but I'd use local unless you have a reason) variable. You can do this with the "Create Local Variables" button/link on the rule's main page after you create a new rule. Call it whatever you want. I'd use the "Number" type. You need to supply an initial value, but it shouldn't matter too much since your rule should set it first thing anyway [EDIT: actually, you'll want to set it to a valid CT like 2000, not 0, or you'll run into problems creating your rule, like I did after taking this screenshot...]. When that's done, you'll see something like:
Second, you'll want a trigger for your Rule. I'd recommend the "Button Device" type, then choose your button. This will give you a UI more or less like Button Controller, so if you've used that app, you should feel right at home. If not, then...
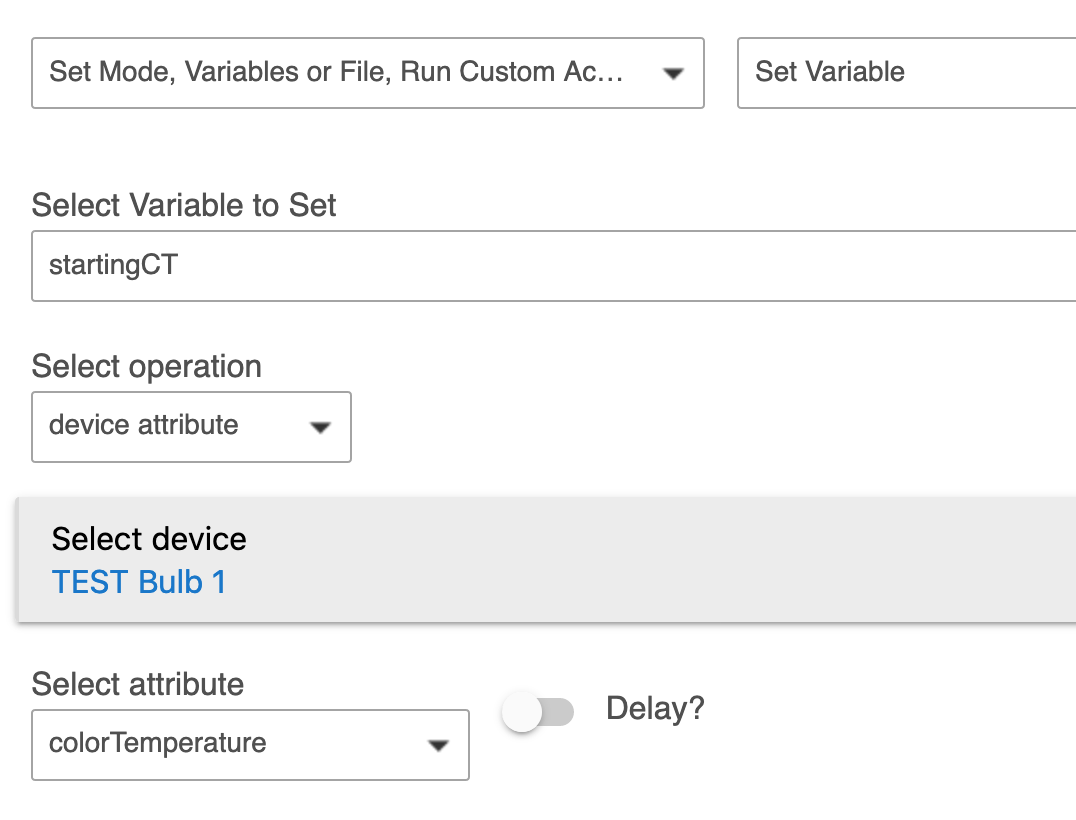
Third, all actions in RM are created via the UI. To find where a particular action is located in the menus, the "List of actions" in the docs may be helpful: Rule-4.0 - Hubitat Documentation. To set your variable to the initial CT of the device, you'll need the "Set Variable" action and would need to choose options like this:
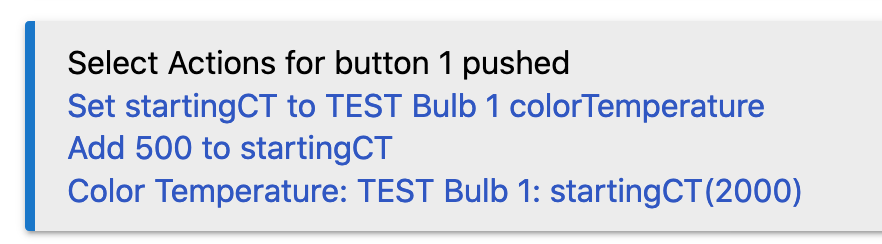
That's probably the hardest part. Then, you can just use that variable when setting the new value later after adjusting it as you want. All finished, you might have something like:
I'm not checking for valid CTs (e.g., if yours maxes out at, say, 6500, I'm not doing anything to stop it from trying 7000, which in a best case might just do nothing, but maybe it's a concern for you). I'm also not wrapping around, so if you don't have two different buttons, you might want to do something else. But this is the general idea!

