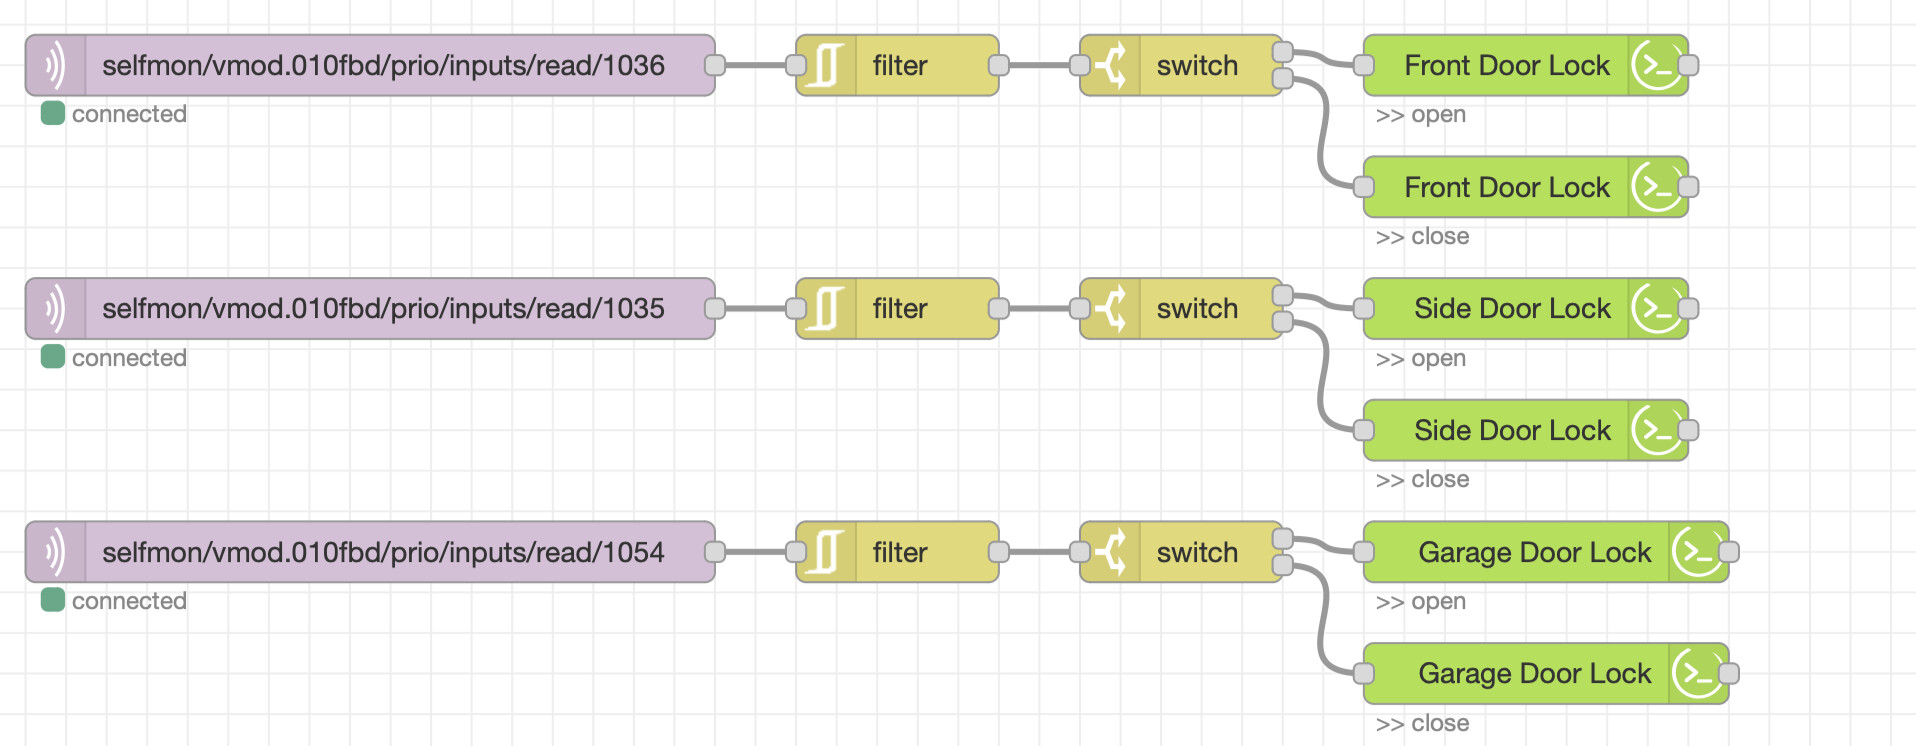
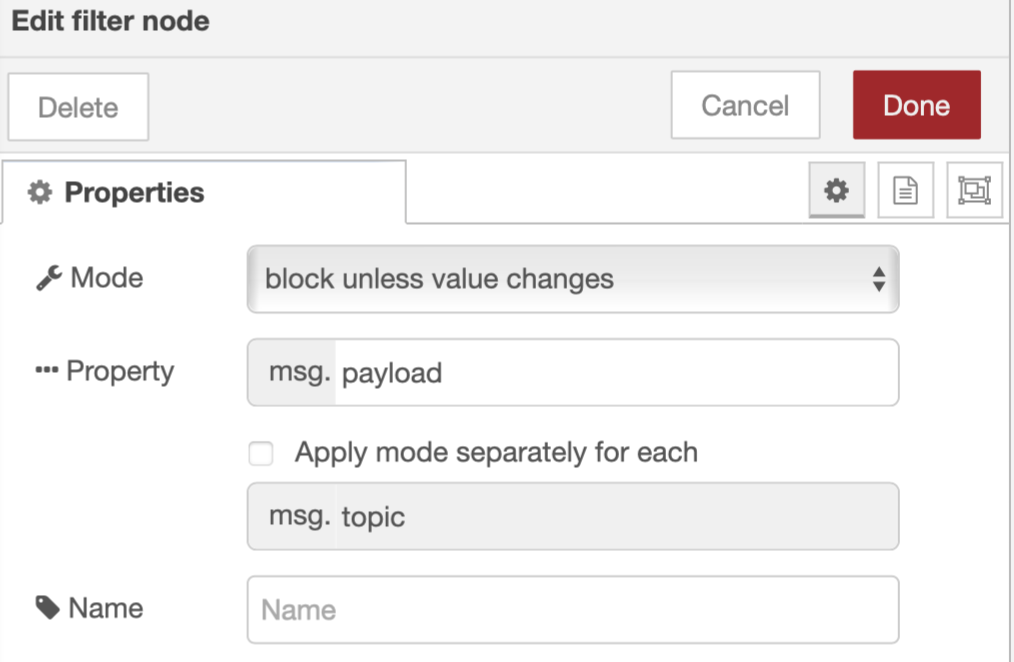
I'm monitoring 17 zones in total (currently with 17 individual flows, though they're all in the same flow). I've just dropped a filter between MQTT and Switch as below and it is for the main part stopping an update to a zone that has not changed.
I've got a few anomalies where I open one zone and another PIR reports 'inactive' but I'll have to do some more testing.
It's a pain that all of the previous virtual devices are tied to the previous MQTT app. I was initially hoping to delete that app, leave the virtual devices and point the node-red function nodes to those existing ones so that I didn't have to switch out devices in all the RM rules.
I've a bit more tweaking. I don't think I need to send the 'inactive' message to the virtual motion sensors as I can just use the 'auto inactive' setting in device preferences.
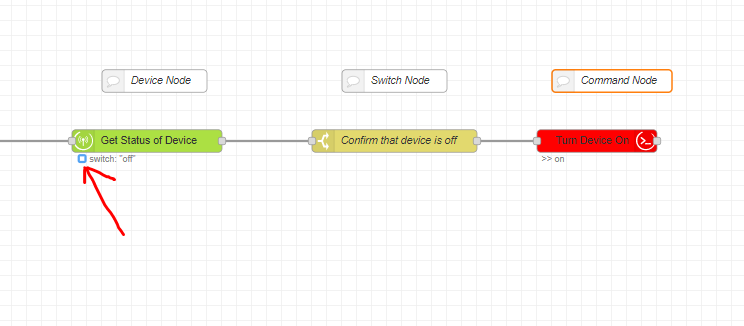
Instead of a filter node or flow variable, you could add a Device Node and Switch Node in front of each Command Node. Node-Red stores the current values for everything so the Device Node doesn't have to waste resources querying the device.
Try something like this in front of each Command Node:
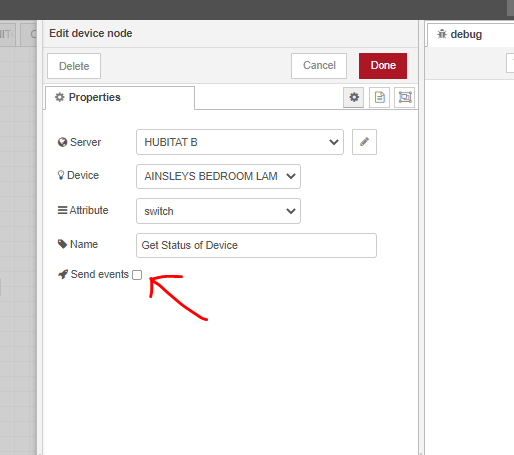
Make sure that the blue box indicated by red arrow under the Device Node is hollow. That means that Device Node is not sending events.
In the Device Node edit, make sure the Send Events box is unchecked.
I have a Good Night Flow that does this for Z-wave Plus devices so that it doesn't send Off Commands to 30 devices when only 3-4 are needed and bog down my Z-wave mesh.
You can set msg.deviceId and msg.command in front of a Hubitat command node. (You can also set msg.arguments which isn't needed here).
I tend to prefer fewer nodes, which is why I often end up using functions. If I need to use a filter, then a switch, then change nodes in order to accomplish what I can do in a single function node, I'll use the function.
I'm pretty sure this entire thing can be done in 3 nodes.
The function is:
// get the zone from the MQTT topic
var zone = msg.topic.split("/")[5]
// compare the payload to the stored flow variable holding the previous payload
if (msg.payload == flow.get("zone_" + zone + "_state")) {
    // do not send the message - that state has not changed
    return null
}
else
{


    //just for fun, set the function node status to show the last zone and changed status
    node.status({ text: zone + " " + msg.payload })

    // set a variable named "zone_X_state" (where X is the zone number)
    flow.set("zone_" + zone + "_state", msg.payload)
    var deviceId
    //lookup deviceId based on zone
    if ( zone =='1054' ) { deviceId =  '111' }
    if (zone == '1036') { deviceId = '222' }
    if (zone == '1035') { deviceId = '333' }

msg.deviceId = deviceId

//translate 'Closed' payload to 'Close' command, fix upper case
if ( msg.payload == "Closed" )
{
    msg.command = "close"
}
else
{
msg.command= 'open'
}

return msg
}
Note the "if" statements translating the zones to Hubitat device IDs. You'll need to look up the correct deviceIds (you can get them from the MakerAPI 'All Devices' URL) and add 1 line for each zone with the corresponding deviceId
Edit: the hubitat commands are case sensitive, so make sure they match up correctly.
Any special reason, or is this just a 'tomato / tomahto' thing?
In this case, if I had to add/edit a zone or device, I'd much rather edit that function node than dive into a spaghetti bowl full of interconnected nodes.
This is like the rule machine forum where you get 10 different ways of getting the same thing done!
I've got all (17) of the individual flows working and triggering their new virtual devices (the filter fixed the repeat messages). I've gone through all of my rule machine rules, cloning each rule and swapping out the old for the new virtual devices and I've had to rebuild all of my dashboards to remove the old/add the new devices. So I can now delete the old MQTT app and driver as I've deleted it's virtual devices.
I'll maybe have a play when I get chance and try to rebuild a flow using some of the methods/nodes you've described above. One thing I didn't see...Is there a simple way to pause/stop a flow, so that I don't have conflicting flows if I try to rebuild? Thanks
I don't know the programming language necessary for a function node. I understand nodes and strings. The only function nodes I've used were copy/pasted from others.
Yes. that looks like a replacement broker. No idea if there would be any benefit. Since it is a version 0.x and hasn't been updated in a year, maybe it's easier to keep up-to-date with the direct install on the Pi. Then again, I don't think you need constant updates for the MQTT broker, especially if it isn't exposed to the internet.
My broker is installed under Docker as a component of another application. Node-Red is one of the only things I run directly on my Pi. Mostly everything else runs under Docker.
Each node should have an 'enabled' button at the bottom left corner when you edit it. If you disable the first node that is initiating the message, that will stop it.
Click that to 'disabled' and the node won't forward any messages.
Here I've disabled the MQTT-in node:
You could also just remove the wire between the first and second nodes:
Since "Flow" properly means the whole tab in Node Red but also gets used to describe a single set of connected nodes, I should mention you can also disable an entire Flow (tab) all at once. Double-click the tab and you'll find an 'enabled' button just like on the individual nodes. I have a Flow/tab named "Unused" that is disabled and where I store things I'm no longer using but may want to refer back to later. Anything I cut & paste over to that tab is automatically disabled due to the flow being disabled.
I think I would use Node-Red HTTP Request nodes to Maker API rather than virtual devices in this situation. This eliminates the need to receive MQTT requests on the Hubitat Hub.
The Maker API App will provide the URLs specific to your devices.
I'll leave it as is with the broker installed directly on the Pi.
I've seen a lot of information regarding docker but I've not used it. Most of the programs running on my Pi, I've installed directly by copying/pasting commands and hoping for the best. I'll take a look at it.
This would work best for me as each 'flow' is separate. The disabled tab is a good idea since I can try thing out there.
There should be no MQTT requests on the Hub. In my case the virtual devices are essential. It's working like this:
Conventional PIR > Alarm Control Panel > Alarm Control Panel MQTT Module > MQTT Broker on Pi > Node-Red Subscribes to topic > Control node actions Virtual PIR on HE mirroring the conventional one.
I guess the http request node would be another way of completing the flow without the need to use the Hubitat palette but probably no easier.
One thing I do need to do with some urgency is backup the Pi/clone the Pi SD. I read a post a few days ago regarding cloning the SD to a USB that could be used if the SD failed. With the quantity of rules I have that rely on MQTT and now Node-Red, it would be a tragedy if the Pi failed.
After a few failures early on, I now have my 3 RPi 4s running on bootable 128Gb SSDs. No SD involved. If you haven't already done so, you can download a utility onto a NEW SD card using the Raspberry Pi Imager software. Next insert that SD and boot your RPi from that. It will change settings so that RPi can boot from USB SSD. Then shut down RPi, insert existing SD and turn back on. Then, insert USB SSD and there is an option to clone from SD to SSD. Finally, shutdown again; remove SD leaving the USB SSD plugged in; and then turn on RPi again. It should boot from your SSD and have everything that was on your SD.
Please look online for exact instructions as I listed that from memory. I take no responsibility if you simply follow my instructions and there might be a better way since I did that over a year ago.
Finally, there is a great Dropbox pallet that broke recently due to a Dropbox change. However, the developer is actively working on a solution.
This looks interesting, can you tell me what alarm panel it is you are using? Looking at the zone identifiers and terminology it sounds like a Honeywell system?
I have my fingers crossed that it is a UK/EU Honeywell 'Galaxy' type system and not a US version so I can replicate it
@EVOLVING.HOME yup it’s a Galaxy Dimension. Mines a GD-96, but older non dimensions work I believe. A bit of information...
It uses a SelfMon VMOD (virtualisation module). The VMOD (£ 85 delivered) has the functionality of a Galaxy Comms Mod (E-080-x) but it also provides a nice http keypad which you can use in a web tile and importantly allows the MQTT functionality. I've added quite a few additional devices to the alarm in order to solely use them with Hubitat (the zones can be left set as spare). I have additional PIRs for lighting and have added microswitches behind the mortice bolts of my standard locks so that I can monitor open/close on them and do automations around that. After all it's easier to add devices to the alarm than shell out on wireless kit needing batteries. There are a few points to be aware of, such as:
you can't monitor the onboard Galaxy Zones directly without programming links
the VMOD needs to be on the same bus as the RIO's
Take a look here: SelfMon - Security Systems for more info. Stuart McGurnaghan who is the 'GalaxyGuy' is a bit of a genius and designed the module and its software. He's very helpful and will answer any queries on the SelfMon Users Facebook group.
Also of note is that SelfMon monitoring is only £1 per month and provides path monitoring, SMS, e mail notifications, DDNS and remote control of the alarm using the app.
Mine is also a gd-96 and this is something I may be quite interested in
Currently my setup is more "hardwired" and is using links already, I have numerous RIO's on both bus lines. I got creative and what i have done is linked zones to outputs, then i'm using the RIO outputs to drive a seperate 16 relay output board. These relays then trigger inputs on an esp32 arduino board that is added to HE using Hubduino. Effectively doing similar to your setup but in a hardware way, and to be fair works great.
I do have an ethernet mod on my panel but is solely used for remote connection via the GX app or user management suite on my laptop.
With regards:
If you use RIO's populated with zones on both bus lines, is it limited to only seeing the zones on that specific bus or will it see all zones, both buses 1 & 2?
is this optional? I also use a pyronix gsm dialer for this function so don't really need any additional monitoring (although topping up the SIM card probably costs around £12 per year also ).
When I get in I will have a look at the facebook group.
So effectively the VMOD alone could replace what you have, so that you're only using programming. There'd be no need for the output board or the Arduino board (so long as you can run the MQTT broker on a Pi or always on machine.
Galaxy > Input linked to output > output board > Arduino would become
Galaxy > VMOD to broker via MQTT > Node-Red to HE
I think there's a possibility of keeping the ethernet mod and adding the VMOD. I replaced mine and use the selfmon app instead. I can still use the RSS software and get the benefit of path failure notifications. Also the VMOD means you don't get the annoying unstoppable COM 4 failure when the internet is down.
You can monitor the zones directly on the RIO's on the same bus as the module. On the other bus you can simply program a link from those zones to a virtualised zone on the same bus as the module. You can have virtual RIOs for any address on the bus not occupied by a physical RIO. What I did to avoid using any links was to connect what was my Bus 2 into Bus 1 in the panel (un-terminating the bus in the panel). Of course you can also put an additional VMOD on the other bus.
Completely optional. The VMOD can solely be used for MQTT if you like. While the GX app 'looks' nicer and instantly shows set/unset status, the Selfmon app is better for me. It just uses a graphical keypad. It allows different notifications to be sent to different users. You can map different events to different recipients and methods - push and/or e mail and/or SMS. If your internet goes down and the selfmon server misses x number of hourly test messages you get a path failed message pushed to your phone. The account is just topped up via Paypal (minimum of £5 each time) and they e mail an adjusted account statement each month so you know what's remaining.


 and if i do, your inbox is going to get hammered