Control Panasonic ERV?

@calinatl , I think you're good there. If in doubt, just wire it up (don't connect the ERV to IN/OUT) and check voltage across IN/OUT. It should be zero as you toggle the relay on/off via Hubitat. Based on that reply you got, and what @jtp10181 has said already, I'm about 99% confident you are ok. This information is good to know as I may use this in future projects. Powering from 120V is a lot easier in many situations. This is basically a nice replacement for the LFM20, which was unreliable and about six times the size.

Glad to help (and get educated on a new relay option too). The Zen16 is great, but the external power requirement makes integrating into an existing box quite difficult.

Thanks to @hubitrep and @jtp10181 for setting me straight on this device :slight_smile:

1 Like

Was able to wire this up with two Zen51's. Zooz support was very helpful and gave specific directions. They confirmed that not only are the IN and OUT pigtails a dry contact relay totally isolated from L and N pigtails, they later confirmed the IN and OUT pigtails are also isolated from the S pigtail.
It was a bit a difficult to fit two Zen51's in the box, but managed to do it.

So far it seems to work great. The ERV can now be controlled from either Hubitat or from the wall switches - both work equally well.

ETA: thanks to @hubitrep and @denwood and @jtp10181 and the others who contributed to the above discussion. Not only did it help me automate the Panasonic ERV to be able to control it with Hubitat, I also learned from the discussion. Much appreciated!

2 Likes

Per post 27 above, I got this wired up and initially I could control the ERV from either the wall switch or the Hubitat.

Suddenly it stopped working from the wall switch. I have definitely not rewired anything, and I don't think I changed any of the parameters. Does anyone have any idea what could cause this, and more importantly, how to fix it?

If you are using my driver turn on debug or trace logging. If the device is sending any messages they will get logged. Also check the connections, maybe something came loose?

1 Like

@jtp10181
I don't think I'm using your driver. On the device page, under type, I selected "Zooz Zen51 Dry Contact Relay" since that matches the hardware.

Re: checking connections - do you mean the physical wiring connections in the box?

Yes.

That is the system driver you are using, you could turn on debug logging there see if you get anything. Not sure if all the settings are exposed on the system driver, but you could always try mine to confirm all the settings: [DRIVER] Zooz Relays Advanced (ZEN16, ZEN17, ZEN51, ZEN52)

1 Like

@jtp10181 : I redid the wiring in the box with Wago Lever connectors, and all is working again. Thank you!

Also, installed your driver. Will post questions about it over there!

Another follow up to this post.
The two Zen 51's are working great to control the two functions of the dumb double paddle switch

  • Standby/On
  • Hi/Low

The challenge is the switch positions. The automation rules are fairly good at turning the ERV on and off, but then the buttons on the dumb single gang dual switch don't match the positions I've trained my household on. While it seems intuitive to me that if the ERV is totally silent, it is off, no matter where the switch is, others in my household think if the switch position is where they were trained for the unit to be on, "it is just operating very quietly today."

In addition to the retraining of my household, which is under way, I'm aware of three other potential solutions but would appreciate some feedback

  1. Totally automate this so switches are never used so the physical position of the switch does not matter. Working on this (see below) but not sure it is attainable.
  2. Replace the single gang regular dual switch (maintained contact?) with a single gang momentary dual switch. After much googling, I've found a Legrand Pass & Seymour TM811-DTMOW that might work - just not sure because the spec sheet calls is a "Double Throw Momentary Contact." Doesn't double throw mean that if one is on, the other is off? So every time I put the speed on high, the standby/on would immediately go to standby? Or am I reading too much into this?
    Spec Grade Decorator Momentary Contact Switch
    If this switch is not correct, does anyone have a link to the existence of a Code Compliant single gang, double switch where both are momentary?
  3. Both 1 and 2 above, which would be ideal, but might be overkill.

Two more pieces of info:
Until I can obtain plug in presence sensors, I'm not sure I can totally automate this. However, the ERV will become more automated when my Third Reality plug in Motion sensor arrives - the one @rlithgow1 suggested in this thread:
How are folks solving for 'Entire Family Awake' scenarios - #5 by rlithgow1)

With the two Zen51's, the box is tight. Not sure if a momentary switch would be deeper and thus take up more space than the standard big box store single gang dual paddle in there now. To make it fit, I could remove the Zen 51 controlling the Hi/Low fans speed which would free up some space in the box, but it turns out to be somewhat useful.

The switch you linked to, I am not sure what is going on there. It looks like maybe the top/bottom are split and they are both basically buttons. Since it says it is momentary and a DT it should basically act like two buttons. When you press and hold the top , the top contact is closed, when you let go it opens. Same would happen on the bottom.

This one I found appears to do the same thing: Double Throw Center Off Momentary Decora Switch Leviton 5657-2 and they call it a "DTCO" switch.

@jtp10181
Yes, what I have now is a double paddle in the space of one switch. But they are manual switches so they hold their position. So a family member might turn the top switch from Standby to On, but then the Zen51 turns it off. The person goes back the next day and sees the switch in what they understand to be the On position, even though the ERV is now off. And to manually turn it on, they have to flip the switch from the on position, to the off and then back to the on.
Same with the bottom switch, except that one is just fan speed.

You wrote

"when you press and hold...the contact is closed, when you let go it opens."

Perhaps I don't understand what momentary means. I thought switches like the Inovelli are momentary for their on / off function, because you press up and it goes on, but the physical switch goes back to a neutral position. You don't have to hold it. The advantage is there is no physical indication of whether the switch is on or off. I'm looking for that same function but with two switches in one "slot"...

They are in a sense momentary because when you press the paddle is it pushing a button on the board behind the paddle, but the switch firmware turns it into a maintained state switch since when you let go the contact stays ON or OFF.

Momentary switches as I said, will close the switch when you press it and then it opens again when you let go. You can set the ZEN51 to work with this and I think it may work well for you. Instead of a paddle switch you would basically have two buttons that when pressed would toggle the state. So you would not be able to see the current state from the switch at all.

Thinking about it, if you do have regular paddles on there now the options 2 for the switch type should work OK. In theory that should keep your on/off switch working the same as it did before except that it may not always be in the same state as the ERV. But on should always be On and off/standby should always be off. Maybe that is how its working and the state difference is the only problem?

Parameter 7: Choose the type of wall switch connected to the relay and its on/off behavior.
Values: 0 – toggle switch (device changes status when switch changes status); 1 – momentary switch (one-button switch like the ZAC99; 2 – toggle switch with fixed actions (always toggle up for on, always toggle down for off); 3 – 3-way impulse control (for selected 3-way scenarios, refer to the notes in the wiring instructions for your set-up); 4 – garage door mode (simulates a momentary push button switch in the Z-Wave interface, used for garage door opener applications). Default: 2.

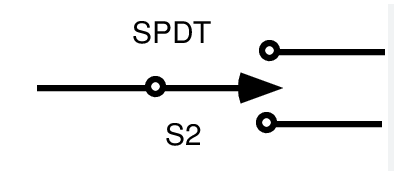
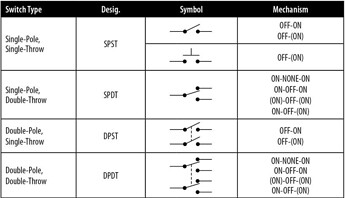
I reviewed the wiring you posted on the first post and it looks like the switch you have now is basically just a double stacked SPST (Single pole single throw). Which SPST is the same as a regular old dumb light switch.

The DTCO switch I found would work like the SPDT except when you let go of the switch it would return to the central off position, where no contact is made.

Like this:
image

What about visual feedback, e.g. a dimmable night light or smart bulb tracking the state of the ERV ?

There should be a way to wire the SPST dumb dual switch / set up the automation so a change of position at the switch always toggles the corresponding operational setting of the ERV.

You could use a CO2 monitor for this purpose. What commercial HVAC systems use to drive dampers.

1 Like

Had not thought of that. Nice idea! I like it because it gets right to the heart of the purpose of the ERV which is sufficient CO2, and ignores all other noise. All these other things are secondary to the CO2. I presume that if the area is unoccupied, CO2 remains relatively stable? I would not want high CO2 readings to trigger the ERV when the area is not occupied as that would be wasteful.

Any recommendations on a CO2 sensor?
I found this Zigbee one from Titian - not cheap...

Thanks! Yes the switch I have now is a regular dumb old light switch except stacked with two switches where there is usually just one.

If I understand correctly,

  1. In parameter 7 of the Zen51, I could change how the existing switches behave, so if the switch is toggled to the position understood as on, but the automation then shuts it off, it would not need to be flipped to off then back to on in order to turn it on? The switch would operate similar to a 3 way switch which has no particular position for off on - just flip it different from what it is now to change the state from what it is now?

  2. The switch you linked only has one paddle. Pressing it up toggles the on/off. Pressing it down toggles the high/low of the fan?
    And the "press and hold" does not apply because that is a setting taken care of in the Parameters?

Thank you for the chart. I am learning so much!

Yes, if you want to do that you would set it to setting 0 Toggle Switch mode. In that mode whenever the paddle changes positions it toggles the ZEN51 regardless of the paddle position or the ZEN51 current state. So yes it acts like a 3-way setup where the switch position is irrelevant.

Yes I believe that is how it will work from the description. It would have two output connections, one could go to each zen51 and then you configure the input as a momentary switch. Each time you press it, it would toggle the zen51 state. I think the one you found might be similar as well it just has a different paddle style that is broken into two buttons. I believe you can even get held/release scene events from the ZEN51 when using a momentary switch, if needed.

Keeping the existing double stacked switch with toggle mode might be more intuitive than the switch I found.

CO2 will decay according to your house's natural air exchange rate (even with the ERV off, there is always some leakage) and should eventually settle to the outdoor value, which is around 420 ppm at sea level.

Depends on your objective for using an ERV. In my case I want to ensure sufficient fresh air supply and have it set up to keep CO2 levels below 1000 ppm at all times. The HRV turns off only when CO2 goes below 600 ppm.

Come to think of it, your use case might be a bit tricky to balance as this is not a whole-house setup.

@calinatl , driving based on C02 will work, and this is what I do. I would add that I also track VOC and Radon and drive off those levels as well.

If you just want CO2, I'd get the Ecowitt WH45 (sensor with CO2, PM2.5, PM10, temp, humidity) and Ecowitt GW1100 (LAN gateway) which can run from USB power and requires no web api...using local communication from gateway. It's been 100% reliable. ~$150 USD for both.

If you want to also monitor Radon, VOC and CO2, the best bet there would be the Airthings View Plus ( View Plus | Airthings ) which has a WIFI gateway built in, and can run from USB power. This needs a web api though to work. I have three of the Airthings Wave Plus, one on each floor. These require batteries and need a separate WIFI gateway so I'd go with the View Plus. These devices are not as reliable as the Ecowitt WH45.

Both of the above have Hubitat integrations.

Keep in mind that with a max of 35 CFM supply, that Panasonic will likely need to be running 24/7, something you'll see when you start monitoring. I believe you have another ERV running in the home correct? In that case, a sensor in the spot ERV occupied area will work fine. Having four CO2 sensors in my home, I can tell you that CO2 accumulates quite quickly in occupied areas. A "perfect" whole home system would have fresh air supply to main living areas, bedrooms, bath and kitchens and 0-10V dampers to control supply to where it is most needed.

In any case, I have extensive experience now with demand controlled ventilation as my two HRV ECM fans are controlled pretty much by CO2/VOC/Radon levels, and the HRV is integrated with the kitchen exhaust EC fan (for makeup air)...also automated to the induction cook top. I should be able to address most of your questions in that department :slight_smile:

@hubitrep , my thoughts on CO2 demand driven ventilation have changed a bit once I started monitoring Radon and VOC as well. I only shut down the system if Radon is below 150 bq/l, VOC below 200 ppb, and CO2 below 500. This rarely happens. I found that when I shut down the system on CO2 below that 600 range, then VOC and Radon would spike. My system is based on EC fan control (2 fans for supply/return on an HRV) so will toggle through 50, 65, 75 and 90 CFM ventilation rates based on what's going on with VOC, Radon and CO2.

1 Like

@denwood Thank you - as usual great information.

I do have an Airthings Wave Plus for another area of the house, but am not thrilled with it. The data can only get off the device via bluetooth, via its phone app, ASAIK. I did not want it on a phone that travels with a person, because if the person(s) are not in the house, the data won't transfer. So I put it on an old phone that stays in the house. But that also won't sync unless you manually turn the phone on and open the app. Thus I've been considering moving to the newer device that has both a wifi connection and a info screen.

Had not considered the Ecowitt. Will look into it as the local aspect definitely appeals to me.

The downside of the Airthings device is that the data has to go up to the Airthings servers before Hubitat can download it. The upside is that Airthings is the only device I'm aware of that will report Radon readings to the Hubitat.

Presumably radon readings are most important on the first level of the house, so I could use Airthings on Level 1, where the ERV runs 24/7/365 and use Ecowitt on the upper level where I'm trying to control the ERV. Not sure if there is any downside to the devices not sharing the same platform...

1 Like

Airthings Wave Plus can report to Hubitat, but you need to purchase their wifi gateway (hub) and pair the sensor to that. I have three AT Wave Plus devices paired to an AT hub and they sync every two minutes. At this point you can check in on the sensor via your phone anywhere…bluetooth will not be used by the sensor as your AT Wave Plus will connect to the AT hub using RF. Once you have the AT hub installed, then you can install the integration in Hubitat . Hubitat will use the web api to pull the AT hub data from the cloud…clumsy but it works fine. The upside then is that anyone with the AT app and your login can check in on air quality.

You are correct in that radon reports to Hubitat are pretty limited with respect to products. Your control plan sounds good. Radon levels will be highest at your lowest level…for us, the basement.

You can use both Ecowitt and AT on your setup. I actually average the CO2 sensor values to arrive at a variable to use in my automations to cycle through the 50/65/75/90 CFM profiles. This way the upstairs sensor will bias the house average higher at night (bedrooms all upstairs) and tends to bump vent levels.

How interesting. In fact the initial reason for getting an HRV for my 1950's house was to control radon, which was right at the margin of what Health Canada considers safe. It did help, but I wasn't satisfied so I had a sub-slab ventilation system installed, which completely eliminated the problem. The HEPA-equipped HRV I selected brings additional health benefits by diluting respiratory particles in general. I get the idea of ventilation based on VOC (for cooking fumes mostly?) but I have not yet automated our range hood so probably not useful in my case.

Here, the stock HRV unit essentially turns off when no one is home, runs on low speed (50 CFM?) most of the time, on high speed sometimes when we're all home, and as a last resort the bathroom extractor fan turns on to be used as a poorman's makeup air (I know, it's not really :man_shrugging:) when 100 CFM of fresh air isn't enough. I might use the new Airplay integration to shout "open a window!" if all else fails :smiley:

In our cold climate, an HRV can create a low humidity situation (should have sprung for an ERV instead, I guess) which I need to correct with humidifiers... quite the rabbit hole :slight_smile:

Correct. I use 1 View Plus, 1 Wave Plus and 1 Wave Radon in my house. I am not a fan of the automatic baseline calibration algorithm used on the View Plus so generally don't recommend it unless you need the radon reading. The Awair Element is a better product IMO (still a cloud API). I've never tried the Ecowitt, sounds interesting. An acquaintance of mine builds good quality CO2 sensors and one of his models offers a local LAN API, although most of the models go through a cloud API : https://co2.click. I use one of these for DCV at a second location (model C).

I was really hoping the new IKEA IAQ sensor would offer CO2 readings, but it does not.