I've looked at rule machine but unfortunately a lot of my pistons in webCoRE run webhooks on my local lan for different ESP8266 controlled LED strip devices (NeoPixels). I haven't found an integration to control digital LEDs that works natively with ST or HE yet. They are controlled via http commands. They work great out of webCoRE currently without a problem. So, I'm hoping that they will port well into HE. Either that or I'm able to find a digital LED controller that will integrate with HE but as yet...no luck. Lots of controllers for analog RGB, RGBW and RGBWW strips but nothing for digital ones.
Some of my other pistons I might try to port to Rule Machine but I'm hoping some of the problems I've been reading about with webCoRE have been worked out by this point.
Ryan i was in ur boat about 3 weeks ago and well am still kinda there. I am still trying to find my way atound and honestly in many wahys failing. I dont completely understand the workings of HE yet so i get frustrated. But as i am converting house over to lutron caseta everywhere, I am finding the speed and reliability wonderful. Perfect no but i assume that is the setup or lack of setup which is on me.
Since ur getting pro hub u are headed in right direction. Good luck
Thanks! My big question is around brightening and dimming and the number of buttons that can be "pulled" for each Pico. They are called "3 button raise and lower". If I wanted to use them to control a smartbult for example, so that the on was on, off was off and raise and lower brighten and dimmed, how exactly would I do that in HE? I haven't yet found a clear tutorial on that part of it yet. Guess I'll have to wait till my bridge pro gets here and try some stuff out.
Lol tutorials would be wonderful. I find simple tasks or setups to b devoid of info or do this then that BUT. its young and if u ask ur answered quickly
Not sure i understand ur question what pico u have?
With the default Lutron settings, the up and down arrows brighten and dim the light. But if I connect the Pico to HE to control another light, how do I set it up so I get the same functionality? What app do i have to use? Is it a hold or a press to raise/lower this much?
When you get your Pro hub, and start adding your Pico Remotes to it, do not associate (in the Lutron App) the Pico Remote with any Lutron Switches that are also paired to the Pro hub.
Instead, you install the Lutron Integrator App in Hubitat, and add your Pico remotes to Hubitat. This will then cause the Pico to show up as a Button Device. You can then use Pushed, Held, and Released button events to trigger actions within Hubitat Apps, like Button Controller and Rule Machine. Each of the 5 buttons can be used for whatever actions you like.
Following on what @ogiewon said above, you can use the raise lower buttons for most devices just as if they were tied to a Lutron dimmer, by using pressed/released with startLevelChange and StopLevelChange. There are posts here about that capability. @mike.maxwell got all of this working, and could chime in....
Okay, so the held function is like the native behavior the pico's have with the lutron hub, right? As you hold it down, it continues to dim (or brighten) until you release it. I ask only because most other button controllers use "held" as a long press (i.e. ST_anything).
There are two Pico drivers. One treats a Pico like a Minimote, and gives each button two functions: Pushed and Held (along with Released). The held timing can be set on the device page. The second driver, called Fast Pico, offers only Pushed and Released events. Both allow the raise/loser functionality.
The difference is that for the regular driver, the raise/lower functionality is started by the held action, and the actually raising/lowering begins after the held timing period. For the fast Pico it starts right away upon the Pushed action. In each case, it stops when the button is Released.
That's such a better way of handling a button! Finally! I always thought ST's way of doing it was odd with the pressed, double pressed, held thing.
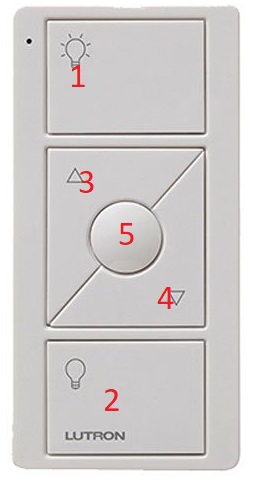
And the buttons are numbers like this, right?
You would have to see their full product line of keypads to see the pattern it fits into -- it makes some sort of sense from some engineering perspective when looked at that way. For example, the top and bottom are on and off, 1 and 2. For a two button Pico they are still 1 and 2, etc... A four button pico lacks the center button, #5.
Well this is kind of a bummer. I have around 12 Caseta switches in my house paired to a non-pro bridge, and I just bought a bunch of RadioRa 2 equipment and a Hubitat for conditional logic, but I was hoping to leave my existing Caseta switches and have them work together with RadioRA 2, at least at first. But now I’m looking at having to buy the Caseta Pro Bridge if I want to have the two systems work together, but spending another $100 on a system I’m moving away from seems kind of dumb. I, for one, would appreciate Caseta support via cloud, even if it’s not as good as local control.
Welcome to Hubitat!
Unfortunately, Hubitat has made it VERY clear that cloud connection to Caseta is not in their game plan currently. And if you've ever tried the cloud integration on ST, you'd see why. It is PAINFULLY slow. While telnet locally is about as close to instant as you can get.
Are you technically inclined enough to set up Home Assistant? (You could even use Hass.io--both the components you'd need to integrate it with Hubitat, the Hubitat MQTT Brdige and an MQTT broker like Mosquitto, are available as add-ons.) If so, Home Assistant has some sort of non-Pro-Bridge integration for Caséta. I think it might still rely on the cloud (my understanding is that it basically pretends to be the mobile app, which I imagine hops through Lutron's servers, but I'm not sure if it still needs that after setup), and I'm not sure if Picos are among the devices supported, but if you're desperate, it's worth looking into.
Or you could buy a Caséta Pro Bridge for $97 new and sell your old one on eBay for hopefully not too much less, or maybe you'll find a used Pro on eBay for less as well. Obviously, this might not be a good idea if you're thinking about moving to Radio RA2. Your Picos will work but all your in-wall devices will need replaced, and you can occasionally great deals (I bought two and never paid more than $175 or so) on new or used RA2 Main Repeaters on eBay if you're patient. But you could also keep both and tie them together with Hubitat where needed. With how expensive RA2 switches and dimmers are, you might come out on top even needing an extra Pro Bridge on top.
Depending on your use case, it may be worth it to have a Caseta Pro bridge.
Potentially save some money, put the Caseta devices in out of the way places, use Hubitat to connect with any RadioRA 2 devices via scenes or keypad buttons.
Caseta Pro bridge is a good hub for adding Picos. a) if you are approaching the device limit on your RadioRA 2 main repeater(s), and/or b) If you are using Picos and Hubitat logic then there is a potential performance issue with slight delays of light response. The Picos are transmitters only and there can be communication delays as the path becomes Pico -> RadioRA 2 main repeater -> Hubitat -> RadioRA 2 main repeater -> RadioRA 2 dimmer. Putting the Picos on the Caseta bridge is one way of minimizing delays. (The better IMO is to program the scene in Lutron software to a phantom button and call the button in Hubitat.)
 You guys gotta talk slow for some of us simple humans.