Does anyone know how to put the time a switch (zen16) (used to control a valve) is set for into the dashboard tile so the countdown time is displayed and watched?
For example, if a switch on the zen16 is controlling valve 1 of the sprinklers for say 8 min., how can we put that min value in the dashboard for the zen 16 switch tile?
Sorry I don't know how else to explain it. Thanks
As I understand it, you want a count down to appear on the dashboard that represents how much time is left until the switch is turned off automatically.
There are more than one way to do this, but here is how I would:
Step 1: Create an Integer Hub Variable (Settings -> Hub Variables)
Step 2: Add the switch and variable to a dashboard
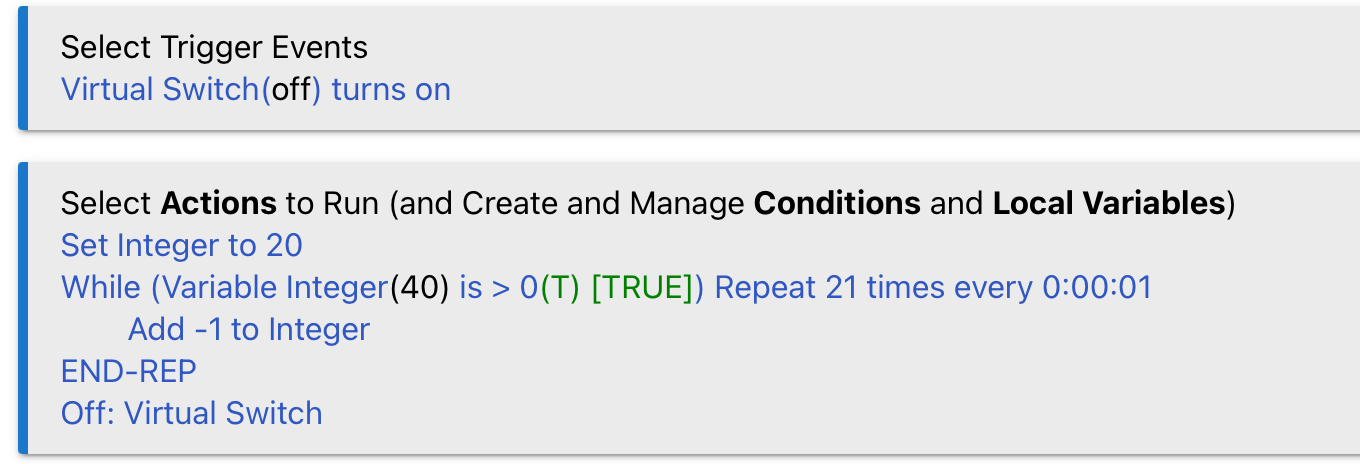
Step 3: Create the following rule. Replace « Integer » with the variable you created in step 1, and « Virtual Switch » with the switch you want to link to the count down:
Thanks, I will give it a try. Am I correct in that the number 20 would be the minutes set for a particular valve to be on?
1 Like
Does the driver update the countdown in an attribute, or just tell you how long it will run for?
If you need to create your own countdown, do as Sebastien said as one method. Make the variable a connector, and then you can put it on a dashboard using a variable number tile, after adding it to the dashboard device list.
If the driver provides the changing countdown attribute, just use the attribute template for the zen16 device and choose the attribute to display.
1 Like
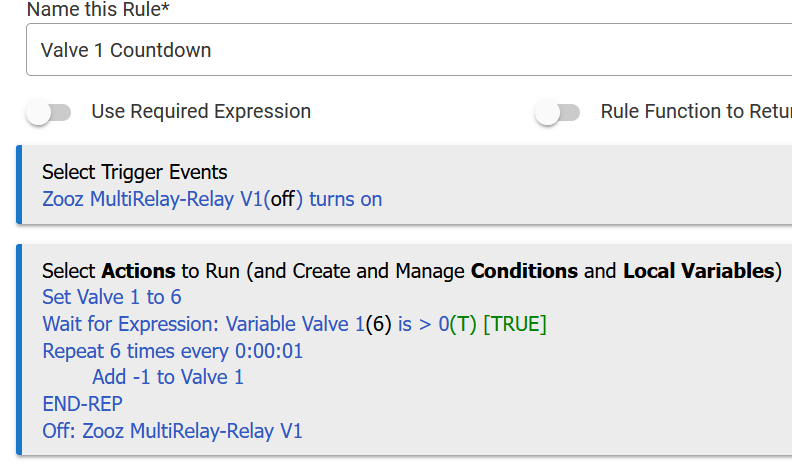
Here is the rule I made from @Sebastien showed me. Is it correct and one other thing, is this rule going to affect the turning ON or OFF of the switch because I already have a rule for that.
Also I am running valve 1 for 5 minutes. Do I simply remove the Off in the last step?
@user2574 , I am not sure how to answer but I am trying to see the time set for that valve, in say the top left corner of the tile, then when the valve turns On I would like to see it count down ex. 5 to 0 and then reset it back it back to 5 for the next time the valve opens.
If you use a variable connector, you can also use the variable tile to set the countdown, as you can enter the number into it via the dashboard.
So, in your rules, Set Value 1 to 6 would become Set Value 1 to "value of the variable." You would need to set a rule variable first to save what number is currently in the hub variable, so you can set it back to that after the countdown is done.
At the end, set the hub variable back to what you saved for the value it had before counting down. Then you could change that hub variable value anytime on the dashboard, and the next countdown will start from that number instead, and then return it to that number when done.
I think this would be easier in Webcore, if you have ever used that app for automations.
Edit:
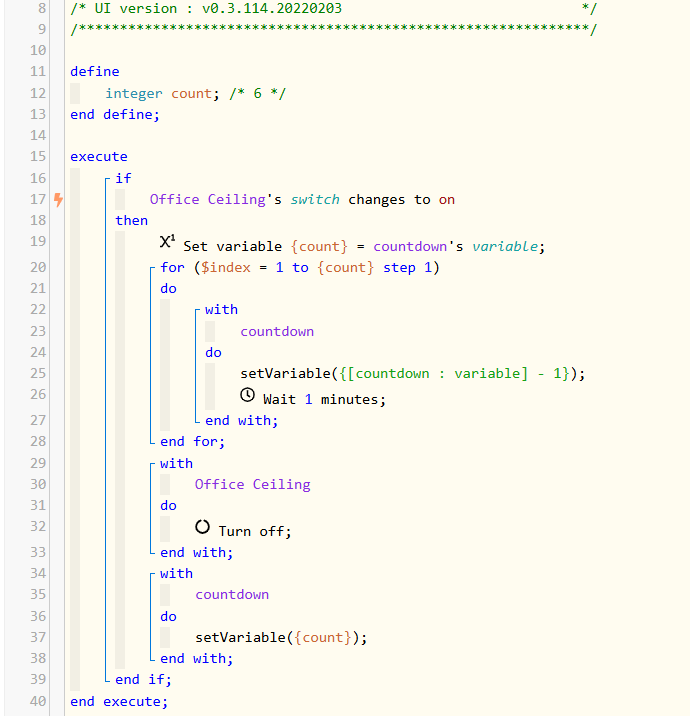
Here is a webcore piston that does what you want. countdown is a hub variable connector (a device with a variable attribute).
- trigger from office ceiling turning on
- set the local variable count to the current value of the hub variable
- Run a for loop for as many iterations as the value in the hub variable and subtract 1 each time
- pause one minute on each loop and update the hub variable to that value
- Loop done - turn off the light
- return the hub variable to what it was set to before
Each app/rule run separately, so they typically won’t impact each other, unless you specifically set them to in some way.
In this case, the rule sets the relay to off in this rule, so it if it also sets it to off in the other rule, it will get 2 off signals, which isn’t a problem.
Removing the « off » at the end is ok, as long as something else turns it off in a similar timeframe (that matches your timer).
The best way to know for sure is to try it. That is what I did for the rule above - I set it up using virtual variables to see how it would behave.
@Sebastien @user2574 Thanks guys. I am going to try both, but maybe in a few days, kind of under the weather so to speak. But I will report back.
2 Likes
You might find you like Webcore better than rule machine, but there is a learning curve. What I posted will not be clear how to do in Webcore at first. What I like about Webcore is how it presents the logic to you in a very readable, code-like form, even though most everything is selected with drop-downs.
In the loop, I am setting the variable device countdown (created with the hub variable connector) by assigning the variable attribute in the device to its current value minus one. I did that with an expression, which you will see you have a dropdown option for. Expressions let you do more complex things by manually typing what you want to do. That line for set Variable is done with "Add an action", Location, add a task, and select "setVariable". I use an expression to assign the variable, and countdown:variable is pulling the current value of the variable and subtracting one from it, so you just need to type that into the expression box.
If you have not made a connector before, you just click on "create" on the hub variables page under the connector column for the variable. Then select "variable" as the type in this case. You will then have a device named the same as your variable, with a variable attribute that you can set in the device page, or from the dashboard variable number tile.
1 Like

