@mbishop, handlePresenceEvent is called on parse method. It will be called on any ZigBee packet received by the hub for the Arrival Sensor. At minimum, while you are on battery, you will have power reporting once every 40 seconds. If there is an error in power reporting, it will skip that one packet. The next one will come 40 seconds later.
I believe the mystery is the timer is not started. If I can reproduce the issue, I can work on a fix.
Thanks for sharing this idea. I may give it a try. It still surprises me that this sensor could drain my battery (2018 Audi A7), but whatever.
@Sebastien, any advice before I dive into this? I don't consider myself a car guy, never even opened the fuse box, but am otherwise very comfortable working with electrical.
I would use a low voltage cut off module if you have concerns about battery drain. I have one on my dashcam. They are available on Amazon or from Ali express. The unit monitors your voltage level on your battery and if it goes below a certain threshold it will turn off the power feed to the device on its output. I think the one on my dashcam cut off threshold is about 12.3Vdc.
@mluck, Just FYI, the average consumption of the arrival sensor while it is not charging is around 30uA. This kind of consumption is not anywhere close to drain any a car battery.
Draining the car main battery is not my concern. It is just the Arrival Sensor is designed to take advantage knowing whether the car has started (therefore, it will topping up its own battery while the car is running). I also make the sensor more aggressive in sending data back to the hub when the car is powered on.
Most automotive service manuals use 20 milliamps as the threshold for normal vs parasitic draw. In other words, anything less than 20ma from the whole vehicle is perfectly acceptable. 30uA is nothing, even adding it to the normal vehicle draw.
It is very doubtful this sensor could have drained a battery that quickly.
It may be time for a battery. Most batteries only last about 4-5 years, and you are close to that. I would have it checked just in case.
If you don't think spousal satisfaction is a key consideration in Home Automation, you must not be married. I overheard my wife telling a friend, "I get so annoyed with his constant tinkering with the automation. But then I go to someone else's house, walk into the bathroom, and it takes me a second standing in the dark to realize I need to look for the light switch. Like, what barbarity is this?"
@mbishop, thank you for the additional information. Let me think about it. My hubitat dev hub died. I would not be able to try this at my home. But, your explanation perfectly make sense to me.
In this is the case, let me see if I can fix something in the configure logic. I think the recommendation is to click configure in the case a user change driver. I think it is more appropriate during this method, we start a timer if the presence attribute is present.
It has been pretty straightforward for me on a couple of Nissans and a Chevy truck. To be on the safe side, you can unplug the red (+) connector on the battery. You could do it at the same time as when you change the battery to combine both events… But you may want to confirm that you have a switched « outlet » before you do this. It is not always clear which are switched and which are always on.
The most difficult part I find is passing the cable in the frame of the car by removing some of the inside panels. I’m always afraid I’ll break something, but never did…
I have a couple information that may be beneficial for us.
First, I am aware that some of us here use Zigbee2MQTT to handle our ZIgBee devices. I just want to let you know the incoming release for Z2M will include Arrival Sensor converter. If I am not mistaken, it should be release after 1.25.1.
What this mean is you can pair Arrival Sensor to Z2M natively. You just can start pairing in Z2M. The Arrival Sensor should be discovered and the driver will be automatically paired.
The second information is I discover that Z2M has a little quirk that may be beneficial for Arrival Sensor use case. Z2M with TI ZIgBee stack is capable to duplicate a ZIgBee Coordinator to a different physical stick. Z2M is able to replace a broken stick with a new one without re-pairing. This technique can be used to duplicate information of one coordinator into another.
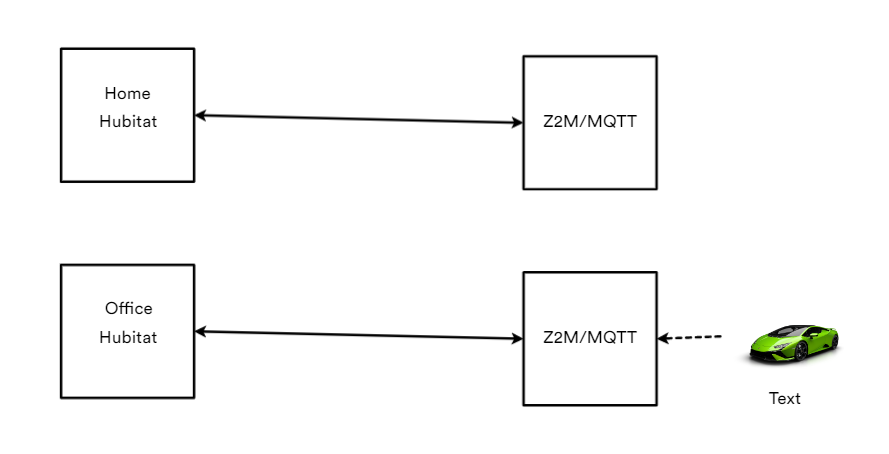
Knowing the above, what is the benefit for us? Some us may have multiple location with its own separate home automation. Perhaps, we have home and office HA system. Wouldn't it be nice if Arrival Sensor can be paired to both locations? The Arrival Sensor can hop from one location to another seamlessly without needing to be re-paired. We can track whether our car is in either location. While near those locations, we can setup automation to help protect the car.
This is an early test. I have a video to demonstrate how it work. I apologize that the video is a bit longer than I wanted. I am sorry if you seen fragments of your non preferable hub in the video. Those are my test environment. My intention is to share a knowledge of what is possible. It is not my intention to open a discussion about one hub versus another. Z2M is a HA neutral Zigbee eco system which we can use with Hubitat through MQTT.
I will make separate post on how I am able to duplicate ZigBee Coordinator in 2 Z2M system.
Thanks @aaiyar. I am going to share how I am setting mine up in Z2M. Let me gather those information and post it here. I will definitely share the information so that the idea can be tested to those who are interested in such scenario.
***NOTE: The following information is not a mandatory to use Arrival Sensor with Hubitat. Arrival Sensor can be paired directly to Hubitat without Zigbee2MQTT. This post is intended for those who have hubitat at multiple location and need the Arrival Sensor move automatically between locations. This is more of an experimental configuration which may be beneficial for some of us ***
I will not cover how I pair my Arrival Sensor to Zigbee2MQTT. It should be very trivial especially once the converter for Arrival Sensor will be built in to the Z2M. We will be skipping to the point where you have 2 Z2M hub at different locations and one of them as Arrival Sensor has already paired.
WARNING: I would not make a duplicate coordinator to existing Z2M mesh. The ZigBee mesh where you duplicate the coordinator will need to re-pair its existing devices if you do so. I would start with a fresh Z2M mesh on the destination. I am giving this warning for convenience. I want to make sure that you don’t get to position where your have a lot of device paired and need pairing again
The above steps do not create a duplicate ZigBee environment. Each Z2M can have different devices paired to it. However, each hub will have the same ZigBee coordinator.
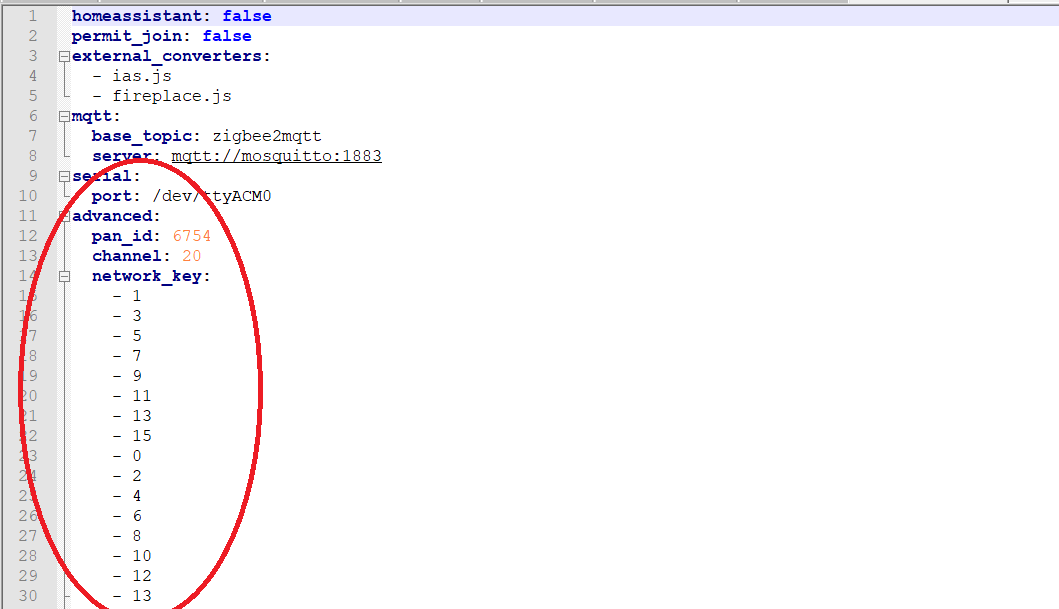
There are 3 files in Z2M that we need to edit.
the configuration.yaml of both Z2M mesh have to have the following information circled the same. Please note the network key will be unique on your system. My network key is just a test. You do not need to copy mine exactly. You just have to have the same key on both of Z2M mesh.
You can make make a copy of your coordinator_backup.json to your Z2M instance where you intent to make a duplicate Z2M coordinator. I am not sure whether this is a necessary step. I just think that I want to make sure that I make sure that I make as much copy as possible.
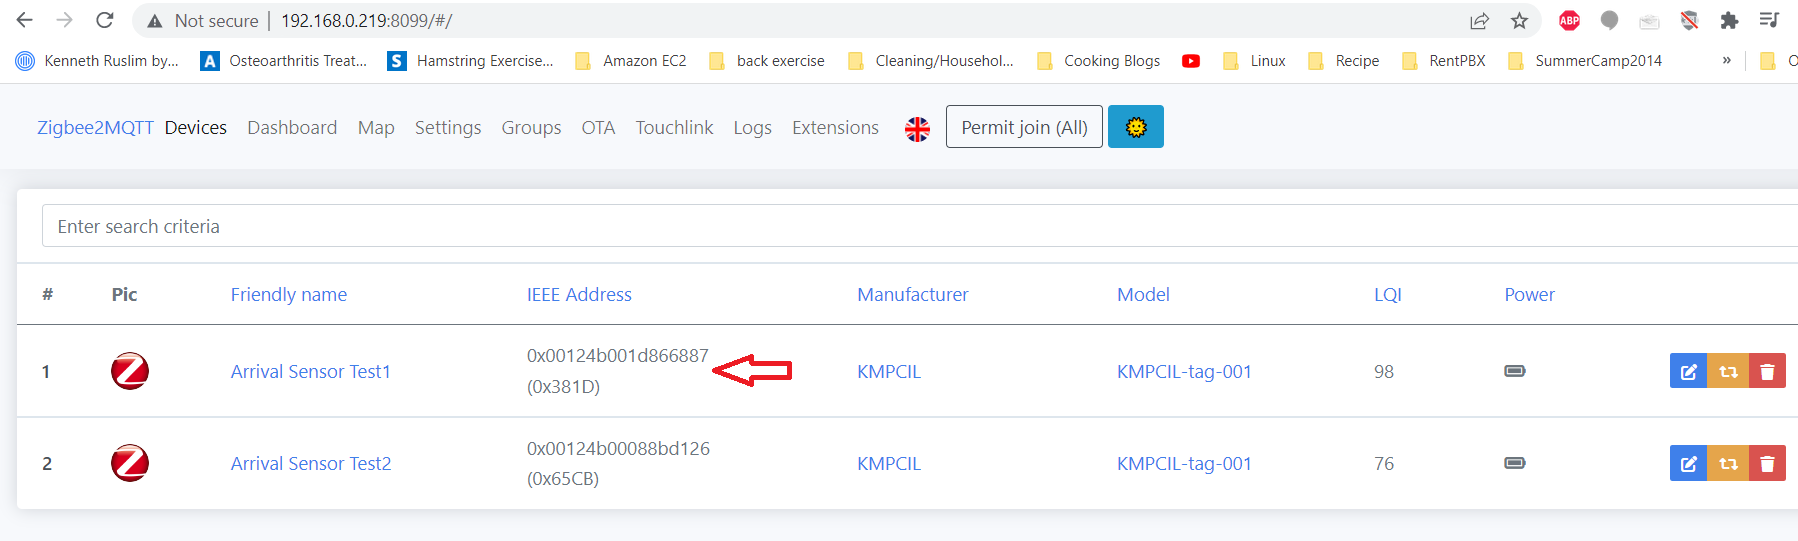
In the database.db file where you pair the Arrival Sensor, you will see something like the following entries. Please make a copy so that both Z2M have the same entries with the exception the id. You should adjust the entries so that they are not conflicting with your other devices.
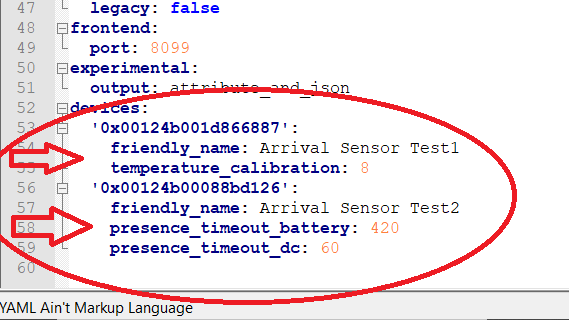
You also need to make a copy of the Arrival Sensor information in configuration.yaml.
TI stick is capable to copy a mac address to a device. Depending on TI CC25XX or C26XX, you may need use TI Flash or Flash2 to copy the mac address of the source coordinator stick to the destination. I only tested mine with CC2652P. I have SONOFF USB 3.0 plus dongle to test with.
Another Notes.
We must use the same ZigBee stick (perhaps only compatible with z-stack/TI stacks only). I use Sonoff USB 3.0 plus dongle on my hubs. I further recommend that the stick must be from the same model. CC2652X stick is probably not going to be compatible with CC253X.
Each Z2M must not be within reception of each other.
Each Z2M is its own independent instance. There is no sharing resources between hub. You will need to configure the automation independently from each other. It is only the sensor can joint on to the Z2M that is within its range.
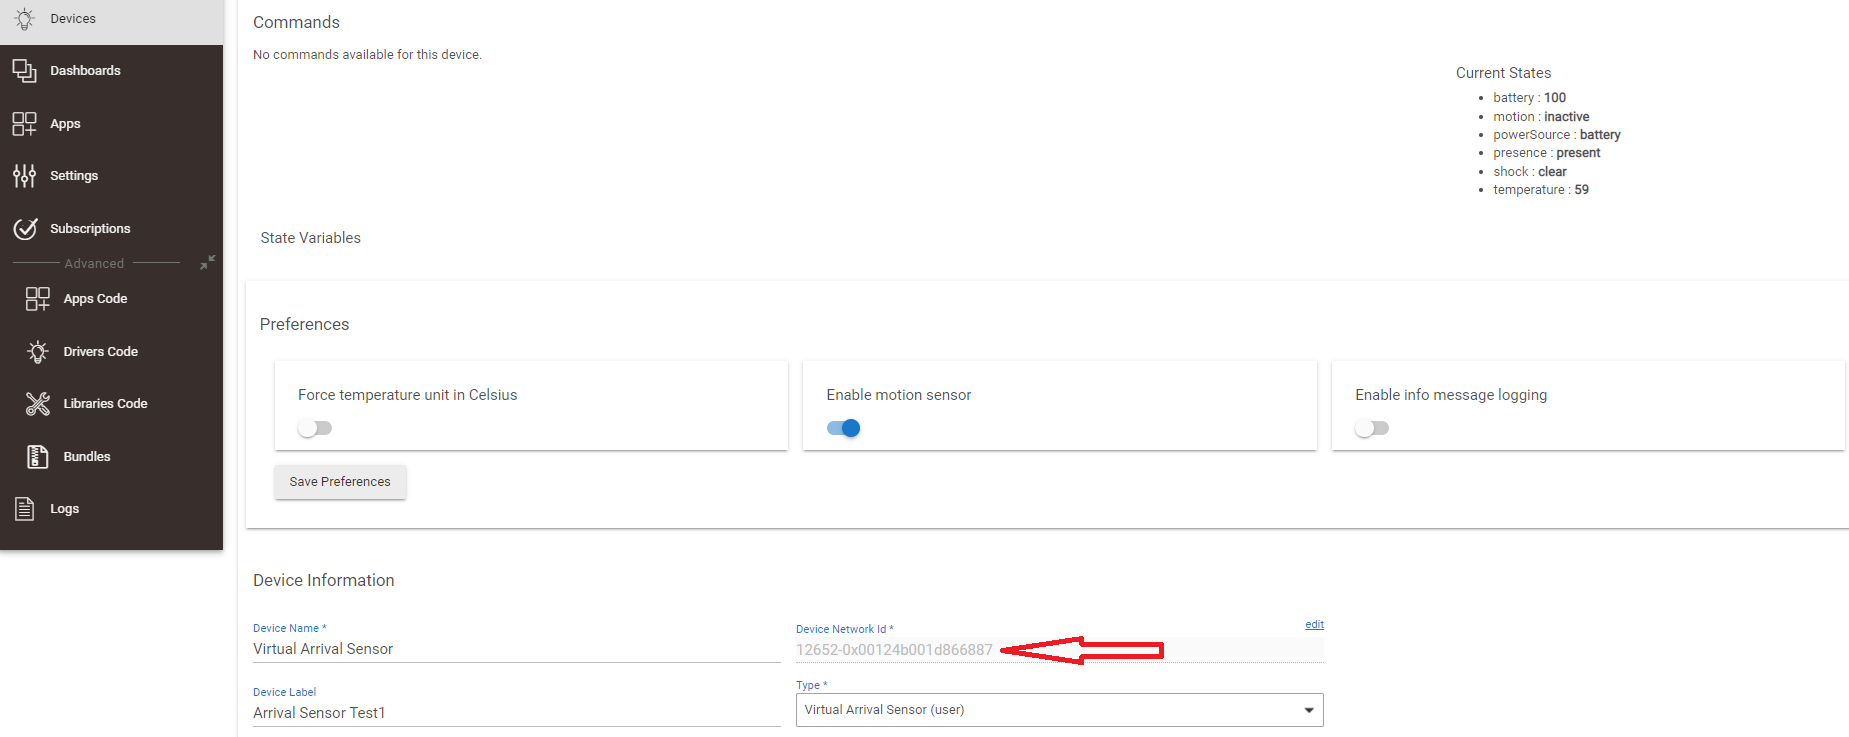
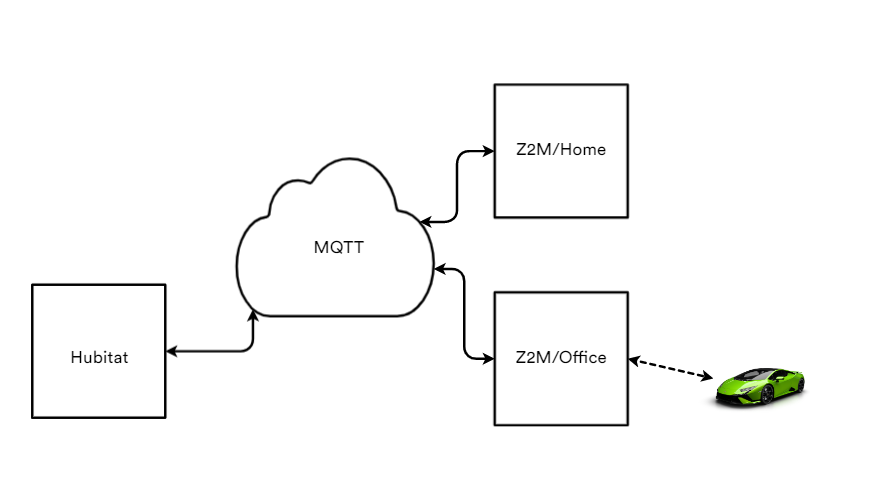
How are we going to bring the Arrival Sensor to our Hubitat? I make a set of App and DTH to make bring the the arrival sensor using MQTT to our hubitat. Z2M does not have automation capability. Hubitat is on the other hand is very strong with automation. We can bring the 2 worlds together using MQTT. It would look like just arrival sensor paired directly in Hubitat.
If you have 2 sets of Hubitat at different locations, you can setup a pair of local Hubitat + Z2M. As the car is near one of the location, its presence will be detect by the respective location system. You may setup any automation you like on each location.
Just to set the record straight for anyone that follows me: my dead car battery was definitely not caused by this awesome device. The problem was an old battery, which I've since replaced.
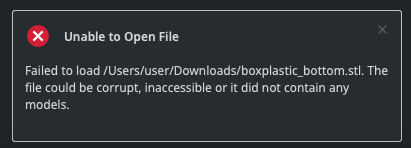
Has anybody successfully printed the case? Neither Iman nor I are 3D printing experts, but I figured how hard could it be. I took the two "small" STL files to my local library and they got the below error when importing boxplastic_bottom and boxplastic_top into their slicing software (Cura). Anybody have ideas or suggestions?