TKB zwave plug in socket driver

I'm migrating from Vera and have a lot of TKB Plug in switches and dimmers. They work fine on Hubitat using the Generic Zwave Switch/Dimmer drivers. But they have an LED on them that annoyingly is set to be On when the device is Off and vice versa. TKB apparently think this is sensible but as we have them controlling bedside lamps and the LED is quite bright it is not what we want. It is configurable by parameter #1 and in Vera I could access this, but with the generic drivers on Hubitat I can't.

Has anyone created a driver for these that can set this parameter, or is there any other way I can get access to change it? I appreciate that being In the UK I am using kit that not many others will be aware of, and am happy to try to write my own device driver, if I only knew where to start!

I am a little confused. What drivers were chosen for you at discovery? If it was the generic z-wave outlet driver, you could try changing it to generic z-wave dimmer or switch, both of which have an indicator light preference.

Or, are you using the dimmer/switch driver and the preference selection is not functioning as you'd like it to? Also, if you could post model numbers, that may help in finding a solution.

Sorry, you're right, I should have explained it more fully.

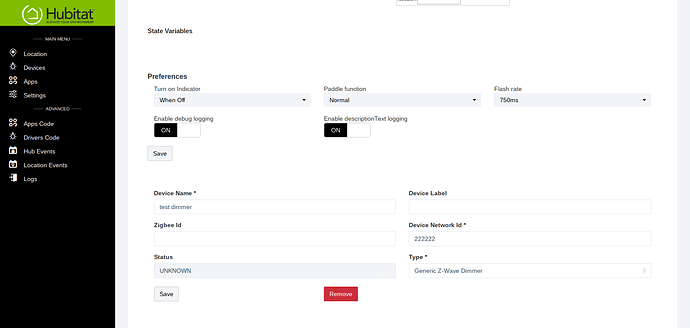
The devices I am using are TKB TZ68E plug in switches and TKB TZ67E plug in dimmers. Neither had any device automatically allocated to them on initial setup, so I selected Generic Zwave Switch and Generic Zwave Dimmer respectively. They work fine with those drivers. I did see the Indicator On/Off option and tried it but it made no difference. As a very raw Hubitat newbie, I wasn't even 100% sure if that was to change the unit's LED or just for how it was displayed in Hubitat.

Now that I know that is definitely for the device LED, I have just tried it again but it has no effect on the LED operation on the TKBs. Whichever option I select, On, Off or Never, the LED is on when it's off and vice versa.

1 Like

And just to confirm, after saving the new driver and after saving the preference change, you are clicking the configure button?

Yes I am.

Well darn! I found this Smartthings DTH for the TZ68E. You could try porting it to Hubitat to see if it works. Unfortunately, I am not a coder, so the steps needed beyond replacing physicalgraph with hubitat are beyond me. I'll keep looking to see if I can find something for the TZ67E.

1 Like

You, Sir are a star and I am now officially a coder!

So I copied the DTH you linked to, changed all physicalgraph to hubitat (Is conversion from ST to Hubitat really that simple?) and braced myself as I hit save in device code area. It gave an error to do with "MultiInstanceCmdEncap" in line 131. So as ignorance is bliss I just deleted that area of code and it then saved OK. I then switched one of my TX68E devices to use that DTH and loaded OK. I clicked the "Indicator when on" button and it worked - LED only on when device on :smile: It still switches on and off OK, but I must admit to being a bit nervous about just deleting a chunk of code with no idea what it did. I will monitor it to see how it goes. I have noticed that as well as the switch on or off entries in the device events it also shows dimmed % commands so I wonder if the DTH is designed to work with both switches and dimmers?

level 0 % Study dimmed 0% DEVICE 2018-06-10 5:48:23.568 PM BST
level 0 % Study dimmed 0% DEVICE 2018-06-10 5:48:23.523 PM BST
switch off DEVICE 2018-06-10 5:48:23.522 PM BST
level 255 % Study dimmed 100% DEVICE 2018-06-10 5:48:12.271 PM BST
level 255 % Study dimmed 100% DEVICE 2018-06-10 5:48:12.176 PM BST
switch on DEVICE 2018-06-10 5:48:12.175 PM BST
2 Likes

That would be too easy if it works for both.:wink:

You were right, it doesn't work as a dimmer.

But the good news is I can still select the new DTH for the dimmers temporarily, set the LED status and then revert back to Generic Zwave Dimmer and the LED function remains. In fact I've now revered to the Generic Zwave switch for the switches too as I don't trust my "bodged" DTH as a permanent solution. But, I have the LEDs as I want now and for any new units, I'll just use the DTH to code the LED first.

Thanks for your help :+1:

1 Like

Do you have a copy of the code you used in Hubitat?

I would like to do this as it's confusing having the LED the opposite to how we had it in ST

This is the driver I bodged (sorry, I mean expertly re-coded!) to work with HE. It does the job to switch the LED mode, but I always then switch back to the correct generic driver when I've set the LED up. Unless you factory reset the unit, the LED stays coded as you set it with this driver.

/**
 *  TKBHOME Z-Wave Plug - TZ68E
 *
 *  Copyright 2016 Soon Chye
 *
 *  Unless required by applicable law or agreed to in writing, software distributed under the License is distributed
 *  on an "AS IS" BASIS, WITHOUT WARRANTIES OR CONDITIONS OF ANY KIND, either express or implied. See the License
 *  for the specific language governing permissions and limitations under the License.
 *
 *  By default the LED is set to 'Night-Light' mode, which means the LED is ON when the device is OFF. 
 *  To change this so the LED is OFF when the device is OFF, set parameter 1 to 1.
 *
 *  Ver1.0 - First release
 * 
 */

metadata {
        definition (name: "TKB Z-Wave Plug (TZ68E) GT1", namespace: "GT", author: "GT") {
                capability "Switch"
                capability "Refresh"
                capability "Indicator"
                
                command		"led"
                command		"configure"
                command		"reset"
                
                fingerprint deviceId: "0x1001", inClusters: "0x5E, 0x86, 0x72, 0x5A, 0x73, 0x85, 0x59, 0x25, 0x20, 0x27, 0x70, 0x7A", outClusters: ""
        }

        simulator {
                // These show up in the IDE simulator "messages" drop-down to test sending event messages to your device handler
                status "basic report on"                 : zwave.basicV1.basicReport(value:0xFF).incomingMessage()
                status "basic report off"                : zwave.basicV1.basicReport(value:0).incomingMessage()
                status "basic set on"                    : zwave.basicV1.basicSet(value:0xFF).incomingMessage()

                // turn on            
                reply "2001FF,delay 5000,2002": "command: 2503, payload: FF"

                // turn off
                reply "200100,delay 5000,2002": "command: 2503, payload: 00"                
        }

        
}

def parse(String description) {
        def result = null
        def cmd = zwave.parse(description, [0x60: 3])
        if (cmd) {
                result = zwaveEvent(cmd)
                log.debug "Parsed ${cmd} to ${result.inspect()}"
        } else {
                log.debug "Non-parsed event: ${description}"
        }
        result
}

def zwaveEvent(hubitat.zwave.commands.basicv1.BasicReport cmd)
{
        def result = []
        result << createEvent(name:"switch", value: cmd.value ? "on" : "off")
        
        result
}

def zwaveEvent(hubitat.zwave.commands.switchbinaryv1.SwitchBinaryReport cmd)
{
        createEvent(name:"switch", value: cmd.value ? "on" : "off")
}

def zwaveEvent(hubitat.zwave.commands.configurationv1.ConfigurationReport cmd) {
	log "here"
	def value = "when off"
	if (cmd.configurationValue[1] == 0) {value = "when on"}
	if (cmd.configurationValue[1] == 1) {value = "when off"}
	[name: "indicatorStatus", value: value, display: false]
}

def zwaveEvent(hubitat.zwave.commands.associationv2.AssociationReport cmd) {
        def result = []
        if (cmd.nodeId.any { it == zwaveHubNodeId }) {
                result << createEvent(descriptionText: "$device.displayName is associated in group ${cmd.groupingIdentifier}")
        } else if (cmd.groupingIdentifier == 1) {
                // We're not associated properly to group 1, set association
                result << createEvent(descriptionText: "Associating $device.displayName in group ${cmd.groupingIdentifier}")
                result << response(zwave.associationV1.associationSet(groupingIdentifier:cmd.groupingIdentifier, nodeId:zwaveHubNodeId))
        }
        result
}

// Devices that support the Security command class can send messages in an encrypted form;
// they arrive wrapped in a SecurityMessageEncapsulation command and must be unencapsulated
def zwaveEvent(hubitat.zwave.commands.securityv1.SecurityMessageEncapsulation cmd) {
        def encapsulatedCommand = cmd.encapsulatedCommand([0x98: 1, 0x20: 1]) // can specify command class versions here like in zwave.parse
        if (encapsulatedCommand) {
                return zwaveEvent(encapsulatedCommand)
        }
}


def zwaveEvent(hubitat.zwave.Command cmd) {
        createEvent(descriptionText: "${device.displayName}: ${cmd}")
}

def on() {
        delayBetween([
                zwave.basicV1.basicSet(value: 0xFF).format(),
                zwave.basicV1.basicGet().format()
        ])
}

def off() {
        delayBetween([
                zwave.basicV1.basicSet(value: 0x00).format(),
                zwave.basicV1.basicGet().format()
        ])
}

def refresh() {
		log.debug "Executing 'refresh'"
        // Some examples of Get commands
        delayBetween([
                zwave.switchBinaryV1.switchBinaryGet().format(),
                zwave.meterV2.meterGet(scale: 0).format(),      // get kWh
                zwave.basicV1.basicGet().format(),
        ], 1200)
}

// If you add the Polling capability to your device type, this command will be called approximately
// every 5 minutes to check the device's state
def poll() {
        zwave.basicV1.basicGet().format()
}

def indicatorWhenOff() {
	log.debug "indicatorWhenOff"
	//value 1, when outlet on - blue LED light on, when outlet off - blue LED light off
	sendEvent(name: "indicatorStatus", value: "when on", display: true)
	zwave.configurationV1.configurationSet(configurationValue: [1], parameterNumber: 1, size: 1).format()
}

def indicatorWhenOn() {
	log.debug "indicatorWhenOn'"
	//value 0, when outlet on - blue LED light off, when outlet off - blue LED light on
	sendEvent(name: "indicatorStatus", value: "when off", display: true)
	zwave.configurationV1.configurationSet(configurationValue: [0], parameterNumber: 1, size: 1).format()
}}
2 Likes

That works perfectly - any reason why you don't use this driver? It appears to work OK

It was the first driver that I had messed about with and I wasn't very confident there weren't any other issues with it, so I just switched back to be on the safe side. But it did seem to work OK.

Have you had any trouble getting any of these to pair?

I have paired 11 successfully but 3 are being stubborn! Have tried a number of excludes to make sure...

I don't remember having any issues with them. I guess you've tried resetting the problem ones (press the on/off button 3 times quickly then press and hold for 5 seconds until the LED goes out)?

1 Like

Took me a while to find the time to have another look at these, this worked a treat. Thanks a lot!

Super!

1 Like

I've been using the Aeotec Smart Switch 6 successfully with this device (I also have one of the Aeotecs) The power consumption reporting works properly with Aeotec driver (unlike generic Z-wave outlet). Can't change that stupid light behaviour though with it so nice work above!.

I have another few of these devices now that previously worked but since stopped working, I am unable to factory reset them doing the three press and long press - the LED stays on, has anyone else seen this?

I can't add them to Hubitat as nothing is found after multiple zwave includes

I had to do the on/off thing on mine 5 times before they reset ready for inclusion.