The Noob's (in)complete guide to CSS for Hubitat

Thank you very much for the detailed response. That's so much deeper than I thought it would be. I plugged it in quickly and made the changes I thought I'd need but it didn't work for me. Having said that I really have no idea what I'm doing but this tells me what I need to look at and learn. I'll dig in when I get some more time. Thanks again.

Has anyone used the Modal command to make a tile full screen when you click on it. Haven’t been able to figure that out.

@CAZ It is a bit to think about, but it's mostly the parts about having a square grid and using "!important" which are important to get right. Hope you get it working for you!

@albertsmark Not exactly sure which Modal command you're referring to? If I understand what you mean you're talking about a modal dialog in pure CSS? This would be complicated without having a tabindex set on the div. Without that, divs don't have the :focus and :focus-within events. The only way I know of to make this work would be with Javascript since we can't control the html in any other way. It might be possible to inject a div with a tabindex for certain types of tiles (like attribute) which allow input, but even then it wouldn't be easy to get it to work and look nice, but at least it should then be possible.

Example, make an attribute contain the below and create a tile with that attribute:
<div tabindex="-1">My prefs</div>

Then use code like this (this will not be on top, centered or anything like that, it's just to show the principle):
#tile-1 {
transition:height 0s 10s;
transition:width 0s 10s;
}
#tile-1:focus-within {
display: inline !important;
width: 300px;
height: 300px;
transition:width 0s;
transition:height 0s;
overflow: unset;
}

This will kind-of do what you want, but I really don't think it can be done nicely without javascript since we don't have the tabindex tag already in the html. Hope this helps.
There is a way to inject javascript, but that is not very user-friendly...

Is there a way to hide the hide the "Icon Helper Text" on a per tile basis instead of on a global "dashboard" basis?

Each tile has a unique way to target the CSS at it, that's what "#tile-1" is in the post right above yours. Use your browser's Web Inspector (for instance, in Chrome it's Right Click on tile > Inspect Element) to find out it's unique identifier

Hopefully this is a good enough example to demonstrate

Let's say I want to get rid of the word "Present" as the icon is good enough feedback for me

25

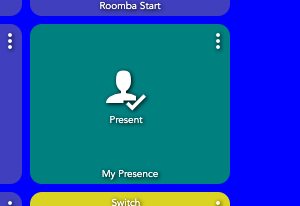
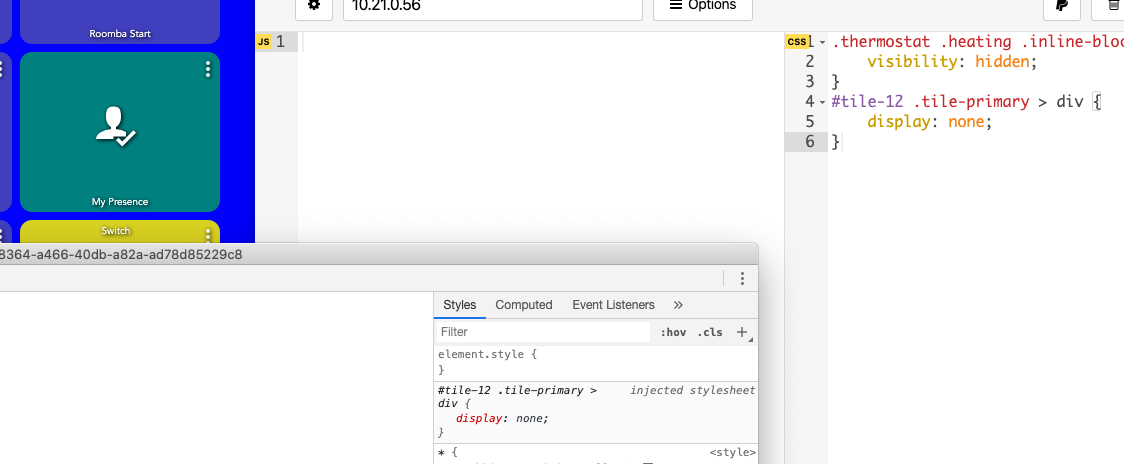
I right click on "Present", choose "Inspect Element" (in Chrome)

There it is highlighted, it is part of the div with the id of "tile-12", and this is the main HTML container for the tile.

Using some CSS to target it:

#tile-12 .tile-primary > div {
	display: none;
}

That says:
in the container identified as 'tile-12' find the container with the class name 'tile-primary' then find the direct descendent (the '>' sign) that is a div and do not show it

As you see, adios to the icon label

Here is more on Descendant selectors that explains it well:

5 Likes

Thank you!!

Another noob question. I'm trying to "Alias", or rename Dashboard tiles (IE: I have Dashboards based on the form factor... tablet, phone, etc) but want to simplify the Dashboard tile display name (IE: "Main" in lieu of "Main-Tablet"). The Dashboard display name is in the "tile-primary" element, but I have not been able to find a way to mask it and alias it with something else.

This isn't what you are looking for?

You'd want to display: none the generated text and then use ::after to put your own custom text.

There isn't anyway to do it automatically in CSS if I am understanding your post correctly

1 Like

The above post earlier in this thread is for tile-title, isn't that what you mean? tile-primary is where things like the temperature go. The label is in tile-title.

I have different Dashboard tiles based on the form factor (IE: iPhone, Tablet/Kiosk, etc). I dashboards based on have room groupings and each is named based on the form factor (IE: Kitchen and Utility Room - iPhone, Kitchen and Utility Room - Tablet). I then have a "Main" Dashboard that I can then launch the individual room group Dashboards via Dashboard tiles. I would like to change the display name of the Dashboard tiles to loose the form factor identifier or suffix. In this example I am trying to change "iPhone Main" to "Main"). The attached image is my first attempt:

This is the CSS that I used:

.tile-primary:after {
visibility: visible;
position: relative;
text-align: center;
left: 0;
right: 0;
bottom: 0;
white-space: pre-wrap;
}
#tile-19 .tile-primary {
visibility: hidden;
white-space: nowrap;
overflow: unset;
}

#tile-19 .tile-primary:after {
content: 'Main';
}

This is the tile elements:

I almost achieved the desired result, other than the new label is offset. I assume this is because it is appending the "tile-primary" element. Is there a way to "overlay" the "tile-primary" element, or should I be using another method?

Obviously, any and all suggestions are welcome!

Not tested, but if you use this instead of what you currently have for .tile-primary:after it should be centered:

.tile-primary:after {
visibility: visible;
position: absolute;
text-align: center;
right: 0;
white-space: pre-wrap;
width: 100%;
height: 100%;
}

Thank you. That got me closer. The label "Main" is now center aligned horizontally, but is top aligned vertically.

Any thoughts on how to get it center aligned vertically?

I'm admittedly way over my skis here.

I think you must have set something else somewhere, I tested what I posted, it worked for me, but here is another way which should override whatever else you've done to positioning:

.tile-primary:after {
visibility: visible;
position: absolute;
white-space: pre-wrap;
width: calc(100% - 8px);
height: 100%;
display: flex;
top: 0;
align-items: center;
justify-content: center;
}

I would also add this to make everything look nicer in general:

*, ::after, ::before {
    box-sizing: unset;
}

Ok, I've followed this thread closely but can't figure this out. Wish formatting in dashboard was much easier!

How do I get the title "All Leak Sensors" in the tile pictured below to wrap?

Here's the CSS I'm using:

Is this a title you set with :after, like this:

#tile-3 .tile-title:after {
    content: 'All Leak Sensors';
}

If not and this is the title that is there without CSS replacement, then you shouldn't refer to :after in the CSS. Since I don't know what else you're doing in your CSS this may be wrong, but try changing "white-space: no-wrap !important" to "white-space: pre-wrap !important".

If it is a title replaced with content, my post above has the correct CSS:

I did use :after

Tried the CSS from the post you linked but that messed up the formatting even more. I think I'll just make the tile wider and call it a day lol! Thanks for posting all this info for everyone!

Sorry it doesn't work, if you post your whole CSS it would be easier to troubleshoot, but if you're just increasing width that works as well! :slight_smile:

Here is the rest of the CSS, does this help?:

#tile-57 .tile-title {
visibility: hidden;
}
#tile-57 .tile-title:after {
content: 'All Leak Sensors';
}

Replace all CSS with this:

.tile-title::after {
    visibility: visible;
    position: absolute;
    text-align: center;
    left: inherit;
    right: 0;
    bottom: 0;
    white-space: pre-wrap;
}

#tile-57 .tile-title {
    visibility: hidden;
    white-space: nowrap !important;
    overflow: unset;
}
#tile-57 .tile-title:after {
    content: 'All Leak Sensor';
}