Sorry for the stupid question but here goes:
This whole subject is about 0-10v AC, right? Not DC?
There's a new product for 0-10v DC motor control. Not sure of the applications.
Yes I think people are most interested in the ZEN54 for AC. I suspect the ZEN53 (which I did not know existed) will function the exact same way just output is in DC.
1 Like
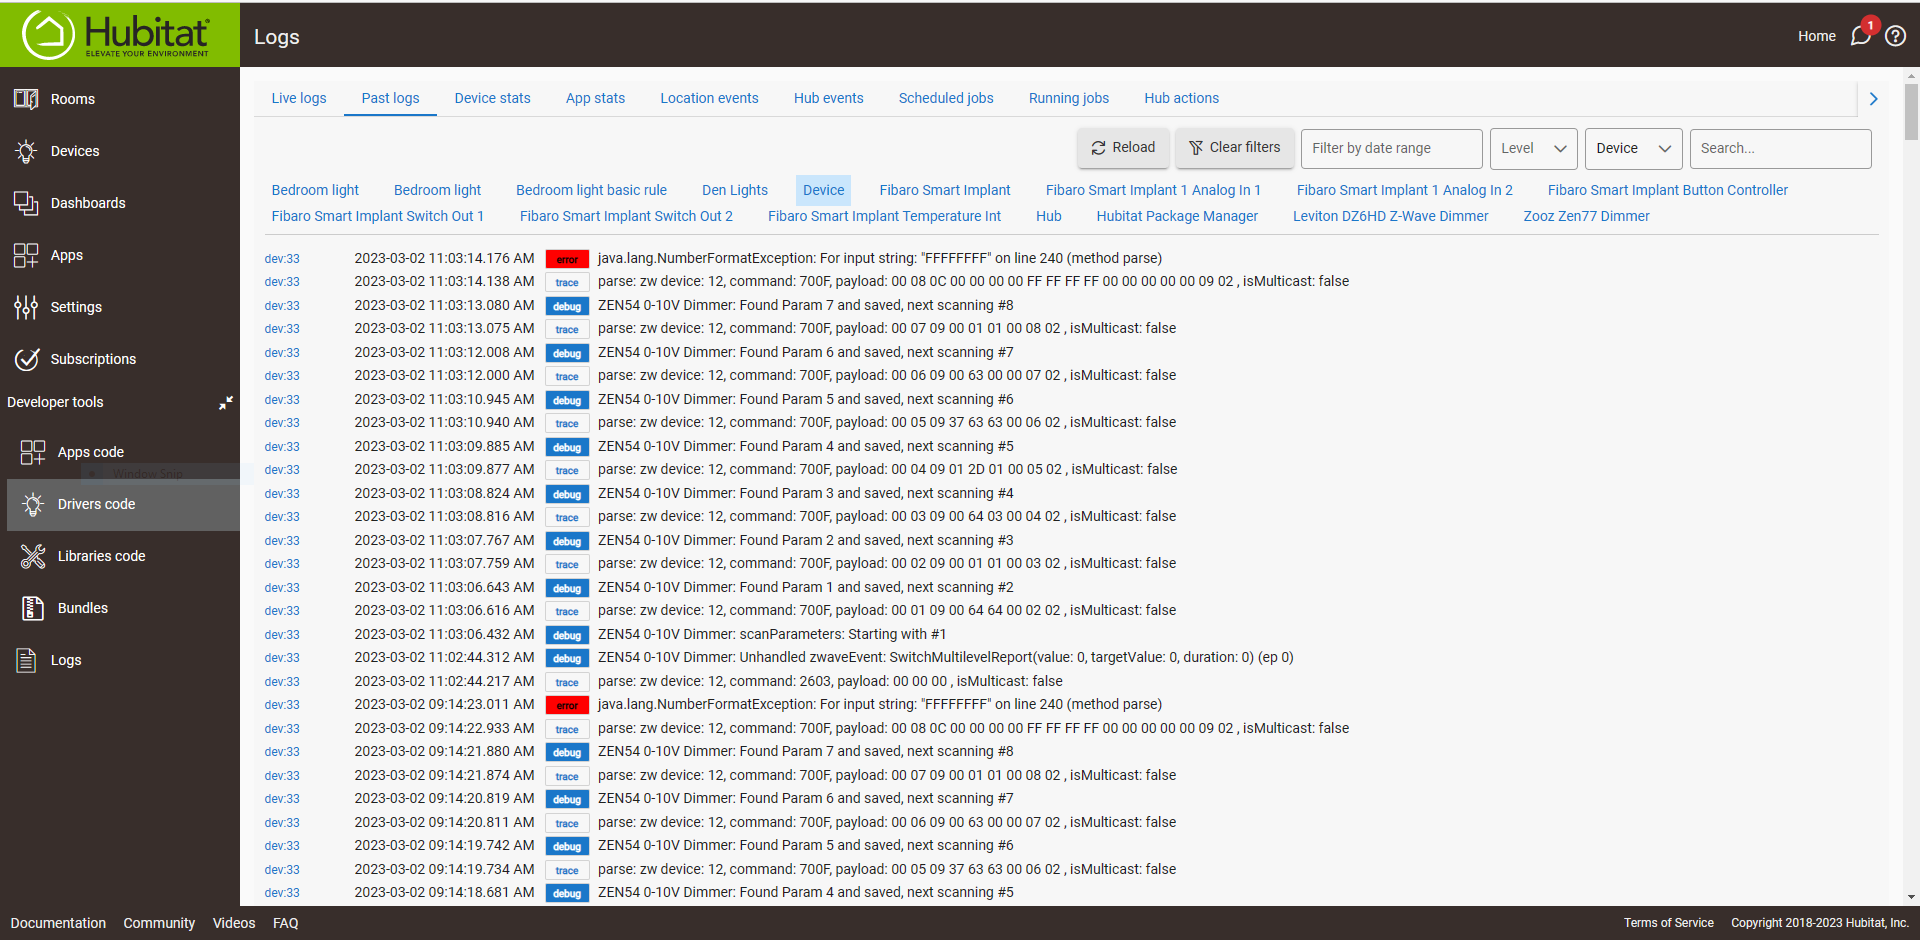
dev:332023-03-02 09:14:23.011 AMerrorjava.lang.NumberFormatException: For input string: "FFFFFFFF" on line 240 (method parse)
dev:332023-03-02 09:14:22.933 AMtraceparse: zw device: 12, command: 700F, payload: 00 08 0C 00 00 00 00 FF FF FF FF 00 00 00 00 00 09 02 , isMulticast: false
dev:332023-03-02 09:14:21.880 AMdebugZEN54 0-10V Dimmer: Found Param 7 and saved, next scanning #8
FYI... Zooz support recommends upgrading the ZEN54 firmware ASAP. I have not done that yet because I was unable to get it registered. Maybe it doesn't matter for this, but just wanted to let you know.
@user2164 sorry can you also show the trace log for the parameter 7 right before than, which worked. A screenshot is much easier to read than copy/paste also.
This could be why they want the firmware updated. I am guessing this is a malformed zwave message which is making the hubitat parse function error out.
Well good news, looks like I should have one of these in my hands before too long so a custom driver will be on its way shortly after that.
3 Likes
It turns out that the Zooz firmware download page doesn't show anything for the ZEN54. I'm waiting for a response from Zooz support to see if I'm on the wrong page, or if there actually isn't a firmware download available for the ZEN54.
Zooz support says there is no firmware update available for the ZEN54 at this time.
I used a Fluke 289 DMM with a 470 ohm dummy load.
The voltages were the same with and without the dummy load though.
This is what I got, very similar to what you measured:
0% 0.04v
10% 1.13v
20% 2.136v
30% 3.13v
40% 4.14v
50% 5.14v
60% 6.15v
70% 7.14v
80% 8.13v
90% 9.15v
100% (99% actual) 9.97v
Looks like there is a 0.13v - 0.14v offset when the output is on. No biggie though.
1 Like
The 54 is DC out, not AC.
I've been chatting with the CAD supplier who is saying the Zen54 and Zen53 will be available to order in a day or so. I'll order a few of them for testing once they list them in their catalogue. https://shophometechsolution.org/
Just curious on your comments regarding dummy loads. Is it typical for output to vary on 0-10V controls depending on what is connected? I saw some strange readings on the Leviton 0-10V dimmer. Then I got a PM from @Kyl on getting his fantech ecm fan working:
@Kyl did get his Fantech EC fan working using the wiring below, with what he figures is a 10V reference voltage added in (he'll post here with follow up pics)
Fantech red 10v reference AND Fantech yellow 0-10v input -> leviton purple +0-10v
Fantech 0-10v GND (blue) - > leviton -0-10v (grey)
It sure sounds like he had to run connect the Fantech +10V supply together with the +10V control leads on his fantech fan to get it working. This makes no sense to me...
The AC infinity fans work fine with the Leviton 0-10V dimmer, but at the low voltages (as in under .1 V) the fan speed seems to randomly wander up and down, enough to be noticeable in CFM output. I'm going to test with the Zooz 0-10v to see if I can refine that behaviour a bit.
I wanted to make sure that the voltage did not change with and without a load.
I chose 470 ohms as at 10 volts, a 500 ohm load would draw 20 mA and I chose that load sort of arbitrarily.
I knew (assumed) the power supply could deliver much more although not stated, but I am going to use these for driving the analog input of a VFD for a big fan speed control (2 h.p.), and I wanted to see if the voltage with and without a load would change and it doesn't change enough to be of a concern to me.
The 54 seems to use a programmable SMPS for the DC output, and sometimes these supplies change slightly with different loads.
1 Like
@user2164 @pomonabill220 @denwood
ZEN54 driver ready for testing.
1 Like
@jtp10181 , awesome. Should have two units in hand within a few days.
Just tried your driver and works like a dream!!!
Thank you for your work!
1 Like
@jtp10181 , the driver works perfectly...awesome work sir ![]()
I tested out the Zen54 Zooz zWave 0-10V dimmer on an AC Infinity 4" CloudLine EC fan and it works a treat. Here is how it is wired. The Zooz dimmer is small enough to fit into the Cloudline Fan housing if you remove a bit of the corner bracing plastic inside the housing.
If connecting a dumb switch to toggle the fan on/off you would connect the blue wire (SW) from the relay to one side of the switch (instead of directly to ground as I have it shown), and connect the other side of the switch back to the grey (ground) wire.

The Zen54 dimmer does a better job with these fans with respect to voltages, particularly at the the lower speeds where granularity under 1 volt makes a difference on finer fan speed control.
2 Likes
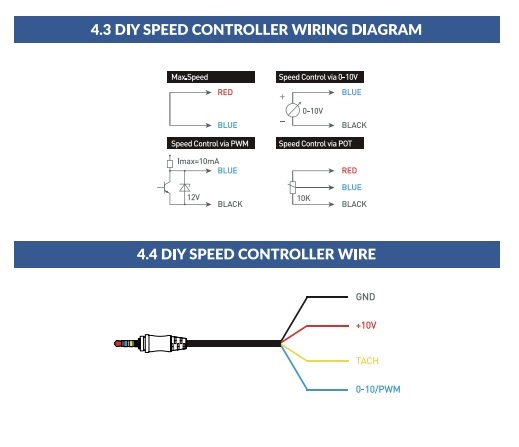
I can confirm that the TerraBloom EC fans work very nicely with the Zooz Zen54 0-10V dimmer.
Connect the Zooz Zen 54 grey wire to Terrabloom black wire (using their DIY wiring plug)
Connect Zooz Zen54 violet wire to Terrabloom blue wire (using their DIY wiring plug)
Terrabloom red and yellow wires are not connected.
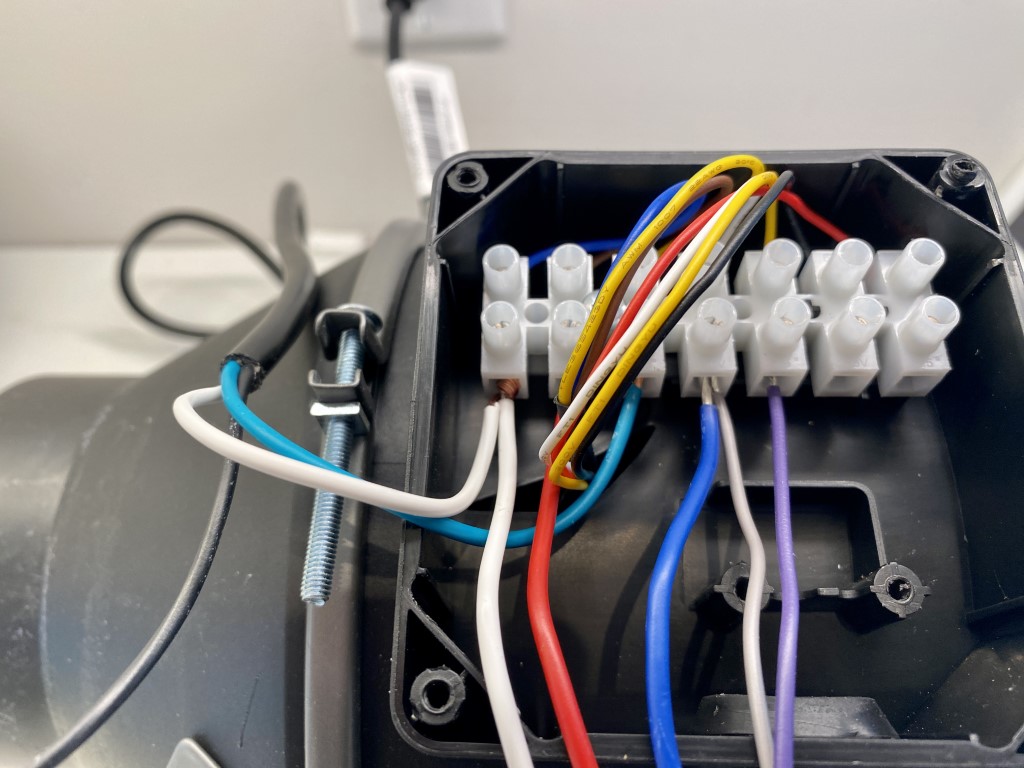
I’m using the Zen54 to automate the exhaust fan hood (terrabloom 6” fan with metal case) to the induction cook top. The fan turns on/off and ramps up or down depending on power use by the cooktop 
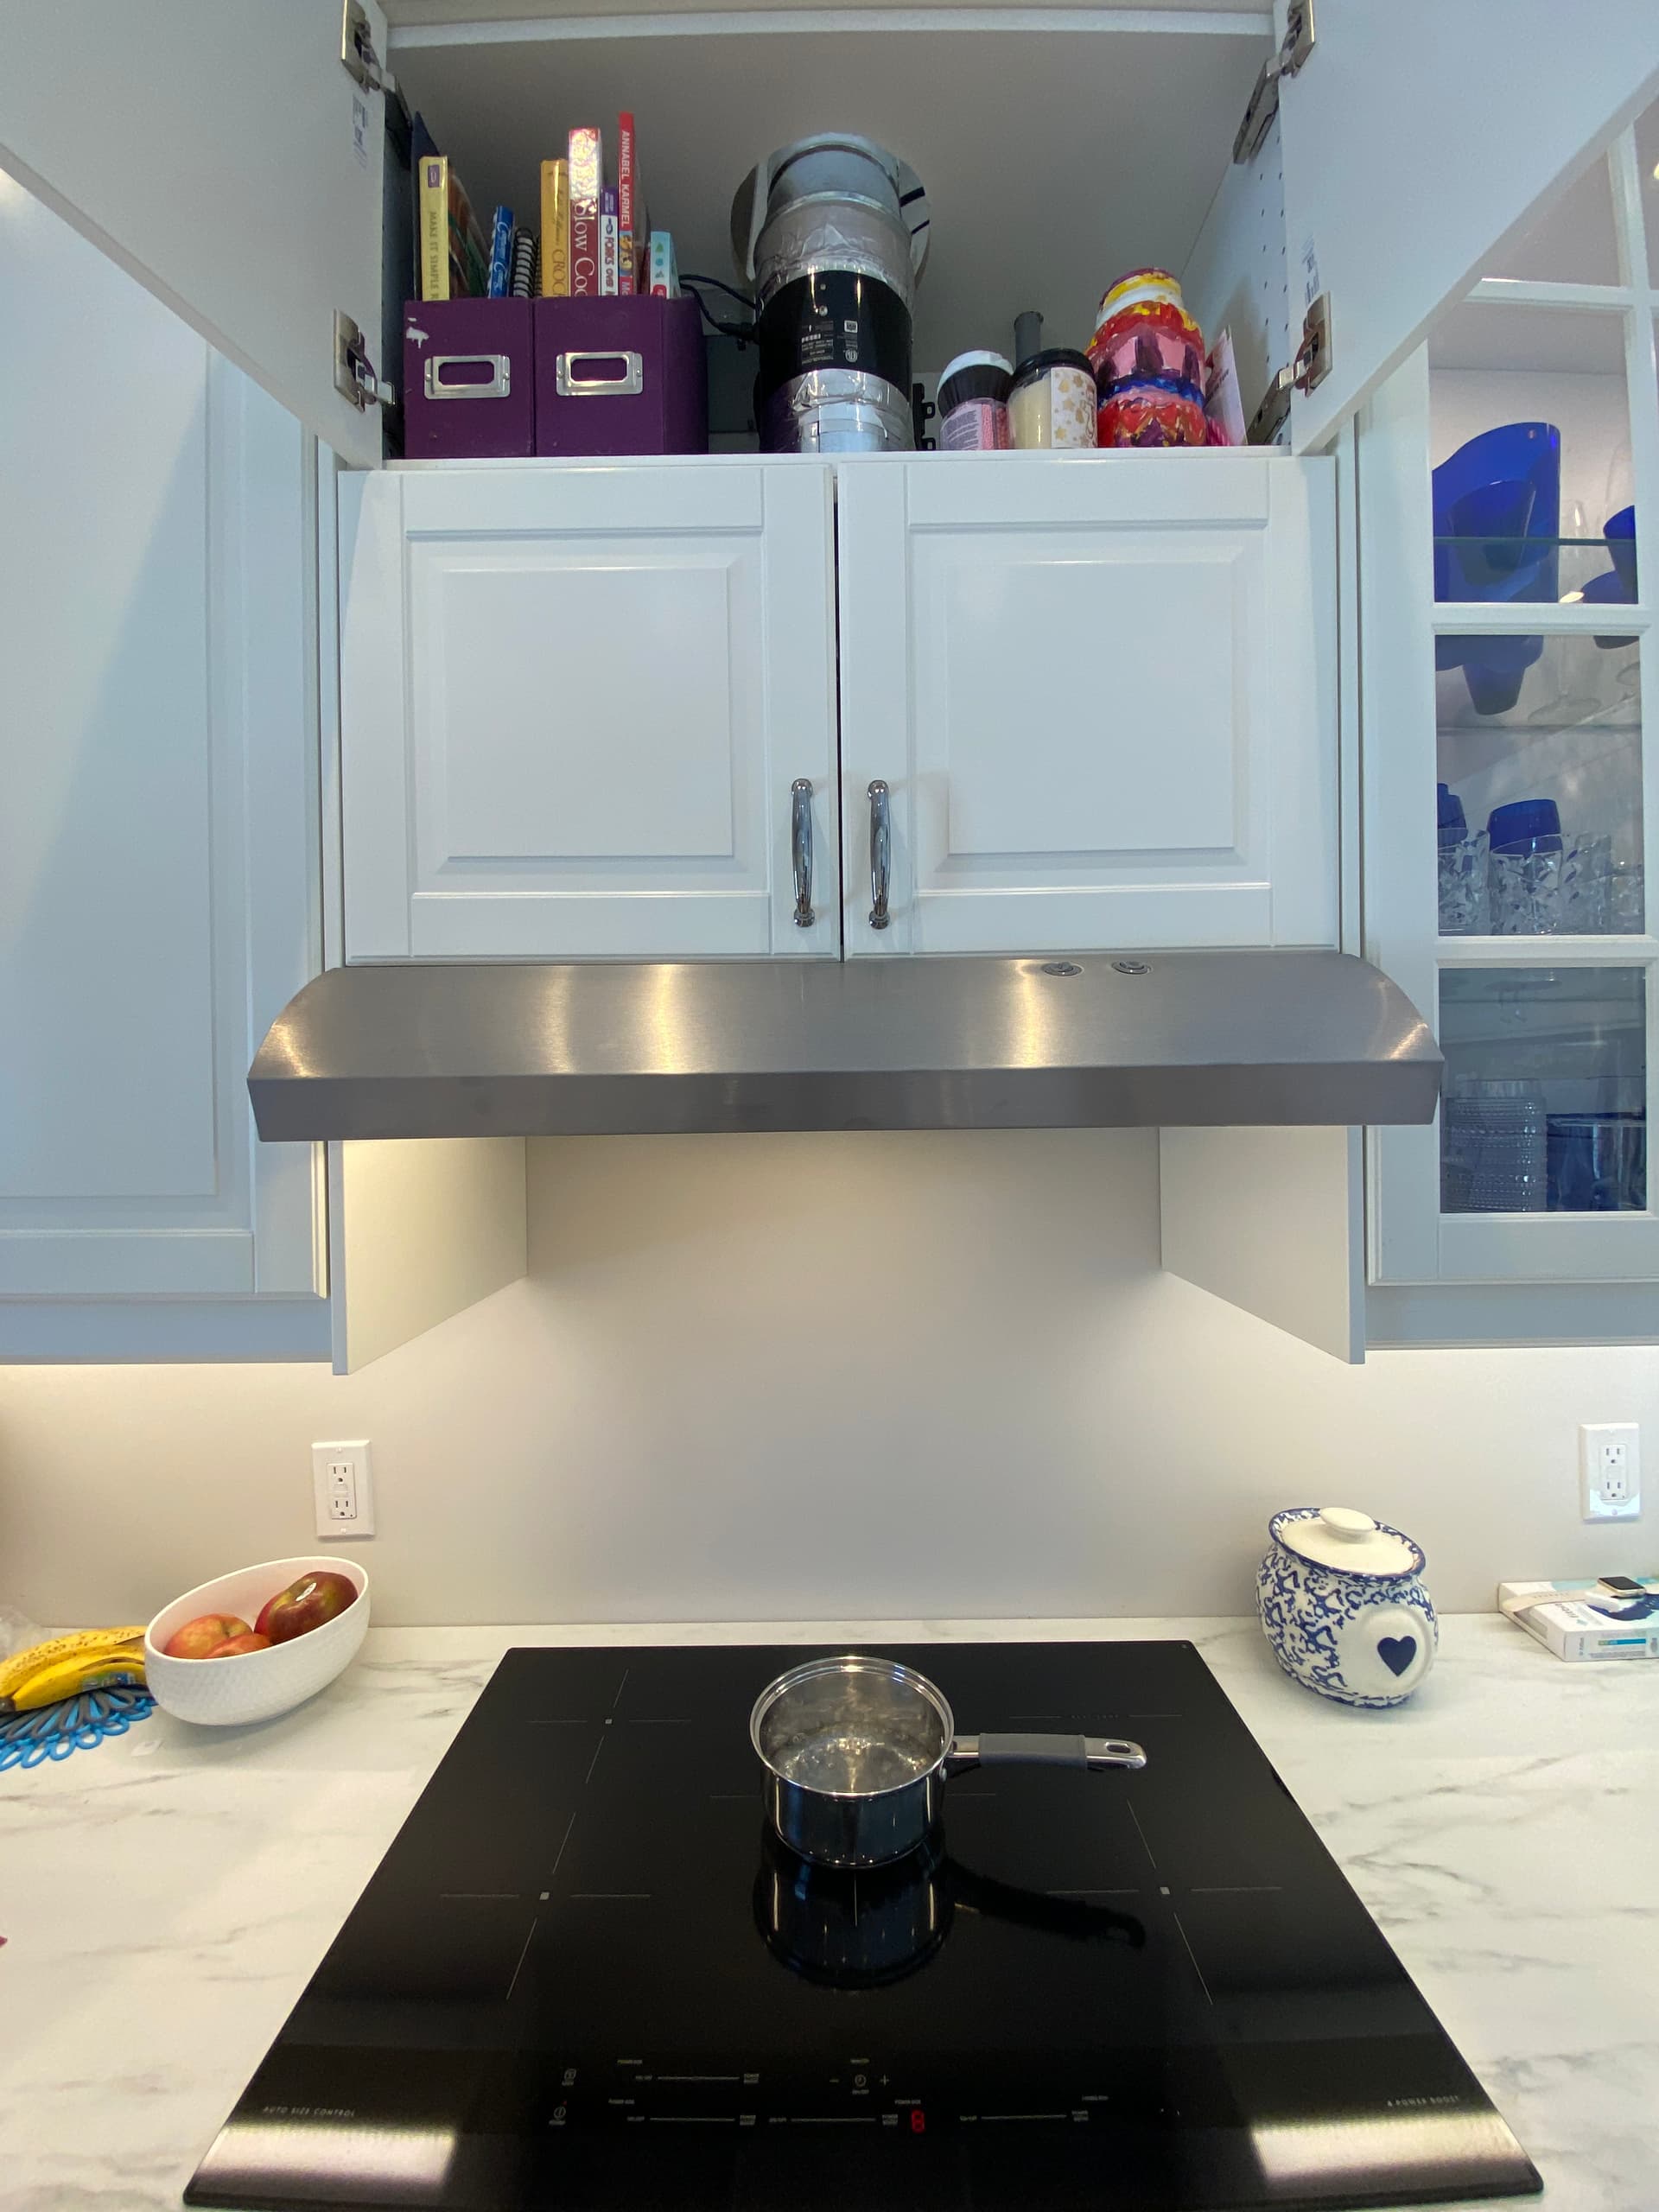
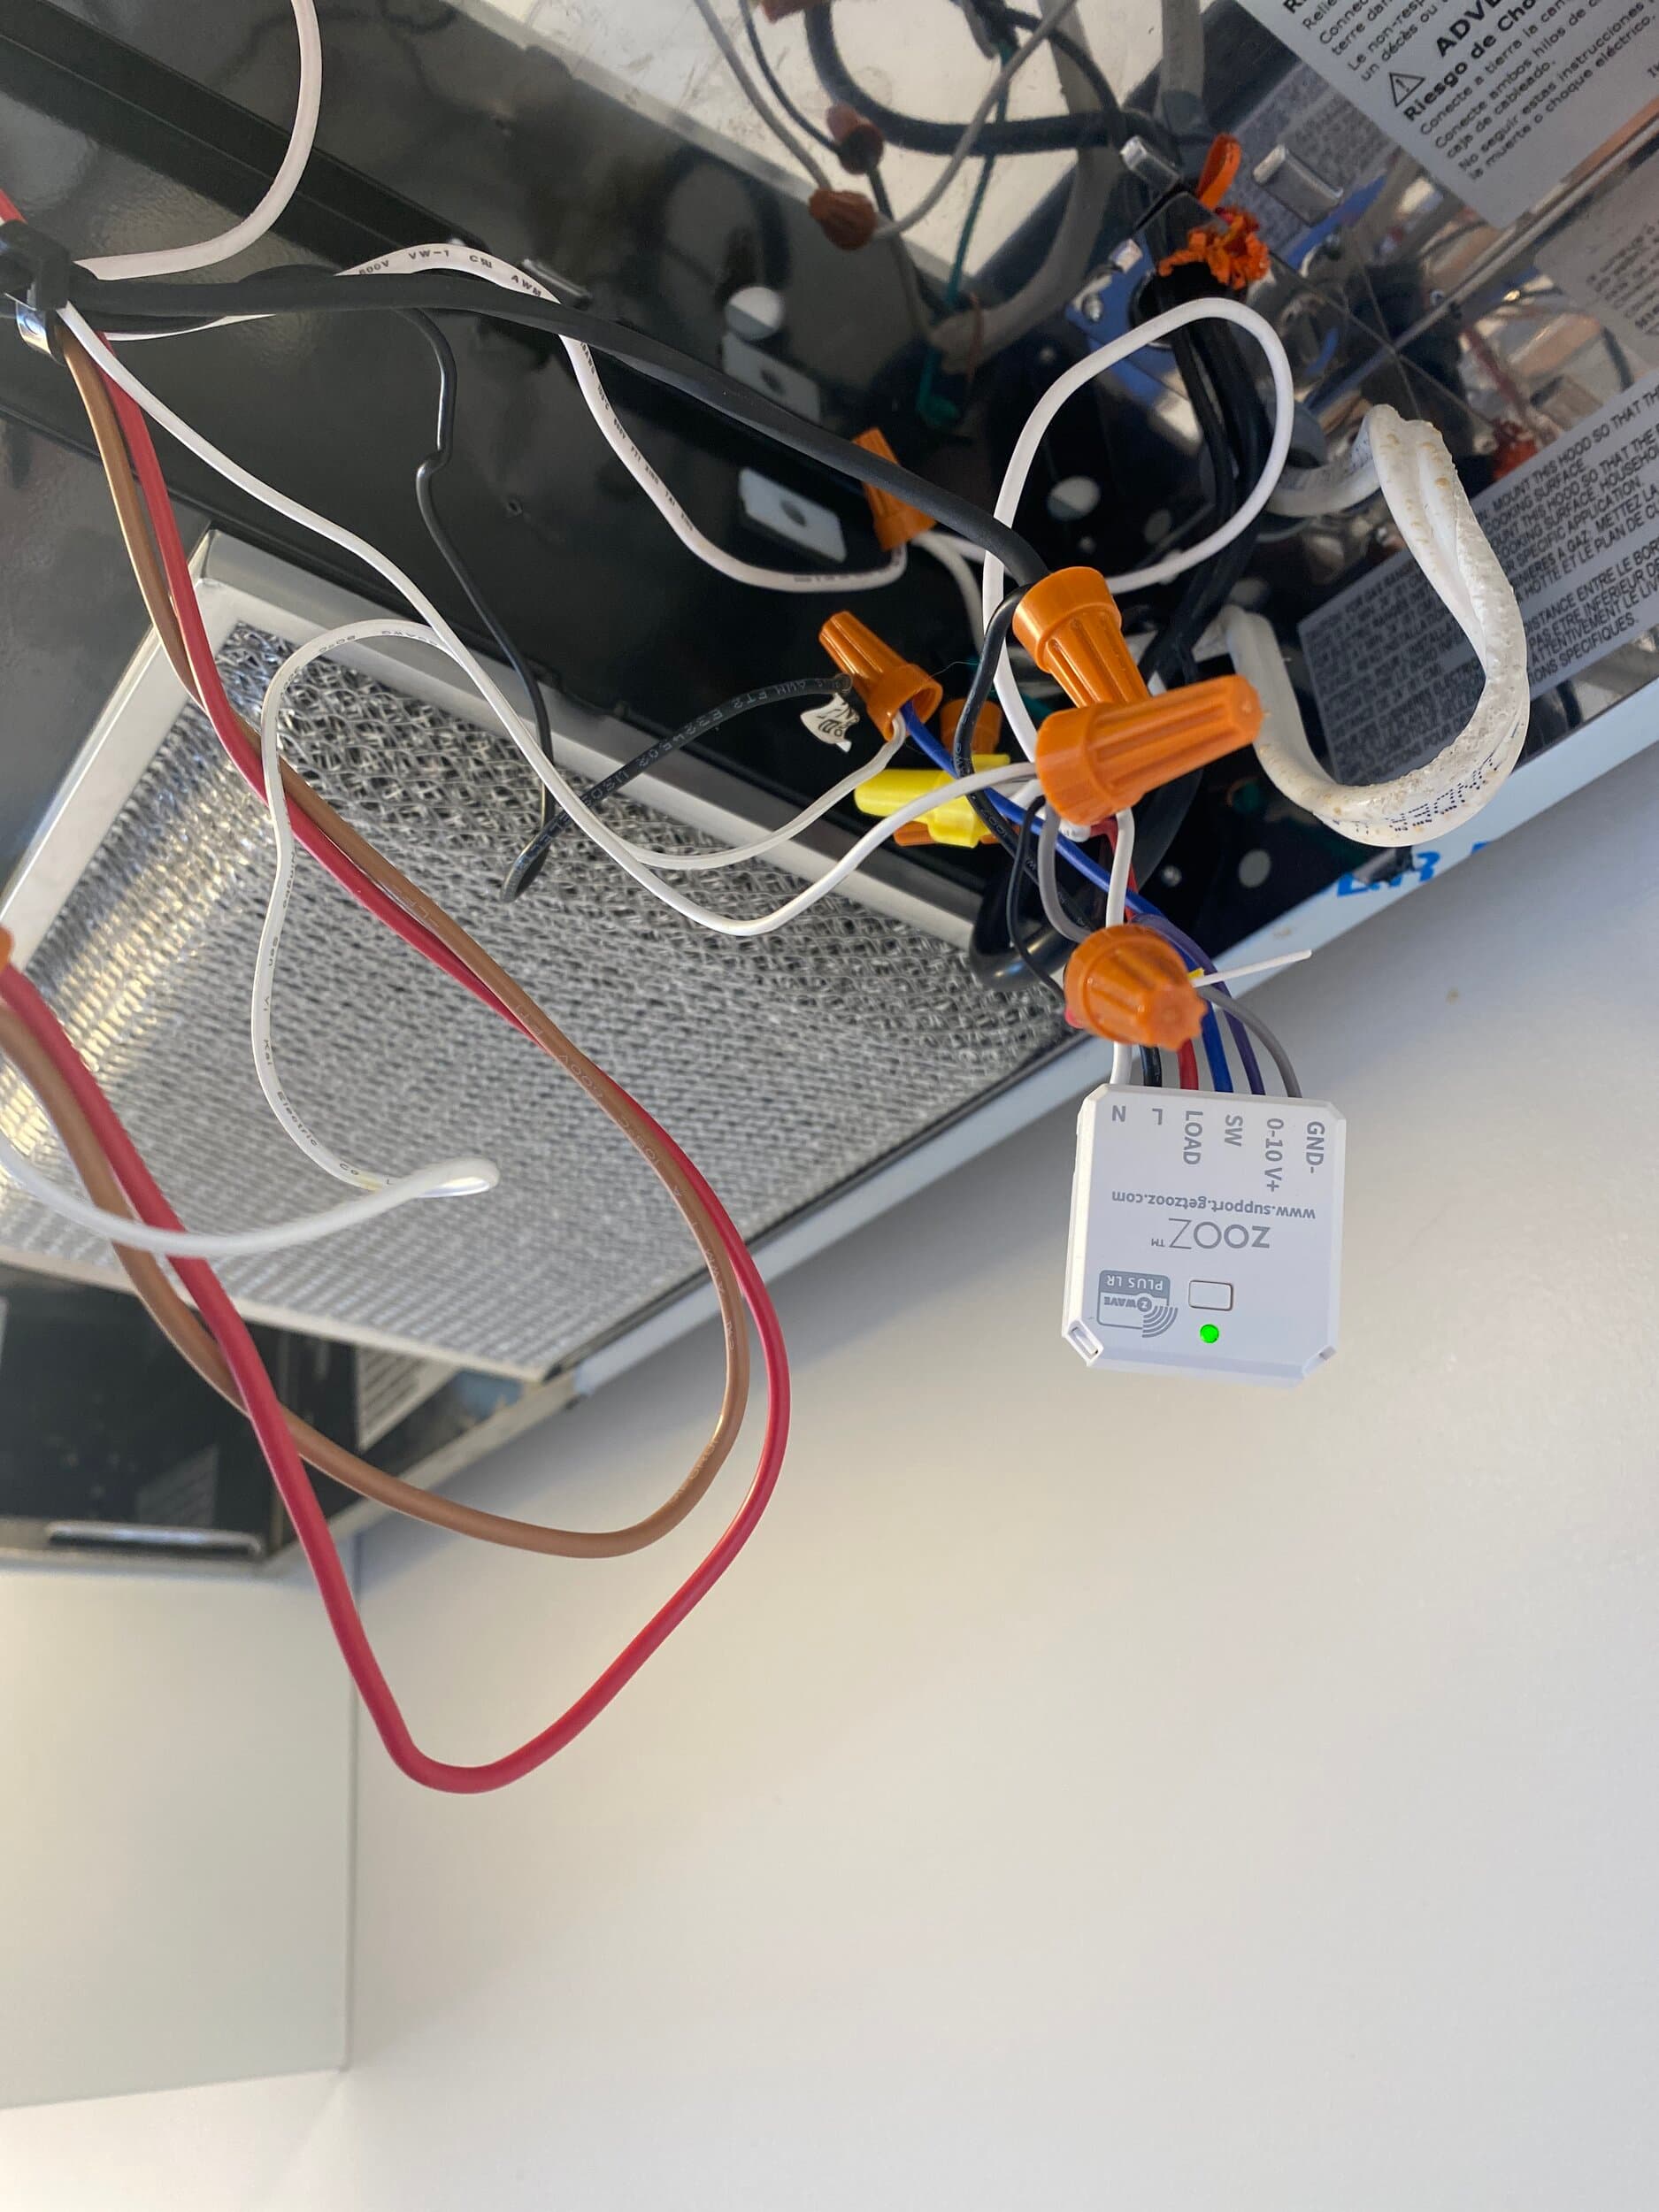
This is a bit of a mess as I connected up everything first to make sure it all worked. The Zooz Zen54 "switch" wiring (just dry contacts really) are connected to the exhaust hood's existing fan switch. The "load" wire goes up to power the Terrabloom fan on and off, as do the 0-10V wires to control it's speed. It all tucks up under the hood's metal connection shielding.
1 Like
Here is what I sorted to have the kitchen fan speed set according to power use on the induction cooktop, with 1:30 seconds of max speed to pop the exhaust hood ball. I'm using an insulated Broan Ecovent for the outside hood. This hood has a foam ball which falls back into an insulated bowl to seal up the vent when not on use. That ball can become slightly frozen in place in very cold weather, hence the 1:30 time with the fan going at 100%. The extra pressure pops the ball out...otherwise there is no venting!
1st I needed to figure out a relationship between induction power and dimmer settings. I did that here: Slope Calculator
I figured when the induction cooktop is at 250 watts, I want the fan at 40% and with power at 4000 watts, the fan should ramp to 99%. Plug those numbers into the graphing web site above and you get "Dimmer Setting" = 0.0157 * (Induction Power in watts) + 36. The equation I'm using in the 3rd pic here is actually Dimmer Setting = 0.02 * (induction power in watts) + 34
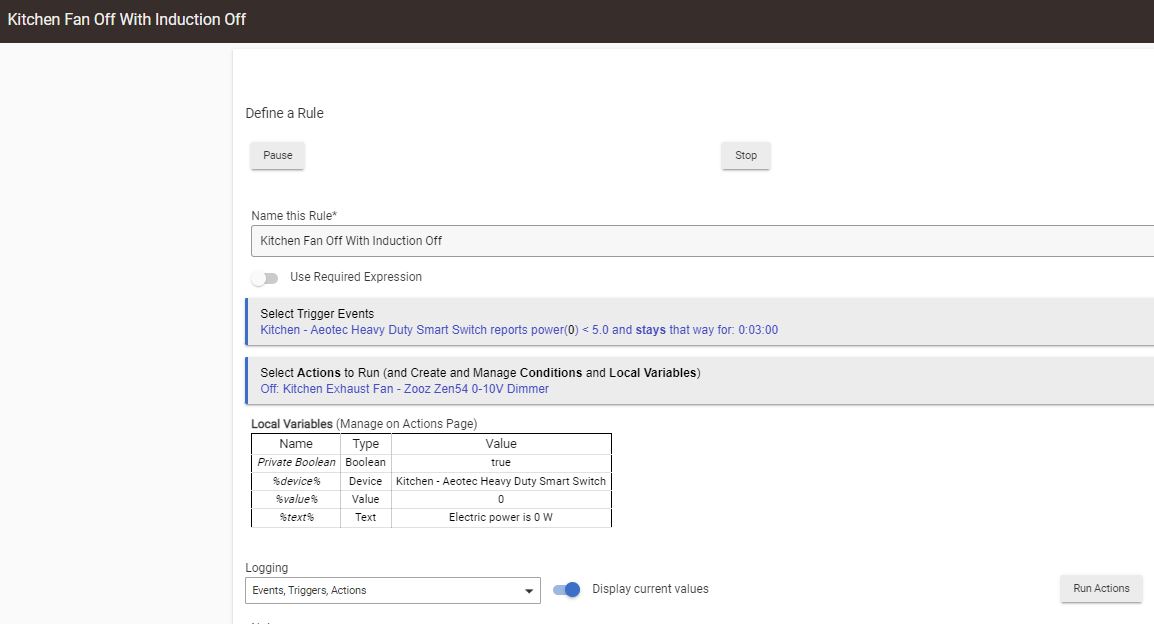
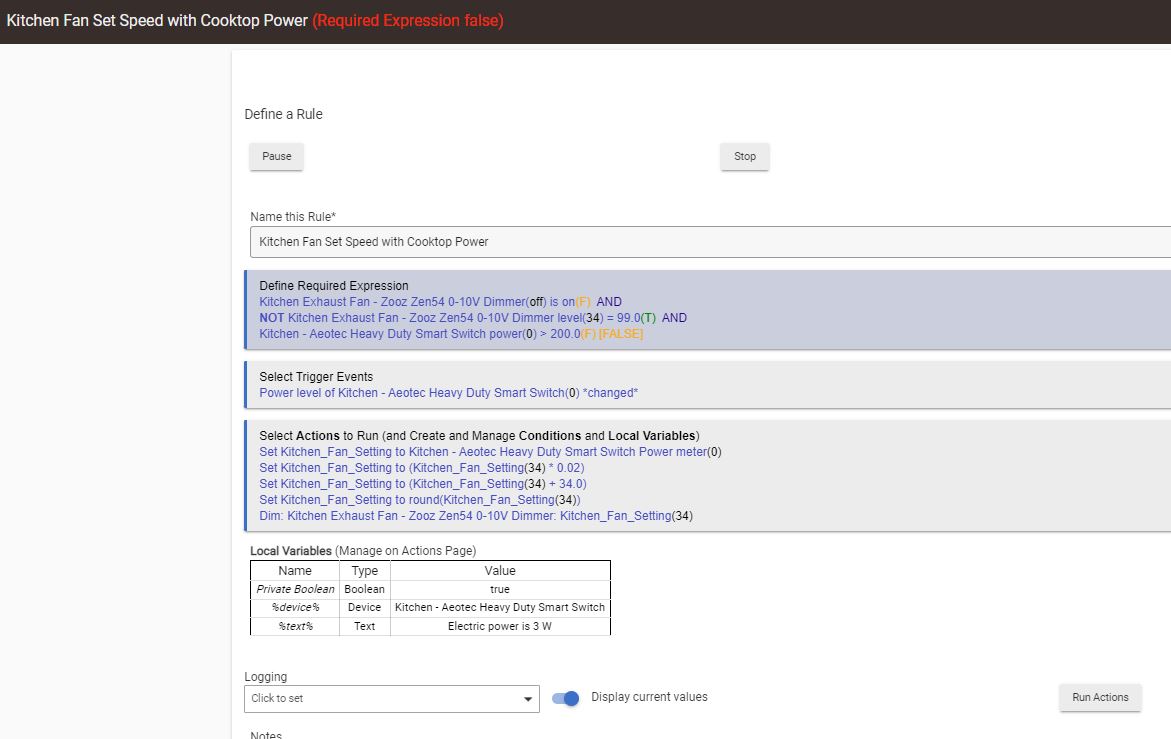
Turns fan on with cook top use and sets it to full power for 1:30 seconds, then ramps it down to 50%. At this point, the speed will be set dynamically every time power use changes on the cooktop.
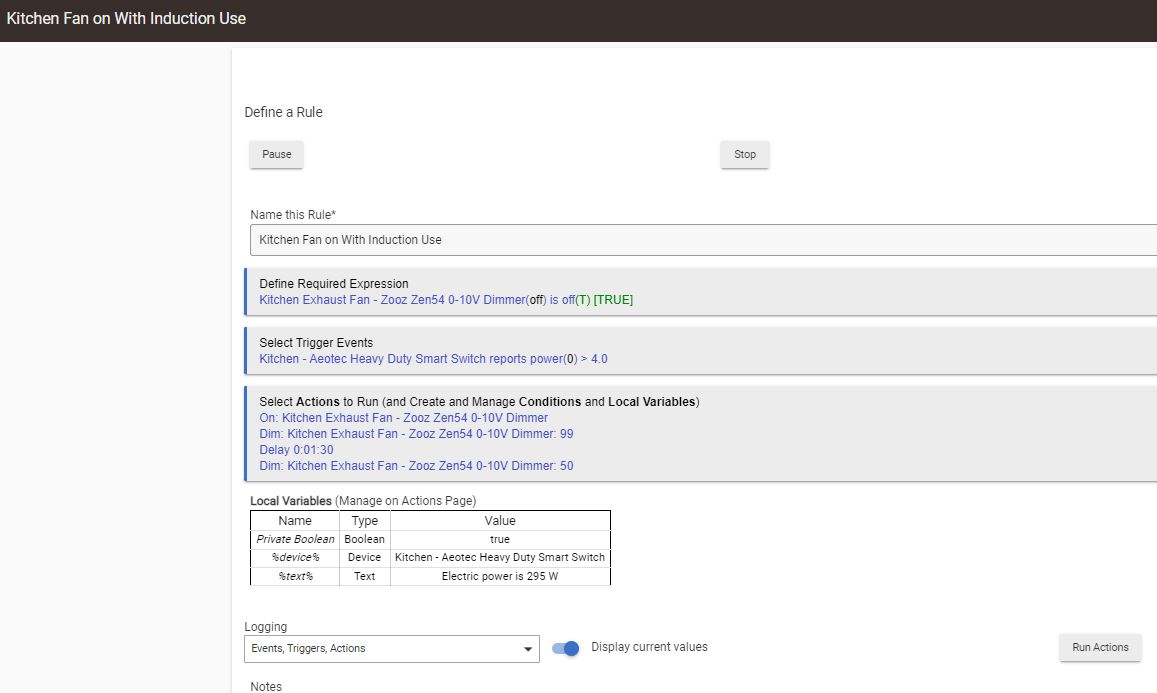
Modifies the kitchen fan speed every time power level on induction cooktop changes...but not until it runs at full power for 1:30 minutes. I set a variable, then do some math on it to arrive at the "correct" dimmer setting for the fan.
1 Like
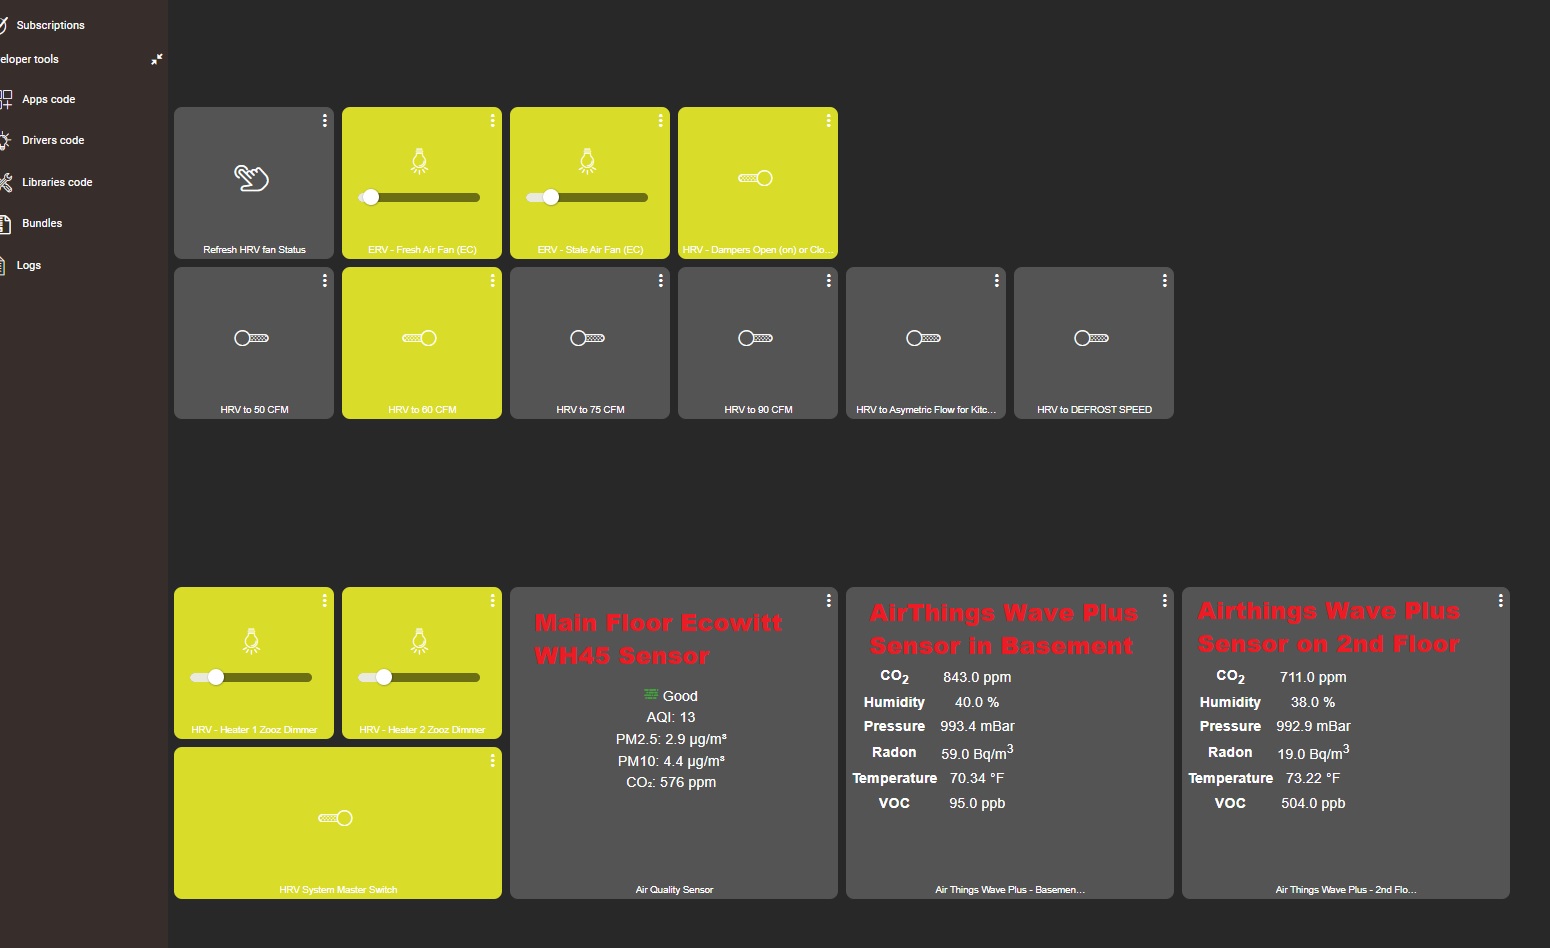
After observing the system for a few months, I realized that Co2 levels in our home vary quite a bit by floor, depending on occupancy in those areas. To that end, I added two AirThings Wave Plus sensors which add radon and VOC sensing to the system.
The Hubitat hub now takes the average CO2 over the 3 sensors to set the ventilation rate on the EC fans. Additionally, if VOC levels are over 200ppb, it sets the fans at max (balanced) flow. CO2 averaging works better at night where previously the main floor CO2 levels would drop, lowering air exchange CFM, but we'd see fairly high CO2 levels in the upstairs bedrooms. Averaging ensures that high values in one area will increase the home's air exchange rate.
We've never tested our home for Radon, so it's also reassuring to see that levels are actually pretty low.