"Smart" Chain waxing setup with Hubitat and Rule Machine + $20 Rice Cooker

Here's a simple project using the Shelly Uni Plus, a temp sensor, and a 300 watt Zigbee dimmer along with Rule Machine. A simple dashboard with a variable set up for temperature set point entry completes the project. I learned a lot about heating to a set temp, and how to manage power levels to minimize "overshoot" of a set temp.

Products Used: $20 Rice Cooker: https://www.walmart.ca/en/ip/starfrit... Shelly Uni Plus: https://www.aartech.ca/shelly-plus-uni DS18B20 Temperature Probe: https://www.amazon.ca/Gikfun-DS18B20-... Hubitat C7 Hub: https://hubitat.com/home-automation/h... 0:00 Intro 1:47 Slow Cookers are too Slow! 2:48 Enter the $20 Rice Cooker 6:28 Setting up Automation 8:35 Shelly Uni Plus and DS18B20 temp probes 11:38 Cleaning first with boiling water 12:48 Waxing the chain with Silca Super Secret Chain Wax 19:47 Using the Wipperman Connex Master Link 20:29 Thanks for Watching!

6 Likes

Almost like rediscovering PID control, with an On/Off controlled variable.
See: PID Explained: Theory, Tuning, and Implementation of PID Controllers & Proportional–integral–derivative controller - Wikipedia

Perhaps folks will stumble onto Bode plots next...

Not meaning to be harsh, but this is very basic industrial control theory, that's been used since like the early 1900s. - Perhaps, I'll write a PID app in Groovy, if there is alot of interest, as there are standard PID function blocks in nearly every PLC known to man.

That all said, still an interesting use-case for a Hubitat.

3 Likes

Yes, very simple...but of course new to me :slight_smile:

There are a lot of variables at play, particularly with changes of state, however yes, pretty every PIDs out there controlling things like the Instapot already do this :slight_smile:

There are some interesting physics at play with respect to mass, thermodynamics etc. that show up when you try and do this with various devices. For example, the temp ramp rate vs power input must play into more sophisticated programs for things like say a beer brewing tank etc. Or likely it gets a lot easier when the mass of the heated substrate is much higher?? In my case the rice cooker's mass is likely more then the wax itself so thermal overshoot is harder to manage. I found when dealing with thermostatic control of in-floor heat in my last (very efficient) commercial building that thermal bumping was hard to manage when, for example, the sun came out, or heating loads dropped. That was about 4000 square feet of concrete, but again, not very simple to manage super accurately, even if you could completely integrate all variables that would affect an occupied building's thermal performance.

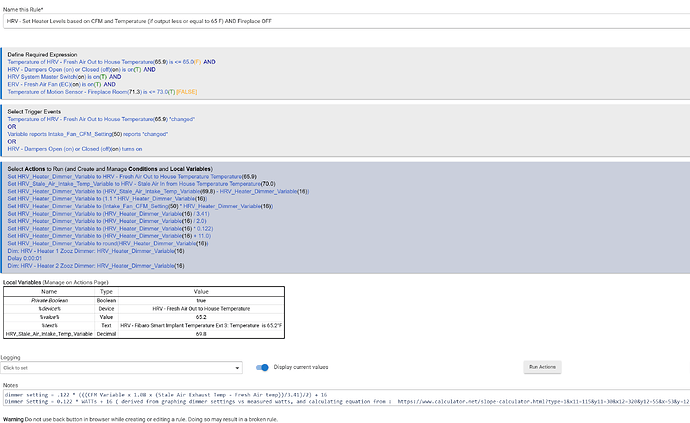
I do a much more sophisticated version of this in my HVAC HRV air tempering setup. I have two PTC heaters, but power to them is constantly modified based on the target temp, exhaust air temp, and un-tempered air temp. For this I graphed the two dimmer settings from 0-100, compared to actual measured wattages at the PTC heaters. Then I sorted the equation to relate the two values. Armed then with the delta temp (which constantly varies in winter as the HRV cools between defrost cycles) and the CFM of the system, Hubitat does a very nice job of managing the wattages to the heaters so that the air temp delivered to the house is bang on accurate :slight_smile: Figuring out how many watts are required to increase air temps at a given CFM turns out to be a pretty basic calculation.

Super clunky to do this in Rule Machine, but it works quite well, even at -35 C outside ambient :slight_smile: The HRV runs balanced delivery profiles from 50 to 110 CFM in six increments (based on CO2, VOC, Radon levels in the house), so I needed more elegant controls for this scenario to manage the heaters. I am 100% not a coder, as is likely obvious here...ha.

1 Like

If you want to get serious, and there is money on the line, then MPC (Model-Predictive-Control) is the much more "invogue" control approach - as it's built around a dynamic model of the process that your trying to control - this allows the controller to "predict" how the process will respond, and generate a proper CV move - The trick here, is building the proper model, but there are lots of "distrubance tests", and basic process physics, that can come into play. If you dealing with improving yields a small % in a refinery or brewery, then lots of $$ are in play, and lots of math is bought to bear.

See: Model predictive control - Wikipedia - There are still "less standardized" function blocks for MPC in some higher end PLCs, and most DCSes. - But again, it depends on how much return for the effort is in play. -

The very lastest stuff, is AI for controls, but that's all very "probabilistic", and personally, I'm not sure if that's really ready for prime time in a chemical plant and H&HS (Health and Human Safety) applications (but they are using all the for self driving cars, so what do I know).

2 Likes

It looks like a fun project, though it makes me happy that I installed a chain oiler instead.

I did a rudimentary PID control to use a convection toaster oven for solder paste reflow. It is not pretty and there are tons of things that I would do differently in retrospect. But, these hobbies are like woodworking. It keeps you humble and interested in learning more.

1 Like

Nice Idea to use the dimmer to regulate the power to the cooker, it is great when you have that option to regulate the amount of heat being applied.

In my case, I was trying to regulate the heating and cooling of my house, to get rid of the overshoot and undershoot, as I could not change the amount of heat or cool that is produced by regulating the AC or the furnace when they are running.

My solution was to write a thermostat driver that uses anticipator settings, so the heat comes on just before falling to setpoint, and the heat turns off just before it get to setpoint. This takes the swing out of the time it takes for the heat to actually start heating, and for how long it continues heating after the furnace turns off (baseboard hot water heat).

I use two offsets from setpoint - one just above setpoint, and one just below setpoint. Those are used to start and stop the heat/cool timed cycles. So, if heat is set for 70, and the upper offset is .08 degrees, a heating cycle starts and runs for X minutes (cycle seconds is a setting), when temp is below 70.08 and temps are falling. Then the cycle ends, and it turns off the heat, and it starts a wait period (wait seconds is also a setting). During the wait period, it checks if the temp begins to rise again, and if it does, the heat cycling ends. If not, at the end of the wait period, it runs another timed cycle, then waits and checks again for rising temps before it stops running the heat cycles.

The lower offset is used for ramping. The heating ramps if below this offset, meaning heat will stay on continually until it reaches the lower offset. So, it then turns off the heat at the lower offset before reaching setpoint, to not go over setpoint. Once temps are over the lower offset ramping temp, the normal cycling will kick in, and start a heat cycle if the temp starts falling again, with temps still being below the upper offset to kick-off a timed heat cycle. Cooling is just the opposite of heat, with cooling starting at the lower offset, and ramping stopping at the upper offset.

This has worked incredibly well for me, and my house temperature stays within .5 degrees from setpoint. Way better the the Honeywell T6s were doing, as I was getting 3-5 degree swing from them, no matter what setting I used for "cycles per hour" in the thermostat settings.

By tweaking the offset settings and cycle times in the driver, I can get any heating zone dialed in to use this method. However, outside temps play a big role in how fast the house heats or cools. To compensate for this, I use an outside temp sensor to automatically adjust the heat cycle times and the wait times from the initial settings. Cycle times for heat increase as it gets colder out, and decrease as it gets warmer, and the opposite for when the thermostat is in cooling mode. I found a pretty simple equation for how much to adjust the cycle times based on outside temps.

So, even without the ability to modulate the amount of heat being applied, and even when the heating being applied does not just instantly change after being turned on or off, there are ways to maintain a consistent temperature with anticipator setpoints and timed cycles where PID cannot be used.

1 Like

Where's the link to your basic industrial control app? You're obviously not a cyclist. This is a fun way to play with chain waxing with Hubitat. Not something I intend to do but as someone that rides 4 - 5,000 miles a year I really do appreciate it.

1 Like

I actually am a cyclist, I predominately do about 200-250 miles a month on Zwift, in the basement (just bumped up my FTP!). That said, I don't wax my chain, as I'm riding a beater moutain bike, on a Wahoo Kicker. Since my bike stays dry, I just hit the chain with Finish Line Dry if/when it gets noisy. Clearly I'm not as serious a biker as you or @denwood, but I try.

As for a PID block, a fairly standard Rockwell PLC block looks like the below, other PLC folks have similer functions, but it can be more complex with cascaded loops, bumpless resetes, etc. - The devil is in the details. - Using PID Instructions

I'm not clear if you actually wanted a PID block in HE, and as noted, I haven't written one in Groovy, but the algorithm is fairly strightforward, and a "basic" Python implementation is here: https://www.digikey.com/en/maker/tutorials/2024/implementing-a-pid-controller-algorithm-in-python

If you have a specific need, I can help implement a simple app that would like take a PV, and SP as select device attributes or hub variables, and run the PLC loop on some specific time interval or based on some update on one of the inputs (a RM trigger) and then generate a CV control action - Likely, incremental moves. Again, some of this would depend on the specifics on your use-case, but PID algorithms are very classical and well understood for heating/cooling some liquid in a vat.

My overall point, is that this need (to a liquid in a vessel - aka, heat wax in a cooker), is a well studied and basic part of control theory, and there is a wealth of info to build from (loop tuning, etc), versus starting from scratch, and "rediscovering" overshoot, oscillations around a setpoint, deadbands etc.

Again, let me know if you have a specific need, and I'm sure I can help out with some of the algorithm and basic app development if you have an interest/need.

3 Likes

You've put a lot of thought into this. My modulating burner/ECM motor Lennox I think does a decent job of this, calculating rise rate and adjusting fan speed as well as the burner as appropriate.

I was a bit lazy but it would be pretty easy to just sort a simple equation (like my HRV air tempering automation) that adjusts power with every temp change, so more like PID control I'd assume where power would ramp down to zero at the set point and be continuously variable. Come to think of it, I think I'll do exactly that :slight_smile:

It's rather surprising how well the HRV air tempering thing works with the two PTC heaters connected to two Zooz Zen 72 wall switch/dimmers...again just a pain to do this equation in RM 5.1. This equation takes the current CFM setting and temp delta, to then provide the correct dimmer setting to the PTC heaters:
dimmer setting = .122 * (((CFM Variable x 1.08 x (Stale Air Exhaust Temp - Fresh Air temp))/3.41)/2) + 16
The stale air temp is pretty constant as it's the home's ambient temp, but the fresh air temp varies continually in cold weather between defrost cycles on the HRV as the heater core cools down. CFM varies depending on the air quality sensors. The end result is that fresh tempered (heated) air entering the main living space from the HRV is pretty identical to whatever the house is currently set to for ambient (less at night).

I found this makes sorting an equation (dimmer setting vs measured wattage from the dimmer) pretty simple too, as long as the relationships are more or less linear: Slope Calculator

1 Like

Not sure if I'm a serious enough biker, ha, at my current state of portliness...

I had to replace a $120 chain on my full suspension (summer bike) in just one season. That is what got me looking at better lubes. Turns out Muc Off dry is a terrible product. Not only are products like the Silca wax (with tungsten disulphide) outstanding for wear, but they also result in a completely clean drivetrain which means a lot less maintenance over the season.

Yeah, your not going to do the linear algebra needed in MPC, in RM5.1 - And your "straight line" equation is the "P" in PID control - Basically, Error = Setpoint - Actual, then scaled (multiple) by some P gain, and that's a control move on the output variable to get you close to the SP.. With P alone, it's easy to overshoot, hence the "D" term (derivative) to slow down the response from the "P" term. - And "I" is setup to slowly integrate the error, to compensate over time, for any accumulated offset.

90% of the "normal" loops are generally driven by the "P" gain - Which is effectively what your doing. - I do industrial controls, communications and machine automation for a living, so I sort of deal with this on a daily basis.

2 Likes

I very much appreciate your input here. There are very few folks who appreciate this conversation, but I most certainly do. I don't even attempt anything close to this topic with friends and family...ha. I see that rate of change is very much part of the Python PID logic you linked to. Would WebCore work better for this I wonder? I use it for my solar pool control which is super simple really. It just looks at the roof temp vs water temp...the pumps are not ECM, so no point in getting any fancier.

I would like to do something a bit more sophisticated with my HRV 0-10 control on the two ECM fans. Right now I just run the ventilation system using Hubitat scenes which set the fans (based on balancing readings from the HRV using a differential Magnehelic instrument) to effect balanced profiles of 50, 60, 75, 90, 100, and 110 CFM. This was lot easier than trying to make them continuously variable and/or auto balanced based on feedback using a pitot tube and as yet undiscovered sensor for air pressure.