Thanks I got the DM really appreciate that, still did not work, dropped it in a validator and it had a fix option, which it seemed to sort out, no idea whats going on, I am trying the dashboard layout now and again get an error but will keep at it, something stupid my end being a newbie I am sure
1 Like
I had things like this happen when it came to larger groups of code. Literally one single wrong character can take the whole thing down.
When it happens to me and it's a copy paste situation I like to use a Notepad type application to paste it into and then adjust my windows to be able to look at things side by side.
1 Like
That is very odd, I put it through an online validator before I sent it just to make sure I wasn't missing something when I copied and pasted it
Json Less the Custom CSS (lets try it this way)
Copy and paste the Json than click save, than go to the CSS tab and copy and paste the CSS in there (don't miss the "." at the begining of the CSS
Json
{
"localization": "English",
"roundedCorners": 0,
"dateFormat": "MM/DD/YYYY",
"hideLabels": true,
"customColors": [{
"template": "hsm",
"bgColor": "rgb(158,0,0)",
"iconColor": "",
"state": "disarmed",
"customIcon": ""
},
{
"template": "hsm",
"bgColor": "rgb(1,161,9)",
"iconColor": "",
"state": "armedhome",
"customIcon": ""
},
{
"template": "hsm",
"bgColor": "rgb(1,161,9)",
"iconColor": "",
"state": "armedaway",
"customIcon": ""
},
{
"template": "hsm",
"bgColor": "rgb(1,161,9)",
"iconColor": "",
"state": "armednight",
"customIcon": ""
}
],
"colWidth": "",
"cloudRefresh": 1,
"hsmPin": "",
"hide3dot": false,
"clockMode": true,
"gridGap": 8,
"tiles": [{
"rowSpan": 1,
"template": "buttons",
"col": 2,
"colSpan": 1,
"id": 0,
"row": 5,
"device": "2306",
"templateExtra": "0"
},
{
"rowSpan": 1,
"template": "buttons",
"col": 1,
"colSpan": 1,
"id": 1,
"row": 2,
"device": "2306",
"templateExtra": "1"
},
{
"rowSpan": 1,
"template": "buttons",
"col": 2,
"colSpan": 1,
"id": 2,
"row": 2,
"device": "2306",
"templateExtra": "2"
},
{
"rowSpan": 1,
"template": "buttons",
"col": 3,
"colSpan": 1,
"id": 3,
"row": 2,
"device": "2306",
"templateExtra": "3"
},
{
"rowSpan": 1,
"template": "buttons",
"col": 1,
"colSpan": 1,
"id": 4,
"row": 3,
"device": "2306",
"templateExtra": "4"
},
{
"rowSpan": 1,
"template": "buttons",
"col": 2,
"colSpan": 1,
"id": 5,
"row": 3,
"device": "2306",
"templateExtra": "5"
},
{
"rowSpan": 1,
"template": "buttons",
"col": 3,
"colSpan": 1,
"id": 6,
"row": 3,
"device": "2306",
"templateExtra": "6"
},
{
"rowSpan": 1,
"template": "buttons",
"col": 1,
"colSpan": 1,
"id": 7,
"row": 4,
"device": "2306",
"templateExtra": "7"
},
{
"rowSpan": 1,
"template": "buttons",
"col": 2,
"colSpan": 1,
"id": 8,
"row": 4,
"device": "2306",
"templateExtra": "8"
},
{
"rowSpan": 1,
"template": "buttons",
"col": 3,
"colSpan": 1,
"id": 9,
"row": 4,
"device": "2306",
"templateExtra": "9"
},
{
"rowSpan": 1,
"template": "attribute",
"col": 1,
"colSpan": 3,
"id": 10,
"row": 1,
"device": "2308",
"templateExtra": "InputDisplay"
},
{
"rowSpan": 1,
"template": "buttons",
"col": 3,
"colSpan": 1,
"id": 11,
"row": 5,
"device": "2302",
"templateExtra": "1"
},
{
"rowSpan": 1,
"template": "buttons",
"col": 4,
"colSpan": 2,
"id": 12,
"row": 2,
"device": "2293",
"templateExtra": "1"
},
{
"rowSpan": 1,
"template": "buttons",
"col": 4,
"colSpan": 2,
"id": 13,
"row": 3,
"device": "2294",
"templateExtra": "1"
},
{
"rowSpan": 1,
"template": "buttons",
"col": 4,
"colSpan": 2,
"id": 14,
"row": 4,
"device": "2295",
"templateExtra": "1"
},
{
"rowSpan": 1,
"template": "buttons",
"col": 4,
"colSpan": 2,
"id": 15,
"row": 5,
"device": "2503",
"templateExtra": "1"
},
{
"rowSpan": 1,
"template": "hsm",
"col": 4,
"colSpan": 1,
"id": 16,
"row": 1,
"device": "-3",
"templateExtra": " "
},
{
"rowSpan": 1,
"template": "buttons",
"col": 4,
"colSpan": 2,
"id": 19,
"row": 1,
"device": "2307",
"templateExtra": "1"
},
{
"rowSpan": 1,
"template": "variable-number",
"col": 5,
"colSpan": 1,
"id": 17,
"row": 1,
"device": "3598"
}
],
"goBack": false,
"modePin": "",
"bgColor": "#ffffff00",
"lanRefresh": 2,
"iconSize": "40",
"cols": 5,
"rowHeight": "",
"hideEvents": false,
"tempScale": "F",
"noColors": false,
"readOnly": null,
"rows": 5,
"hideIconText": true,
"hideTextShadow": true,
"name": "Z Dashboard",
"fontSize": 11
}
CSS
.header.flex {
padding:0 !important;
}
.wrapper {
overflow: hidden;
padding-right: 15px;
}
.dashBack.flex, .dashName.flex {
display:none;
}
.he-tap:before {
content: none;
}
.tile.button .tile-title, .tile.attribute .tile-title {
visibility: hidden;
display: none;
}
.tile.button .tile-contents, .tile.attribute .tile-contents {
height: calc(100%);
}
.tile.attribute .tile-primary, .tile.button .tile-primary {
padding:0;
}
#tile-1 .tile-primary :before {
content: "1";
}
#tile-2 .tile-primary :before {
content: "2";
}
#tile-3 .tile-primary :before {
content: "3";
}
#tile-4 .tile-primary :before {
content: "4";
}
#tile-5 .tile-primary :before {
content: "5";
}
#tile-6 .tile-primary :before {
content: "6";
}
#tile-7 .tile-primary :before {
content: "7";
}
#tile-8 .tile-primary :before {
content: "8";
}
#tile-9 .tile-primary :before {
content: "9";
}
#tile-0 .tile-primary :before {
content: "0";
}
#tile-11 .tile-primary :before {
content: "Clear";
}
#tile-13 .tile-primary :before {
content: "Home";
}
#tile-14 .tile-primary :before {
content: "Night";
}
#tile-15 .tile-primary :before {
content: "Disarm";
}
#tile-12 .tile-primary :before {
content: "Away";
}
#tile-16 .tile-primary :before {
content: " ";
}
//#tile-19 {background-color: rgba(0,0,0,0);}
#tile-10 .tile-primary {font-size: 30px !important;}
#tile-11 .tile-contents{-moz-transform:scale(.5);zoom:.5}
#tile-12 .tile-contents{-moz-transform:scale(.75);zoom:.75}
#tile-13 .tile-contents{-moz-transform:scale(.75);zoom:.75}
#tile-14 .tile-contents{-moz-transform:scale(.75);zoom:.75}
#tile-15 .tile-contents{-moz-transform:scale(.75);zoom:.75}
#tile-16 .tile-title{visibility:hidden}
#tile-17 .tile-title:after{content:" ";left:0;padding:.5em .5em 3px .5em;position:absolute;top:0;visibility:visible;width:100%}
#tile-17 .tile-title{visibility:hidden}
#tile-17 .tile-contents{-moz-transform:scale(1.75);zoom:1.75}
I got it working in the end, sent it to my lad who is a SW Dev for Sky and does JAVA, he has validators they use and said it was some additional custom CCS stuff it was calling that he removed, TBH he just sent it back to me and it worked. I was getting the same issue regardless of which JSON code I copied from the thread for any keypad apart from the original at the beginning. Happy days now creating a nice interface on Fire7 to go by the front door.
2 Likes
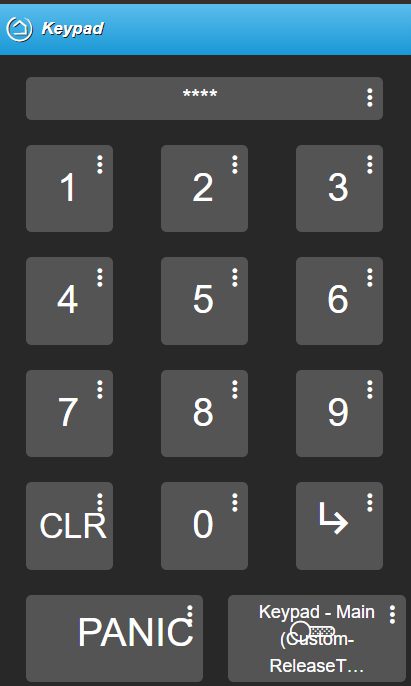
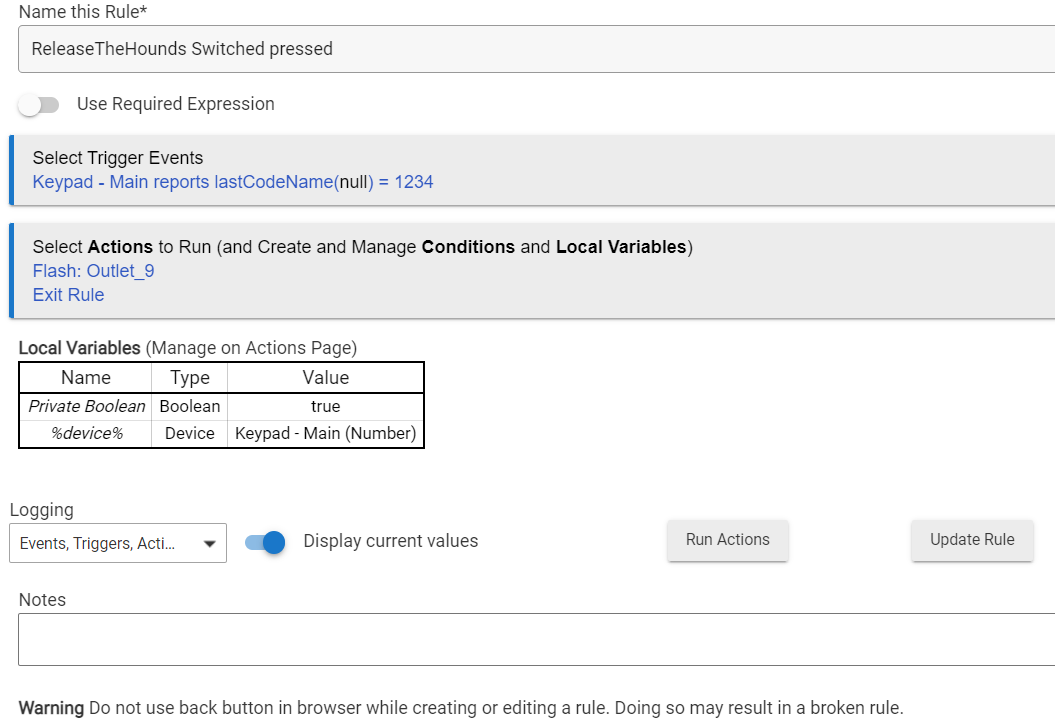
Any assistance is greatly appreciated!
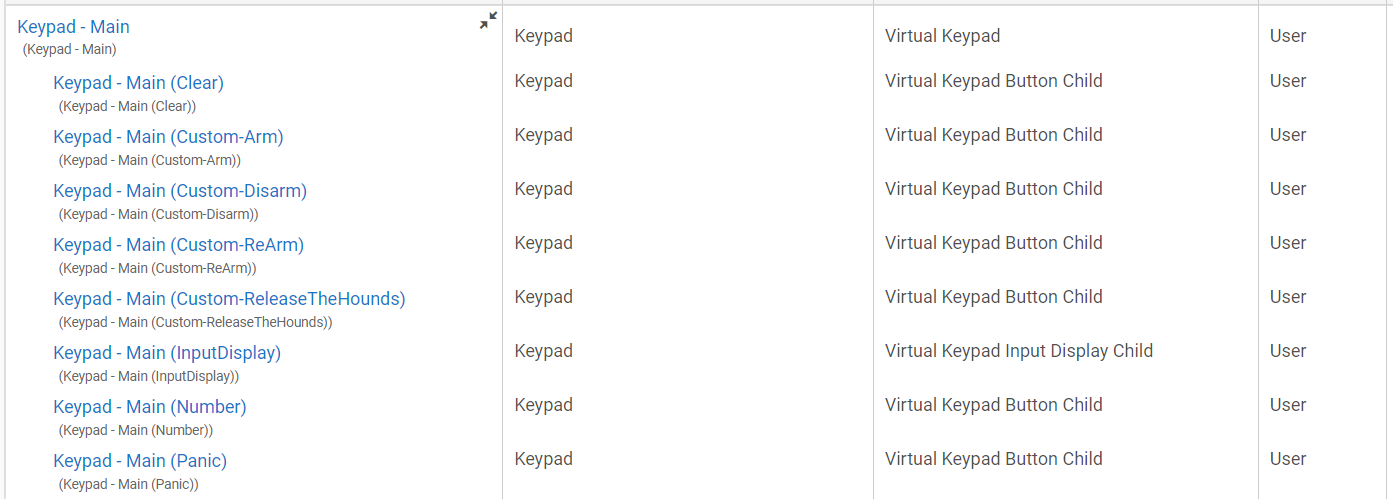
I have the key pad app & child processes installed.
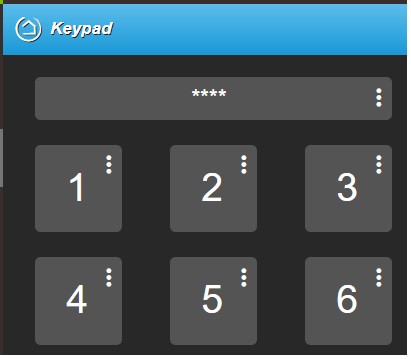
When I click a number button, the "*" shows up in the "InputDisplay" window.
See attached img.
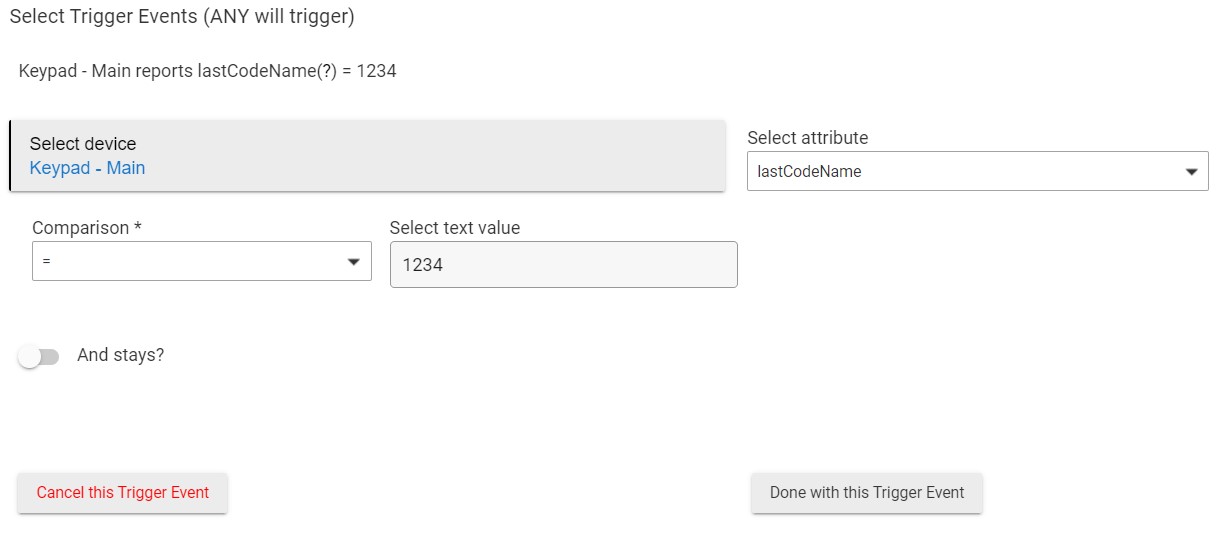
The key does not get forwarded to the attribute "lastCodeName" variable.
See attached Rule manager img where (null) is returned.
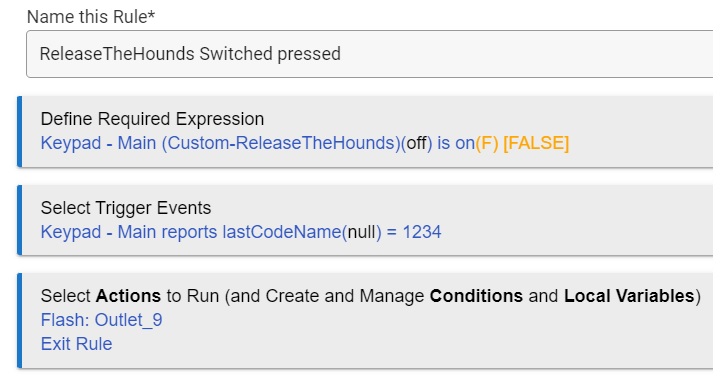
HELP plz!
Do you have the code saved in lock code manager and setup on the child keypad device? Which version of virtual keypad are you using regular one or basic? The code will show up as *'s in the input window for security. I'll take a look when I get a chance to get to a computer and see if I can help troubleshoot some ideas.
Thank you.
Its the regular version, not basic.
No lock code manager app.
I had the 1234 pin, saved in the device settings for the parent app.
If I can get this working, I'll install the lock code manager app.
@user3420 I have setup a new keypad on my test unit this morning and have setup a pin through the device (not using lockcode manager) and when I use the code on it's populating lastCodeName.
Does your code show up under current states? my suspission is that the pin didn't get saved to the device.
Do you have enable lockCode encryption turned on on this device?
I found that I am unable to add a pin if lockCode encryption is turned on but for pins that are already setup u still get the lastCodeName populated correctly when used
Thanks for the reply & support scubamikejax904.
No. lockCode encryption is turned off.
I know I'm missing something, I just don't know what it is.
I've taken several screen captures & stored them as pics in this (attached) 7

jpegs.
Ok i see a couple things i should have noticed before.
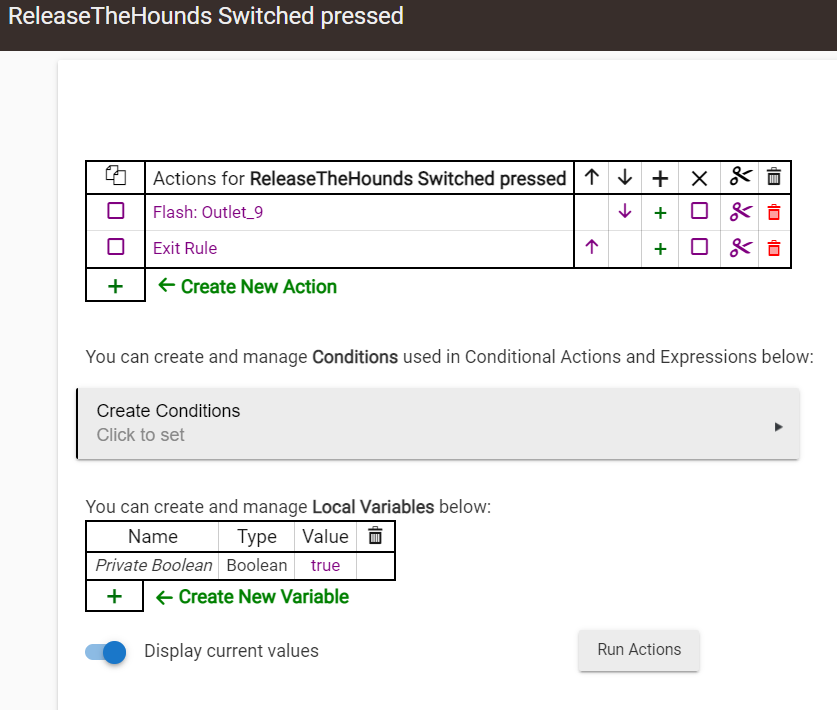
1 - you have a required expression that will have to be on before the trigger triggers (try and remove that). If the switch is off the rule will never run even with the correct code entered
2 - last code used will return the name of the code not the pin it self. "ReleaseTheHounds" not 1234 that is probably the biggest issue with the rule itself
These 2 issues don't have anything to do with why the keypad won't report lastcode used
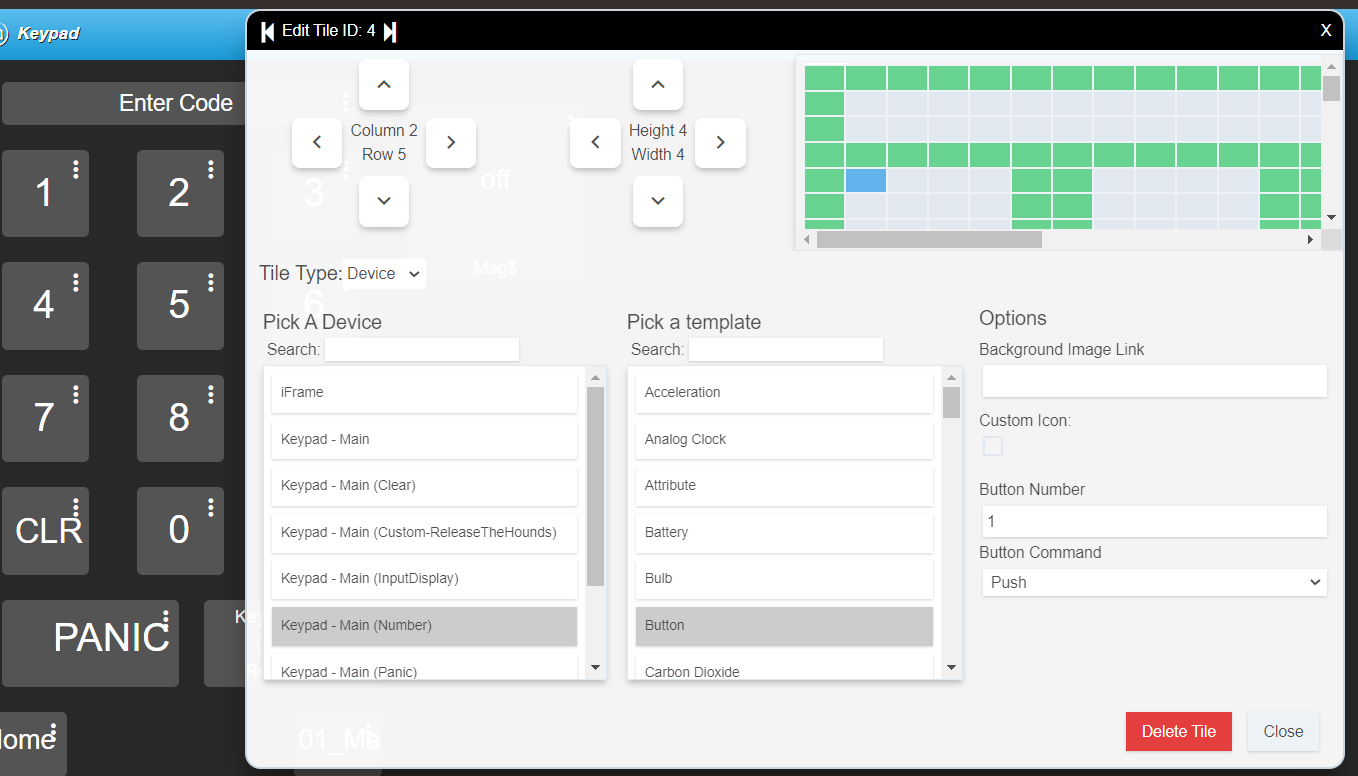
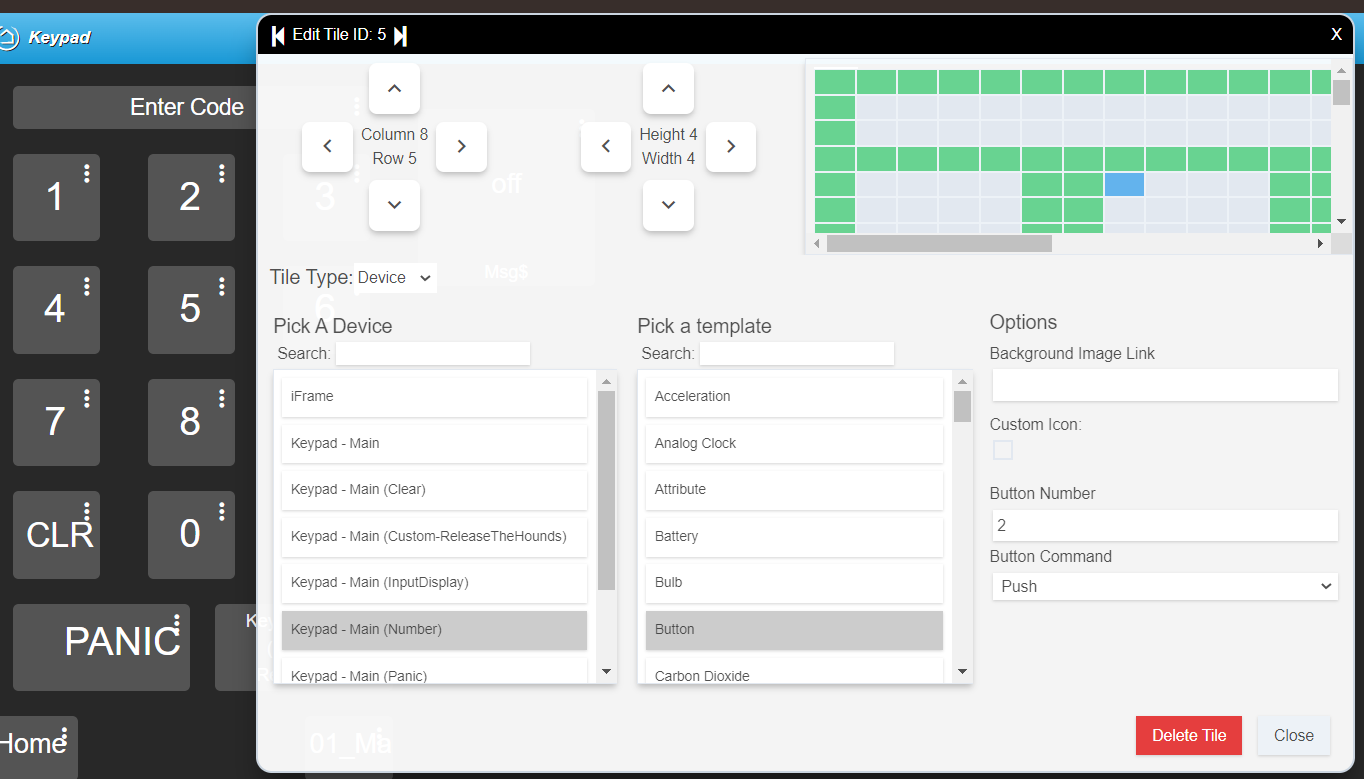
On your dashboard did you verify that all the number buttons are set to those specific numbers ("1 button", set to button 1 "2 button" set to button 2 etc. I'm wondering if there is a glitch in there and 1234 isn't actually being pressed.
If that doesn't work let me know and I'll try to look more and see if I can't find the issue
Thank you again scuba.....
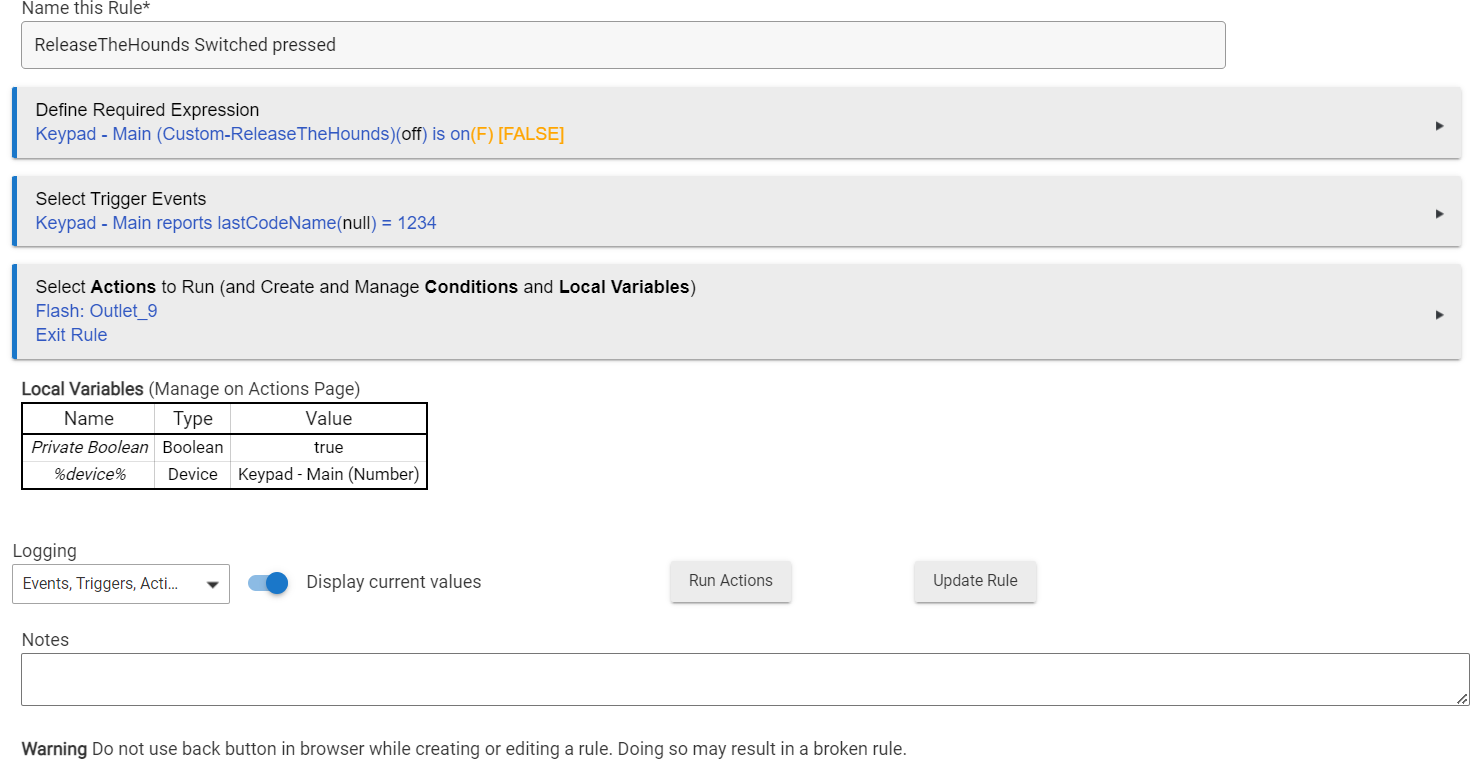
1 - OK. Fixed. I removed the precondition. I had put it in there (after) trying to find anything that may be needed...It is now gone...See pic
2 - Yep, understood (I think). I've added 5 more pics.
I've verified the #1 is linked to the #1 button (see pic), along w/ #2, #3, etc
So that's not the problem.
What other tools/hooks/debug info can I provide? Thanks again
Bruce
I think there is some confusion with the custom button/switch functionality. the custom buttons are both buttons and switches. buttons for the dashboard, and switches to trigger RM or other outside apps.
The goal with those are, when you input an approved code and click the custom button, the keypad will turn the custom switch on, then off.
your RM rule can then trigger from the 'custom switch turns on' event and doesnt need to check the input code because the keypad already validates the code before turning the custom switch on.
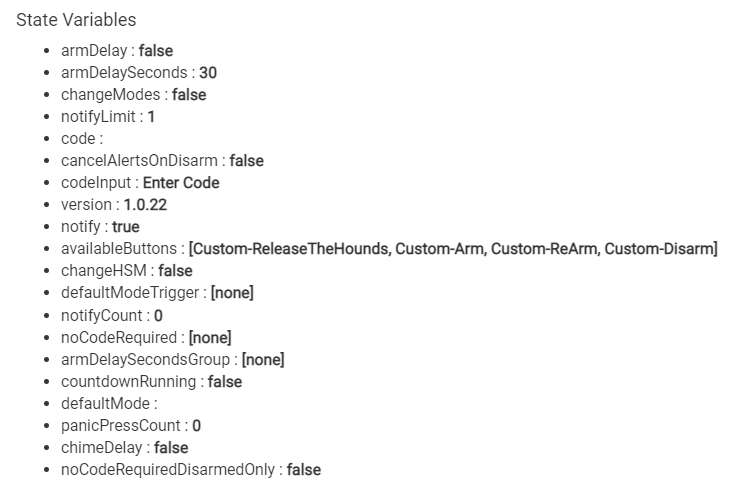
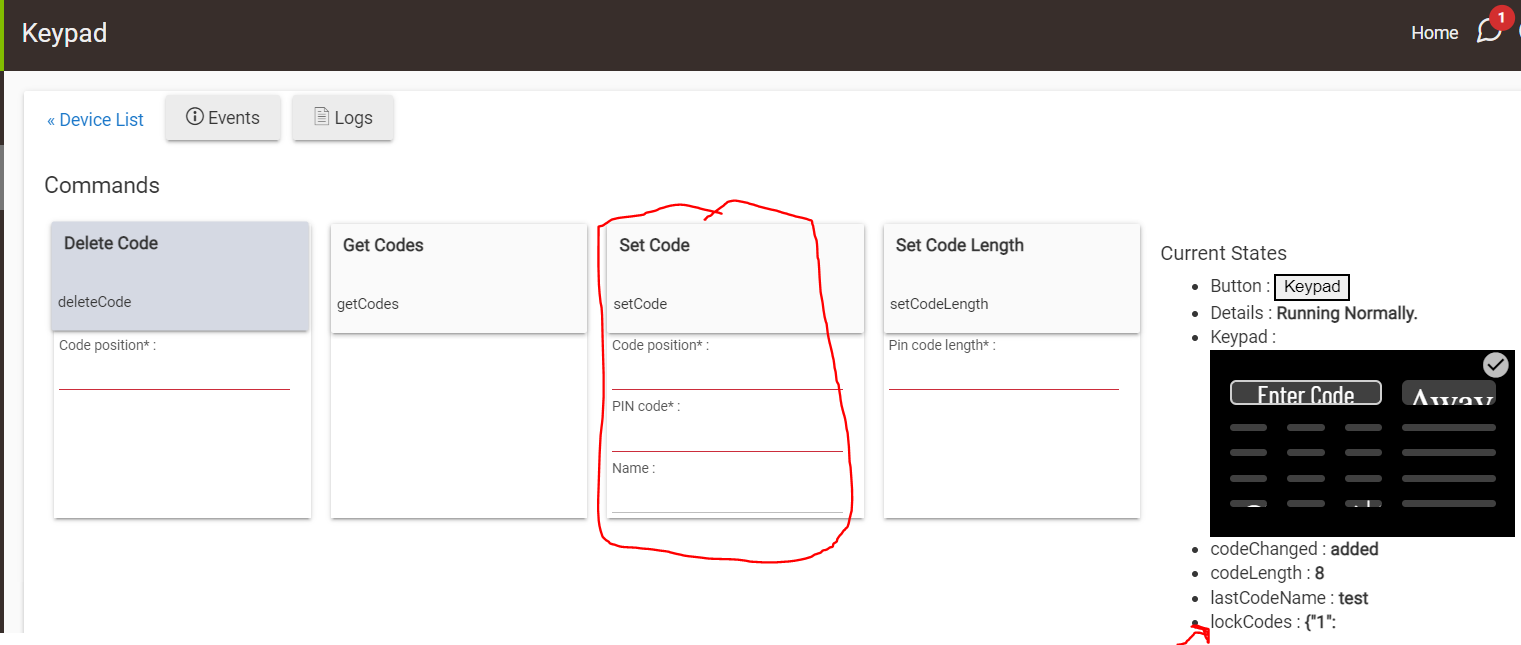
now, to get the code to work with the keypad, you either need to use lockcodemanager, or in the keypad device, you need to set a code using the command input "set code", which will add the code to the 'lockCodes' state as seen here:
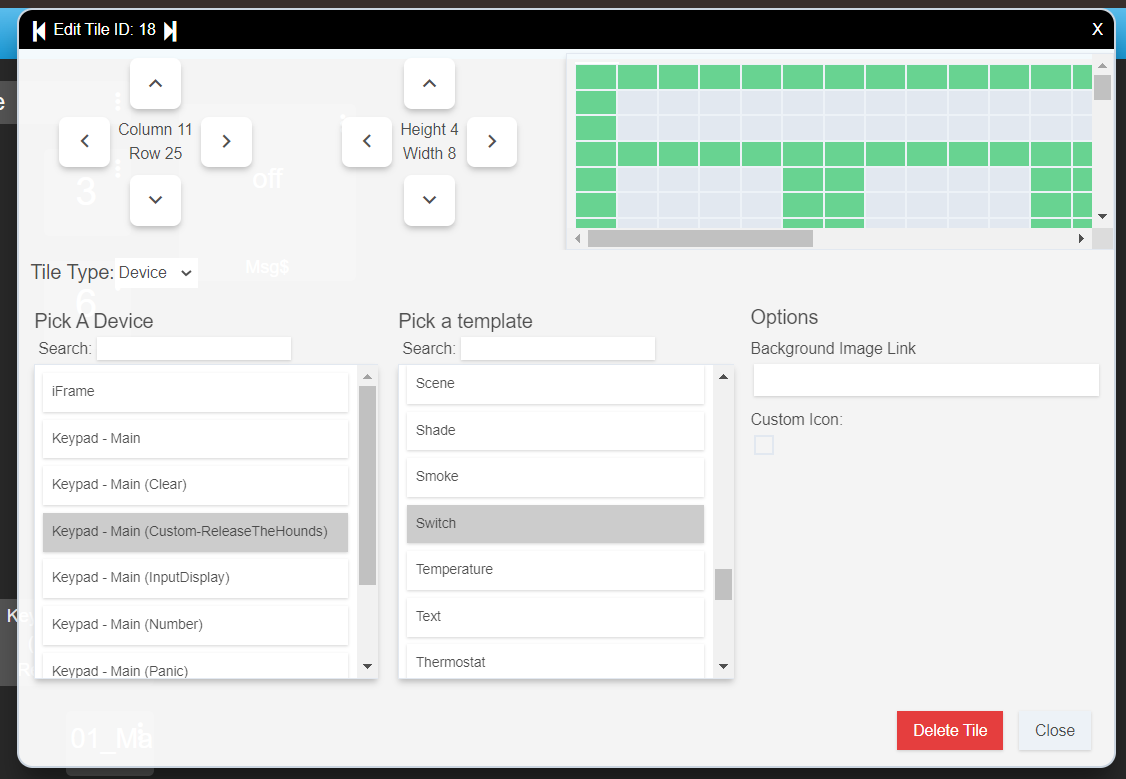
once the code is set, you need to update your dashboard, and instead of setting:
Keypad - Main (Custom-ReleaseTheHounds) to "switch", set it to "button" and the button number can be 1 like this:
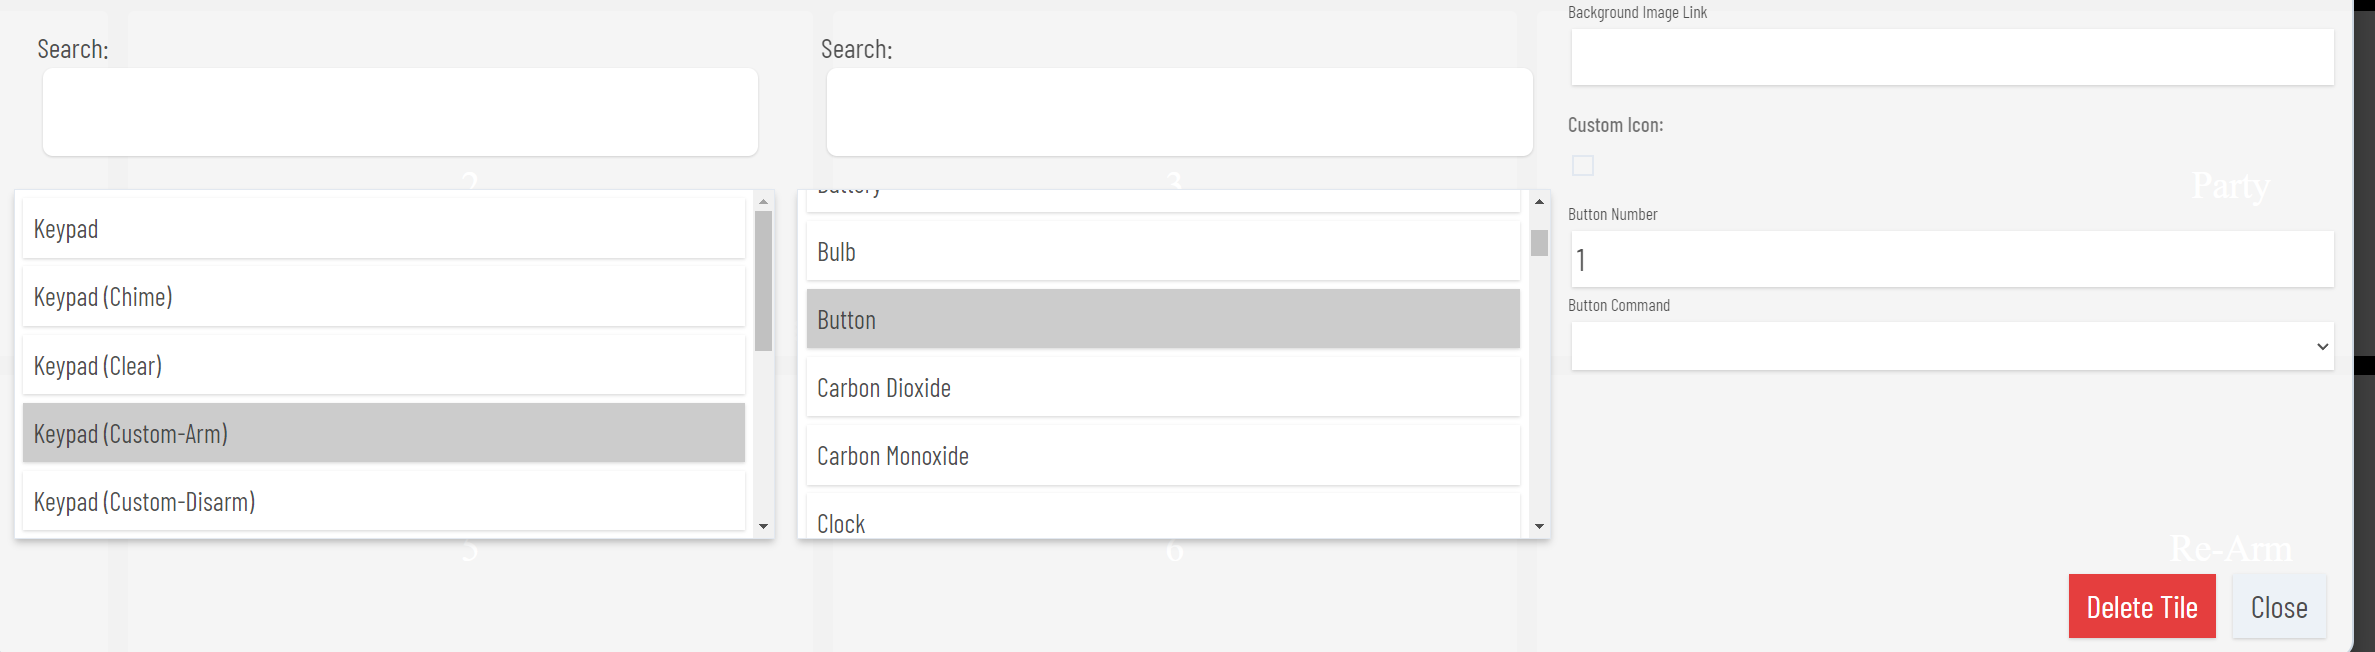
Now, when you type in a pre-set code into the keypad then click on your custom button.. the custom switch will turn on, triggering your RM rule.
I think the other setting you have in the keypad app and device should work after the above are done, but post if you continue to have issues or need some clarity on the above.
1 Like
Thanks for some more clarification. I'll play more with it tomorrow. 1 thing that stands out is the set code that you circled on your screen.
I did enter the code 1234, on mine, and when I click save, it moves the info off the entry cells, to the right side list.
Thats one item.
The next are the buttons, which are all numbers 0-9. I don't get why the variable is not getting updated, even before switch, ReleaseTheHounds is clicked.
I'll look for the lockcodemanager app you referenced. It sounds like its the better way to go anyways. Thks again.
DING DING DING! WE HAVE A WINNER. IT WORKS!
Thank you mbarone! That cleared things up completely. I didn't get the 'change the switch to a button' step in all of this, till you made it crystal clear. It also became clear a name (variable) is called, and NOT the specific pin numbers. I struggled with this, trying to find what I was missing before asking for help. THANK YOU! Now onto the lockCodeManager step.....
1 Like
Thought I would drop my latest set up for motivation since it seems that there is new batch of users interested in this incredible app.
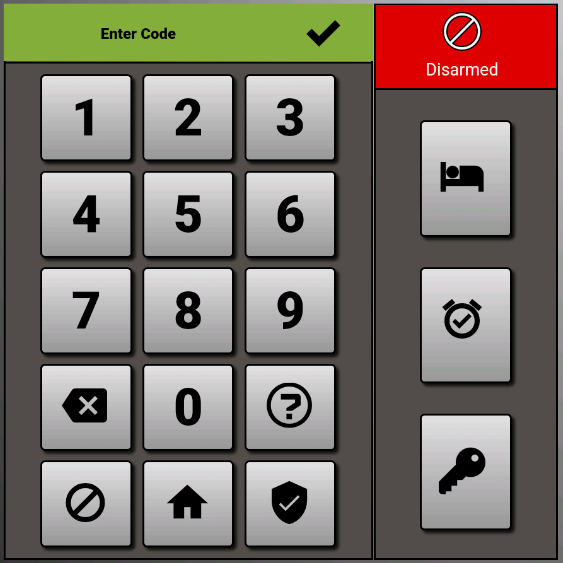
I have buttons on the bottom set up for standard HSM control. The ones on the side are (top to bottom)
Sleep control : tap and house locks down and goes dark and set HSM night. Tap it again during reasonable sleeping hours and it toggles sleep exit for letting in a dog we forgot etc. Otherwise it sets day mode.
Sleep in switch: we have scheduled house wake up times set for week and weekend. We have all gotten very comfortable with it as a much calmer alarm. This disables that if we want to.
Guest Control: Only accepts a guest key code. If HSM is armed it disarms and sets guest mode (cameras active and contact notifications to our phones) Entering guest code and pressing again will start the normal armed away countdown. This has been very handy for pet sitters for example.
2 Likes
@mbarone, I am desperately seeking help. I am way over my head with this. I think I have managed to create a Virtual basic Keyboard, but I have no idea on how to add it to the dashboard I am using on my Fire Tablet 7. The dash board I am using is HD+ (Hubitat Dashboard) (Joe Page). Any help you could provide would be greatly appreciated. Be gentle I am a complete newbie. Thank you.
I have been using this for awhile now, but I have a question. Currently, it appears that I can send my codes and user data to the keypad using Lock Code Manager. This is pretty straigtforward. However, it seems that there is no "Enter" button. Instead, it gives me "Command" buttons. Essentially, when a correct code is entered, the "output" seems to be only the Command attached to the particular button. So for example, I enter a code for user "Andy" and hit "disarm", it disarms properly. I can use the momentary switch for other actions in RM.
However, I am trying to see if I can create a simple "Enter" button rather than a command button, so that when a code is entered, the device simply reports to Hubitat "code for user "Andy" successfully input on "keypad". This way, I can use it in RM to provide different actions based on whose code was entered, not which button they pressed.
Is this possible with this virtual keypad?
You can create custom command buttons using the app to configure the keypad device. These wont do anything except trigger the switch which RM can use to trigger custom functions.
in addition to a custom command "Enter" you can have RM read they keypad state variable "lastCodeName" which displays the name value of the last successful pin input used.
1 Like

