[RELEASE] Tasmota Sync - Native and Real-time Synchronization between Hubitat and Tasmota 11 or later

Thank you. It seems to be working well for most people and I really like Tasmota so I'd like to see it get a bigger following on Hubitat.

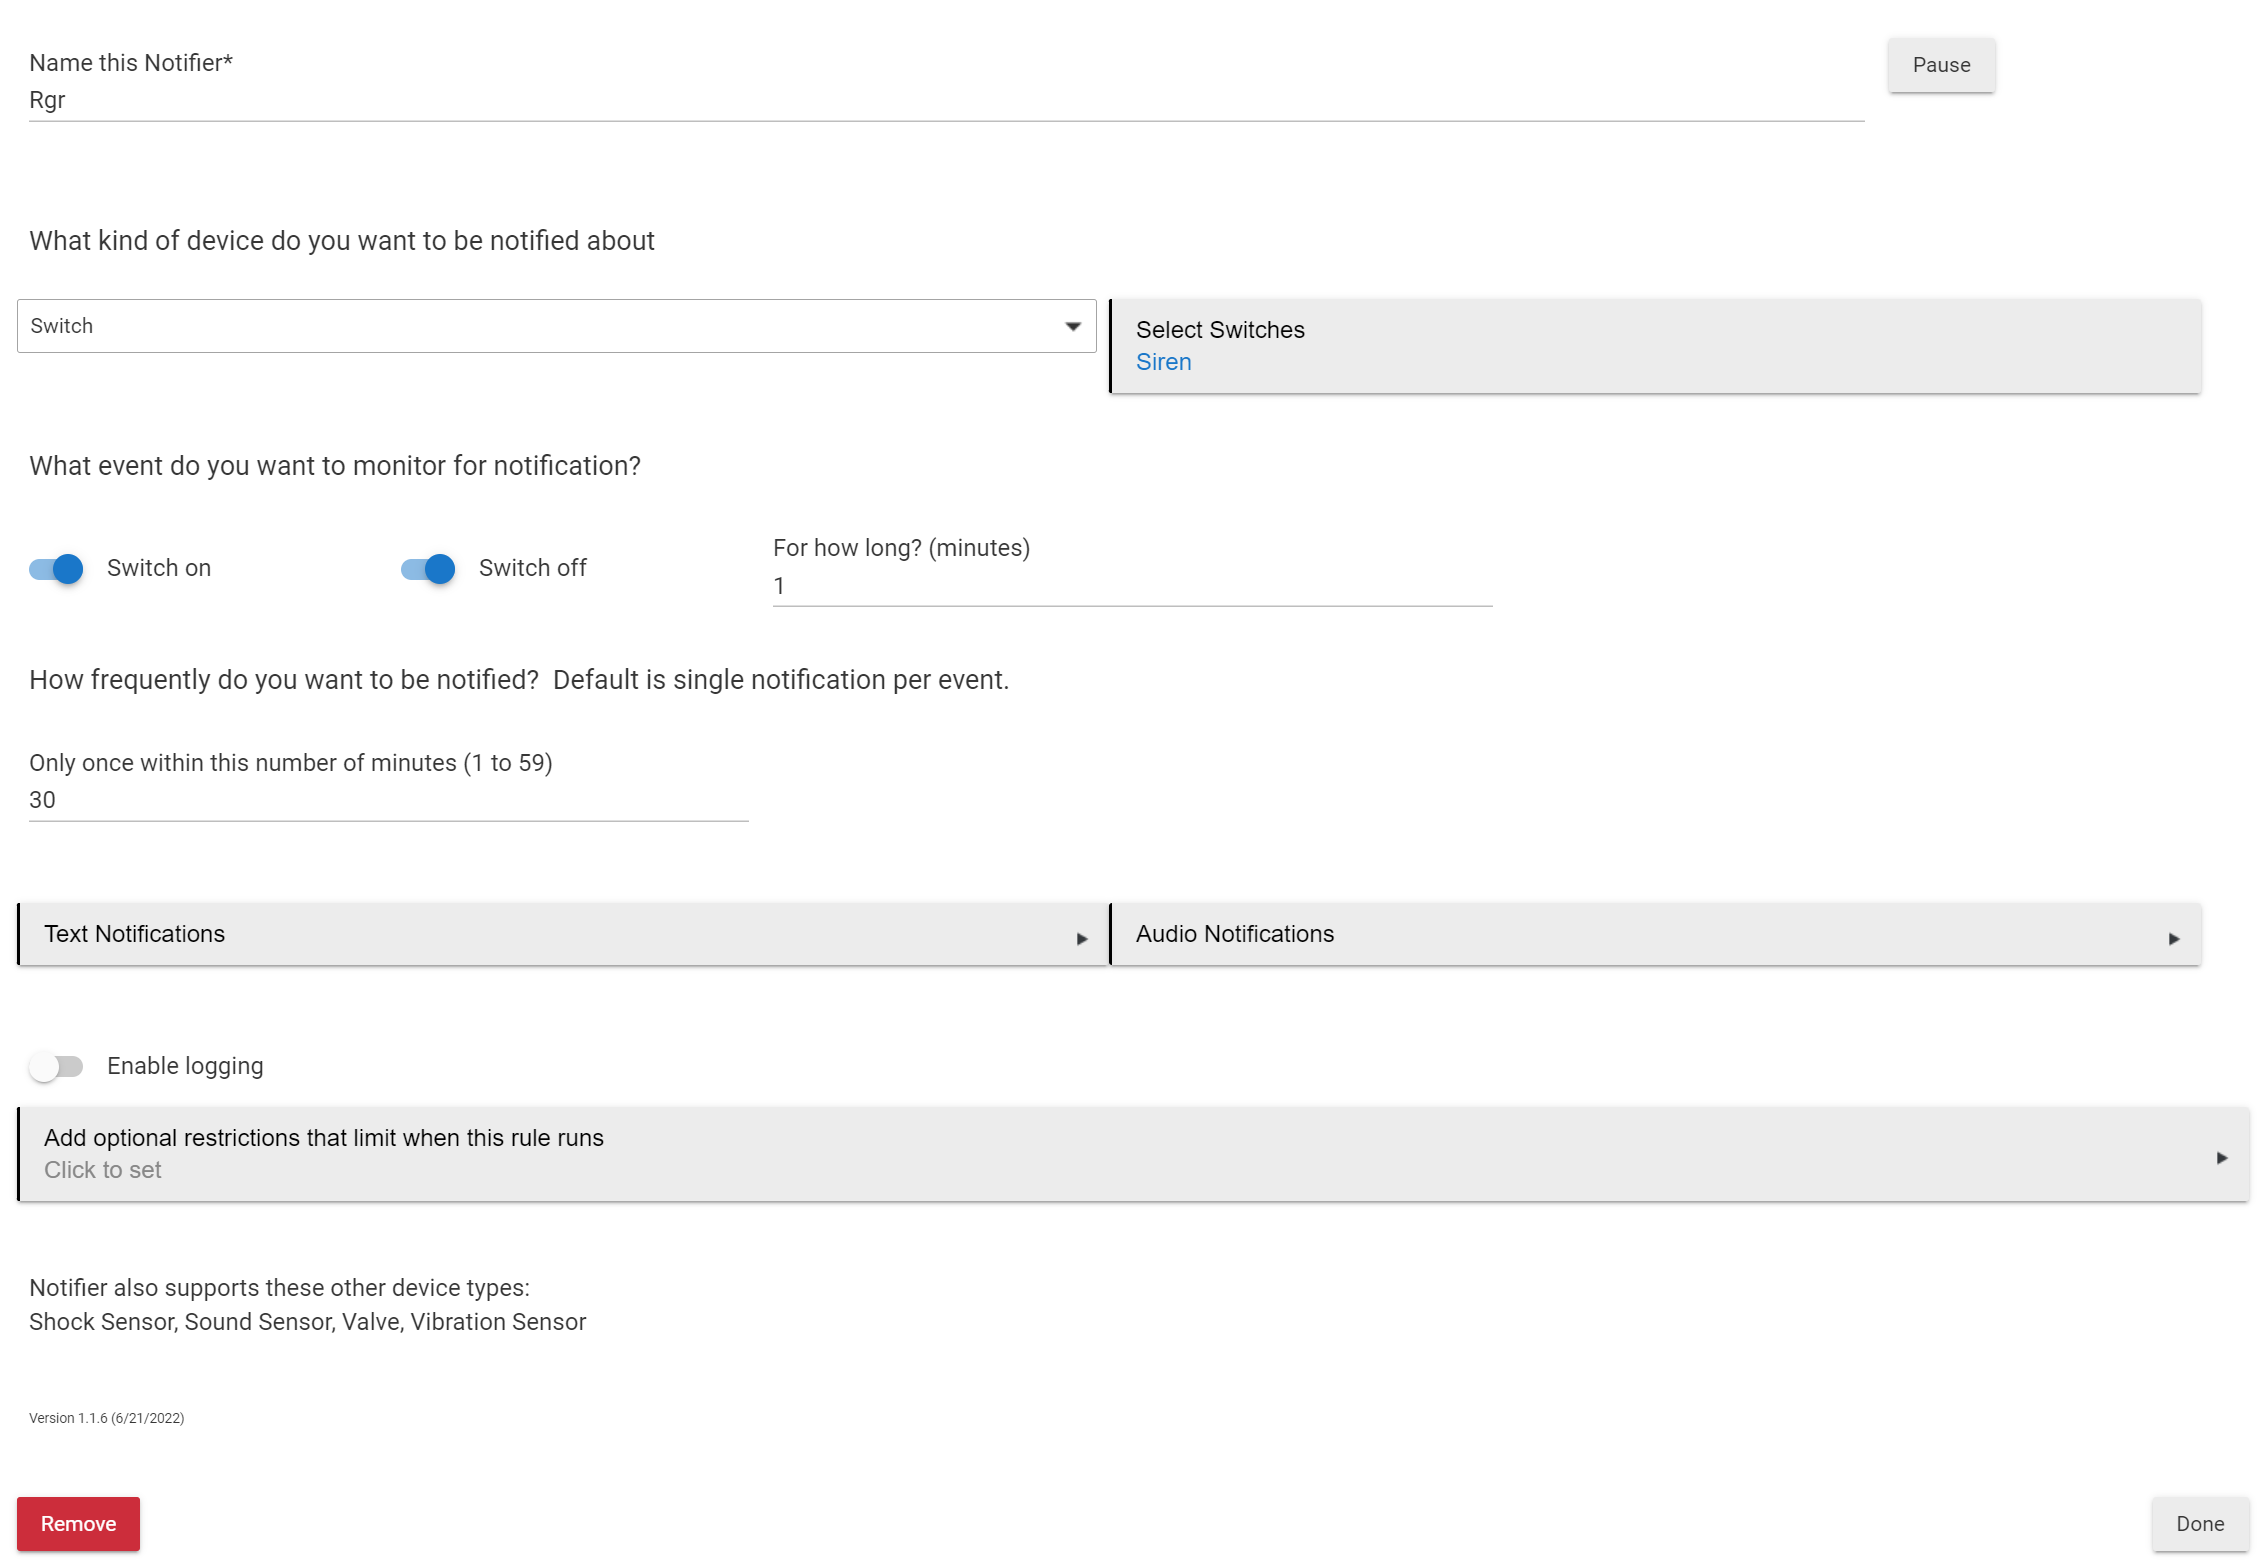
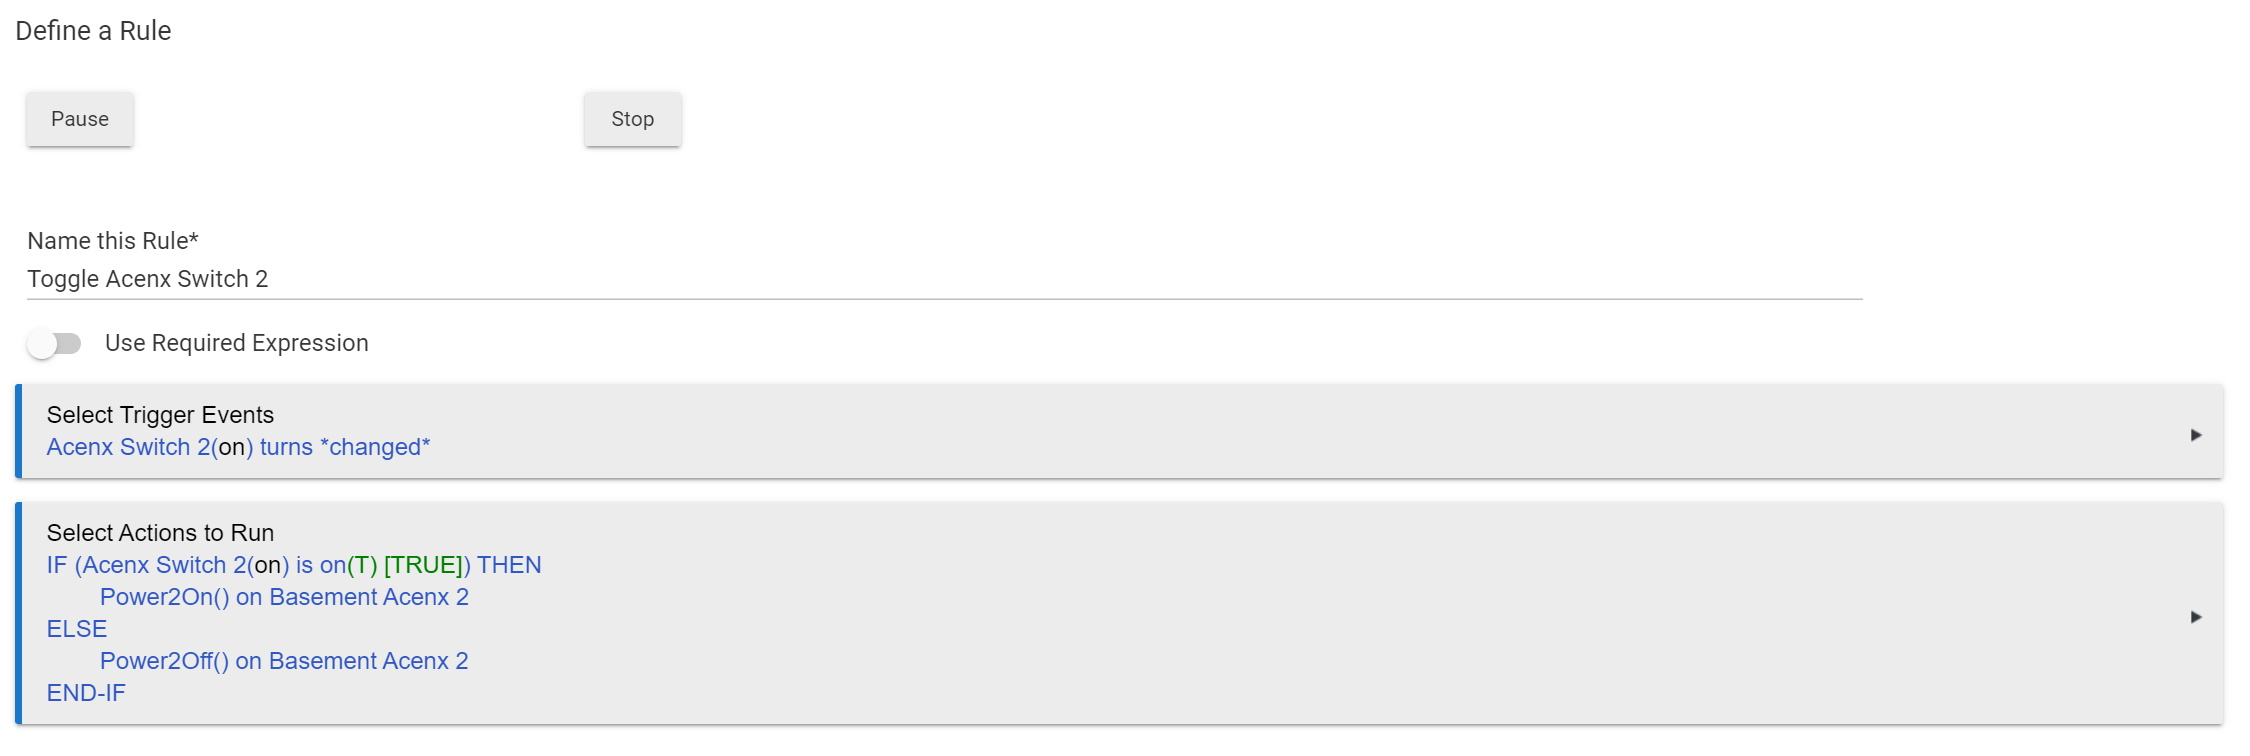
After defining the rule did you turn the role on? rule1 on for example. Please post the rule that is not working.

Changes that get made at the Tasmota UI get reflected by the presence of Rule3. So the most important thing is that you have done a tasmotaInjectRule() which it sounds like you have.
Rule 3 sends changes on two different timescales. Common things like power, color, dimmer, fanspeed etc are monitored and if a change is detected they get sent immediately and you will see the change take effect in Hubitat in 1-2 seconds in my experience.
The second timescale is the one that I think is applying to you. This affects sensor values such as current, power, temperature, pressure etc. Tasmota measures these every second but if we sent them to Hubitat every second it would be very detrimental to Hubitat. Instead these sensor values only get sent at the "Telemetry Period" and in the case of TasmotaSync will only get sent if at least one of the values has changed.

If I remember correctly the TelePeriod default is 300 (seconds) but can be changed to anything in the range of 10-3600 using the TelePeriod command. The TasmotaSync driver display the current TelePeriod in the State Variables.

One important note is that the "Current States" area refreshed automatically (almost always) but the State Variables only refreshed on page refresh.

Bottom line, do a tasmotaInjectRule. Set the TelePeriod to 10. Apply a load to the device and you should see changes occur. If not, turn up the logging level and look at the logs which should yield a reason.

1 Like

Started to tinker with the rules and setting up a relay system. I think I'm making progress, but have hit the "end of my day" already, so it's off to shower and sleep for me. One snag though. When I use the physical buttons, tasmota recieves a "tuyareceived data" thing that basically has the serial data for each fan speed. I put that into a rule and had it do a "power2 on" rather than an MQTT publish. This synced up the relays on the web gui with the physical switch status, and your suggested rule allowed web gui changes to go the physical switch just fine. However, when the fan is turned off, the "speed relay" associated also turns off. When the fan is turned back on, the physical switch remembers the speed it was on last, but Tasmota doesn't, and apparently doesn't receive a "tuyareceived" status to update it.

I haven't began the "link to hubitat" process yet, so forgive me if this would be alleviated during that, but would that "missing speed data" create an issue on Hubitat's side of things?

I'll continue to tinker and either come back with issues, or return with a grand success story that I'm sure somebody somewhere will be happy to find via the google machine. Thanks for your advice and suggestions thus far. I'll keep you posted!

You would need to use a variable to preserve the speed each time it is changed.
ON Power3#State=1 DO backlog TuyaSend4 3,0 ; mem1="3,0" ENDON

and then restore the speed when the power is restored.
ON Power?#State=1 DO TuyaSend4 %mem1% ENDON

or if we are talking about a literal power restore you would use something like this.
on power1#boot DO TuyaSend4 %mem1% ENDON

Hope that helps.

I´m sorry for not being clear, when I mentioned I defined a Rule, I was talking about Hubitat Rule Machine, not a Rule on Tasmota Device Console.

Now after doing a TasmotaInjectRule(), and after setting TelePeriod to 10, it works as expected (Great!!!), but now I have a weird behaviour;

I´ve set a Rule Machine rule sending or speaking a notification everytime a water pump turns on, and what it does, it sends/speaks a message every 10 seconds for 3 minutes +/- before the water pump turns off, and then I just get one message informing me that it has turned off.

Still in the testing process to try different rule formats/apps to see if I can jut get one message / instruction when it turns on, and one when it turns off.

Any ideas?

Thanks for your help

Rgr. Easiest way, would be to use the Notification manager. It has the ability to limit the number of notifications within a given time period. Something like this.

Gary,

Thank you again for your advice with the fan stuff, both in this thread and the other. I have yet to take the time to implement your latest suggestion, I'll get to that one shortly.

In the meantime, I've moved along to another one of my node-red integrated switches to try and migrate them over to Hubitat / Tasmota Sync exclusively. This one is a Treatlife (Tuya) 3-way switch (Template can be found here). I have tried to set it up as both a single and a dual relay switch and can't seem to get it to play along well (once again).

Here's the rundown. Applying the listed template, it will show up as 2 relays on the UI. One reflects a "sensor" line that essentially reflects the actual status of the load, either on or off. The other is the actual physical relay, either on or off (or in a 3-way application, more like A or B). When set up with Tasmota Sync, power commands are sent to Relay 1, or the sensing line. That's fine, because I want on commands to tell the "off load" to turn on. Set up a tasmota rule that when Power1 changes, toggle Power2. Easy day.

BUT! When somebody comes along and toggles one of the "dumb" switches on the other end of the circuit, it flips the "A/B" relay in the switch, which toggles the "load sensing" relay to ON, which activates the rule to toggle power2, lights turn off, sensing relay flips, rule1 activates, and then we have a flickering rave party.

So I thought, maybe I can get Tasmota Sync to "listen" to Power1 for any changes and reflect that state in the UI, but then send on/off commands to Power2 (the physical relay). That would allow the UI to always reflect what the "sensing load" shows, but then only impact the actual relay toggle when commands are issued.

But then that essentially means sending commands to Power2, but then waiting for commands to return via Power1. As with the fan, I started picking through the driver to see if I could figure it out and figured I'd be better off just coming here to ask first.

Thank you in advance! I hope my antics aren't giving you too much of a headache and it's seen more as a test of creativity, flexibility, and perseverance! :stuck_out_tongue_closed_eyes:

If I understand correctly it sounds like you are unable to get the 3 way switch configuration to work properly before adding Hubitat to the mix?
I don't have any 3 way switches but here is a thought that might work.
Configure them as two totally independent switches such as.

Switch1 @ 192.168.0.120
Switch2 @ 192.168.0.121

On Switch1
ON Power?#State=0 DO webquery http://192.168.0.121:80/cm?&cmnd=power off ENDON
ON Power?#State=1 DO webquery http://192.168.0.121:80/cm?&cmnd=power on ENDON

On Switch2
ON Power?#State=0 DO webquery http://192.168.0.120:80/cm?&cmnd=power off ENDON
ON Power?#State=1 DO webquery http://192.168.0.120:80/cm?&cmnd=power on ENDON

This should keep the two switches in sync.

Then connect them to Hubitat as a single relay switch.

Maybe better ideas but there is something to think about.

P.S. You can just paste these commands into your browser to test them out before putting them into a rule. http://192.168.0.120:80/cm?&cmnd=power off

I suppose I didn't describe it quite right. The "3-way" configuration is merely a description of how the internal workings of the switch works. It takes the incoming line power and directs it to a load A wire or a load B wire. The load is energized if the wires further down the line in the dumb switches are "in line" with the load. This is opposed to a single pole that is either toggled to "load connected" or "load not connected." I have only the one smart switch in the entire lineup, then a dumb 4-way switch at the top of the stairs, followed by a dumb 3-way switch at the end of the upstairs hallway, then the actual lighting load, then the neutral line goes back to the breaker panel. Essentially the 3-way switch serves as a standard on/off toggle (in reality it's an A feed / B feed), but Tasmota can use the smart switch's "sensing" line (GPIO14) to detect when one of the dumb switches upstairs has been flipped, completing the circuit and energizing the load, then marking the "sensing" relay as being "on" while the "relay toggle" (the A/B toggle) remains in its original position.

But here's where it gets (more) complicated. Tying that into Hubitat. If I use the "sensing line" as the signal to the hub so the UI shows "on" when the load is on, then sending commands to the load sensing relay would require flipping on the physical relay upon a change in the load sensing line. For example, load is energized, sensing line is "on," hubitat sees it as on. Send off command, tasmota receives it and flips the load sensing relay to off, a rule toggles the physical relay to toggle to whatever side it wasn't on, load is deenergized. Perfect.

But somebody comes along after that and flips a dumb switch, the load is energized. The load sensing relay goes from off to on, the rule triggers and flips the physical relay, which then turns the load off again. The sensing line sees this change and flips accordingly, sends another toggle to the physical relay, rinse and repeat.

Unfortunately, I'm traveling the rest of the week and won't be home to tinker, but figured I'd post an update to this little venture anyway. (As a separate aside, been working with the fan controller and have made progress. Far from perfect or consistent, but I'm getting there.)

Hi @garyjmilne

Thank you so much for the work you have done. I wanted to ask before I even tried to make changes. I have a custom device running Tasmota that measures (ultrasonic sensor) the distance from my garage roof to the floor. Using a Tasmota rule, if the distance is greater than say 150cm then the car is not in the garage. If less then there is a car in the garage. This rule either turns a switch on (car is present), or off (no car)

What could I use in the Tasmota sync drivers to replicate this and is the distance sensor supported?

This is how it is showing currently in Hubitat

Hi Greg, in theory that should be pretty easy. I have some SR04 so I know they work as long as you have the sensors version of Tasmota installed which you already do by the sound of it. I'll refer you over to the universal sensor thread which you can find [here.] ([Released] Tasmota Sync - Universal Sensor Driver - #15 by garyjmilne) for future discussions around this topic.

Here is what you need to do.

  1. Change the IP on the DRIVER of your existing "Greg Car - Universal Parent". The field is called Device Network ID. This lets you keep your old config while you try out the new one.

  2. Install my Tasmota Sync Universal Sensor Driver per the instructions and make sure you add the IP of the Tasmota device and the Hub. Looks like you have a switch on your Tasmota device so you would use the Universal Sensor driver with Single Relay.

  3. Do a refresh and it should populate the attributes.

  4. Once it has detected your ultrasonic sensor it should populate an attribute called distance if I remember correctly.

  5. Once that is working you can now do the tasmotaInjectRule and the tasmotaTelePeriod and it will send updates from Tasmota back to Hubitat automatically.

  6. When you are creating Hubitat rules around the sensor values you need to use the custom attribute value as your trigger.

I may have missed something so you can find the documentation here.

Sounds complicated but once you have been through it you will find it's quite easy to do.

P.S. You need to upgrade to Tasmota to version 11 or later. I'm using 12 on all my devices without any issue. Here is a guide if you need any help with that. https://github.com/GaryMilne/Hubitat-Tasmota/blob/main/How%20to%20Upgrade%20from%20Tasmota%20from%208.X%20to%2011.X.pdf

1 Like

It's a difficult one to think through without an actual device to tinker with. What I would do is figure out in english language terms what I want to happen in each of the scenarios.
Relay On, Sensing On - Receives Sensing Off
Relay Off, Sensing On - Receives Sensing On
etc.

My guess is you will need to use either a variable (%var%) or another relay to store "the truth". You might need to use the oneShot capability of rules to prevent the race condition that you are seeing. If you need more complex expressions in rules Tasmota has a version that allows that.

P.S. You can concatenate the values of the 2 relays into a single variable (like I do in my driver) and then use that single variable to decide what to do.

Sorry that I can't help more.

Did it all work out O.K.?

Hi @garyjmilne

I managed to change over the Tasmota device with the ultrasonic sensor and all is good. What I did want to ask you is, under the State Variables it has a LastSensorData and this does not update the time unless I click on refresh. Does this have anything to do with the device updating to HE. The values are changing in the Current States but the dashboards don't seem to be updating unless I re-load the dashboards? Any ideas?

Greg, glad it is working for you. I understand your confusion re:[quote="greglsh, post:157, topic:93651"]
under the State Variables it has a LastSensorData
[/quote]
Hubitat gets updated in two ways with this driver.

  1. After doing an injectTasmotaRule the Tasmota device sends the data (if changed) unsolicited based on the TelePeriod. When this happens it updates the lastTasmotaSync field.
  2. When doing a 'Refresh' via the Hubitat interface or when Polling is configured. When this happens it updates the lastSensorData.

Note that the state Variables area of Hubitat does not refresh automatically like the Current States does.

1 Like

Anyone interested in the Tasmota Sync drivers should also take a look at this companion app I wrote to distribute commands to multiple Tasmota devices at the same time. Makes a lot of things easier.

Hi @garyjmilne

Wanted to ask you I have Sonoff Tx light switches which have been flashed with tasmota. I have changed them to your sync driver. What I have is single, double and triple switches. I can operate the "primary" switch fine from the dashboard, but how would I "access" the second and third switches from the dashboard like I had before.

So I basically need to add a button so that I can switch2 and switch3 on and off?

If by dashboard you mean the driver interface screen then you would use the Triple relay/switch driver.

Hi

Yes I have used the double relay/switch and the triple relay/switch, how do I add the second switch as a button on the dashboard?
As you can see with the old driver each light was "exposed" as a separate device. Now it is one device with 2 switches? How do I add a button on the dashboard for the second switch?

Thanks for help.

I have changed this 2 switch light fixture to your driver and I have not deleted the old ones below just to show you.

I don't use dashboards, partly because they are ugly and rather limited. If you want something prettier take a look at sharptools.io. They have an Hubitat approved app that shares all the devices and state with their platform and can produce prettier results but it costs $25/year.

But in answer to your question this is what you have to do.

  1. Create a Virtual Device

  2. Create a rule like this.

Basically, when the virtual switch is toggled it triggers the rule. The rule matches the state of the Switch2 on the physical device to the state of the switch on the virtual device. The key is that you have to use the custom command options for your actions.

  1. Place the virtual device on your dashboard.

and now you have what you were looking for.

I was hoping to create an app that would allow me to do all this leg work and make it easy to create these linked virtual devices but there is no API to create rules so they have to be done the manual way. It's a powerful platform but geared towards those that don't mind a little tinkering.

1 Like

I CLAIM VICTORY!! @GraphicHealer Might be happy to someday come back to know that I have successfully frankensteined the "Fan with Dimmer" driver to work with this tuya monstrosity!

For the google machine wanderers that find this, I have managed to get the Treatlife DS03 fan and dimmer controller talking to hubitat perfectly.

It's literally going on 4am here, so I'll come back with updates another time, but just wanted to pop in to do my victory lap before bed. Managed to get my 3-way issue figured out too, but that one was much less polished. I may go in to rework it, just because, or I'll choose to not rip out the little hair I have left and just leave alone what is working.

Anyway, thank you so much for these drivers. Much of "my work" was copy/pasting code you already wrote and tweaking variables and such to make it work for me, but it never could have been possible without you blazing the trail. Thank you so much!