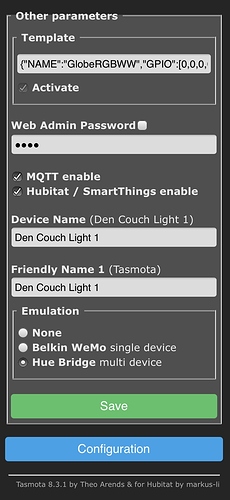
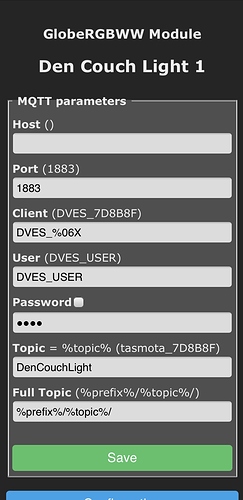
There may be settings to get that sent, but if you could turn on the debug logging in HE for those lights, maybe there is something that just looks different and a small change can fix it?
Firstly, just wanna give a big shout out to @markus ... great work on the app and drivers. It has made integrating Kogan Smart Plugs (with energy metering) with HE alot better!
Just wanted to provide a bit of feedback on my experience thus far, in case it helps another user ...
ISSUE For some reason, when I attempted to add the Kogan Smart Plug (flashed with the standard Tasmota firmware) with Hubitat, it provided the expected parameters (using the extended driver) but wouldn't push through the power metering values to the InfluxDBLogger.
SOLUTION It was only after re-flashing with the custom Hubitat Tasmota firmware, that the power metering values were parsed and pushed through to the InfluxDBLogger.
Well, turned on debug logging on both the app and the drivers but I’m not getting any debug information coming to the logs... very odd...
Then it may not be sending anything. Do you have MQTT active on the devices? If not, start it and see if you get messages to MQTT.
Yup. I had enabled MQTT while trying to set the group and left it on.
Thank you ![]()
This is really the only supported way of doing it ![]()
Do you see anything in MQTT being updated?
To see what is sent, yes you would need one. If you don't have one, don't worry about it. I'll have to look at these new features and see how to get updates out.
@DementedDragon have you looked at this yet?
I may be being an utter newb here, but when I go to the Wiki for installation instructions and click on the [to get a device ready preparing the device with the correct firmware] link, it points here(link deliberately broken for illustration purpose):
https:/ /github.com/markus-li/Hubitat/wiki/Generic-how-to-use-Hubitat-Tasmota-7.x-firmware-and-driver-guide
but goes here:
Had me going around in circles for a bit.

Can someone have a look at this process and let me know if I have made any obvious errors?
To summarise, I have a whole bunch of Sonoff Minis that I am going to be using as in ceiling light drivers, I want to flash them to the Hubitat Tasmota.
I will do the following for each one:
- Fire it up and update to the latest firmware using ewelink
- Open it up and put it into DIY Mode
- Connect to my specially prepared guest network(sonoffDIY)
- Change the WiFi Credentials to my HA network
- Flash tasmota-minimal.bin (Not sure this step is totally necessary)
- Flash Tasmota-Hubitat.bin(presumably from here Releases · markus-li/Tasmota-Hubitat · GitHub
- Apply the correct template for the Sonoff Mini (I think this one is right
"{"NAME":"Sonoff Mini","GPIO":[17,0,0,0,9,0,0,0,21,56,0,0,255],"FLAG":0,"BASE":1}") - Ensure my WiFi credentials are still good and proper.
At this point I should have a Tasmota flashed for Hubitat Mini to do with as I please?
I understand there's some work to be done Hubside, but I'm specifically trying to get to a repeatable process for the Minis.
Fixed, thank you for pointing it out.
Do NOT do this, for all OTA updates (TuyaConvert and Sonoff DIY), never use minimal, it will create problems. You will need to use a "Lite" firmware from the original Tasmota release version 8.3.1, then you can use "tasmota-hubitat-v8.3.1.bin.gz".
Once you have the correct Hubitat enabled firmware on, run "Reset 5".
The App and driver on HE can do this automatically for you, just choose Sonoff Mini in the dropdown.
Good to know, thank you I'll update my process.
Presumably I'll need to go through the installation of the T4HE as documented in your wiki.
In all honesty I haven't even powered the Hubitat on yet, I am by profession a Technical Architect, so planning comes before doing for me.
I'll get the HE up and running then so that I can flash all these devices correctly.
Yes, or you can use Hubitat Package Manager, it will make things easier.
I updated my Sonoff minis this weekend and it took me quite a while to get things going...
In case you (or others later on) are interested, here are the steps that worked for me. Sounds like you already have part of it in place.
Set this on the WIFI:
SSID: sonoffDiy
Pass: 20170618sn
Get following tool as one option to connect to the device (didn't work for me)
Download and install "Advance REST Client" - That one is harder to use - you need to follow the commands in the document below... But it is the one that worked for me.
https://install.advancedrestclient.com/install
Follow instructions from:
Configure router with only 2.5GHz and the correct SSID & Pass)
Setup IIS on the laptop to share the firmware via local IP address:
- From "Apps & features", go to "Programs and Features" - Link in top right
- From "Programs and Features", select "Turn Windows features on or off"
- From "Turn Windows featukres on or off", select "Internet Information Services" to install IIS
- Copy the Tasmota Firmware files to "C:\inetpub\wwwroot" to use the laptop's IP address to download the files
Set the Sonoff into DIY mode. It will connect to the sonoffDiy
(Note - if you upgrade to the last Sonoff firmware, 3.5.0 I think... The process is different)
Use Advance REST Client to test the connection, enable OTA flashing and flash. See github instructions.
Checksum can be determined with the following command:
C:\Users\sebas>CertUtil -hashfile C:\inetpub\wwwroot\tasmota-lite-8.1.0.bin SHA256
SHA256 hash of C:\inetpub\wwwroot\tasmota-lite-8.1.0.bin:
088b710b91f3e0b03478132df3f78fa9cd4358d9fcbcd8aa4bca8cddc57e2b06
CertUtil: -hashfile command completed successfully.
Execute the JSON command to allow firmware flashing
The JSON command to flash the firwmare is (I was only able to flash 8.1.0 on it) :
{
"deviceid": "1000b5d5df",
"data": {
"downloadUrl": "http://192.168.87.21/tasmota-lite-8.1.0.bin",
"sha256sum": "088b710b91f3e0b03478132df3f78fa9cd4358d9fcbcd8aa4bca8cddc57e2b06"
}
}
Follow the typical Tasmota steps (connect to the device's Wifi and then update the firmware)
- Update to 8.3.1 Minimal
- Update to 8.3.1 Tasmota
Hey,
Thanks for your response.
This is the one I'm hoping I can get working, there's a YouTube vid that showed it working and it seemed simple enough that I was hoping to replicate, I'm doing 22 of these things in total.
Had a quick look, think it may be worth my time to get the GUI, point and click solution running, but I'll definitely prepare this as an alternative.
I run a UniFi USG/Controller/AP setup, I have a 2.4GHz sonoffDiy wlan setup on VLANS with only the working windows machine connected to it, hoping it will simplify the topography enough that things just work (yeah right!)
Thanks again!
![]()
I'm using a Koogeek KSP2 smart plug with power monitoring (using W-DEXI template) and it is found Ok with your app and Universal Metering Plug/Outlet. But it seems that the data is not being parsed correctly. In the Events table only the Power and Voltage parameters have an entry in the Unit column. All the other parameters have the units appended to the value (eg "current" is shown as "0.068 A")
This gives me a problem when I try to graph these values as they are not seen as numeric (I can only graph Power and Voltage).
Any ideas?
This is by design so that you can get the unit displayed on a tile in the Dashboard. This was discussed in the HubiGraphs thread during the last 24 hours and now has a fix in HubiGraphs. I might also add the option to save without the unit, but for now at least there is a solution.
Thanks. I didn't realise that Dashboard tiles would not be able to access separate Units info.
To me, a complete beginner with Hubitat, it would have been more logical to fix the tiles but I guess that this is some kind old long-running saga that I was not aware of.
So, if I understand correctly, the shortcoming in tiles has required you to make a 'fix' in your app, which has required Hubigraphs to make a 'fix' in their app. Hmmm.
Just as an aside, the units for Power and Voltage do appear in the Units column and are not integrated into the Value column. Why is this?
Yes, fun, isn't it ![]() It's a shortcoming of the Dashboard and to fix it an update from Hubitat would be needed or we would need to inject our own Javascript (which feels very much like overkill).
It's a shortcoming of the Dashboard and to fix it an update from Hubitat would be needed or we would need to inject our own Javascript (which feels very much like overkill).
Those have dedicated tiles that do display the unit.
@markus - I've just finished updating from 6 to 8.3.1 on a few sonoff basic units that I use for assorted jobs around the house, I've also switched from @ericm's Sonoff Connect app (which has served me well, kudos to him) to your T4HE. I'm impressed, thank you for the hard work.
I'm now looking at switching from Veeceeoh's Xiaomi drivers to your release - I just hope it goes as smoothly 


