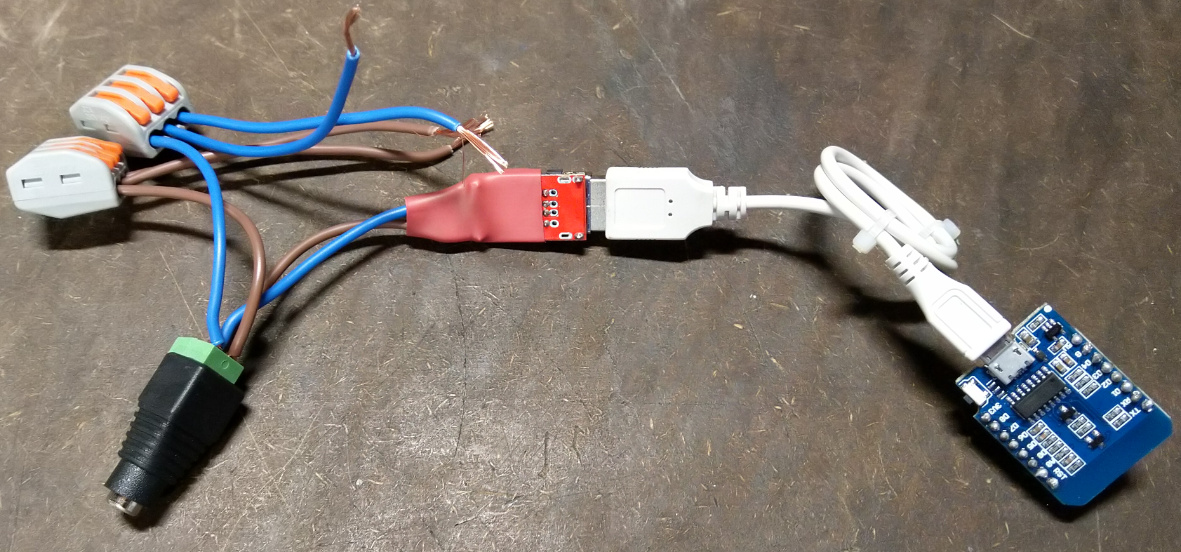
Harness is complete, I just need the 2 channel relay to arrive in the mail and I will then connect up to power then connect the Wemo's D1 Mini 
1 Like
OK, I have pushed all of the new code into my ST_Anything GitHub repository.
New example sketch that implements a valve device controlled by a pair of relays
You'll also need the two new \libraries\ST_Anything\ files that implement the new EX_TimedRelayPair device (I know, the name sucks! ![]() ) Grab EX_TimeRelayPair.h and EX_TimedRelayPair.cpp.
) Grab EX_TimeRelayPair.h and EX_TimedRelayPair.cpp.
Finally, you need to update your "HubDuino Parent Ethernet" groovy driver code...and ADD the new "Child Valve" groovy driver to your hub.
This should get you started. Read the comments at the top of either the EX_TimedRelayPair.h or .cpp files for details of the arguments when defining the device in your sketch. Hopefully I have accounted for whatever behavior you need.
//******************************************************************************************
//  File: EX_TimedRelayPair.h
//  Authors: Dan G Ogorchock
//
//  Summary:  EX_TimedRelayPair is a class which implements the "Valve" device capability, where output1 opens a valve, and
//            output2 closes a valve.  It features optional automatic-turn-off time delay times for for both outputs.
//
//			  It inherits from the st::Executor class
//
//			  Create an instance of this class in your sketch's global variable section
//			  For Example:  st::EX_TimedRelayPair executor1(F("valve1"), PIN_RELAY1, PIN_RELAY2, LOW, true, 1000, 1000);
//
//			  st::EX_TimedRelayPair() constructor requires the following arguments
//				- String &name - REQUIRED - the name of the object - must match the Groovy ST_Anything DeviceType tile name
//				- byte pinOutput1 - REQUIRED - the Arduino Pin to be used as a digital output
//				- byte pinOutput2 - REQUIRED - the Arduino Pin to be used as a digital output
//				- bool startingState - REQUIRED - the value desired for the initial state of the switch.  LOW = "closed", HIGH = "open"
//				- bool invertLogic - REQUIRED - determines whether the Arduino Digital Output should use inverted logic (e.g. active high versus active low relays)
//				- long Output1Time - REQUIRED - the number of milliseconds to keep the output1 on, DEFAULTS to 1000 milliseconds, 0 = will stay on
//				- long Output2Time - REQUIRED - the number of milliseconds to keep the output2 on, DEFAULTS to 1000 milliseconds, 0 = will stay on
//
//  Change History:
//
//    Date        Who            What
//    ----        ---            ----
//    2019-10-30  Dan Ogorchock  Original Creation
//
//
//******************************************************************************************
Give it a try and let me know how it goes!
Have fun!
1 Like
Thank you very much. I will definitely report back once this 2 channel relay arrives.
Update: @ogiewon all loaded and good to go.. hurry up 2 channel relay!! 
1 Like
I have a couple of open relays I might try this to see if it will work for my use this weekend. Will report back how it goes
2 Likes
Wow that was fast service, kudos.
Mike
Two easy questions.
I am fiddling with the Hubduino presence attribute to notify m ein the case of an arduino failure. I had the time setting to 30 seconds (default). The driver would go not present at that 30 second mark. I only have a couple of temp sensors on the arduino at the moment. They report in every 60 seconds or so. Is the driver looking for any kind of update / activity to reset the timer? I am thinking that the default timer is to short for the activity. Actually a couple of minutes would work for my use. Just double checking my ? logic ?.
2nd question. I have a second Arduino running many things through HUbduino. I would like to upgrade the driver to include the presence. Will upgrading the driver reset all my other settings in Hubitat, names and such?
Thanks
Ummm, the default in the Parent Driver is 900 seconds...
input "timeOut", "number", title: "Timeout in Seconds", description: "Max time w/o HubDuino update before setting device to 'not present'", defaultValue: "900", required: true, displayDuringSetup:true
This is to ensure that some sort of update has been received from the Arduino device within that time-frame. If you have sensors collecting and sending data every 60 seconds, then I would probably set the timeout to ~300 seconds (or 5 minutes.) The purpose of the new Parent Presence feature is to simply notify the user in the event something has gone wrong. For example, if the power supply for the Arduino has failed, or you changed the WiFi password on your router, but forgot to update your ESP8266 boards. That's why I thought 15 minutes was adequate for most users. YMMV, of course. ![]()
You can safely update the Parent and Child drivers. In some cases, they need to updated as a matched set. So, please be sure to import all of the code for anything that has changed since you last updated the HubDuino drivers. I had some users test with running HubDuino installations and know one had reported any issues. I upgraded all of my HubDuino instances as well, without any issues.
Now I am thinking that the issue with the timer was self inflicted LOL My working on this project has been so fragmented that I probably set it to 30 and forgot. 5 minutes works for me. I definately like the feature, if something goes south I want to know about it.
I will backup my system and do the update. Thanks
Unrelated question. In the Arduino sketch I beliece there is a section to "insert your own code to do things" Could that be a two way communication to Hubitat? In other words could a variable in hubitat be sent to the arduino to change a setting? Just skulling things out.
Thank you for your help
Yes, this is possible, but not in the section of code you typically find in each sketch. If you can describe the use-case, I can provide you with details on the best approach/design that fits within the current architecture.
can a hubduino device be added to both smartthings and hubitat at the same time? I have an outside temperature sensor running on a NodeMCU. Google home does not support it on hubitat but I think I remember it was able to when connect to smartthings. I use this sensor for a few things in hubitat. But I am tired of my family asking google what the temperature is outside and it saysing " I'm sorry, looks like that device isnt setup yet" 
No, that is not possible. You could use the Community HubConnect integration to mirror HE devices as virtual ST devices.
Why not just let Google use it’s normal weather data feed? “Hey Google, what’s the temperature?” has always worked fine for us.
Many thanks @ogiewon it works perfectly. I just had to change the timing to the below and it worked fine static st::EX_TimedRelayPair executor1(F("valve1"), PIN_TIMEDRELAY_1, PIN_TIMEDRELAY_2, HIGH, true, 7000, 7000);
1 Like
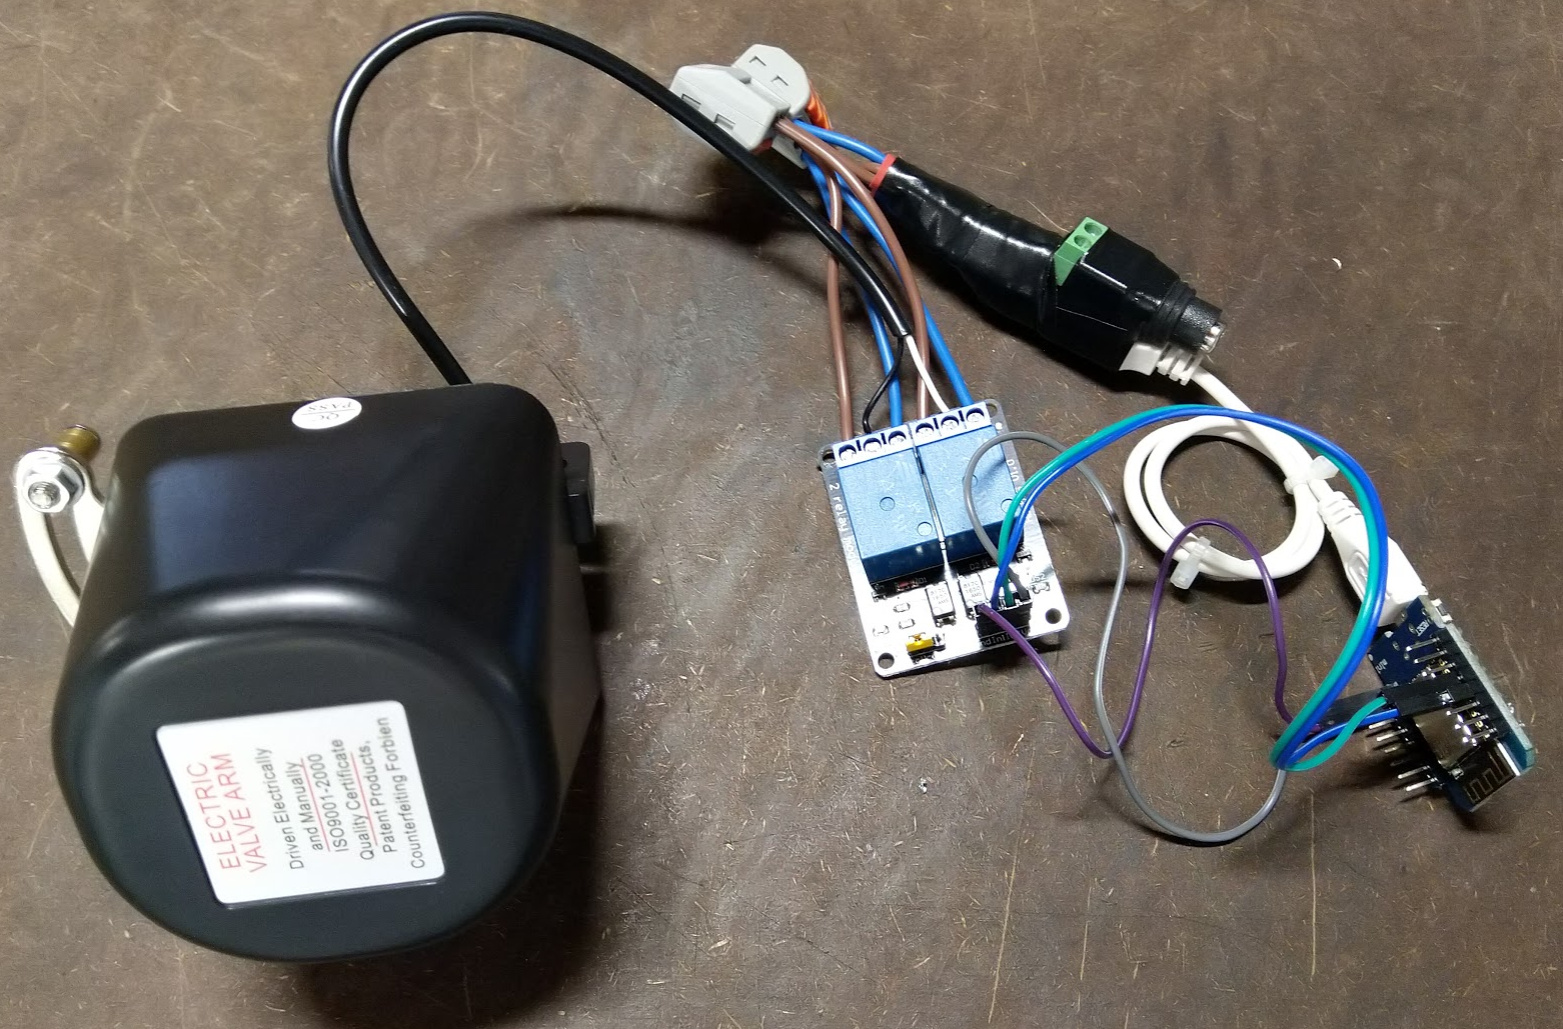
Glad to hear it worked as expected! Do you have a link to the wiring diagram for the relays? I am curious about how the valve actuator is wired through the relays and to the power supply. Thx!
1 Like
Absolutely, I have been documenting it along the way so just finished updating it. See below link.
2 Likes
Just so I understand what you are doing. You are using two relays to change the polarity (12VDC) to reverse the motor or run it forward. When the motor gets to the fully open or closed what stops it? Is there a stop of some kind?
1 Like
You are correct. The motor has a protection mechanism so it will stop once it hits the end but @ogiewon also put a timer on this to actually kill the power too 

2 Likes
They always ask whats the temperature outside and it responds with "that device hasnt been setup yet" If asked what's the temperature? it responds with " inside temp and thermostat settings" We have to ask what the temperature is in our city to pull local weather data.
1 Like
Hi Dan,
The project will deal with basically 3 things:
Temp sensors
Relays
Variables
This project is to replace a hot water control system for my heat. Here's how it works.
There is an outside temp sensor, a water temp sensor and an indoor temp sensor. The relays will a. control the boiler firing. (there are other controls to shut down the boiler under the following conditions a. low water, b. over temp, over water temp) b. relay for the main circulator, a op/cl valve for mixing the hot water (that will take two relays, I envision an open, close and stop where you are kinda operation for the valve. A relay will have to open the common leg of the power when the temp of the water hits the calculated temp.) and the return water from the system Using a set temp point (a mean low temp for my area) the system calculates what temperature the water needs to be using the outside temperature and the inside set temp. I have a curve that the current system uses. I would like the arduino to do the calculations and send the commands for the relays and valve , and temps to the Hubitat so I can actually see what is happening. The Arduino at this point has the sensors and 4 relays connected to it. I can control them from the Hubitat.
So is this something that you think can be accomplished? Can all the logic be on the arduino and have the actual status of all the devices be sent to Hubitat? If so that would be preferable, since the Arduino could still control the heat if it isn't connected to the Hubitat.
@elentz - sorry for the delay...
Most likely.
It is definitely possible to write whatever local logic you'd like within the Arduino sketch.
Where things start getting tricky, is how things will behave after a power blip, Arduino firmware update, Arduino hardware failure, etc... You'd really have to perform a failure modes and effects analysis (FMEA) to make sure the boiler is always in a safe state. Personally, I would hope that a commercial off the shelf solution would be available to have peace of mind.
If you want to pursue this project, I would probably recommend you write a standalone Arduino sketch that behaves exactly the way you'd like. Test it and make sure you're satisfied with it. Once you have a sketch, we could work together to add network communications to Hubitat using the same communications libraries that HubDuino uses.
Hi Dan,
Ha, I didn't think of getting it to work totally within the Arduino and then wrapping the Hubitat portion into the sketch. I believe I have already seen some sketched that do similar operations. I will let you know when I have something working.
Thanks!

