Is it possible to transition a sketch that uses a LCD display using the IC2 bus to sending the information to devices (virtual) on the Hubitat? Most of them would be temperatures, there would be a need for a thermostat function to send back to the sketch a setpoing. I have a hot water heating sketch that uses a 4 x20 display and I would like to have it send the info to the Hubitat.
I'm having trouble compiling an arduino sketch for 8266 OR esp32
I did make sure that I'm using the right chip
![]()
It seems like my libraries are messed up...I'm posting in the hopes someone has dealt with this before
libraries\SmartThingsESP32WiFi\SmartThingsESP32WiFi.cpp.o: In function st::SmartThingsESP32WiFi::WiFiEvent(system_event_id_t)': C:\Users\TimothyO'Callaghan\Documents\ArduinoData\packages\esp32\hardware\esp32\1.0.4\libraries\WiFi\src/WiFiServer.h:39: multiple definition of st::SmartThingsESP32WiFi::WiFiEvent(system_event_id_t)'
libraries\SmartThingsESP32WiFi\SmartThingsESP32WiFi (1).cpp.o:C:\Users\TimothyO'Callaghan\Documents\Arduino\libraries\SmartThingsESP32WiFi/SmartThingsESP32WiFi (1).cpp:70: first defined here
libraries\SmartThingsESP32WiFi\SmartThingsESP32WiFi.cpp.o: In function st::SmartThingsESP32WiFi::init()': SmartThingsESP32WiFi.cpp:(.text._ZN2st20SmartThingsESP32WiFi4initEv+0x0): multiple definition of st::SmartThingsESP32WiFi::init()'
libraries\SmartThingsESP32WiFi\SmartThingsESP32WiFi (1).cpp.o:SmartThingsESP32WiFi (1).cpp:(.text._ZN2st20SmartThingsESP32WiFi4initEv+0x0): first defined here
libraries\SmartThingsESP32WiFi\SmartThingsESP32WiFi.cpp.o:(.bss._ZN2st20SmartThingsESP32WiFi17disconnectCounterE+0x0): multiple definition of st::SmartThingsESP32WiFi::disconnectCounter' libraries\SmartThingsESP32WiFi\SmartThingsESP32WiFi (1).cpp.o:(.bss._ZN2st20SmartThingsESP32WiFi17disconnectCounterE+0x0): first defined here libraries\SmartThingsESP32WiFi\SmartThingsESP32WiFi.cpp.o: In function st::SmartThingsESP32WiFi::SmartThingsESP32WiFi(unsigned short, IPAddress, unsigned short, void ()(String), String, bool, int)':
SmartThingsESP32WiFi.cpp:(.text._ZN2st20SmartThingsESP32WiFiC2Et9IPAddresstPFv6StringES2_bi+0x0): multiple definition of st::SmartThingsESP32WiFi::SmartThingsESP32WiFi(unsigned short, IPAddress, unsigned short, void (*)(String), String, bool, int)' libraries\SmartThingsESP32WiFi\SmartThingsESP32WiFi (1).cpp.o:SmartThingsESP32WiFi (1).cpp:(.text._ZN2st20SmartThingsESP32WiFiC2Et9IPAddresstPFv6StringES2_bi+0x0): first defined here libraries\SmartThingsESP32WiFi\SmartThingsESP32WiFi.cpp.o: In function st::SmartThingsESP32WiFi::SmartThingsESP32WiFi(unsigned short, IPAddress, unsigned short, void ()(String), String, bool, int)':
SmartThingsESP32WiFi.cpp:(.text._ZN2st20SmartThingsESP32WiFiC2Et9IPAddresstPFv6StringES2_bi+0x0): multiple definition of st::SmartThingsESP32WiFi::SmartThingsESP32WiFi(unsigned short, IPAddress, unsigned short, void (*)(String), String, bool, int)' libraries\SmartThingsESP32WiFi\SmartThingsESP32WiFi (1).cpp.o:SmartThingsESP32WiFi (1).cpp:(.text._ZN2st20SmartThingsESP32WiFiC2Et9IPAddresstPFv6StringES2_bi+0x0): first defined here libraries\SmartThingsESP32WiFi\SmartThingsESP32WiFi.cpp.o: In function st::SmartThingsESP32WiFi::SmartThingsESP32WiFi(String, String, IPAddress, IPAddress, IPAddress, IPAddress, unsigned short, IPAddress, unsigned short, void ()(String), String, bool, int)':
SmartThingsESP32WiFi.cpp:(.text._ZN2st20SmartThingsESP32WiFiC2E6StringS1_9IPAddressS2_S2_S2_tS2_tPFvS1_ES1_bi+0x0): multiple definition of st::SmartThingsESP32WiFi::SmartThingsESP32WiFi(String, String, IPAddress, IPAddress, IPAddress, IPAddress, unsigned short, IPAddress, unsigned short, void (*)(String), String, bool, int)' libraries\SmartThingsESP32WiFi\SmartThingsESP32WiFi (1).cpp.o:SmartThingsESP32WiFi (1).cpp:(.text._ZN2st20SmartThingsESP32WiFiC2E6StringS1_9IPAddressS2_S2_S2_tS2_tPFvS1_ES1_bi+0x0): first defined here libraries\SmartThingsESP32WiFi\SmartThingsESP32WiFi.cpp.o: In function st::SmartThingsESP32WiFi::SmartThingsESP32WiFi(String, String, IPAddress, IPAddress, IPAddress, IPAddress, unsigned short, IPAddress, unsigned short, void ()(String), String, bool, int)':
SmartThingsESP32WiFi.cpp:(.text._ZN2st20SmartThingsESP32WiFiC2E6StringS1_9IPAddressS2_S2_S2_tS2_tPFvS1_ES1_bi+0x0): multiple definition of st::SmartThingsESP32WiFi::SmartThingsESP32WiFi(String, String, IPAddress, IPAddress, IPAddress, IPAddress, unsigned short, IPAddress, unsigned short, void (*)(String), String, bool, int)' libraries\SmartThingsESP32WiFi\SmartThingsESP32WiFi (1).cpp.o:SmartThingsESP32WiFi (1).cpp:(.text._ZN2st20SmartThingsESP32WiFiC2E6StringS1_9IPAddressS2_S2_S2_tS2_tPFvS1_ES1_bi+0x0): first defined here libraries\SmartThingsESP32WiFi\SmartThingsESP32WiFi.cpp.o: In function st::SmartThingsESP32WiFi::SmartThingsESP32WiFi(String, String, unsigned short, IPAddress, unsigned short, void ()(String), String, bool, int)':
SmartThingsESP32WiFi.cpp:(.text._ZN2st20SmartThingsESP32WiFiC2E6StringS1_t9IPAddresstPFvS1_ES1_bi+0x0): multiple definition of st::SmartThingsESP32WiFi::SmartThingsESP32WiFi(String, String, unsigned short, IPAddress, unsigned short, void (*)(String), String, bool, int)' libraries\SmartThingsESP32WiFi\SmartThingsESP32WiFi (1).cpp.o:SmartThingsESP32WiFi (1).cpp:(.text._ZN2st20SmartThingsESP32WiFiC2E6StringS1_t9IPAddresstPFvS1_ES1_bi+0x0): first defined here libraries\SmartThingsESP32WiFi\SmartThingsESP32WiFi.cpp.o: In function st::SmartThingsESP32WiFi::SmartThingsESP32WiFi(String, String, unsigned short, IPAddress, unsigned short, void ()(String), String, bool, int)':
SmartThingsESP32WiFi.cpp:(.text._ZN2st20SmartThingsESP32WiFiC2E6StringS1_t9IPAddresstPFvS1_ES1_bi+0x0): multiple definition of st::SmartThingsESP32WiFi::SmartThingsESP32WiFi(String, String, unsigned short, IPAddress, unsigned short, void (*)(String), String, bool, int)' libraries\SmartThingsESP32WiFi\SmartThingsESP32WiFi (1).cpp.o:SmartThingsESP32WiFi (1).cpp:(.text._ZN2st20SmartThingsESP32WiFiC2E6StringS1_t9IPAddresstPFvS1_ES1_bi+0x0): first defined here libraries\SmartThingsESP32WiFi\SmartThingsESP32WiFi.cpp.o: In function st::SmartThingsESP32WiFi::~SmartThingsESP32WiFi()':
SmartThingsESP32WiFi.cpp:(.text._ZN2st20SmartThingsESP32WiFiD2Ev+0x0): multiple definition of st::SmartThingsESP32WiFi::~SmartThingsESP32WiFi()' libraries\SmartThingsESP32WiFi\SmartThingsESP32WiFi (1).cpp.o:SmartThingsESP32WiFi (1).cpp:(.text._ZN2st20SmartThingsESP32WiFiD2Ev+0x0): first defined here libraries\SmartThingsESP32WiFi\SmartThingsESP32WiFi.cpp.o: In function st::SmartThingsESP32WiFi::~SmartThingsESP32WiFi()':
SmartThingsESP32WiFi.cpp:(.text._ZN2st20SmartThingsESP32WiFiD2Ev+0x0): multiple definition of `st::SmartThingsESP32WiFi::~SmartThingsESP32WiFi()'
libraries\SmartThingsESP32WiFi\SmartThingsESP32WiFi (1).cpp.o:SmartThingsESP32WiFi (1).cpp:(.text._ZN2st20SmartThingsESP32WiFiD2Ev+0x0): first defined here
Are you using the correct version of the Arduino ESP8266 Board Manager? It is detailed in the ReadMe. The ESP32 board manager may also need an earlier revision as well.
turns out I must have downloaded some updates to the library..... windows created files with (1) after them.. When I compared the 2, the ones without (1) were newer and had change flags. Not sure if there was an option to overwrite that I missed. Anyways all good.
1 Like
well... i thought I was really smart and I put a switch in my mailbox to detect it being open, then I dug a trench, dug under my sidewalk and through my garage to an ESP32 ...The switch is normally open when the mailbox is open.
I declared success when i saw the device state change on my dasdhboard....
Later I discovered that its flipping from open to closed over and over !!!!
The circuit is 2 wires, one end going to switch that is open when MB closed, and the other ends going to ground & GPIO18
Note there is about 115' of 18 gauge wire
I measured the voltage on GPIO18 and it was 4.7 Volts, when I disconnected the wire to GPIO18 on the terminal block, the voltage on GPIO18 was 3.5V. THAT makes no sense to me....how does a 115' of wire that is not connected RAISE the voltage?
I have the pullup enabled
static st::IS_Contact sensor12(F("contact8"), Mailbox_CONTACT, LOW, true, 500);
Help, I'm baffled
thx Tim
well....I had to disable the internal pullup and add a 10K resistor to 5V and now its not going crazy.
Hope this helps someone else!
Tim
1 Like
Hey there,
I'm starting out with ESP8266 programming, and I'm looking for a beginner-friendly platform. Arduino seems pretty straight forward, as far as I can tell. But have in mind, I can't tell much, because I have no experience in programming...
So far, I just have a few simple questions:
-
Looking at the Hubduino page, there are a few examples of sensors, buttons etc. I can use. Am I limited to this, or could I use pretty much every sensor? I'm asking, because I'm planing to integrate the Ikea Vindriktning, which already has a dust sensor, and it would be nice to just use a D1 mini, connect it to the sensor and bobs your uncle.
-
Another project I have in mind is creating a multiple function switch, comparable to the Tradfri Remote:
Using the D1 mini, some touch sensors for a cool look should do the trick. Again: Am I limited to specific parts? Would this be supported by Hubduino?
Welcome to the world of Arduino programming. Hopefully you have some C/C++ programming experience, as HubDuino is not a turn-key, ready-to-run solution. It is a set of libraries and example sketches that can be used to integrate a wide variety of sensors and devices into the Hubitat environment. It assumes the user is already familiar and somewhat proficient as an Arduino IDE programmer.
The sensors/devices that I have added support for are listed in the Readme.
This package currently implements the following Hubitat Device Capabilities:

Alarm (Siren and Strobe both supported if desired, using 1 or 2 digital outputs to relay(s))
Contact Sensor (Magnetic Door/Window Switch such as http://a.co/6iwkHwG)
Illuminance Measurement (using an analog input + photo resistor such as http://a.co/4zhbgEH)
Motion Sensor (using a HC-SR501 Infrared PIR, for example. Can also be any motion detector that outputs a digital signal)
Switch (simple digital output connected to a relay such Sunfounder Relay - http://amzn.com/B00E0NTPP4)
Relative Humidity Measurement (DHT22, DHT11, AM2320)
Temperature Measurement (DHT22 - requires Rob Tillaart's DHT 0.1.13 Library, included in this repo)
Temperature Measurement (using Dallas Semiconductor DS18B20's, requires OneWire and DallasTemperature libraries included in this repo)
Temperature Measurement (via the Adafruit MAX31855 Thermocouple library, included in this repo)
Temperature Measurement (via the Arduino MKR THERM Thermocouple library, included in this repo)
Temperature Measurement (using AM2320 sensor) (also does humidity)
Water Sensor (using an analog input a a simple moisture sesnsor such as http://amzn.com/B00HTSL7QC or http://a.co/eZNTyIH)
Door Control / Garage Door Control (i.e. Garage Door Contact Sensor + Relay Output) - See 'ST_Anything_Doors' example
Smoke Detector (as a simple digital input)
Smoke Detector (using the MQ2 sensor)
Relay Switch (implemented as a timed relay, that turns off locally - i.e. no ST cloud command necessary to turn off)
Button (both pushed and held events are supported)
Switch + Color Control (RGB) - used for analog RGB LED's
Switch + Color Control (RGBW) - used for analog RGBW LED's
Switch (using RCSwitch (i.e. Radio Control Switch) - See 'ST_Anything_RCSwitch' example (Requires RCSwitch library, included in this repo)
Servo Motor (using Capability Switch Level (0-99) to map to Motor Angles (0-180) - See the 'ST_Anything_Servos...' example sketch
Illuminance Measurement (using a TSL2561 I2C sensor)
Illuminance Measurement (using a MAX44009 I2C sensor)
Illuminance Measurement (using a BH1750 I2C sensor)
Illuminance Measurement (using a VEML7700 I2C sensor)
Illuminance Measurement (using a Color TCS34725 I2C sensor)
Temperature Measurement (using a AM2320 I2C sensor)
Relative Humidity Measurement (using a AM2320 I2C sensor)
Temperature Measurement (using a SHT31 I2C sensor)
Relative Humidity Measurement (using a SHT31 I2C sensor)
Temperature Measurement (using a BME280 I2C sensor)
Relative Humidity Measurement (using a BME280 I2C sensor)
Pressure Measurement (using a BME280 I2C sensor)
Temperature Measurement (using a BMP280 I2C sensor)
Pressure Measurement (using a BMP280 I2C sensor)
The IKEA Vindriktning appears to be a commercial air quality sensor. I do not see any way one would easily integrate such a device with HubDuino, as it does not appear to readily expose any electrical signals. How are you planning on wiring such a device? ![]()
This seems more easily accomplished. You could start with the following ST_Anything_Buttons_ESP8266WiFi.ino example sketch which supports up to 7 buttons, with both "pushed" and "held" events.
Thank you ![]()
Nope, not even a little bit. But I think, I can learn. ![]()
I found a very nice way, which was originally for from blakadder using Tasmota. The used PCB has easy accessible, labelled pins. I would just follow the instruction. I got a D1 mini and an AMS1117 breakout board. REST would be connected to any free pin, which is not I2C (just to have the possibility of adding more complex sensors), VIn and GND first to the AMS1117, then the D1 mini.
For more detail, the original article: IKEA Vindriktning air quality sensor running Tasmota | Blakadder's Smarthome Shenanigans
Edit: Also for Arduino: GitHub - Hypfer/esp8266-vindriktning-particle-sensor: Wifi MQTT Data Logging via an esp8266 for the Ikea VINDRIKTNING PM2.5 air quality sensor
Ok, looks easy for someone with no idea what he's talking about. I would say, I can handle that. ![]()
Thanks for the quick answer. I will see, how much I will accomplish and ask if I run into trouble. ![]()
@ogiewon Don't really understand this Arduino integration for SwitchBot devices in the same way that you might. Curious if it could be made to work with HubDuino and skip the need for MQTT.
It's intriguing because it doesn't require the SwitchBot hub. Not crazy about the idea of Bluetooth sensors that don't support Bluetooth Mesh, but their contact sensors are intriguing as they have motion, contact and a button in a single device.
Hey there,
total newbie to Arduino, still. I'll try to flash a D1 mini the next days, when the hardware arrives. I got my Arduino IDE 2.0 and the ST_Anything_Button_ESP8266Wifi.ino. So far I understand most of it. What I don't get: How do I get a device IP for the device I'm trying to add to my network? 
Or is there something I don't get with the sketch?
in the sketch, you specify your SSID and password. you can also statically give an IP address. if you don't statically assign an IP, you'll need to go into your router to find the IP address, or use something like an IP scanner to find it
So basically, I assign the IP-address before flashing, right?
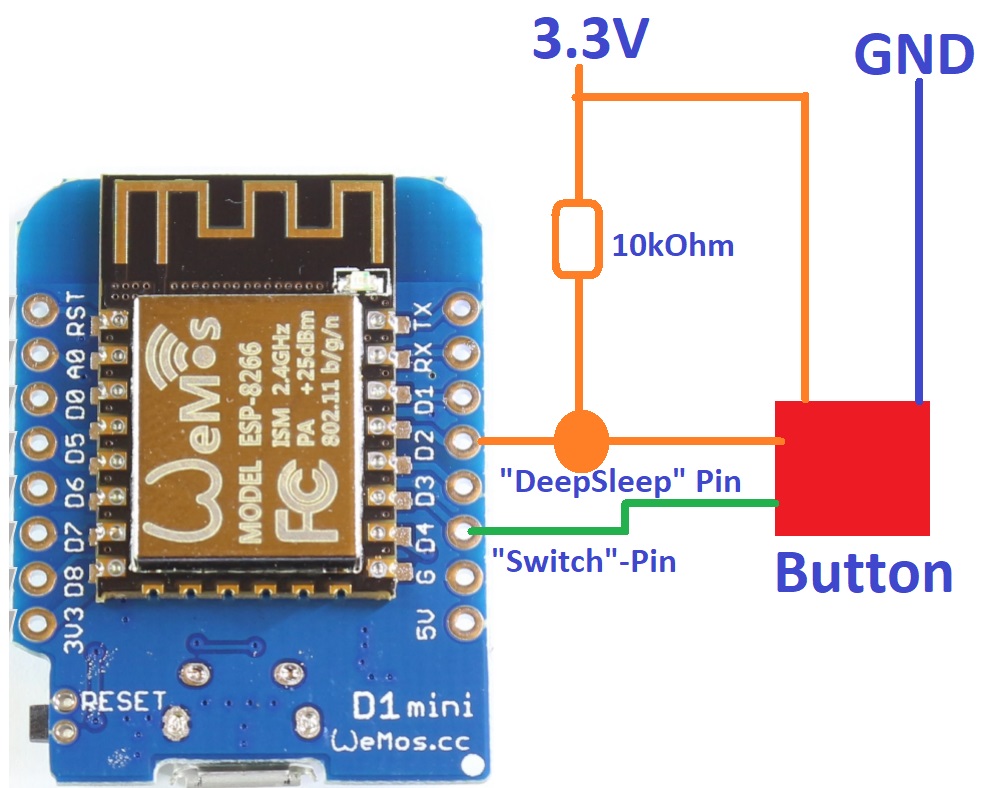
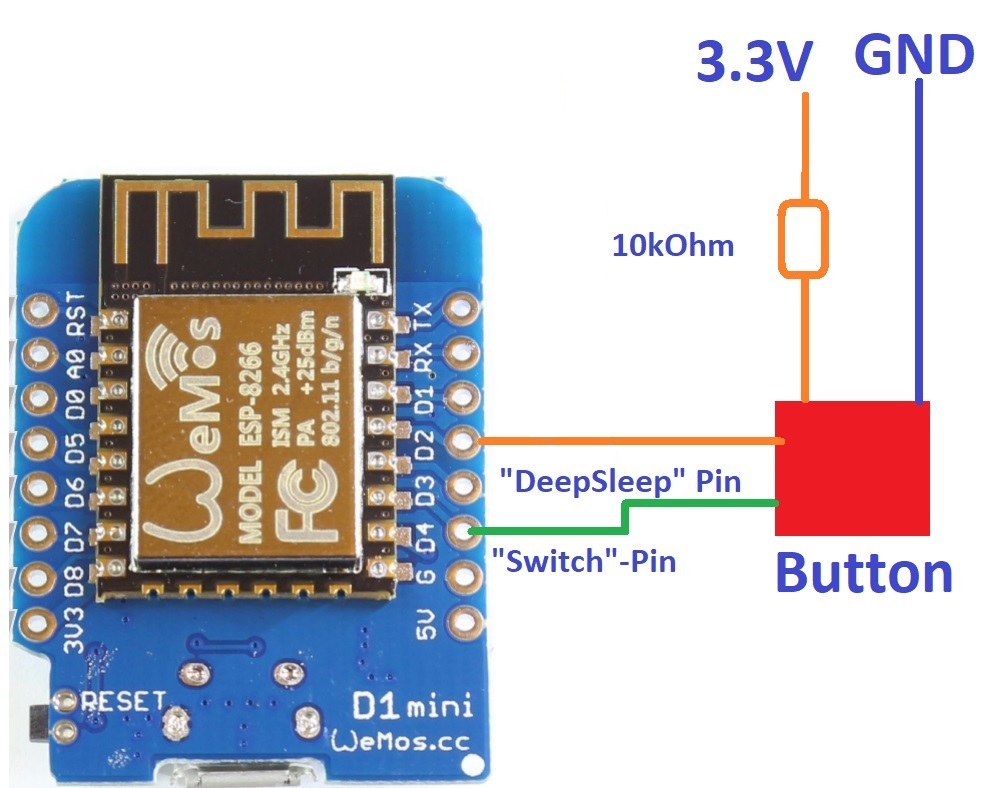
Wonderful. One last question, concerning wiring and DeepSleep. I'm planing on building battery powered Buttons. To save battery life, I was planning to use DeepSleep mode and using the toggle of the buttons to wake the ESP8266 up. What I'm not sure about now is the wiring. I know, that in case of the D1 mini, to use a button to wake it up, you have to connect a defined wake-up pin to 3,3V, interconnected with a 10kOhm resistor to GND with a switch in between. But in order for the switch to function properly, it has to have power, too. So I've "designed" two schemes, and I'm not really sure, which one is correct. Could you or anyone else with a little more knowledge have a look?
These will be incredibly slow Button Controller devices, as it takes time for the ESP8266 to wake up from deep sleep, connect to WiFi, and then transmit its data. The reaction time may not be to your liking, depending on how responsive you're expecting it to be.
I would personally simply use a Zigbee Button device, or a Lutron Pico remote if you have a Lutron Smartbridge Pro.
That's sad. Ok, then it will be connected to mains power.
Yeah, I got some Sonoff and Xiaomi buttons. They are reliable, but I want something more personalized for my needs. Do I have to go that path? No. Do I want to? Yeah. ![]()
![]()
2 Likes
Is there any setup already for a thermistor .....like whats in this video
")
Thanks
Tim
There is currently no support in HubDuino for a simple thermistor. There is support for many other temperature sensor devices in the project though. Would one of those work for your application? If not, then it should be possible to add thermistor support to HubDuino without too much effort. If you’re an Arduino IDE C++ programmer, it might even be fun for you. If not, I could assist, assuming you already know the specific model of thermistor you’d be using, and have an example Arduino sketch that could be used as a starting point.
I do have one of the others...but yes I'd like to pursue this.....I will see what I can come up with and what questions I have.... My hope is to monitor my 3d printer plate to know when printing is done (temp will drop)....
Thx
Tim

