I can offer my first ever Hubitat driver - for these TRV devices. I am using - successfully so far.
Happy for others to try it too.
Not all functionality of the TRV is implemented but quite a bit is - see the readme file on github.
Do get in touch with any comments, advice, obseravtions.
POPP TRV Driver Files
5 Likes
Yep, it all seen to work!
I have been keeping an eye out for a Popp thermostat driver as I desperately need to be able to toggle the child lock feature. My toddler thinks twisting the thermostats is the best thing ever!
Any chance you’d give that feature an implementation? 

This far I have been using the generic thermostat driver with the Popp valves. Basic functionality is there but nothing more.
I see that you have chosen to implement the Popp TRV’s as sensors and not thermostats. I totally share your frustration with regards to the cluttered thermostat tiles with fan control and whatnot.
I chose to fix that in CSS such that my thermostat tiles now looks clean and with only the up/down buttons. Let me know if you’re interested and I’ll share the code with you.
Cheers!
Away this week but happy to look at child lock when I get home. I’ll be in touch.
1 Like
Thank you so much! I have tried to see if I could update your code but I have no idea what I am doing.
Try v1.2 - there is a toggle added on the driver page
1 Like
Just installed two of these devices - all going well so far, thank you.
Would you consider adding the switch capability??? On or Off - on could be max heat and off could be min heat if the device itself does not have the ability to switch off?
Many thanks,
Simon
Further developments to the driver in v1.6 on Github. This implements most of the thermostat cluster attributes now and is working for me with POP TRV and Hive TRV which both appear to be a badged Danfoss Ally Zigbee TRV. But see my note on use of external temperature sensor, if you plan to use this feature.
File [POPP TRV Zigbee Driver v1.6]
2 Likes
You’re the best!!!!
I’m upgrading to the new driver now.I’ll report back about how it went in a day or two.
Thank you for this driver.
I am really new to hubitat, till now i was using a raspberry pi for automating things, but i want to get rid of the excess wires and i think this should be the best solution for me.
Actually this is the only driver which works for me with Popp TRV.
I was about to return the valve, due to incorrect integration in hubitat.
Yesterday i managed to install the new version (1.6), created a rule to update temperature from external sensor, because the valve is covered and the reading was inaccurate.
Since i did this, i noticed that the valve is opened like 90%, i don't have a log about this, but each time i checked, it was above 90%, even if no heat was required, means that the room temperature was above set point.
With the previous versions of the driver, i didn't manage to get the valve open, when the room temperature was below set point.
If i did not increase the set point with 7-8 deg, valve was open under 10% all the time.
I am not sure if i configured something wrong or what is causing this odd behavior.
Could you give me some tips on this?
Is there a way, to control the exact percentage of the valve opening?
Thank you!
PS: since this is my first post, i think i don't have the permission to upload some pictures with the rule and the actual stat of the TRV
Hi.
Sadly you cannot control the percent open directly, only read it. It is built by danfoss as read only.
Difficult to advise from here. I would
Remove the device in hubitat.
Factory reset the trv. (batteries out, then replace while holding the button for a while, I think)
Add the device again.
Then in the trv page in devices press configure and wait for all the attributes to populate.
All the above is because the old driver may have left a legacy setup in the trv.
Then, as you have, chose 'covered' in the device page and set your heating setpoint.
The external temperature sensor can then send its temperature to the trv via an app This has to be regularly repeated, but see my note in the readme file on github on the firmware bug work around.
Finally, look at the three adaption attributes on the device page and whether the trv characteristic is currently lost or found. The trv has to learn how much to open / close your valve when installed in your heating system. It can learn this automatically as you use your system but you can initiate that operation. It takes a while (I just left my valves to it and all their characteristics became found by the time I checked back the next day.)
Oh, also have load sharing off unless you have two radiators trying to work together. I have not tried two rads in one room.
Finally use a heating setpoint a degree or two below what you want the control loop seems to overshoot for a while.
Good luck.
Other option is to use the min heating setpoint as off and the max as on the use a virtual thermostat to mirror the device and try to control both using the built in thermostat controller.
Hi,
Thank you for all the info.
I did as you advised and now i have the following attributes:
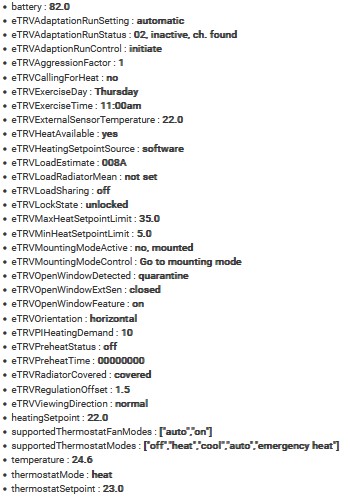
After i adopted the TRV, i initiated AdaptionRunControl and got the results from above.
Regarding setting external temperature, i have the following rule:
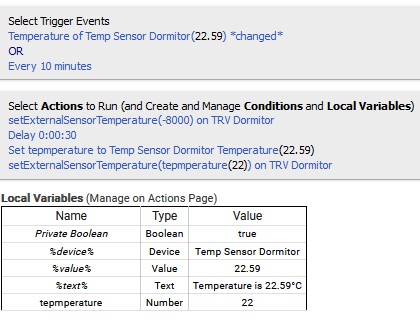
Somehow this is how i translated your notes, but i am not sure if it is correct or not.
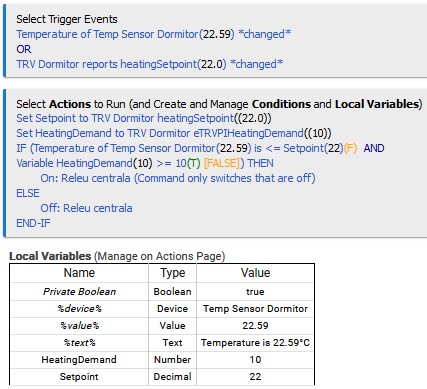
Since this is the only smart TRV in my setup, i implemented a fail safe depending on the HeatingDemand value. I had occasions, when the temperature was below set point and the valve was closed, boiler was fired up, but the radiator was cold.
After all, i think the driver is working fine in my system.
I just need to get used to how the TRV is designed to work.
Thank you for your help 
Thanks for your message. It looks like you are up and running.
They are not the easiest of devices, are they! I think I am still learning how to get them to work well. I am not sure whether the short -80 period for the eTRVexternalsensor temperature is adversely affecting the TRV's PID control loop. I am monitoring my valvesa nd room temperatures to see how effectively the TRV is controlling the room temperature. It seems OK in uncovered mode (because, I think, the external sensor is just used to generate an offset, but in covered mode the interruption does allow regular updating of external sensor temperature but it might be affecting the TRV's internal calculations.)
I an not sure where your "supportedThermostatModes" and "supportedThermostatFanModes" are from, but the realist is the TRV only doies heating and has no fan.
If all else fails you might be able to link into the Danfos API and use the Danfos App, I have not tried this.
Indeed, they look pretty complicated. Especially for me, because i don't have any experience with hubitat.
I just realized that i am confused about the value which i should send before updating the external temperature. is it -80 or is it -8000?
I will increase the wait time then, so i won't affect that much the TRV's PID control loop.
Sadly, i did not found a good solution for logging and graphing the temperature. I am using Hubigraph for now, and the room temperature is pretty close to the set point so it looks like it is working great, even if the valve open percentage is not what i expected.
"supportedThermostatModes" and "supportedThermostatFanModes" are from the generic driver.
After re-adoption, i lost the set point control from the thermostat tile in the dashboard and the only way i found to get it back, was to configure first with the generic driver and then change it to yours.

I know that the TRV is not like other usual thermostats and it's a pity that you can't customize the default templates for dashboard that easy ...
Currently i am using the default dashboard, but i need to find a solution for this also.
I am using the graph function in Web-core which is pretty good (with lines, stepped lines and bar charts] and it generates a 'device' tile with the graph which can then be added to any dashboard.
Use -80 (the TRV itself uses -8000 but the driver does the necessary division / multiplication; it come from -80 degrees or -8000 hundreths of a degree.
I think we need as short a time as the TRV will allow at -80 (so I would not increase it). I am trying to shorten the delays. It may be the case (just a thought without evidence) that any interruption upsets the TRV's PID calculations; I just don't know.
You could try adding ..... capability "Thermostat" .... to the driver's metadata and then you might get the setpoint control but I have avoided this because I can't stand the amount of clutter that goes with thermostats on the driver page.
In my opinion, the dashboard is the weakest part of hubitat (this may be my fault for not learning enough about it). You could investigate the Simple CSS editor in Hubitat Package Manager, this is on my list. But what I would really like to do is change the colour or ions on a tile depending on the state / temperature from a sensor. I have not yet managed this.
@user3101 thanks for your work on the driver and for sharing it, much appreciated!
the driver seems to work great but the device is not recognised by the HomeKit integration as a thermostat, adding capability "Thermostat" fixes that but it shows low battery warning in the HomeKit... will try to look into that more
Thanks.
I put in the readme file that I deliberately avoided thermostat capability and I access all the attributes in apps by selecting the trv as a temperature sensor.
This is a compromise and I would expect the driver to work with thermostat as an extra capability albeit with extra clutter on the device page screen.
Jonathan
oh I see, this make sense now
Dear Jon,
Thanks for implementing the child lock feature again. My 2.5 year old still spins the TRV’s while grinning at me. He knows that I don’t want him to, but now it doesn’t matter. I adore that little rascal.
How is OTA firmware upgrade getting along? I read on GitHub that you were preparing to implement it in your code. I have installed 14 Popp thermostats by now and all but two are working fine. When I attempt to find the reason as to why that is, is seems like the two that are giving me trouble is running on the vanilla firmware.
Again, thank you so much for giving us your driver. If you can receive a tip via PayPal, then send me your PayPal email. I owe you a few pints of beer and some more.
Thanks for your email. I am sorry but I have been unable to find any firmare updates that I could use for OTA updating and so I have not spent any time writing driver code for that. Everything seems to have gone rather quiet on the question sof whether updated firmware will be released. So sorry to disappoint, on that. (Not a paypal issue)
You may have seen, on github, that I have given in and implemented the Thermostat Capabilities so that I could use Hubitiat's Thermostat scheduler. Looking back, I should have done that all along. Latest version is v2.7.
I have also given up with external sensors. I think that the work around was working but I am not sure, and rather than replace bateriers in my external sensors I opted to try without. And for me that is working well.
1 Like
Are you generally happy with this TRV performance during the last heating season?
My next planned project is Aqara E1 thermostat external temperature sensor, but I am already a bit dissatisfied because of the lack of the valve opening percentage reporting by Aqara.

