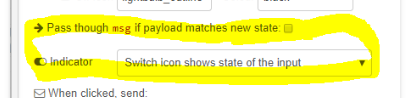
In the dashboard switch node, change this and set it to follow input:
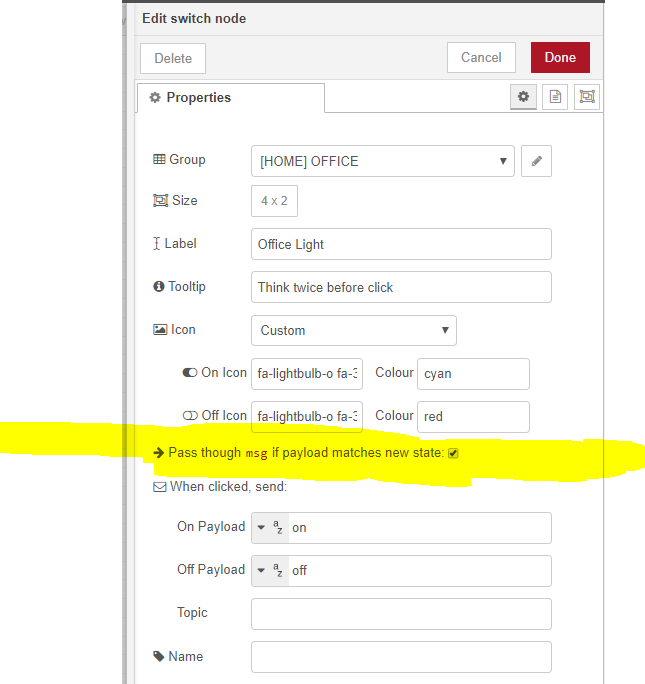
I found that, the icon will get updated only if that's ticked, otherwise, the icon stays the same regardless the state of the actual light switch.
No, the icon will change if you tell it to follow the INPUT. The default is to follow the OUTPUT.
That is how I have all my dashboard switches setup, and the icons all change state on the dashboard if I turn the light on/off manually from the switch.


EDITED: Can't believe that. Such a small thing that I completely missed. Thanks @JasonJoel & @stephen_nutt
It's not super obvious.
@fblackburn @dan.t I have it on good authority that Maker API will start returning event type (digital or physical) in Hubitat release 2.2.0.
Not sure what changes will need to be made to add that value to the device node output message, but if either of you are Hubitat beta testers, you might want to take a peek when you have time.
If you're not, then it will just have to get in the queue with all the other changes pending. 
2 Likes
I’ll take a look, I am part of the beta group
2 Likes
Sweet - useful for switches & dimmers, but also really useful for locks.
In my use case, I can use it to distinguish between someone physically locking the front door deadbolt with the thumbturn (i.e. they're inside the house) vs digitally locking it (i.e. they're outside).
1 Like
Yeah, this is one feature I've been really hoping for. There are certain things I just can't do with the Maker API responses without that info.
Bruce didn't seem to like the idea the first time I asked a few months ago, but I must have caught him in a weak moment this time. 
Very excited (which is probably sad, but don't judge me!)!
3 Likes
This video was the one that make me rethink everything
REST is dumb, MQTT is smart 
Workflow question.
Do you place your dash stuff on a separate flow (with all other dash), or on the page/flow that it relates to (switches etc) ??
I use MQTT for a lot of things. zwave2mqtt, my arduinos all publish to MQTT, weatherflow weatherstation, OwnTracks location tracking (external MQTT which is bridged to my local MQTT), etc. It is pretty awesome and reliable.
But professionally I come from the oil industry, and that is where MQTT was born, so we've been using it for many years in different forms.
By the way, that video was excellent. The examples used for QOS, retain, and LWT were spot on and did a great job of simplifying those topics.
Separate flows. For busy dashboards I run out of room in a single flow, and actually have to use multiple flows for a single dashboard.
I'm really not crazy about NR dashboard. The fact that on a NR restart nothing is updated until an update is received from HE is a non-starter for me. I am sticking with SharpTools for now, even though it is a cloud solution.
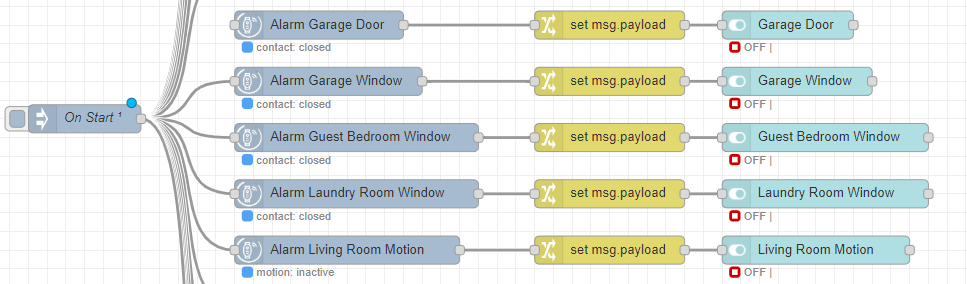
You can set the nodes to refresh on Node-Red restart using a trigger... I setup a one time trigger block that runs 30 seconds after startup, and force all of the device nodes to update their value and send it to the dashboard nodes.
2 Likes
So thought before I get into things this morning that I'd run "apt-get update" and "apt-get upgrade" this morning on the Pi 4 I bought for NR
the second command apparently killed it.  It's been an hour since I ran it (over SSH) and now it won't respond to pings or accept SSH connections. I fired up Etcher and set up a different SD card and tried to reinstall buster-lite, but that didn't work either.. it responds to ping, but "Connection refused" when trying to SSH.
** Ahh: just relized I forgot to setup the "ssh" file in the root of the SD card **
I have a light which comes on at sunset and goes off at sunrise. I want to add a door contact to the mix so that the light comes when door contact is open and off when the contact close during a certain time from 9PM to 5AM and cannot get it working correctly. Any help or suggested would be appreciated. Thanks below is what I have set at this point.

The sequence below will turn on a light when a contact sensor is open between 9PM-6AM and turn it off when the contact sensor is closed. You can import it and change it as needed.

Code to import
[
{
    "id": "8de037e.53a12c8",
    "type": "hubitat device",
    "z": "cf3bcc81.2331d",
    "name": "Contact - Back Door",
    "server": "a22e0ea9.276dc8",
    "deviceId": "419",
    "attribute": "",
    "sendEvent": true,
    "x": 330,
    "y": 460,
    "wires": [
        [
            "b8b088d0.e9e328"
        ]
    ]
},
{
    "id": "b8b088d0.e9e328",
    "type": "switch",
    "z": "cf3bcc81.2331d",
    "name": "open/closed",
    "property": "payload.value",
    "propertyType": "msg",
    "rules": [
        {
            "t": "eq",
            "v": "open",
            "vt": "str"
        },
        {
            "t": "eq",
            "v": "closed",
            "vt": "str"
        }
    ],
    "checkall": "true",
    "repair": false,
    "outputs": 2,
    "x": 550,
    "y": 460,
    "wires": [
        [
            "40f3e0ac.2b5e7"
        ],
        [
            "507e7281.566004"
        ]
    ]
},
{
    "id": "40f3e0ac.2b5e7",
    "type": "time-range-switch",
    "z": "cf3bcc81.2331d",
    "name": "21:00-06:00",
    "lat": "",
    "lon": "",
    "startTime": "21:00",
    "endTime": "06:00",
    "startOffset": 0,
    "endOffset": 0,
    "x": 750,
    "y": 460,
    "wires": [
        [
            "22630376.b40ae4"
        ],
        []
    ]
},
{
    "id": "507e7281.566004",
    "type": "hubitat command",
    "z": "cf3bcc81.2331d",
    "name": "Garage Tube OFF",
    "server": "662851c4.3ccad",
    "deviceId": "4200",
    "command": "off",
    "commandArgs": "",
    "x": 770,
    "y": 501,
    "wires": [
        []
    ]
},
{
    "id": "22630376.b40ae4",
    "type": "hubitat command",
    "z": "cf3bcc81.2331d",
    "name": "Garage Tube ON",
    "server": "662851c4.3ccad",
    "deviceId": "4200",
    "command": "on",
    "commandArgs": "",
    "x": 990,
    "y": 460,
    "wires": [
        []
    ]
},
{
    "id": "a22e0ea9.276dc8",
    "type": "hubitat config",
    "z": "",
    "name": "HubitatM",
    "usetls": false,
    "host": "192.168.1.46",
    "port": "80",
    "token": "496f7f11-256d-44c9-99c6-4ed460d3efb0",
    "appId": "1522",
    "nodeRedServer": "http://192.168.1.4:1880",
    "webhookPath": "/hubitat/webhook"
},
{
    "id": "662851c4.3ccad",
    "type": "hubitat config",
    "z": "",
    "name": "HubitatS",
    "usetls": false,
    "host": "192.168.1.36",
    "port": "80",
    "token": "5dee560c-c42c-4e4b-bdf7-6bed1bb77371",
    "appId": "4489",
    "nodeRedServer": "http://192.168.1.4:1880",
    "webhookPath": "/hubitat/webhook2"
}
]
2 Likes
I have been using flow and global context variables also to persist device attribute values, and am trying to understand the implications of this. A couple of questions..
Can anyone share what they use for an "init" pattern, i.e., grabbing the initial attribute values (at flow startup) for whatever device nodes are of interest in the flows? Is it just something real simple, like:
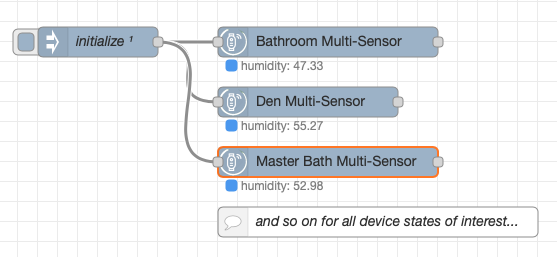
And given the info that the device node caches all current attribute values... is It correct to say that after the first device attribute read/update, there are no more queries back to Hubitat, no matter how many replicas of the same device node exist in any flow?
And also that any subsequent event from Hubitat for the device updates all of the device nodes that reference any of that device's attributes?

