Homebridge has been updated with a new automatic service generator tool: Install Homebridge on macOS · nfarina/homebridge Wiki · GitHub
I've already done that. I get the same error.
That file has/had a certain permission, inherited from the Directory (probably). If deleting the file didn't help, then it's due to directory permissions. (What new files inherit during creation.)
Okay, so it looks like I buggered up things by trying to use the new hb-service tool instead of the old lauchctl method, because now neither one works. I'm going to leave things as they are for now and re-do the whole thing when I eventually replace or reload my Mac.
I installed a Hampton Fan controller in two of my ceiling fans. it a Zigbee controller. HE was able to add it and I am able to control the fan withe variable speeds and the light from HE.
When I added it to MakerAPI to see if I can control it from Homekit app. It does shows up on my Homekit and I only see a fan button not the light button. However, when I used the fan button, it turn off and on the light not the fan or control the speed of the fan.
Look like something it not set up right or I messed up somewhere. All I did was add device in the MakerAPI and I didn't change anything else.
What I may have done wrong here?
Within the Hampton Bay Device on Hubitat, there is an option to have it create 2 Child Devices, one for the Light and one for the Fan. I recommend you enable this feature and click Save. Instead of sharing the Parent device via the MakerAPI to HomeBridge, share the two Child Devices instead. This should create a Fan and Light within HomeBridge. (Note: I have not tested this myself, but I do have a Hampton Bay Fan controller on Hubitat, so I am very familiar with the device.)
Update: I just tested this approach on my system and both the fan and light appeared within HomeKit and seem to work as expected.
2 Likes
Thank you @ogiewon. I will give this a try.
1 Like
I can't see to find a way to create child devices. I tried to find this in document but I am not having much luck.
How do i create child devices from parent device?
1 Like
Oh, I have to save preference after enabling it! slap his forehead
Thank you!
2 Likes
Had a huge issue with my rPi and lost all my homebridge configuration information. Ugh...so I am setting everything up as a VM on ubuntu. I used the cool new editor to create my config.json:
{
    "bridge": {
        "name": "Homebridge",
        "username": "10:0A:A1:23:D1:35",
        "port": 51936,
        "pin": "687-22-274"
    },
    "mdns": {
        "interface": "10.0.2.38"
    },
    "platforms": [
        {
            "platform": "Hubitat-MakerAPI",
            "name": "Hubitat MakerAPI",
            "app_url": "http://10.0.2.38/apps/api/2414",
            "access_token": "6493babb-6321-4edd-8620-8b91eacdfd55",
            "local_ip": "10.0.2.38",
            "local_port": 20010,
            "mode_switches": false,
            "hsm": false,
            "debug": false,
            "logFile": {
                "enabled": true,
                "path": "",
                "file": "",
                "compress": true,
                "keep": 5,
                "size": "10m"
            }
        }
    ]
}
Here is the error I get when running homebridge:
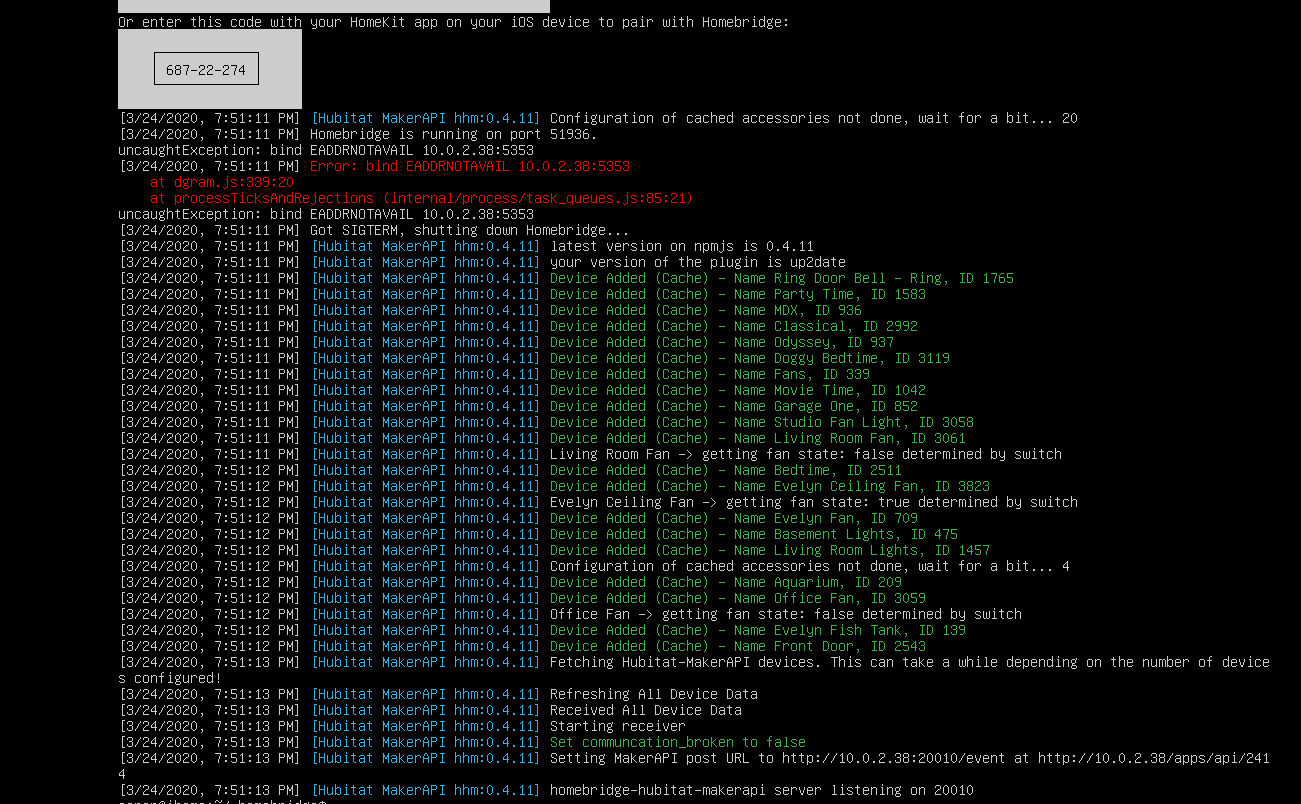
Thoughts?
Too many 10.0.2.38's in there.
Here's a config I built in the tool:
{
    "bridge": {
        "name": "Homebridge",
        "username": "D3:9E:F6:32:54:72",
        "port": 51936,
        "pin": "468-89-739"
    },
    "mdns": {
        "interface": "192.168.7.129"
    },
    "platforms": [
        {
            "platform": "Hubitat-MakerAPI",
            "name": "Hubitat MakerAPI",
            "app_url": "http://192.168.7.63/apps/api/132",
            "access_token": "60eec6d6-7109-4e3c-a409-ec81c2303694",
            "local_ip": "192.168.7.129",
            "local_port": 20010,
            "mode_switches": false,
            "hsm": false,
            "debug": false,
            "logFile": {
                "enabled": true,
                "path": "",
                "file": "",
                "compress": true,
                "keep": 5,
                "size": "10m"
            }
        }
    ]
}
This goes ON the Homebridge computer, using MakerAPI data FROM the Hub.
In my case, Homebridge is running on 192.168.7.129 and the Hub running MakerAPI is 192.168.7.68
( I installed MakerAPI because I don't normally use it. I got the URL just like the tool told me to do, and typed in the address of my Homebridge installation. I'm now going to delete it ![]() )
)
1 Like
That is impossible. Your ubuntu machine can't have the same IP as Hubitat does... You sure you entered the right values in the tool?
EDIT: Some more information. The reason that is failing is that homebridge is trying to reserve the port 5353 on the IP address 10.0.2.38. But I bet that this is your Hubitat IP address. When you are using the tool to create the config, make sure that you enter the IP address of your ubuntu machine in this field here:

2 Likes
I got it up and running. Ubuntu is a tad bit different than a rPI. I must admit the response times are night and day. Glad I went to a more powerful host and virtualize a Ubuntu instance to support the smarthome. 
1 Like
What model Raspberry Pi were you using? My RPi 3 is very snappy running as dedicated HOOBS system. I am curious how much quicker it could be...![]() . In other words, should I consider running on more powerful hardware? Hmmmm...
. In other words, should I consider running on more powerful hardware? Hmmmm...
Well I have (2) rPI to support my smarthome. Both run snappy enough as I keep load balancing new solutions on each. I also run SSD hard drives on both rPIs. Here are my reasons for switching to a $100 dedicated PC:
- Virtualize the linux environment so I can do snapshots and proper backups to prevent potential issues of corruption OR my mistake on following procedures and screwing up the entire OS
- Want to use NodeRed which is a CPU hog on a rPI for the 140 devices I have monitoring
- Want multiple VMs so I can fool around with new technologies without "committing" to them. Shutdown when I don't want them quickly
- Had too many rPI failures both SSD and hardware.
1 Like
Thanks the Snapshot was useful. Just what I was looking for.
1 Like
Hi dan.t,
Thank you for your effort, I am new to HE so I would like to confirm an issue: using your plugin, I could control a device which is labeled "Apple Homekit", without another bridge device like homekit bridge on Pi. Pairing from HE, input device 's homekit code and start to control. Am I right?
Welcome to the community!
@dan.t's Homebridge Plug-in via MakerAPI for Hubitat requires an always on computer running Homebridge, like a Raspberry Pi, in order to function. If using a RPi, you can achieve this easily using HOOBS. HOOBS offers a free download of their image for a RPi, or you can buy a ready to run kit from them. It is relatively straightforward to then add @dan.t's Homebridge Plug-in via MakerAPI by following his directions.
Also, what this integration with Hubitat does is expose Hubitat devices to the HomeKit system on your iOS phone or tablet. It allows HomeKit to control Hubitat devices. It does not really allow true HomeKit devices to be controlled by Hubitat.
1 Like
HomeKit from Apple works best with an Always On Apple Device such as an AppleTV, iPad or HomePod. This brings two major benefits: 1) access via the Apple Home App to your Homekit system from afar. 2) Automations can be created that tie individual devices together.
Homebridge functions as a HomeKit Accessory. Apple believes they are the center of the universe, as does every other 'ecosystem' vendor. As such, they don't 'export' devices to Accessories. Accessories add to Apple, not the other way around.
The workaround requires you create a virtual device on Hubitat, expose it to Apple via Homebridge and then using Apple Automations, transfer device's states to the Hubitat virtual.
One of the most common is Presence. Your iPhone acts as a presence sensor to HomeKit. You can mirror that Presence into Hubitat via an automation transfer.
Homebridge requires it's own always on computer, configured to run NodeJS. It may be tiny like a Raspberry Pi or via an always on Mac. NAS devices can often be used as well.
Always On Homebridge connects to Always On HomeKit, exposing to Apple the devices it knows about. The Homebridge MakerAPI App on Hubitat is the mechanism for selecting Hubitat devices to Homebridge, as well as a pipeline for the Events that then are able to travel from Hubitat through Homebridge into the Apple system. Changes made to those devices in the Apple Home App are reflected back to Hubitat as Events.
I hope I didn't make it More Confusing.

3 Likes

