I have made many improvements to this node.js server. I don't have many devices and need help testing. If you would like to contribute, please go check out the repository.
Still don't have pictures that do this beautiful dashboard system Justice, but the repo does have basic pictures of home screen. No pics of settings, weather, controls, or icons currently. If you're interested, use the docker yaml or a stand-alone install and send me some pics.
When you are proud enough of what you have written to actually post pics of what the dashboard would look like populated, then maybe.
Oh, you can create as many virtual devices as you’ld like in HE. I cant wait to see what your pics of your beautiful dashboard system looks like fully populated.
I think i did care enough to read your own words… If you’ld like i can bring the convo to the other forums i found that you posted the exact same post to.
I cant read code well enough to determine if your code is also dangerous, but your response is throwing up some red flags.
I decided to give this a go. (Incidentally, there are some screenshots here). I installed the app in a Docker container. I believe I connected successfully to Hubitat. I then I enabled https (as recommended in the instructions) but when I tried to restart the server got this:
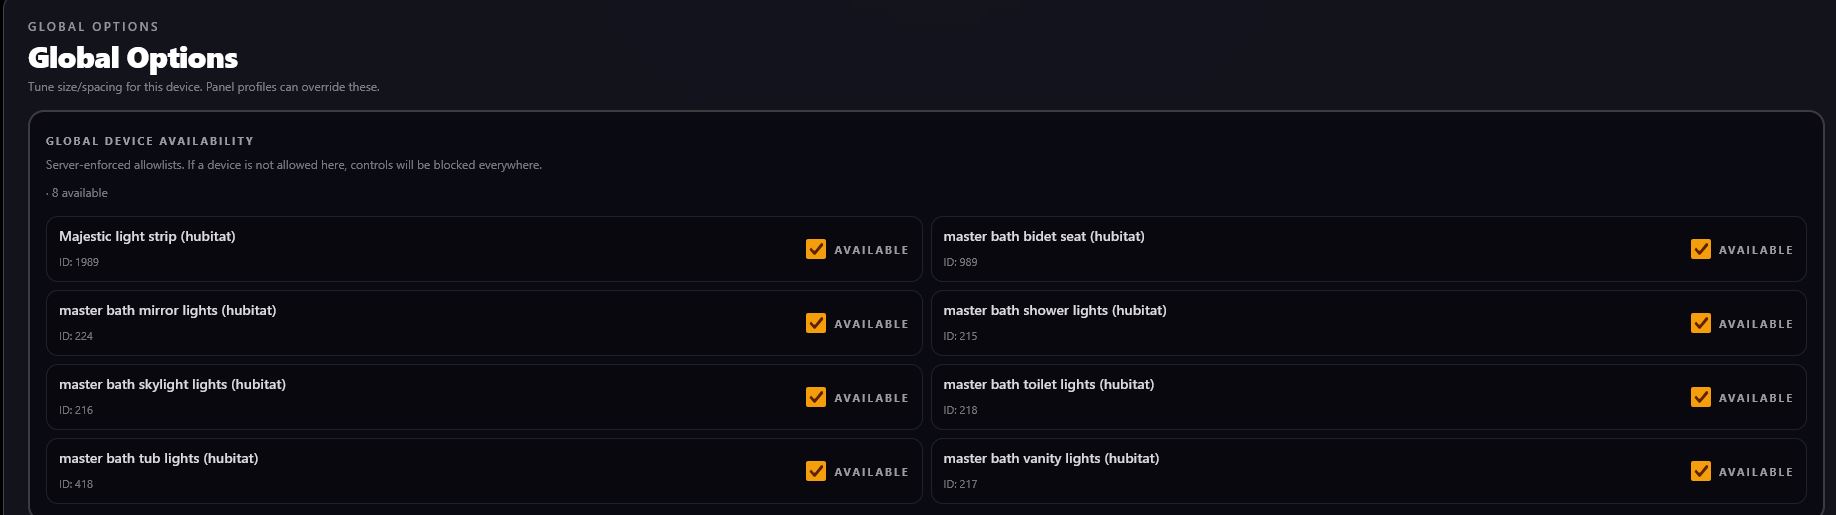
The global options handle what's available in any single panel. The device options are per panel device options that have to be configured to allow those globally available devices to appear
I will add an issue on the repo for the server restart. I hadn't paid much attention to that because I run standalone and just run a service CTL command to restart.. Thank you for pointing that out
Status: I still can’t reproduce the service-restart issue, but while investigating I found a couple likely causes and pushed fixes.
Docker image vs local build (important context)
If you built the image locally, you may have been running newer code/config.
If you pulled from Docker Hub, you may have been running an outdated image — I forgot to update the Docker repo after a late-night build (it was ~3am one night last week). I think that step got missed.
Why HTTPS may have failed before
Due to my Docker inexperience, the previous setup wouldn’t work for HTTPS “out of the box” unless certs were provided before the image was deployed.
What’s fixed now (HTTPS)
The YAML now exposes ports 80 and 443.
Reminder: update the URL in your browser to https:// — the page auto-refresh can still try http:// unless you manually change the protocol.
What I’ve updated/pushed
I’ve now built and pushed using the latest YAML + latest code.
What I’ve verified in testing
Cert logic works
Service restart works
In testing, “restart doesn’t work” symptoms can happen if the link/URL is opened with the wrong protocol (needs https:// when applicable).
One possible remaining issue (checking tomorrow)
I have a sneaking suspicion there’s still something I need to fix (the thing that kept me up around ~3am).
I think it may be: device options not copying when a panel is duplicated.
If true, it means config work done on one panel might need to be redone for every copied panel (not expected).
I’ll confirm tomorrow and fix if that’s the case.
Thermostat help needed (user perspective)
I’ve been testing mostly with virtual devices, but I realized I’ve never owned a thermostat.
From your perspective:
Do you want full control, or does that feel like too much?
Do thermostat commands/capabilities vary a lot between models (names/functions), or are they mostly standardized?
Thanks
Thanks again for taking a chance on my app — I appreciate it. I know your time (and everyone’s time) is important.
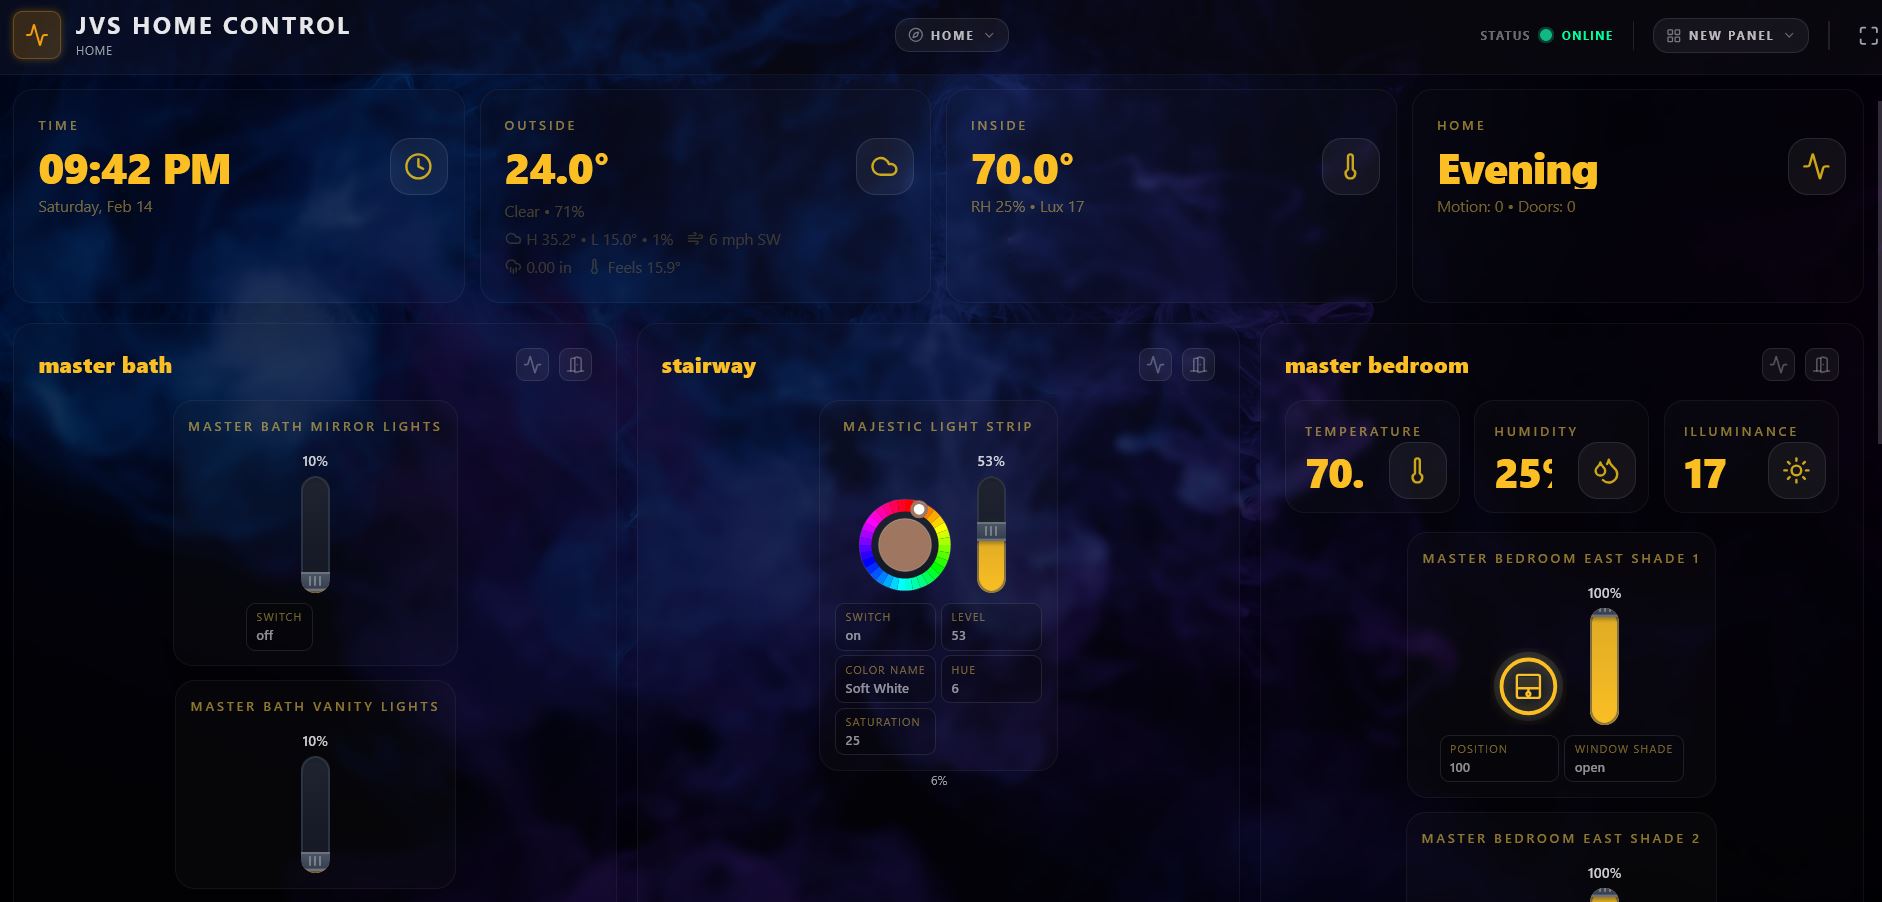
I've played around with it briefly. Nice work--it does look great visually, as compared to the native Hubitat dashboards.
A few questions:
-Is there any way to move items around (I'm probably just missing it).
-When I add new devices in Maker API, is it correct that I need to go into each one in global settings to mark them available? I would think having them available by default would be desirable (I wouldn't have added them if I didn't want them to be available).
-Perhaps I'm missing this as well, but it would be useful to define defaults for a certain device type--say lights--so users don't have to go into each of a dozen lights they added to say they want the same info and commands for each one.
-I notice that for the shade toggle, I have to click within the outer circle (border), but clicking on the central icon doesn't do anything. Is that intentional?
-By the way, for shades, I eventually realized I needed to pick "brightness slider" to control the opening. Perhaps for a shade, it should be called position slider?
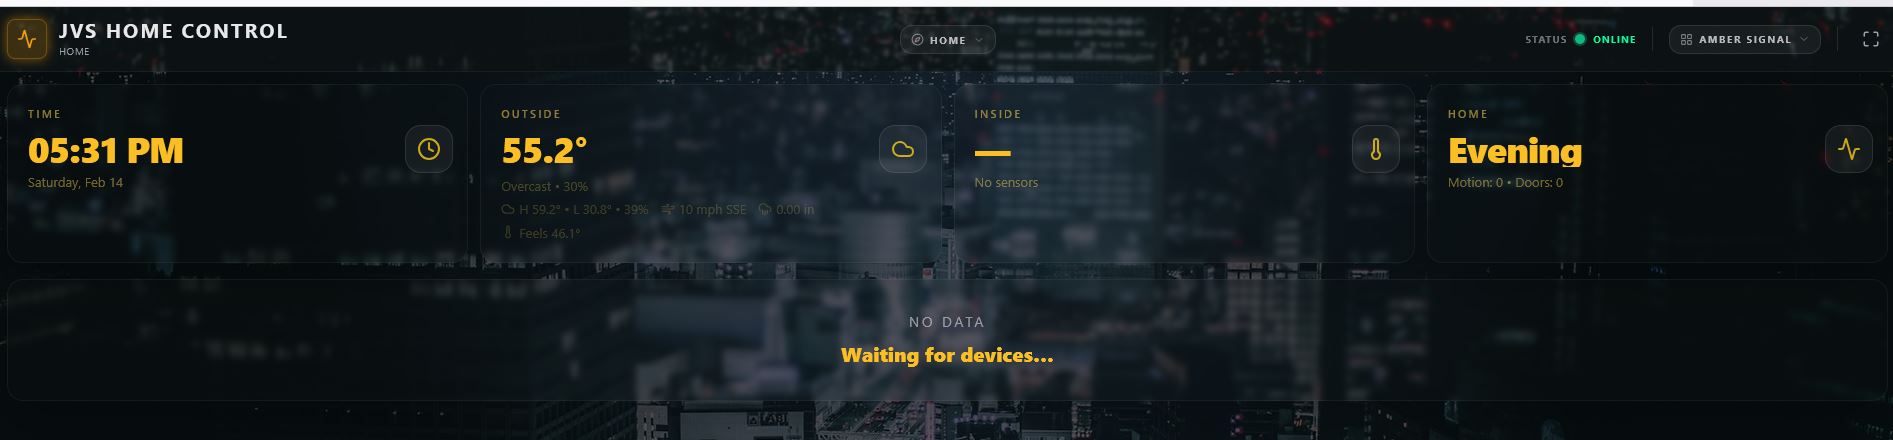
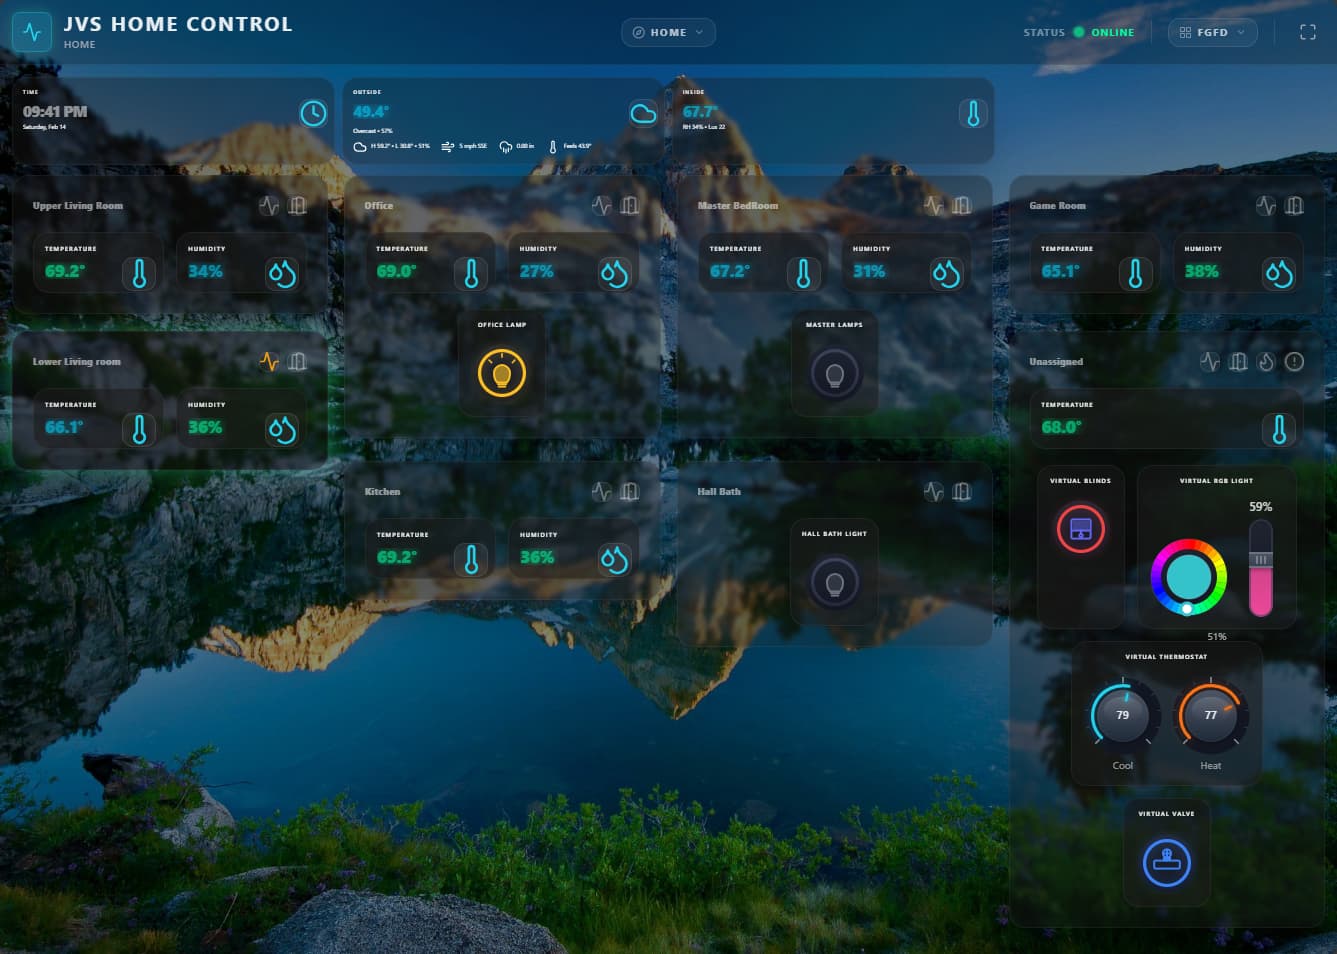
I just threw some things on here to test, but to give people an idea of the aesthetics of your app:
Incidentally, I used docker compose to set up the container. I have since tried using the docker run command--it installs and starts the container, but I can't seem to access it via the webpage.
Moving items around
Yes! Room ordering is supported — head to Panel Options where you can assign order numbers to rooms and devices. The catch right now is that you have to assign an order number to all devices before the sorting kicks in, which isn't great. I've filed an issue (#51) to make this more intuitive.
In the meantime, check out Masonry mode in Panel Options — it gives you more dynamic sizing of room cards and generally feels better out of the box.
New devices requiring manual availability
You're totally right — if you added a device in Maker API, you probably want it to show up. The current behavior is a holdover from before panel-specific filtering existed, so global availability was the only gate.
Now that each panel has its own device controls, it makes sense to default new devices to globally available. I'm adding an auto-add option so you won't have to toggle each one manually. Tracked in #52.
Setting defaults for a device type
I hear you — configuring a dozen lights identically is painful. I'm going to add a "Make default for this device type" button inside each device's options card. Once you dial in one light the way you want, hit the button and those settings become the template for all lights. Tracked in #53.
Shade toggle — center icon not clickable
That's a bug. The original SVGs had center-click handling and it got lost when I reworked the control icons. I'll fix the click target so tapping anywhere on the control (including the center icon) triggers the action. Tracked in #54.
"Brightness Slider" for shades
Ha — I don't have shades, so I literally never thought about this! Great catch. I'm going to context-rename it so shades show "Position Slider" instead of "Brightness Slider." Tracked in #55.
Thanks again for taking the time to set everything up and report back. This kind of feedback is exactly what I need.
A few tips on what you're seeing:
Device properties — Those extra properties showing under your light strip and mirror lights can be removed in Device Options. You can choose exactly which attributes display for each device.
Column count — You can increase the column count so the layout doesn't feel so oversized. I know you're just getting things set up, but worth mentioning. If the text is clipping on the room metrics cards, you can fix that with Card Scale or Text Size adjustments.
Long device names — If any of your device names are too long and messing with the layout, you can rename them in Device Options without affecting anything on the Hubitat side.
Text styling — All text (primary, secondary, tertiary) can be resized and recolored independently. There's a lot of flexibility there.
Climate colorization — Check out the Climate tab in Settings — there's a "Colorize home values" checkbox. When enabled, it changes the color of any temperature, humidity, or lux value based on the tolerance map on that same tab. If you only want to highlight, say, a warm threshold, just set the warm tolerance and its color, and leave the rest set to "none."
Blur and transparency — The room card blur and transparency settings can dramatically change the look of the dashboard. Play around with them — I tend to like about 25% transparency and 5% blur. These settings are really dependent on your background image. A very bright (less transparent) background needs stronger card opacity settings, or the room cards start to disappear into it.
Siren alert — I also added a feature that I may not have documented yet: if you have Maker API posting events back to the dashboard and a siren goes off, the entire screen pulses danger-red around the edges. It was 3 AM when I built it. This is a non-negotiable feature. Again — it was 3 AM.
When you used the Settings UI to configure HTTPS, the server saved port: 443 to your config.json but never restarted due to whatever error you experienced. But your Docker container was only created with port 80 exposed, so the server came back up after you restarted it with a run on port 443 inside the container with no matching port mapping on the outside. That's why the webpage became unreachable.
Unfortunately, Docker doesn't allow changing port mappings on an existing container from what i can tell. (I'm no docker Doctor though) — not even in Docker Desktop. It's a Docker limitation, not just a UI thing.
The fix (in Docker Desktop) (IF I AM CORRECT)
The good news is your data volume (all your config, rooms, devices, layouts, etc.) is completely separate from the container. You just need to recreate the container with both ports:
Go to the Containers tab → click on jvshomecontrol → Stop → Delete
Don't worry — the jvs-data volume is not deleted with the container
Go to the Images tab → find jeamajoal/jvshomecontrol → click Pull to grab the latest
Click Run on the image → expand Optional settings:
Container name: jvshomecontrol
Port mappings:
Host 80 → Container 80
Host 443 → Container 443
Volume: jvs-data → /app/server/data
Click Run
Everything will come right back exactly as you had it — same config, same layout, same devices. The volume preserves all of it.
Going forward
I've updated the setup instructions to always map both ports from the start (80 and 443). That way you can switch between HTTP and HTTPS entirely from the Settings → Server tab without ever touching Docker Desktop again. This one-time recreate is all you need.
Is there a way to access this from another computer on the local network?
I tried masonry mode, but don't see any difference in the appearance or behavior. Being able to move and reorder devices--preferably by drag-and-drop--would be desirable.
He has tons of pictures. What he's saying is that the pictures he has don't do the solution justice. Some people really like dashboards and this could be a beautiful solution for them. I prefer to do hands free automation with voice (Alexa and/or Siri) for what can't be made completely automated. But this looks great.
Drag and drop would be pretty difficult with this design, but I will look into it.
The batch of settings that masonry mode is in is the only set of settings that has a save button at the bottom of it. I plan on changing that but it was an early implementation and even I forget to hit that save button sometimes.
Docker has already exposed the port on your local machine whether it be Port 80 or Port 443. The settings that affect this is the server name below the generate certs that changes the canonical name in the cert itself. These are self-signed certs so it's not going to change a whole lot but if you put the server URL in there it will generate a cert with the name. So if you want to access the server by computer name put https://computername and regenerate the certs.
Now at this point, accessing that port on that computer from your network is going to be dependent upon your firewall settings. I'm assuming you are using a Microsoft OS? If that is correct, then you would need to allow inbound Port 443 and then access the web page from another computer on your network using the computer name you put in the cert or the IP address. And remember, even if you use the computer name and change the cert canonical name, you're still going to get a cert warning because there's no full chain of authority so that's expected.