I think that's the same one I'm trying to use...I watched that video earlier and followed the steps at:
Grab from the video - Looks liek the same stuff:
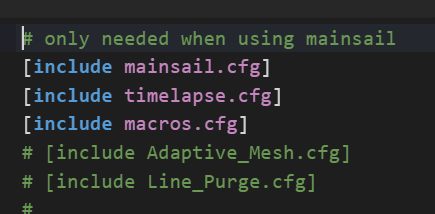
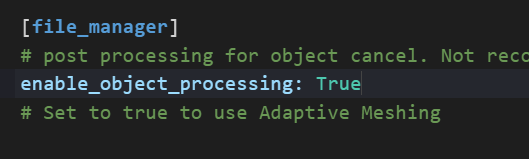
I added the adaptive mesh and purge ".cfg" files from the GitHub, included them (via [include]) in my printer.cfg. Added [exclude_object] in printer.cfg, enabled object processing in moonraker.conf, confirmed Prusa has object labeling enabled (was already on), commented out any Bed Mesh macros, etc. Added BED_MESH_CALIBRATE and LINE_PURGE to my PRINT_START macro in printer.cfg. Did a full FW restart.
In spite of all that a normal full bed mesh calibrate process starts every time...the mesh is not adapting to the print size.
Can't see I'm doing anything wrong, but it's not working as advertised. I've commented it out as it wasn't working, but here's what I have in terms of most of the entries/files. Any obvious things I need to change? I didn't touch Prusa except to confirm the object naming was turned on.
The slim tree supports are the bee's knees. Sooooo much easier to deal with. I have learned that the auto-supports in Bambu Slicer can suck some times (with it sticking supports where they don't belong).
Turned out I just needed to reboot the pi. I'd done several firmware restarts on klipper but had not actually rebooted the pie after making the adaptive mesh changes.
Once I rebooted the pie (and I also reviewed the printer just in case as well,) things are sort of working.
The adaptive mesh probing is not happening in the right location yet. Right now I have a print that is a bed scraper and it's arranged longitudally front to back in the center of the bed. The probing for the adaptive meshes all happening on the right hand half of the bed. The print actually does occur in the middle.
So will be dorking around that for a while to see if I can figure out why it's confused.
I also disabled the line purge option with adaptive printing because I was getting a move exceeds maximum extrusion error that I need to figure out.
And make sure your probe X/Y offsets are correct as they are used by the above section.
[bltouch]
x_offset: 29.00
y_offset: 22.0
And 2/
Check your stepper X/Y min max travel settings to ensure they are correct. These tell the printer where the print area is and if they are incorrect, everything else will be too.
I had an absolutely terrible PETG print overnight. The worst layer adhesion I’ve experienced, massive strings everywhere, it was something else. I’m not sure if maybe some PLA had still been in the nozzle, the Bambu purges at the beginning of the print, but maybe it hadn’t been enough.. but I’ve now been running all sorts of calibrations via the SoftFever fork of Bambu - temperature towers and flow calibrations.
I stared for like 15 minutes at the various flow samples, trying to figure out which one looked the smoothest. It ended up with a pretty substantial increase to the flow ratio, from .95 to ~1.03. I’m a little concerned I chose poorly , so does anyone have insight into what too high of a flow ratio would look like on a print?
The odd part is that my prints have always been dead center (as Prusa auto places them) unless I move them, and then they are exactly where I moved them to.
So I decided, what if another pi reboot clears this up? Can't hurt, and I had made changes to several cfg files recently. So rebooted pi and started a print again and the adaptive mesh was right where it should be. Just bizarre...I promise to not ask any more questions about Klipper w/out first rebooting my pi at least one or two times.
I do need to look at my bed_mesh and bltouch sections as now that you induce me to look at them they do seem a little odd. But as I said things are lining up and printing where I expect them to print...
Well even though it wasn't broke I decided to try and fix it. My bltouch and bed mesh settings I mean.
Got everything updated working perfectly and did a print tonight of a knife sheath and it was pretty cool to see the adaptive mesh probing just in the small area where the sheath was going to be printed.
Super cool.
I haven't messed anymore with the adaptive purge line because I have a normal purge line working just fine.
I may play with that tomorrow, but I've also decided that I need a screen in the room with the printer now that I have this cool interface I can play with, so that's my next plan.
Spare 10" Samsung tablet appropriated (with gracious permission!) from wife, so I have the hardware, now just need to connect a few dots and print a mount for it and I'm good, no more carrying my laptop down to the printer, or using the small screen of my S21. Even though Mainsail is responsive and accomdates dispaly on a phone very well, I'd like a little more real estate for the screen/controls.
My accelerometer is arriving tomorrow but that will have to wait for a bigger chunk of time. Also have my runout sensor to apply, and need to find a way to tie prints to specific spools like I could in Octoprint, that was a really nice feature.
Ended up having an almost flawless PETG print tonight. Ended up making a couple of changes, so no idea what actually contributed to the improvement (and didn’t have to decrease speed from the stock settings). I’ll take the win.
Ended up increasing print temp up to 270, increased the flow ratio, decreased part fan cooling down to 20%, and enabling some retraction settings.
I’m assuming it’s an artifact of the speed at which the X1C prints. The built-in profile for PETG defaults to 255 for example, (which is already higher than the stated range on the filament’s box). Temp tower came out pretty terrible all the way down to 235.
Was it a large print? At high speeds with PLA, I have trouble with heat build-up in the mass of large prints ...often results in a little warping at the corners.