.
To note, I saw today that sites like 9to5mac and slashgear "reported" today about these being available online now... chances are they will sell out, if they aren't already 
Not at those shipping costs ! More than the blinds for some.
2 Likes
Good luck guys who ordered new blinds in the last 15 days.... I ordered 7 new blinds from ikea on March 30th, they charged it on my credit card on the same day, but still they did not ship yet. We have to be patient these days...
Anyway, thanks for that thread I successfully made the blinds (the ones I already have) to connect and work fine in HE (even with the battery level). But then, I realized that we cannot have the buttons AND the HE to work together. My wife doesn’t want to use a phone or tablet to access the blinds. So, I had to installed the Ikea buttons on every blind, giving up the nice access with HE.
In total, I’m going to have 12 blinds in that room. Having them in HE would have been a nice addition.
Thinking outside the box a bit, but why not use a Pico remote? You could even have favorite presets because each 5 button pico has 10 unique button presses. It seems like it would be nicer than the Ikea remote?
Ho i like the pico. I have a few on lutron regular hub. I’m new to HE and didn’t find yet how to interface the pico without buying a new lutron hub pro. It must be possible somehow. I used to talk to the pico with wink. Is it just a question of writing a new driver?
Sorry, only the Pro Bridge 2 will work with Hubitat. Maybe sell the Wink and/or regular Lutron bridge to finance the Pro Bridge? The Wink won't be worth much anyway judging by their last couple weeks of issues.
Why not use a philips hue dimmer?
You can connect it directly to HE and have up/down/on/off
Andy
2 Likes
Hi again. I do not have Philip hue dimmer. And the Ikea buttons come with the blinds so as a first try (and to please my wife that is trying to be zero trash) I wanted to use them.
Anyhow, I have an old phone that I might try to use it to access the local dashboard. I would then leave the phone connected and hanging on the wall. But I’m a newbie in HE and I could not figure out how to group 2 blinds together. I tried the groups and scenes but there is no IKEA blinds in there. I see my blinds in the dimmer section but when I do that, it’s not working.
Beside, I don’t really need to have a slider to set its height. My goal would be to have it set the same way as a garage door.... one button only. You press it, it starts opening, if you press it before it reach the end, it simply stops. Next time you press it stats moving in the other direction. If I could do that, the layout would use only one button per blind, plus 3 buttons for groups. Is that sounds like a good idea?
But they don't work, so the fact they are included is irrelevant in Hubitat world
Use a Virtual Switches and Rule Machine could do that pretty easily
Something is not quite right, or may be I’m not doing it right. Here is what I’ve done:
Created a virtual device “virtual switch” with auto off disabled.
Created 2 rules machine; one for open and one for close.
The open rule machine:
Trigger with pico button 1
OR
With virtual switch turns on
Action: raise the blind
The close rule machine:
Trigger with pico button 5
OR
Virtual switch turns off
Action; lower the blind.
Dashboard tile:
Device: my virtual switch
template: switch
What is happening is when I press the tile, it changes to yellow and sends the ON state. The blind starts to raise. Then if I press it again, it stops. The tile became gray. I press it again, and it starts to raise again because it sent an ON again. At this point, I was just expecting the blind to lower.
Not sure the on off switch is suitable for this purpose.
Also, in the rule machine, I had chosen the ADJUST SHADE action, but the available actions are only OPEN, CLOSE, and SET POSITION. I think I would need a PAUSE. Here is what is happening if I use the pico.
I press button 1, the blind raises. While moving, I press the button 1 and nothing is happening. If I press button 5, then sometimes it stops, sometimes it reverses. It is erratic.
Any idea?

All right!
I’m about to finish installing the first 6. I’m modifying them to work on the ceiling of a glass room. I need to cut 5/8 of an inch on its width and I build a frame to support the blind on the ceiling. It’s looking good. The last one will have only 12 inches wide. These blinds are very well made.
Are you @Ryan780 gave up on the ikea button? I lost track of this thread. It’s hard to think to throw away 12 of these buttons. I can try to help if I can.
I just installed 3 of these yesterday, really easy set up.
I am trying to control them using a virtual dimmer, I wrote rules for different positions ie.. 50% virtuall dimmer level adjusts 3 shades to 50%. Did one for 0,25,50,75 and 100.
oSometimes it works great and all 3 move to the correct position, other times 2 will go to the right position and one will stop? I go into the device and press open and it opens. Is there an better way to control them as a group?
Also google home integration doesnt see them at all, thats why i created the virtual dimmer and exposed it to google.
.
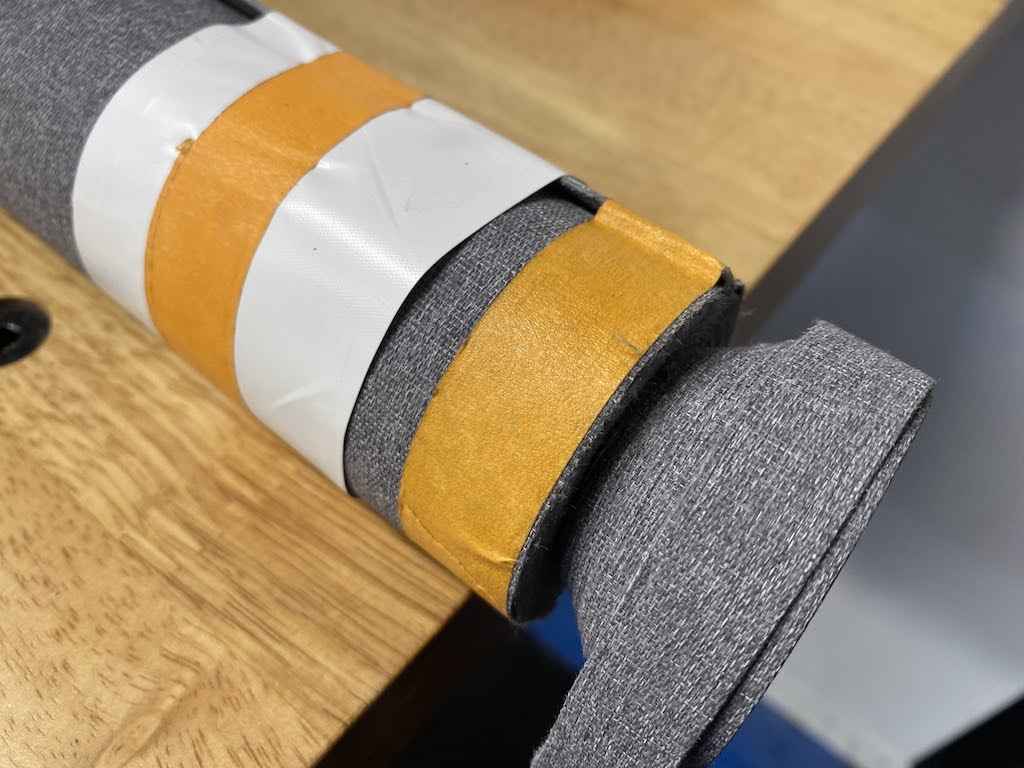
I just put my 4th one of these up in the house. There are plenty of how-to's on YouTube about trimming these to width, but I had never been happy with the "unroll the whole shade and cut with scissors"... i think i figured out a better way.
The one on the right is the non-powered blind I had in my office already, the new one needed a good chunk trimmed off to fit in the window opening. Most of the how-tos I've seen only trim one side. That is not desirable if you ask me, I took 1/2 off needed on the left and right.

Using a few pieces of painters tape, i made a nice loop around where I had to cut, this gave me a nice even line to follow along with. The tape that is more inside is to hold the shade together from unraveling.
I'd super highly suggest a brand new breakaway blade for this. Just try to cut a layer or two at a time and just keep twisting and twisting taking your time. I cut 1/2 of what needed to be cut away on each side.

Almost all the way through
Pretty smooth

I have just a little bit of trimming of the shade material to make it perfectly straight, but for now, it's just fine

Thanks to the directions in this thread and the custom driver, these are a snap to pair up to HE

6 Likes
Hey man, nice job.
On some of your off cuts, you might want to try singing the edges to stop them fraying.
Just use a disposable lighter or an other type of clean flame to singe the very edge. Of course be very careful not to set the whole piece on fire. you just want to singe the edge.
If it works on the off cuts then do the same on your good blinds.
I used this

Which is made especially for this purpose.
The way I cut mine was by laying down flat the blind, then follow a 6’ rule with the cutter. It did a perfect job.
4 Likes
I saw a post elsewhere suggesting that a small amount could be cut off each end of the metal tube as the spacing between the fabric and end is generous. As I only need to trim about 1" I'm considering this as it avoids cutting the fabric and light bleed at the edge would be reduced as it will be mounted in a window recess.
Any thoughts ?
1 Like
That totally depends on the amount needed to be taken off
Just an update to my post, I factory reset the blind that was acting funny and its fine now.
I would still be interested in a nicer way to control multiple blinds at once and how to expose them to google without using virtual devices?

