Hubitat with Homemade Temperature, Humidity, Pressure and Light sensor

Hi Everyone,

I may have mention some of the points here about how I used BME280 spread out through out the thread. I would like to summarized in one post about my specific tune of BME280 since I am releasing my sensor for sale. This is along post. If you are not interested at this point, you can skip it. There is nothing that need to be paid attention to. Perhaps, it will be useful for new owner of these sensors.

In the future, further adjustment may be made. I would still like to have the flexibility of tuning them to be better and better as I get more input. However, the changes if any will be more incremental.

There is a bit misconception that all BME280 is the same. Therefore, the reading will be the same on the final product(or brand) that use BME280. They are physically the same. However, BME280 can be software configured quite differently such that the result of the measurement can be different from application to application.

Here are what we should expect.

Temperature measurement.

BME280 can be configured aggressively to read the sensor data. It can perform measurement at very short interval (milliseconds interval). At this configuration, BME280 can be impacted by self heating. Based on my experience, this impact will cause the reading around 1 to 2 degree Celsius higher. For all of us in US with Fahrenheit as a display, it can look like that there is about 2 to 4 degree higher.

The other spectrum of the configuration where BME280 is requested to perform reading once per second. This configuration does not have any noticeable self-heating.

Through out the development I did adjust the configuration to get the most optimal setting for us. We do not want to be closer to one side of the spectrum. The final shipping configuration today may be different from those who got my sensor in the past.

In regard to temperature, BME280 is very sensitive sensor. It is really good at measuring temperature. The sensitivity and accuracy of BME280 is a double edge sword. Because, there is another source of heat on the board like the Zigbee radio. Keep in mind, the bigger picture that the sensor is not just a Temperature sensor. It still has to function as Zigbee router. It also has other sensors and expansion port that could be in used. They are some of the features that are as important as measuring the temperature.

I have designed the PCB to minimize the impact on the heat. In addition, I recommend below orientation. This is a recommendation. One does not have to follow the recommendation because the device page has offset adjustment. As a reference in below orientation, the sensor should have less than 1 degree Celsius offset.

Relative Humidity measurement.

In the first couple weeks of using the modules, the humidity may be lower than expected. This is due to the re-flow process that the sensor is subjected to. This is documented in datasheet. The sensor can optionally be re-condition according to datasheet. My personal opinion is that I would leave it alone. I have seen enough sensor re-conditioned itself after a couple weeks. After this process, the sensor should be within 3% of the specification of BME280.

Please note that the Relative Humidity is influenced by temperature reading as well. The temperature does impact the humidity reading. Higher temperature will lower the Relative Humidity reading of the same absolute Humidity level. I hope this is not confusing.

Pressure measurement

This is one measurement that BME280 is least affected by its surrounding. It is not impacted by temperature, self heating and etc. This is probably one aspect of the sensor that require least amount of adjustment.

I hope this information is useful. In case if you subject the sensor into different orientation that I indent or encapsulating it into a casing, there is some adjustment on Device setting page is expected to get accurate temperature and humidity reading.

In any case, I would like to offer a sensor that is robust, flexible and capable. Out of the box, with the recommended setup, The sensor is reasonably accurate without any specific effort.
Depending on your requirement, the sensor is design to be tune-able to get the precision that one would need.

Thanks
Iman
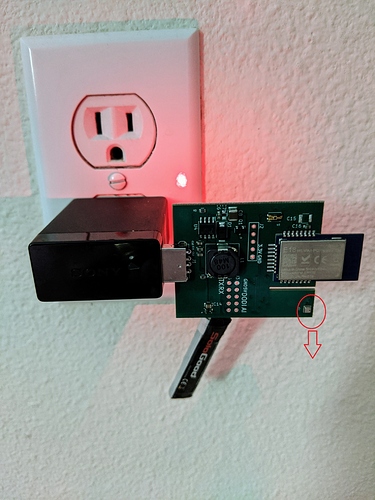
6 Likes

Just got mine hooked up and paired (no issues at all, although I still need to find a battery for it), so I have a couple questions. I apologize if these have been answered before, but with 681 posts in this topic I could not find the answers readily:

  1. Battery is reporting as 100 (%), but I have no battery connected. Is this the expected behavior? I would have expected it NOT to report battery if there is none. Even better report the Power Source information (Basic Report, Attribute 0007, maybe show DC Source (value 04) normally then switch to Battery (value 03) when that is being used.
  2. This one is more to just confirm... there is no configurable refresh interval, it is just going to produce events when the change has been big enough?

Yes. It will report 100% when unplugged.

In my other variant, I did have something similar to what you envision using the IAS cluster. Zigbee has some cluster that you can adopt to detect switch between DC or main power. I do not remember whether Power Source information is "report-able" in Power cluster. IAS DC/Battery cluster is report-able attribute.

Are you looking to find out when the sensor is powered by DC or Battery? If yes, there is a couple option using either the Analog Input. There is a pad (let me check with the schematic and get back to you) that will output 5V when powered by DC. The same pad with go to 4.2V or less when it is powered by battery. By detecting the voltage, you can detect whether you are on DC or Battery. I believe I also have DTH on my my github for this.

The 4 sensors (light, temperature, humidity and pressure) will auto update. Diagnostic Attribute such as packet loss and etc has to be manually refreshed. This is based on Zigbee Diagnostic cluster.

Thanks
Iman

Thanks for the quick response!
I was more curious about the battery value reported than worrying about detecting it. I have plenty of devices to let me know if there is a power failure and this will be on a USB battery pack anyways, but I wanted to make sure it was reporting "as expected".
Ok, that works. I added a simple refresh mechanism into the code (I like sensors to report in on a regular basis if they are not battery powered just to make sure everything is working, personal preference).

Now I need to work on a simple case for it (and dig a battery out of my storage). I saw the one already designed but I think I will make my own.

I am sorry. As part of getting older, I keep forgetting about things. The battery is also report-able value. You do not need to refresh it (poll it). Battery is not part of Diagnostic Cluster.

Thanks
Iman

1 Like

Ha! No worries. Thanks for letting me know.

1 Like

Any way to disable that bright green LED? I don't see a way in the driver to do it.

2 Likes

Tape was suggested to me. Bright sucker, isn't it?!

3 Likes

@LosinIt, yes, thank you.

In this batch, I have ordered a green LED which my initial intend for the light. I used yellow on previous smaller batch.

It turn out that green is so bright. It is something that I will need to revised in the next batch.

The LED is controlled by an battery charging circuit. It is not controlled by the MCU. It only function is just indicating that there is a DC power coming in. I am taking feedback. @rdoolittle would it be an issue if there is no light indicator at all for you? One way to go for me on the next build is to just remove the light. But, if this is an issue, I would maintain some sort of indication.

1 Like

BTW, @iharyadi, what does the red LED indicate? Radio?

The RED Led indicate a battery is being charged if you have one.

If you do not have battery, it should flash really quick. If you have battery, the red LED will turn on when the battery is being charged. Once fully charged, the red LED will turned off.

These are 2 LEDs that I am always considering to remove. I personally always happy that they are there when the room is bright. I can see far away just for piece of mind that the sensor has power without taking my phone or computer.

But, I also feel not so happy at night when it is dark.

Let me know whether it will bother you as a user that you do not have any indicator at all. FYI, In the earlier iteration of my sensor, I do not have and LED indicator. Would it be ok to go back?

It must be really quick because I have no battery and it looks on solid to me. I don't have an opinion on the existence of the LEDs, but I will unsolder them on the one I put in my bedroom. The rest I'm OK with as they are...or without LEDs. Not much help, am I? :crazy_face:

1 Like

Not at all. It help me at least get some feeling of the LED. I am really getting close to remove these LED in the future batch. The inconvenience of not having any indicator is insignificant.

Thanks for the help.

1 Like

@iharyadi

If you have an LED controlled by MCU, then it would be really good. Otherwise, my recommendation is also to remove the LEDs.

1 Like

Thank you. We already used most of the GPIO. It will be hard to use them for different purposes.

Yes, I still have plenty on current batch. I will keep feedback like yours. It is very likely that the future batch will not have and LED as my feeling at this moment.

1 Like

Most devices blink the LED during the pairing process. I was surprised when this didn't. At first, it didn't pair and I didn't know what was going on.

I can certainly use electrical tape to cover it. This is the order I'd like:

  1. Programmable LED enable
  2. Dimmer LED
  3. Include a piece of tape with kit
  4. Document somewhere to cover LED with tape if too bright
  5. Remove LED -- I don't like this

I really like having the LED for a sign of life.

5 Likes

I recently installed my sensor and like quick data output. This is my first and I am glad it is in my garage because of the green LED. I intend to purchase additional sensors for inside my house, but also would like to dim or turn off the LED if possible.

I covered mine with a dab of silicone caulking and it works well and doesn't require any changes to the board, like unsolding. I highly recommend you don't use clear. :wink:

3 Likes

Thanks for the feedback. If you need to have the LED removed before I ship it, I will be happy to do so.

1 Like

@iharyadi Hi, thanks for sending the unit... arrived today! It's all connected up and running fine - will be monitoring over the next few days but so far, so good!

I did have some initial problems in that although the HE was able to add the sensor unit ok, I wasn't getting any temperature, humidity, illuminance or pressure readings - all read as zero. I moved the sensor unit closer to the HE and all fine - will look at that again.

My mesh has a few Innr Zigbee Smart Plugs dotted around the house and they appear to work fine (controlling lights) - along with a Xiaomi Aqara smart temperature humidity sensor (using Markus latest driver) and a Xioami Aqara vibration sensor (waiting on Markus' driver - using veeceeoh currently).

Cheers!

1 Like