Hubitat with Homemade Temperature, Humidity, Pressure and Light sensor

Hi Imran,

Thanks for sharing all that info! And I’m following this thread with a lot of interest, everything I’ve been doing is tinker-town! So very interested in what your building and how it all fits together...

I’m using the bsec closed source library but I’m not entirely convinced by the IAQ scores it returns, my basic understanding is that the IAQ readings are baselined against readings captured during its calibration process. So if it is in an environment with “bad” air quality then that becomes the baseline and output is relative to this.. I need to read the actual spec to see if my understanding is correct and it’s not really that the air I’m breathing is “Hazardous” :slight_smile: but rather an indication that it’s “worse” in relative terms to the baseline established .. opening windows does at least have a positive impact on the returned IAQ scores but I’m still very much alive and kicking despite the hazardous air quality I’m breathing :joy::thinking:

2 Likes

Hi @iharyadi, just put my order on one of your beautiful boards. Being looong looking for this exact board on zigbee, although I have this same setup on a different way :wink:
image

I am interested to know what PIR sensor you had experience with and would recommend for your board.

Thanks for this work.

@manuelangelrivera Thanks for the order and support to my project.

Here is a variant of what I use.

It does the work for me. My only consideration is it is cheap. There are other alternative. Some of the is better than other perhaps in the false positive error. The HC-SR501 is good enough for me.

Just FYI, at one point, I combine PIR + Microwave detection. Using both to check each other is the best result I got. They can be used in area where you may experience sun shade.

I have used different off the shelf PIR sensor. I have always issue with sun regardless brand or make except for some model of Bosch. That model combine PIR + Microwave sensor. That is where I learn about it.

Yeah, well, I got a dozen of those lying around and don't really like to use them because of the false positives as well, but the advantage of this model are the potentiometers. Any other one that comes to mind, I had good results with these as well, while not the most sensitive, that exactly their strength:
3-5m Pyroelectric IR Infrared PIR Motion Sensor Module Detector AM312 Arduino US | eBay

Any other model that you care to share?

Thanks for the information. I will give the AM312 a try if I come across it.

I believe that there is community app that basically use multiple PIR to confirm a move on the same zone. I did try this solution but the false positive is still high for me. You have to place your sensor correctly for this to work. I could not get the right setup.

If you like, you can use LC filter on the vcc line to the HC-SR501. I heard from others that it help. But, I think it is only if you have issue on the power supply. If your DC supply is good, you do not need this.

Any PIR will have issue to sun and its shade. The movement of the heat looks the same to the sensor algorithm. The better PIR has lower rate of false positive. In my research at the time, most PIR sensor can reduce but not eliminate false positive. Learning this, I come across Bosch Tritec PIR. They use PIR+Microwave. I follow that technique using.

https://www.amazon.com/RCWL-0516-Detection-Microwave-Detector-Distance/dp/B07MTWZDQZ

the RCWL-0516 has disable input pad. I did wire the output of PIR to this pin of RCWL-0516.

I am pretty happy with the result.

1 Like

Hi Everyone,

I just want to update my progress on BME680. I have made progress on the following.

I have found a BME680 module that already come with an MCU that is capable to run Bosch close source library.

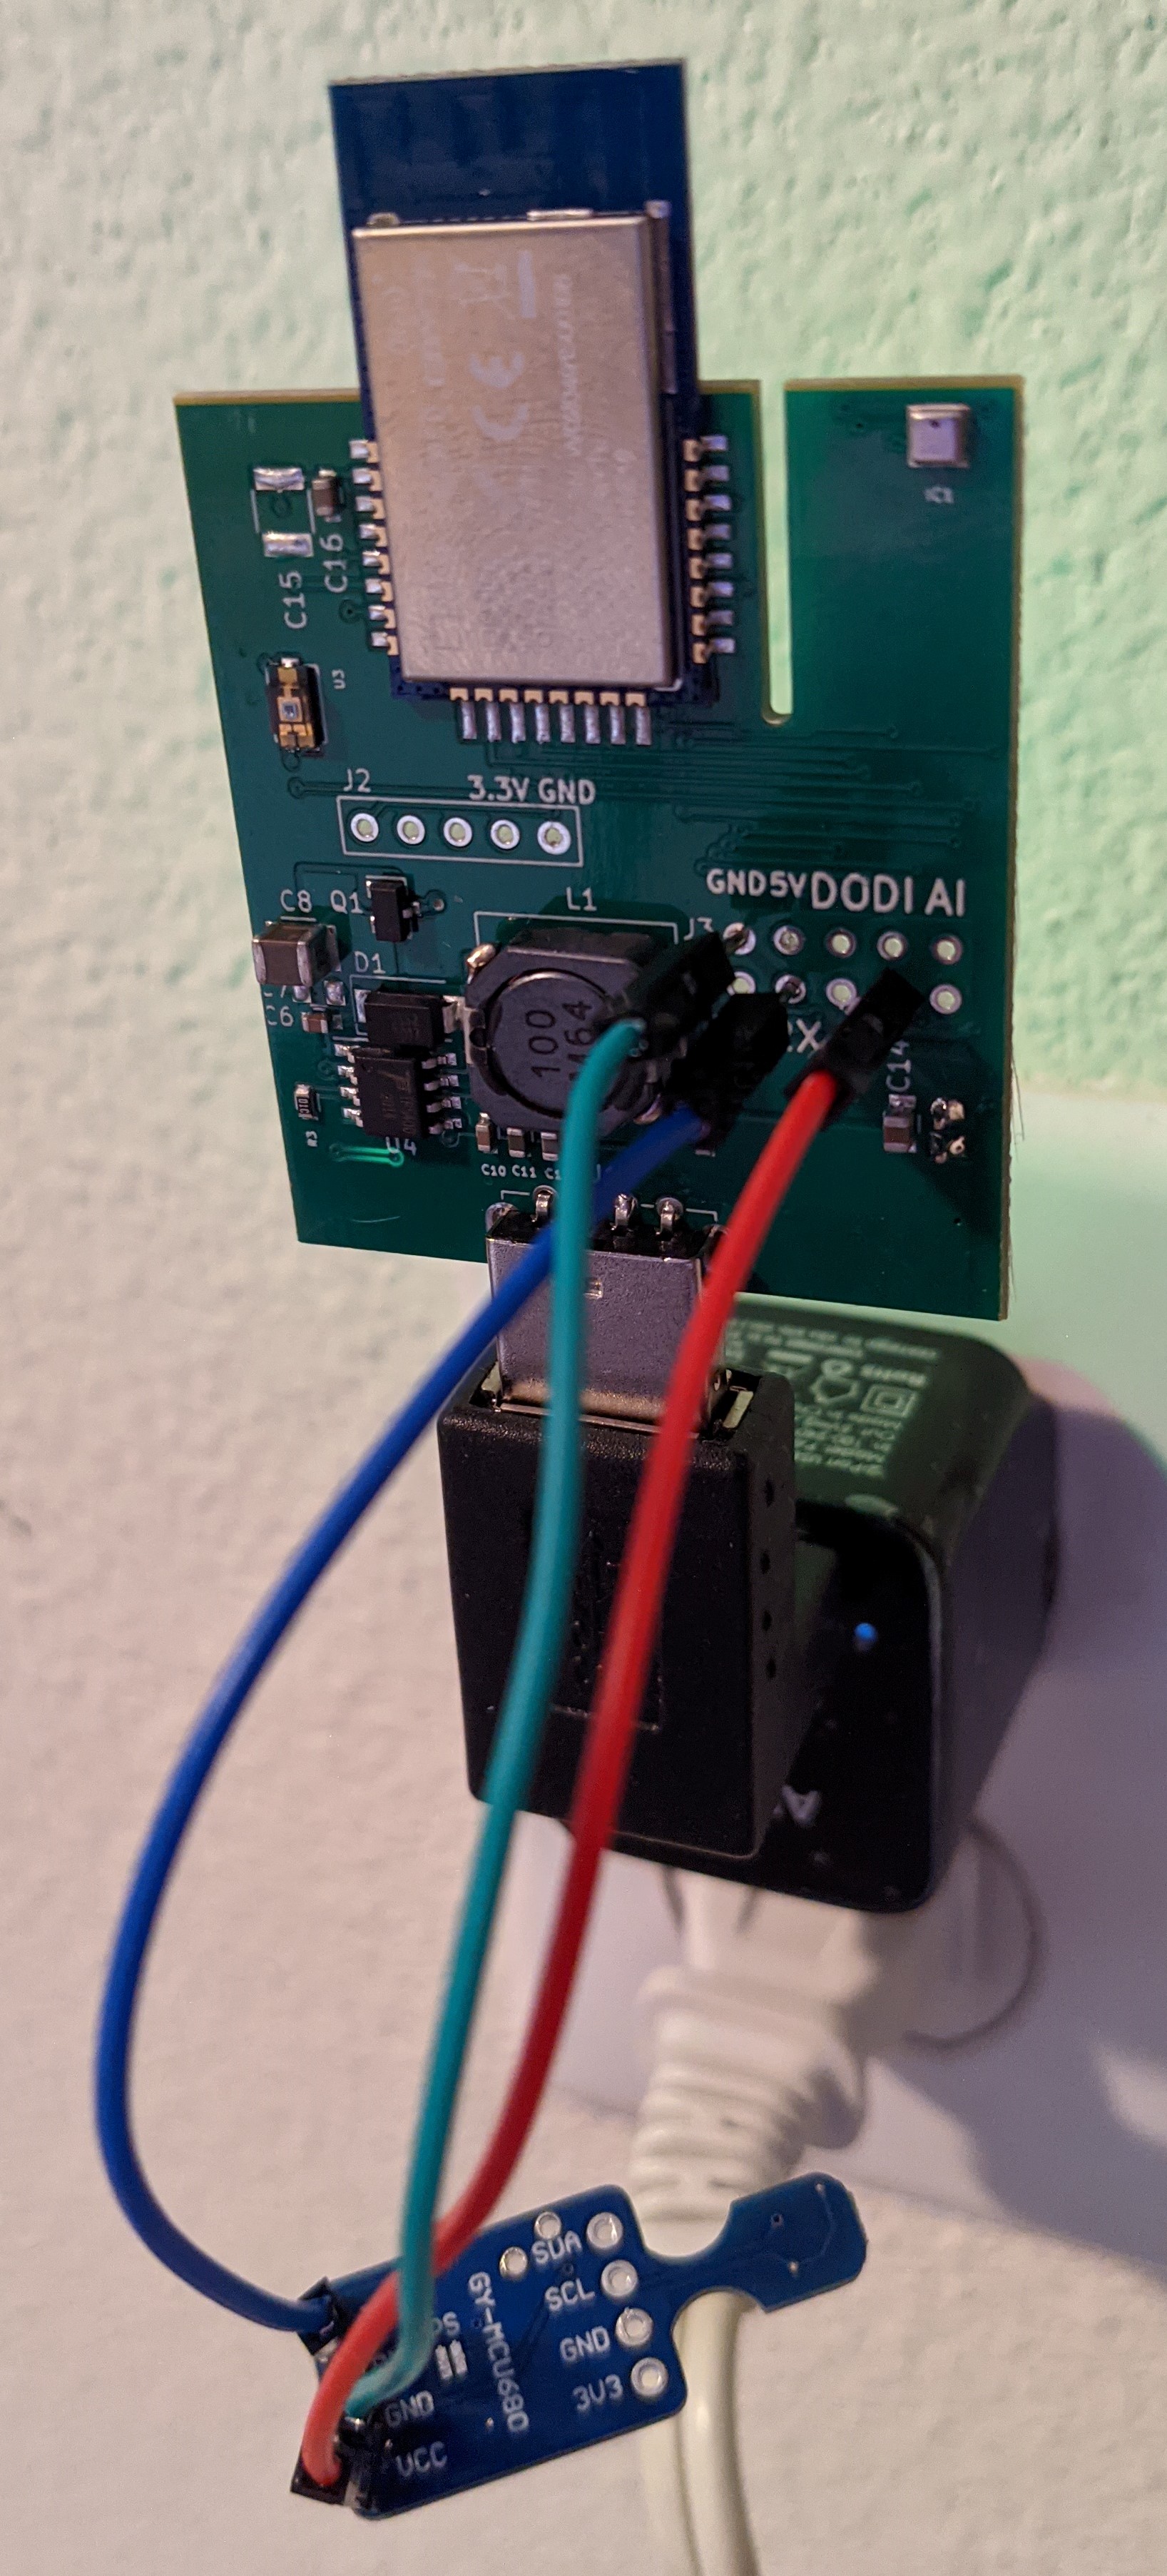
I am able to modify the firmware to send data that is compatible to my Environment Sensor through serial port. My Environment Sensor has serial port expansion. The module is know as GY-MCU680V1 in case you would like to get one yourself.

Here is how it looked like in action on my rough test setup. Just a reminder, The setup on the picture is just for testing. I may create a PCB adapter in its final form to attach to Environment Sensor.

Here is rough DTH that I just made.

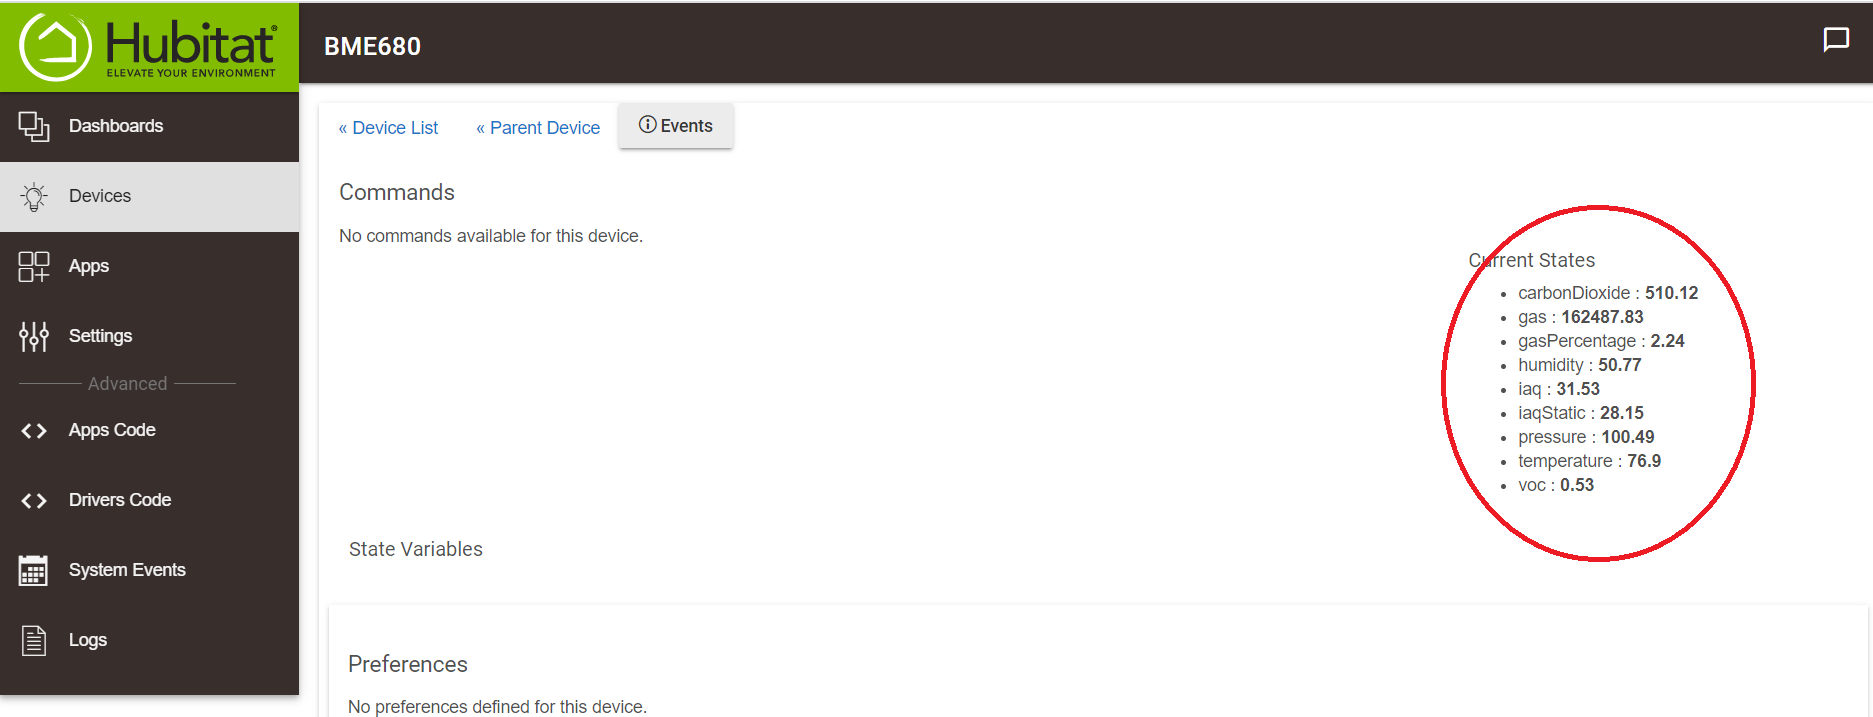
I am a new user of BME680 just like you. Let me share my impression. BME680 has 4 physical sensors (temp, humidity, pressure and gas). These 4 sensors are as solid as it comes.

Bosch build a library that generate estimation of IAQ (indoor Air quality), CO2 and VOC. These are not a dedicated hardware that detect CO2 for example. Bosch use the 4 physical sensor values and use their internal algorithm to say what is the estimated CO2 in the area. They also do the same with IAQ and VOC. Are these estimation accurate? I do not know. But, I have a feeling that it is just an estimation.

You can depend on the gas measurement in absolute. It is very sensitive. A gas reading does not give out a specific type of gas it detect. The Bosch software that would give the estimation for the specific type. This is the part that as a user, I would interpret it more in relative term. It is not wise to use the number that it produce as an absolute measurement value for these virtual types of reading.

Some of you have express interest on BME680. This is the fastest way to get one. Just get GY-MCU680V1 and modify the firmware. You can build the firmware using Arduino. I can share my sketch. However, my experience in building the sketch is quite labor intensive. There are no documents. The processor is based on STM32F0 which is quite well known. But, there are so many hurdle that one must get through so that the total firmware fit on that MCU. I am concern that It will be overwhelming for me to explain here on how to build the firmware and load it into the module.

If you really want to get BME680, I can help you to get a pre-built GY-MCU680V1 with the modified firmware for a small fee. There are work and shipping logistic that I will be required. Please PM me if you are interested.

At last, I want to note. With this configuration, you will have 3 sensors reading that would overlap. Out of the box, the two device would measure different value even on their such close distance. This is due to many factors. To have them reading consistently, one will need to calibrate the sensor reading. Like in my Environment Sensor, I will improve the BME680 DTH with adjustment options.

I also made progress on my work with nrf52840. I build my first Zigbee device which in the future can have BME680 on it. It may take a while to get there as I am prioritizing other use case for that project. If you have not seen what I have been working on for that project. Please take a look at this.

Thanks
Iman

4 Likes

There is still very little room on the BME680 MCU. I pull in OLED library and try whether it fit. It does fit. Now, I can display the reading on OLED as well.

I am thinking about making PCB adapter for it. I hand made a PCB adapter. It is too big for now. But, in the future, I may design a PCB and make it much smaller that will plugged into the Environment Sensor expansion pads.

If We are going to use a second MCU, my plan is to remove the BME280. I will make expansion board with BME680. In addition, I am considering to add additional sensor such as Laser dust Sensor. I am considering to add MICS-4514. However, I need to investigate about this as I think BME680 gas sensor is doing similar job indirectly.

3 Likes

Wanted to share how I end up using your board @iharyadi.
It's not stupid if it works right? :stuck_out_tongue_winking_eye:
It is a USB night light, it had a Battery that I took out and tapped into PIR DO.
Probably could make the batt fit in, but still testing it as is.
Cut a slit on the side to expose the antenna and sensors.


1 Like

This is nice. More importantly, this give me an idea on casing for the future version. Thank you for sharing. It is really good idea. I have been looking for an idea to put a case on the sensor. I think the idea here is just to expose the sensor out from the case while still maintaining them in the same board.

I think this make sense. I can move the radio and all other component into a case. Then just have the 2 sensors pop up.

@manuelangelrivera, Again thanks. It is really smart idea.

1 Like

Thanks for your kind words. Here is a similar example with BME280 using a D1 mini with @ogiewon STanything aka Hubduino firmware.

2 Likes

As an update, after 10nish days of playing and testing, I have decided that the PIR included in the night light is very stable and have not had false positives so far. Currently running automations alongside your sensor and it seem very very stable on my mesh. My props to you @iharyadi for building a solid solution here. The only issue is the price, if I could I would replace all my current sensors with your board, but 30$ plus the casing (about 9$) still kind of steep for the 8 something devices I would like to run. But in a nutshell, I am very happy with the results.

1 Like

@manuelangelrivera Do you mind sharing what are you using for a casing, I have been trying to find one that I like for his devices.

1 Like

There ya go. https://www.amazon.com/dp/B07MHVTHQS/ref=cm_sw_em_r_mt_dp_lKF7Fb4S2BNV4?_encoding=UTF8&psc=1

1 Like

Thanks for the update. I am glad that you are happy with the result.

Just FYI, I offer combined shipping and up to 8% discount on Ebay for multiple devices purchase. I hope this can help a bit.

My cost to have the board manufactured at small quantity is high. When I started (during the prototyping), I hand assemble 10 boards each batch. It gives the impression that thing can be made cheaper because I am not paying for this part of the process. This part of DIY process is gone as soon as I contracted the manufacture to assemble the product. In addition, It is expensive since I make small quantity of boards.

I thought I would share some of the challenge as a maker. I think this is reasonably classic issue for small developer like me.

I am hopping to create something of a higher value to offset for the higher cost. For example, I think there is small number of sensor boards that is available off-shelve that comes with Dual power supply (DC+ "recharge-able" battery). I hope this will help to reduce the maintenance effort keeping up your HA running. There is a less known feature of additional power amplifier on ZIgbee radio. It should help you build a better Zigbee Mesh. The module is also expandable. You still have an Analog input and digital output and not to mentioned the serial port that you can use as ThingShield replacement. Overall, I hope that these are unique and compelling proposition for us to build a better home automation experience.

Thanks for giving my board a try. Your improvement with the casing and feedback is very appreciated.

Thanks
Iman

2 Likes

What you said right there !
I’m not alone in having lost DOZENS if not HUNDREDS of hours because of sensors that dropped off or stopped repeating etc.

Keeping the family and your significant other
off your back does not come cheap !
:blush::pray:
Your sensors are rock solid !!

3 Likes

@njanda Thank you for your kind word.
br
Iman

@iharyadi I can definitely can see the advantages over the shelve, considering your product is unique. Now understanding that perspective, all the sudden price does not sound that bad considering all your work and manufacturing costs. My respect to you. BTW I will be ordering a couple of your boards in the future, but once I replenish the piggy bank :wink: Happy new year and keep'em coming.

2 Likes

Any 'plug&play' batteries you can recommend?

PS. Thanks for the great device and Happy New Year.

1 Like

Any single cell 3.7v LiPO battery for remote control toy should do.

Something like below should work.

I bought mine a long time ago which has smaller capacity. I am using the 200mAh version. I like smaller capacity since I have backup generator anyway.

The other option is to go with single cell 3.7 LI-ON battery. They are typically huge. I tested the circuit with LI-ON battery but I do not use it personally.

Just a note, the circuit on my board come with lipo and lion battery protection. You do not need the extra circuit since my board has battery protection circuit. This is hard to identify until you get the battery. If you have double protection, It should not be an issue. However, I never test them. I always use unprotected battery.

Thanks
Iman

1 Like

@LosinIt I spent a lot of time searching for a sensor to meet my needs and hitting many dead ends. A few of them are sitting on the kitchen counter waiting to be returned. Thank you for pointing me at a solid solution… which is indeed, an excellent repeater :slight_smile:

@iharyadi I have been using one of your sensors for the last week. It works better than I had hoped for. I put it on a power-strip on top of a very tall cabinet where it gets good air flow and light. It controls a humidifier, fan, lighting, and is a solid repeater. Your work is brilliant… I wish you all success.

5 Likes