Elecitric motors are tricky because you change directions by reversing the polarity. You’d need more than a dual relay to make that work.
Another option is an Arduino with a motor shield.
Elecitric motors are tricky because you change directions by reversing the polarity. You’d need more than a dual relay to make that work.
Another option is an Arduino with a motor shield.
I have a screen with an "in-line" control box with just up and down buttons. I was thinking I could just hook up the dual relay module to the two switches.
Wouldn't two Qubino Flush 2 do the trick?
Yes but that is 2 devices you have to buy vs 1. Then you’d need a rule to coordinate the 4 relays. I know we are all on HE, but in ST land I’d never trust that this could be coordinated correctly. IMO I’d go with a solution that is meant to handle motors.
It’s just closing contacts though. 1 vs 2, they all have to work. I’m missing what the difference would be.
Ordered my shutter module today.
The folks at Qubino were super helpful with confirming which would be the right product for my situation. We triple checked the wiring on the projector, in the remote box, and their modules, and are 99.9% sure that we've got this one figured out.
Should have the shutter module tomorrow and hope to install it this weekend.
WOOOHOOO!
Thank you everyone in this thread. The fine folks at Qubino sent me a diagram of which wires needed to get attached to which terminals, and I've got a fine z-wave controlled projector mount (almost) working perfectly.
Google Home has it showing up as a light, so I'm guessing a virtual device is required to make it work the way I want.
Amazing community! Makes being a noob not so terrible.
Sorry for reviving an old thread, but are you able to share the Qubino wiring diagram and confirm you went with the "Qubino Z-Wave Plus Flush Shutter Module ZMNHCD3". Looking to see how this turned out for you and trying not to have to reinvent the wheel. I have the same projector mount, but my problem is the RF controller (or receiver, not sure) died after one use. Unfortunately since this was part of my new build it has been installed for a while and is way beyond the RMA period! Thanks!
jjm1024 No point in starting a new thread when one already exists!
Happy to share everything I got from them.
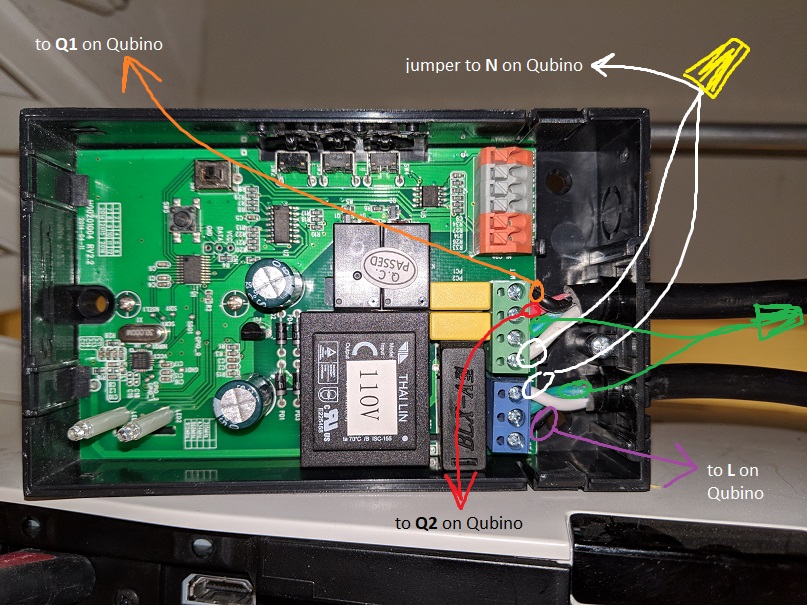
Below are the step by step instructions on how to wire the Qubino switch in this set-up, I've also attached visual instructions for illustration.
Please make sure power is off during the installation. If you're not confident about following the instructions or identifying the wires, please consult a licensed electrician for your own safety. The below instructions are for the Qubino Shutter Module ZMNHCD3 only.
- Disconnect the black wire connect to the blue terminal and connect it to the L terminal on the Qubino module.
- Connect the black wire from the green terminal to the Q1 terminal on the Qubino module.
- Connect the red wire from the green terminal to the Q2 terminal on the Qubino module.
If it so happens that the module acts in reverse (up triggers down and vice versa), you may need to reverse the connections in steps 4 and 5 since the documentation for the receiver doesn't indicate which wire coming from the motor is responsible for up and which one is responsible for down operation.
I created a virtual switch to control the lift, so it would raise and lower to the limits that I had set on the lift itself. You don't want to try and get the height/drop right by manually doing it each time like a dimmer.
So I have "Up periscope" and "down periscope" as my commands for Google to trigger the Hubitat virtual switch. And I have "warm up the theater" as a routine combining dimming the lights and lowering the projector, and then running an "activity" on my Harmony hub to for turning on the projector and receiver.
@ckronengold
Thanks for the great explanation and fast response!
FYI
As a follow up to anyone following along, the Quibino relay worked great! A few things I didn't realize/assumed wrong:


Now, onto integrating my Harmony Hub into Hubitat so I can add the projector mount to my Harmony routines. I am also going to use a PICO added to one of my groups of physical Lutron Caseta switches for a "manual" push button up/down. Trying for the WAF with all my automation/Hubitat projects, but generally failing miserably! Ugh.
![]()
I don't want to go too far OT here and will gladly pick this up w you over PM if you prefer. But since this thread has been about the monoprice lift and Harmony since the get go, I guess its not too far OT.
The answer is to keep the yellow adjustment stick handy, and hope you can reach it when the projector is in the 'up' position. If you turn the "back" limit adjuster clockwise, you effectively lower the maximum retraction. So you can trigger it to go down manually.
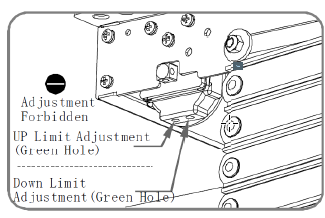
fyi, the manual has mistakes in explaining which way to turn which adjusters.
The stop is only useful if you don't limit the amount of travel for the lift. I presume there's only one position you want to lower the projector to. So set the max limit down using the limit adjusters (pictured above). Then you only need to trigger the lift to start. When it hits the down limit, it will stop. The other alternative (although its not really very good), is to set the Quibino as a dimmer. Then you can manually lower it to 40% (or whatever) and don't need the stop button either.
I never got the Lift to work with the Harmony routines because the Harmony can't integrate z-wave devices without the Harmony Extender. Since I wanted voice control anyway, I created the smart home routines within Google Home, and used that to trigger a Harmony Activity instead of the other way around.
So my "Hey Google, Warm Up the Theater" command lowers the projector, dims the lights, and triggers the "watch a movie" activity on the Harmony. The Harmony activity turns on the receiver and bluray player. Depending on your receiver brand/model, you could turn on the receiver via Google directly, but then the Harmony wouldn't be in sync. So Google controls the room, and Harmony controls the media.
Great suggestion. I didn't think about using the manual stops to drop the mount if something goes wrong. I have a beast of a projector (size wise, Epson 5050ub) that just fits into my ceiling opening so it will be tight and is definitely going to need to be done blind, but in an emergency I can probably do some gymnastics to access it.
Thanks for the FYI, I learned this the hard way during installation and noted the correct rotation for the adjustment screws.
This is how I set it up from the beginning and totally agree that this is the best practice approach. I can't think of a specific use case where I would need to stop it mid-travel but I am just a little disappointed I no longer have the option....Guess I am just hard to please!
I have the Harmony Hub, which does not integrate directly with Z-Wave, but I think via the Hubitat/Harmony integration I may be able to work something out. I will keep this thread updated with any success or failures. I also plan on letting my evil digital overload (in my case Alexa) control my theatre routine via voice as you have done.
I have the same projector. And fat hands. And I boxed in the lift since it wouldn't fit between my 16" joists. I need to put the stick on an extender or something, because there's room for the stick, but not so much for my arm.
I have the Harmony Hub, too. Very interested if you can make something work. I was hoping to use the lights and outlet buttons, but couldn't get them working without using a Harmony Approved lighting hub and the Harmony Extender. Figured I was in good shape already. No reason to waste any effort trying to get something to work differently that was already working.
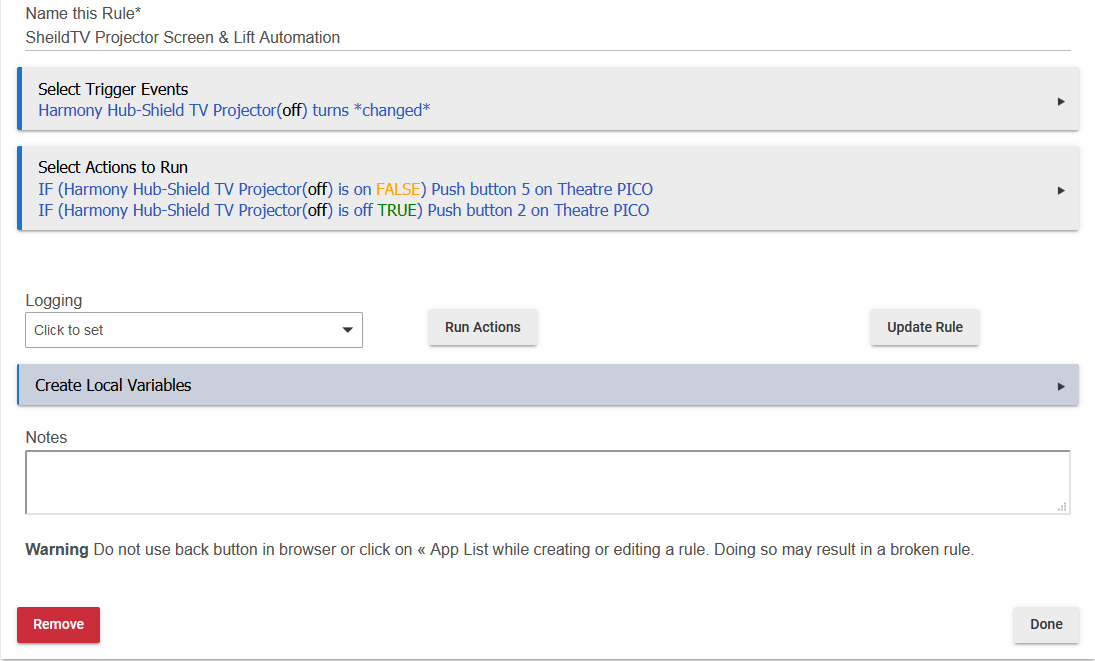
I know this is old, but I figured I would provide an update on the Harmony Hub/project lift automation. Although I wasn't able to get any of the home automation buttons on the Harmony remote to control the projector lift ( I also added a Qubino Shutter Module to my screen) I was able to use the custom Hubitat Logitech Harmony Hub Driver (link below) to integrate the Harmony Hub into Hubitat. Once this integration was implemented, I created a simple RM rule that is triggered by the Harmony Hub scene change to push the buttons I previously programmed for projector lift/movie screen automation. This button push lowers/raises projector lift and movie screen while also adjusting all of my family room lighting for viewing. For example, I press "Watch ShieldTV on Projector" on the Harmony remote and that sends a command through HE to push the corresponding button for screen/projector position as well as adjust lighting. Not sure if this is the functionality you were looking for, but I figured I'd update you with the results. It works great so far and seems like the remote is natively controlling all AV settings, screen/projector position, as well as lighting. Pretty good WAF so far, which is hard to come by in these parts!
Download the Hubitat app