Add GLEDOpto 5 in 1 mini. FIelds "Preset Level", "Color Temperature" and Set Level" are filled out, and I hit "Save Preferences" button. Hubitat C7 will NOT save values, and when I try to use any control for the light, the app says "Please complete the required fields" (yes ... the Red ones with *). No matter how many times I fill out values, hit save ... does not work.
Additionally, after the initial problem of Hubitat App never saving the required fields, I selected driver "Advanced Zigbee RGBW Bulb" (Really need RGBCCT, but it's not there), and now in the logs, get Java null pointer exception "Cannot set property 'requestedHue' on null object on line 815 (method setColor) when attempting to control light hue. It's unclear what driver should be used with GLEDOpto 5 in 1 RGBCCT functionality / LED strips.
Driver selected in Hubitat appears to now be GL-C-008P, controller device I have is GL-C-002P. What is correct driver for GL-C-002P ? SHould the 008P driver work ?
Try Advanced Zigbee RGBW Bulb. Click save then click configure. Works fine with my gledoptos
1 Like
Are you talking about this section?
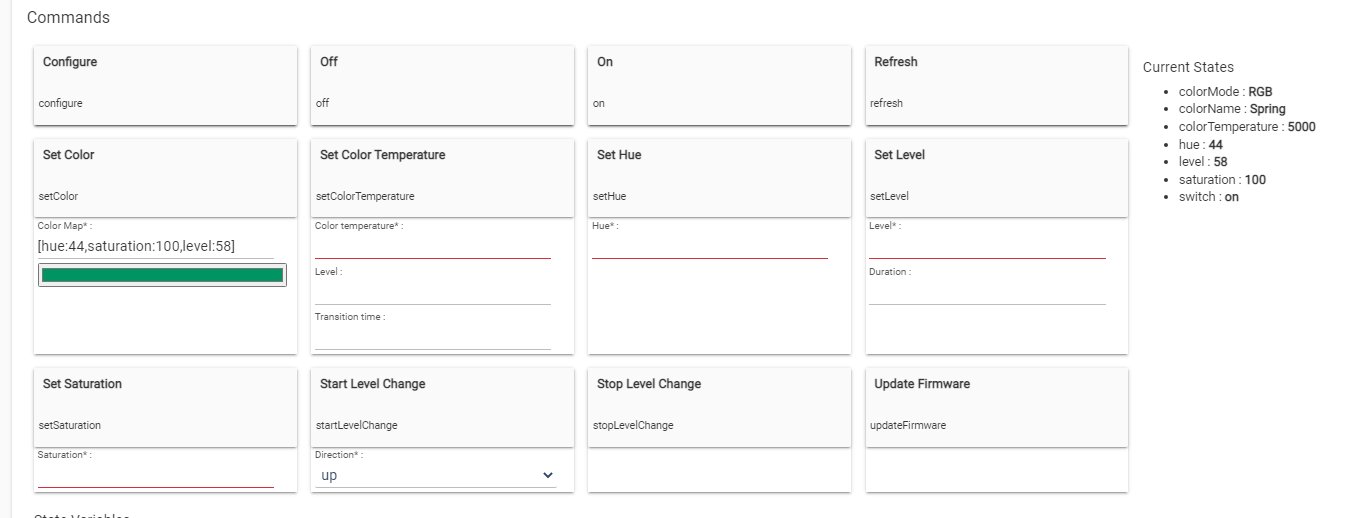
That is simply to test the device, not to "Save" any colors or levels. You fill out level, and hit the grey box above Set Level, for example.
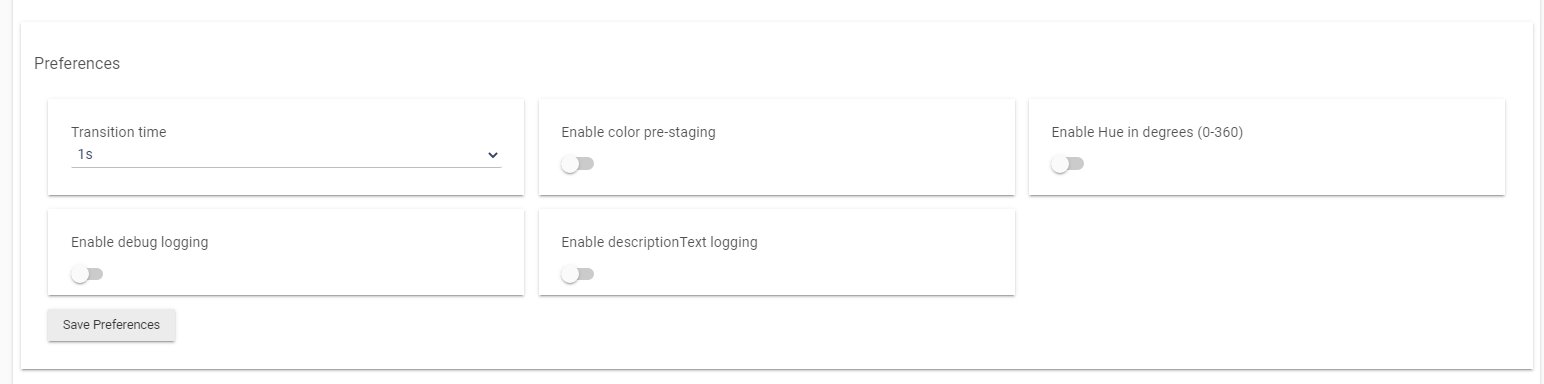
The only thing you save are the items in the section immediately above the Save Preferences, this stuff:
1 Like
Where does one control lights after they are configured. The UI is not good. Tried to install Dashboard on Hub, but that doesn't work. "Apps", "+ Built In App" yields a Text Box labeled "Install New Built In App" with only a close button. Should I write Java code for the new App in the text box ? Seriously deficient. The ONLY App that looks like it could be installed is Basic Rules, which isn't useful at this point. There IS a hyperlink for "Hubitat Dashboard" .. but this only takes you to the documentation (which has been moved, and apparently Hubitat doesn't know how to do a HTTP redirect. Seriously deficient code. The hardware might be OK, but with code this green and UI this bad, it's hard to tell,
Thanks, I understand this now. this section box needs a better title. Not intuitive. It is also not obvious where one would go to control zigbee lights once they are configured and added to a room. There is a simple ON/Off capability that sometimes works, but no color control or dimming ability. Where is this done (i.e. everyday control) ?
Is everyday control relegated to a different application ?
Also, I went with Zigbee so as NOT to require internet. First, it just isn't smart to have a "smart home" connected to the internet 24/7/365, Secondly, we are on a boat and it is normal when traveling between islands to not have any internet. I wish to use the hub directly without wifi, on it's own RF. Is this possible ?
Thanks much
The screenshot above is the device detail page, which is great for initial setup and testing. But as you note, it's not the best for everyday control. Hubitat Dashboard is one option for that. It sounds like you may have some problems loading the page to install built-in apps, so I'm not sure what's going on there. You could try a different browser or a cache-less reload, maybe? The mobile app is another option--the Lights/Switches tab should show these devices (this tab was formerly labeled Devices, but it may have been renamed to show that it only works with these device types at the moment and to eliminate confusion with the Devices page in the admin UI).
As an alternative, many users prefer to simply automate the devices so they don't always need to use an app, webpage, etc. to manipulate the devices. Motion sensors generally work well for this kind of application, but button devices or smart switches (with some kind of "smart bulb mode" so they don't cut power) can too. I'm not a huge fan of voice control but still find it better than an app in most cases, so that's another possibility.
If you use Android or Apple devices, the built-in Google Home integration or new beta HomeKit integration can also integrate devices into native options on your phone/tablet (as well as other options like voice control). Some people prefer this over something like Hubitat Dashboard.
Hubitat Dashboard is available both locally or via the cloud, either able to be enabled or disabled as desired. The local option does not require Internet access (though you do, of course, need a functional LAN to access it--same as you would to get to the admin interface of the hub).
Are you on the latest platform version (currently 2.3.4, though these were all updated in 2.3.3 as well)? It sounds like you're on an older release, otherwise all the documentation links should be updated to the new site by now. They recently moved, and Hubitat does not have enough control over the "old" site to implement a smooth redirect, hence the workaround you saw — which in most cases is a link that should take you directly to a similar page on the new platform. (If you're on the latest release, consider sharing how you got here so it can be updated.)
1 Like
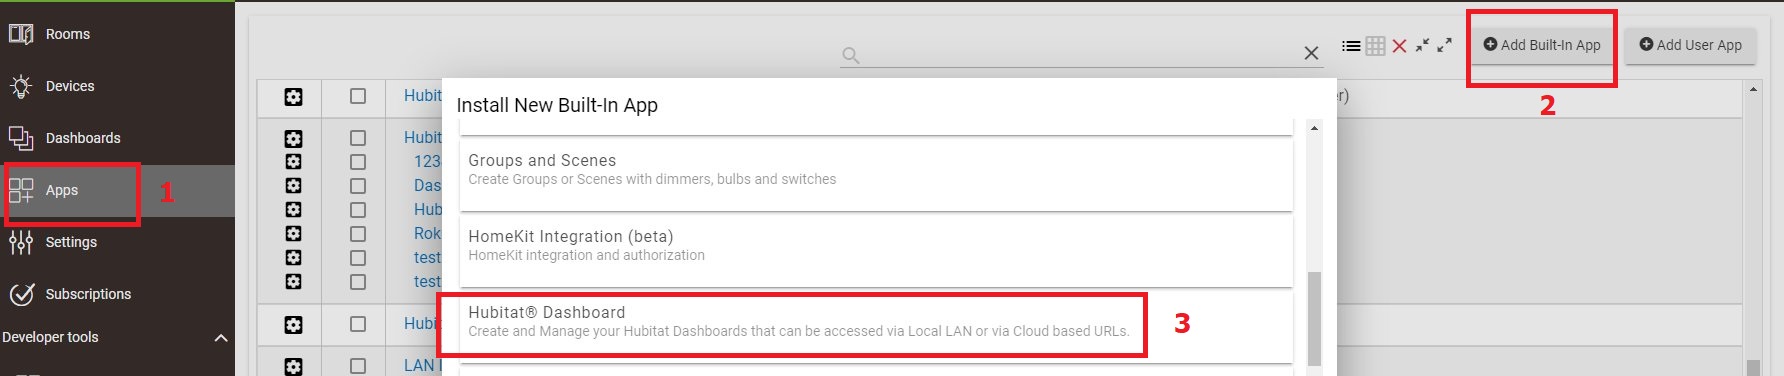
You do want apps, built-in apps. Every once in a while, I have seen where you go back in a minute or two later to Add Built-In Apps, and everything is there. If you have not, you also might try a reboot from the Settings menu.
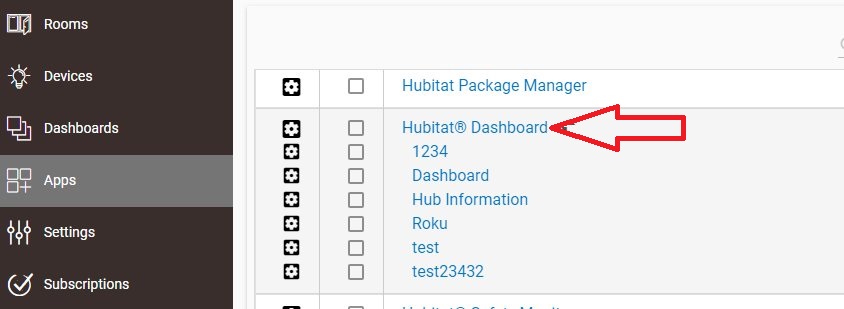
These are the basic steps you have to do before going to the actual Dashboard, and making tiles and so on.


2 Likes
Thanks very much for the detailed answers. After much fiddling around things are working better, and I am getting a better understanding of the concepts and strong points. If I had not had an iPhone and Android, it may have never worked. Some things worked on Android, and others on iPhone, but both had critical roadblocks to installation/config.
FOR THE DEVELOPERS OF HUBITAT:
It's great that you got the code together to make a good prototype for this hub.
Now, hire a professional UXD person of firm and make the UI intuitive and usable to the general public. With a new and improved UI, leave the old interface accessible via a "Legacy" option for all of release 2.x.x, for those that have figured out this UI.
The benefits of just having a simple dashboard included in the product would be worth any downsides (that I can't imagine). There is a difficulty setting up most "smart" devices in a scenario, where an iPhone or Android IS the WAN interface. Without the cheap portable "Mango" router I got just to setup this hub, I doubt it would be working now. "Discovery" of the hub was difficult and took a couple hours of fiddling, plugging in the MAC and IP addresses manually ... and then after hours ... with the mango router, it worked. It would be useful to a small, but significant number of potential customers to be able to setup entirely without access to internet, through a local wifi router only, with no ethernet cable. Users should be able to connect to the Hubitat through WIFI, and be able to do all the setup locally, without knowing anything but a start sequence to connect to admin page on Hubitat.
It can completely be setup without internet access. You make your own dashboard without any internet access as well. The only time you really need internet access is for platform updates. You do not need the internet to setup any zigbee/z-wave devices. There are many people here that isolate Hubitat from the internet. I guess since everything can be done locally, I'm not sure what you mean in your message above.
2 Likes
Closed ... sort of works
What do you mean?
1 Like
This topic was automatically closed 365 days after the last reply. New replies are no longer allowed.

