I have a few GE z-wave smart fan switches; on Smartthings I had the option to set the speed to high/Medium/Low without having to use the slider. Is there a way to do this in Hubitat? Thanks
This will do it.
I have tried to install this but I am getting a long error message. Is there something I need to change for it to work in Hubitat? I am not a coder, just a cut and paste guy.
Thanks
That's a SmartThing DH, not yet converted to Hubitat.
Conversion is a 2 step process (remove unnecessary; replace), and since you can cut and paste ![]() here's the steps:
here's the steps:
Get the raw code again from that link above:
- Delete lines 55 through 90. (Tiles are a ST thing, not Hubitat.)
- Delete line 38, Health Check is a ST thing.
- Row 26, insert these lines:
* 11/06/2018 : Convert to Hubitat
- Then use search replace to search for "physicalgraph" and replace it with "hubitat" (leave off the quotes.)
Paste the result into Hubitat's Driver code and save. All the errors should be gone.
You can now begin testing ![]()
3 Likes
You are awesome! That worked. Thank you
Confirm please, that the first edit is accurate. Remove rows 58-90. Reviewing the linked DTH, it looks like it might need to be expanded to Remove rows 57-93. That feels like all the Tiles section.
From a line above "tiles" to the line before "main"
}

	tiles(scale: 2) {
		multiAttributeTile(name:"switch", type: "lighting", width: 6, height: 4, canChangeIcon: true){
			tileAttribute ("device.switch", key: "PRIMARY_CONTROL") {
				attributeState "on", action:"switch.off", label:'ON', icon:"st.Lighting.light24", backgroundColor:"#00A0DC", nextState:"turningOff"
				attributeState "off", action:"switch.on", label:'OFF', icon:"st.Lighting.light24", backgroundColor:"#ffffff", nextState:"turningOn"
				attributeState "turningOn", label:'TURNINGON', icon:"st.Lighting.light24", backgroundColor:"#f0b823", nextState: "turningOn"
				attributeState "turningOff", label:'TURNINGOFF', icon:"st.Lighting.light24", backgroundColor:"#f0b823", nextState: "turningOff"
			}
            tileAttribute ("device.currentState", key: "SECONDARY_CONTROL") {
           		attributeState "LOW", label:'Fan speed set to LOW', icon:"st.Lighting.light24"
                attributeState "MED", label:'Fan speed set to MEDIUM', icon:"st.Lighting.light24"
                attributeState "HIGH", label:'Fan speed set to HIGH', icon:"st.Lighting.light24"
            }
			tileAttribute ("device.level", key: "SLIDER_CONTROL") {
				attributeState "level", action:"switch level.setLevel"
			}
		}
		standardTile("lowSpeed", "device.currentState", inactiveLabel: false, decoration: "flat", width: 2, height: 2) {
			state "LOW", label:'LOW', action: "lowSpeed", icon:"st.Home.home30"
  		}
		standardTile("medSpeed", "device.currentState", inactiveLabel: false, decoration: "flat", width: 2, height: 2) {
			state "MED", label: 'MED', action: "medSpeed", icon:"st.Home.home30"
		}
		standardTile("highSpeed", "device.currentState", inactiveLabel: false, decoration: "flat", width: 2, height: 2) {
			state "HIGH", label: 'HIGH', action: "highSpeed", icon:"st.Home.home30"
		}
		standardTile("indicator", "device.indicatorStatus", width: 3, height: 2, inactiveLabel: false, decoration: "flat") {
			state "when off", action:"indicator.indicatorWhenOn", icon:"st.indicators.lit-when-off"
			state "when on", action:"indicator.indicatorNever", icon:"st.indicators.lit-when-on"
			state "never", action:"indicator.indicatorWhenOff", icon:"st.indicators.never-lit"
		}
		standardTile("refresh", "device.switch", width: 6, height: 2, inactiveLabel: false, decoration: "flat") {
			state "default", label:'Refresh', action:"refresh.refresh", icon:"st.secondary.refresh-icon"
		}
"main" wants to be "inside" Metadata.
caveat... I don't have one of these devices to test.. just lending a hand with "teaching" how to convert ST code to HE code. ![]()
Ok, thanks. Line 56 through 90 (inclusive). I had thought Main and details lines (91+92) were inside the curly bracket that is opened in line 57, and thus figured it would be part of tiles too. *yep, this is code education! 
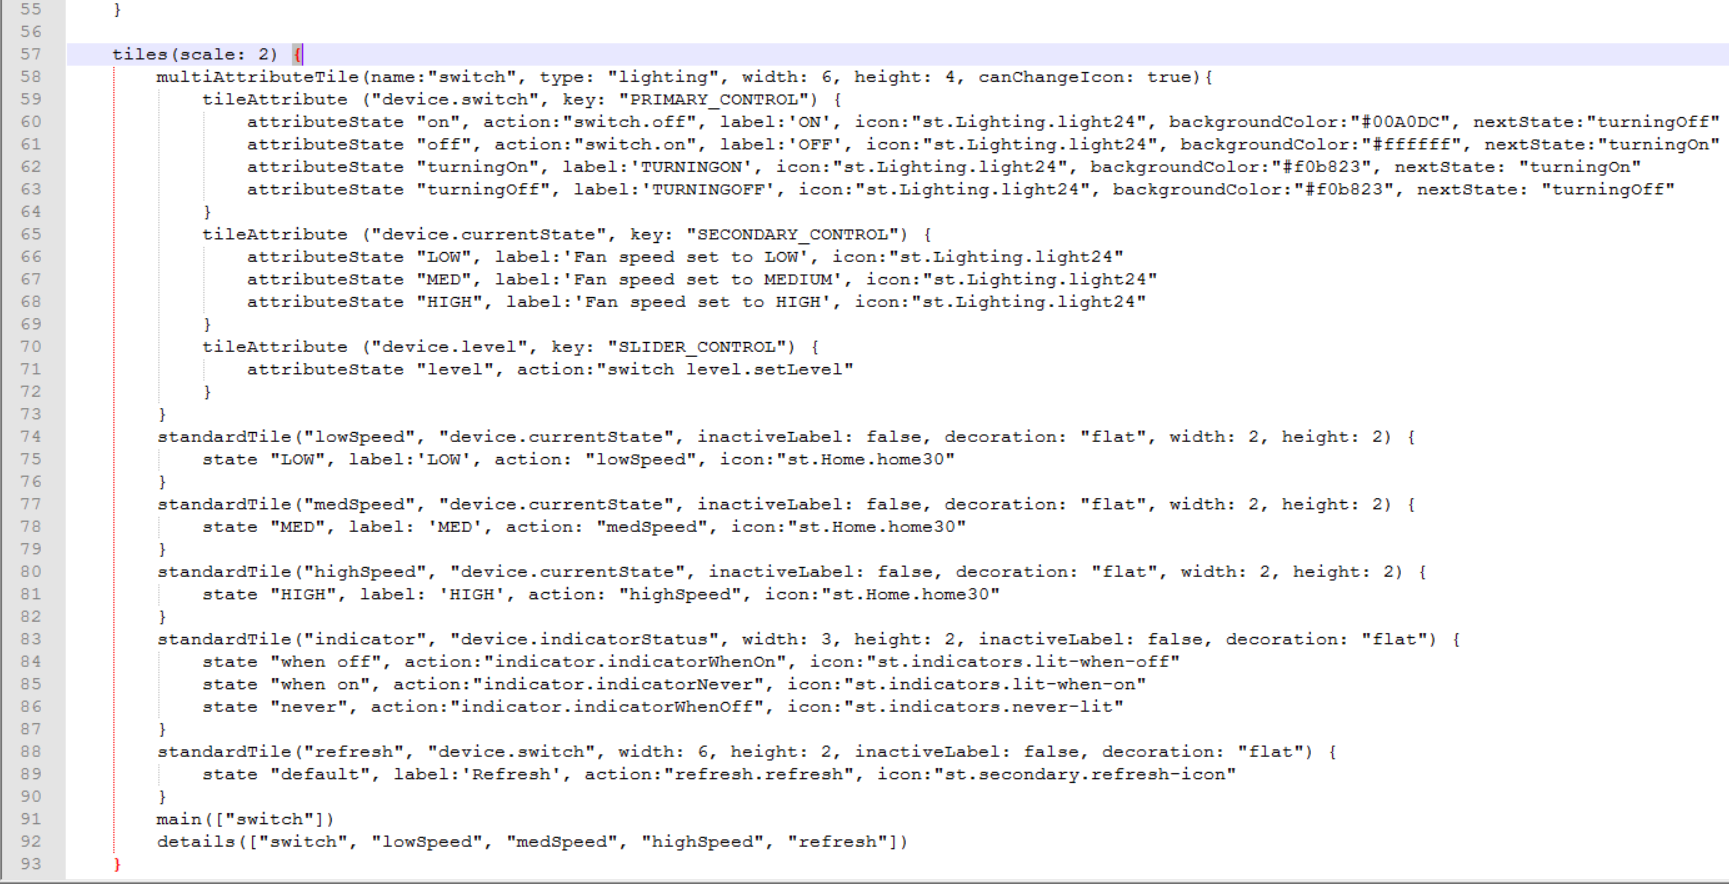
Removing "tiles" is a beautification step. 
Hubitat will 100% ignore those lines.
This code ONLY needed the physicalgraph --> hubitat replacement to compile.
But since I chose to "educate" vs just paste in the edited code, showing that Hubitat doesn't need tiles vs ignore was better in my mind.
1 Like
I was actually expecting that to be true. Feels like that is true for all three edits other than the physicalgraph -> hubitat thing. Cheers!
Follow up question. Is there anything in the device driver that sets the order of the Command buttons as they present in Hubitat? I just added this to one of my switches, Nothing immediately stood out defining High Speed to be first when I reviewed the code.
It's a little bit of chaos.
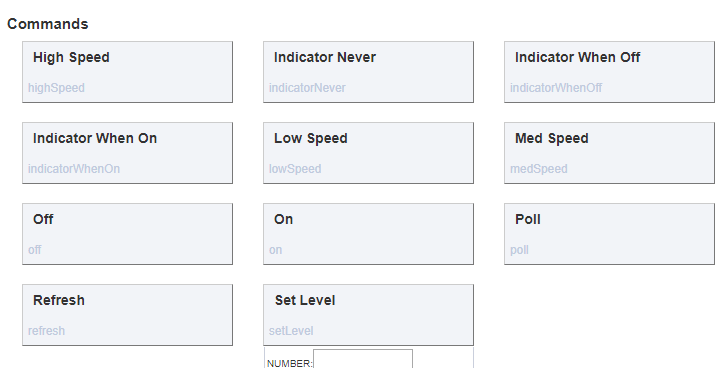
It appears the layout is alphabetical.
Once you have this driver installed and used by the device how do you use the Low, Medium and High controls in the Panel or via Alexa?
My experience with my GE fan switch is that Alexa doesn't support levels for it via Hubitat.
This topic was automatically closed 365 days after the last reply. New replies are no longer allowed.

