Device discovery of a Raspberry Pi

I'm new to Hubitat and have lots of questions.
I have an app which uses an ultrasonic probe to measure the volume of water in a water tank - it's written in Python and runs on a Raspberry Pi.
The Pi measures the volume every minute so I would like it to use this schedule to send "water volume" messages to the Hubitat (so no polling). Currently, I'm struggling with (at least) two problems.

  1. How to make the Pi discoverable. I guess I need to use HubAction, but with what parameters? And what corresponding service/app do I need to add to the Pi to make it discoverable?
  2. How do callbacks work? How does Hubitat route async messages (from my Pi) to the appropriate app/device driver callback? Or does each one see all messages (seems inefficient)?
    Please write my code for me - only joking!
    And if you can point me to existing examples, please make them simple and well commented/documented.

I'll write it in short here, if you need more clarification, just ask. :wink:

  1. SSDP would be the protocol to use, but if you're doing this just for yourself, you could just install as a virtual device and set the Device Network ID to the IP (or MAC) of your rPi (in hex, eg C0A80001 for 192.168.0.1).
  2. Send JSON formated POSTs to :39501. Then the parse() function of a driver will receive it. The message is routed based on the source IP or MAC of the sending device and is matched against the Device Network ID.

My drivers for Tasmota have an app for SSDP discovery and the drivers have the parsing code. All my code is built in a build system, so may not be the best example in terms of readability, but it does all you need.

4 Likes

Simplest method would be to use the Hubitat Maker API builtin App to allow your RPi Python script to update a virtual device on the Hubitat hub via a simple http call.

3 Likes

Thanks for trying to help guys.

Ogiewon, I set up a Maker API app. Am I right that the pi should send using "Send POST URL (replace [URL] with actual URL to send POST to (URL encoded)" where [URL] is an identifier:value pair? And doesn't the app care what kind of data I send, it just treats everything as text? [Edit] Ooops - I have just looked at the Maker API docs and I see that I completely misunderstood its purpose. It just gives me access to a virtual device. But as I wrote below, I don't see how I tell the virtual device what kind of data to expect and how to parse it, etc.

Markus, I had looked into using SSDP, but it looked a bit complicated - I don't think the pi would be discovered without me having to install some kind of server/app/thing in it.
I looked at using a virtual device, but I don't understand how they work. I come from using the Mozilla Gateway hub and with that you have to tell the gateway what kind of incoming data can be accepted from the device (is it an event, a value, etc) so that the hub knows what action to take or where to store it. Virtual devices don't seem to have any of that.
I guess the bottom line is: I need to do a lot more research - I just get the impression that most Hubitat apps poll their devices, so there are very few examples out there.

Actually, that is not correct. The "Send POST URL" field is for the MakerAPI app to send httpPOST data to whatever URL you'd like when the Hubitat devices you've selected in the Maker API app have a change in status. For example, when a temperature sensor changes value, or a motion sensors changes from 'active' to 'inactive'.

If you look in the MakerAPI app on your hub, you'll see a section that looks like the following:

Send Device Command (replace [Device ID] with actual subscribed device id and [Command] with a supported command. Supports optional [Secondary value]
This will include a more detailed URL that you can use to send a command to a device. That command will need to accept a numeric value for the tank level that you want to send. This may be the sticky part... Are you using a 0-100 percent for level? or actual engineering units (e.g. gallons or liters)?

1 Like

Litres or gallons - my app allows the user to choose. I think I'm beginning to understand something.... Virtual devices don't care what the data is supposed to represent - it's just a number - is this right?
If not, how do I tell the virtual device what the number represents and how to treat it?

Virtual Devices, are just like any other device in Hubitat (or SmartThings) for that matter. The support Attributes and Commands. An attribute is essentially a variable that stores a value of either numeric or text data. When an attribute is updated, and EVENT is raised on the Hub. Any Apps that are Subscribed to that device's events will be notified. Commands are callable functions within the driver that can be used for many things, including updating attributes.

A virtual device is just one that is not directly paired with a physical device (Zigbee, Z-Wave, or LAN)

Silly question - I know - but if it is not directly paired with a physical device, what is it used for? I think we could use virtual devices on the Mozilla Gateway, but I never really understood what they were for (lol).
When I add a virtual device to the hub it just lets me give it a name, a network id and a type. Where do I get to define attributes and commands?

The Driver TYPE defines all of those settings for a virtual device.

I your case, I am not aware of any Hubitat Standard Capabilities for a Tank Level... Thus, you may need to write your own Virtual "Tank Level" driver, with a custom attribute and a command to set the value.

It sounds much harder than it really is. Let me know if you want some assistance.

1 Like

Oh, and to answer this question... people use virtual devices for whatever their imagination comes up with. Some people use a Virtual Switch device to indicate whether or not Amazon Alexa believes they are home or not. Some people use a Virtual Dimmer Switch to indicate whether or not something is on or off, as well as use the LEVEL attribute to provide 100 settings.

Virtual Devices (that use standard capabilities) are easily integrated with Apps, like Rule Machine, Simple Automations, etc...

I use a special virtual device that implements both the SWITCH and MOTION capabiltiies. I have an Alexa Routine that turns on that Virtual Switch whenever my Ring Video Doorbell sees motion. The driver for the virtual device also sets its motion attribute to 'active' along with the switch to 'on'. This allows it to appear like any other motion detector on my hub to all other apps.

1 Like

Ok, thanks everyone. I think I have enough info for now.
I think I will try to write my own driver and maybe go down the SSDP route for device discovery.
I like a challenge!

1 Like

There are a lot of polling apps since many device have no way of being configured to report in. As I mentioned before, my drivers implement all the features you are looking for, but yes, they are not simple. I don't know of any simple examples that do all that you need, but hopefully someone else can point you to something?

When you make the App for this, do make sure that once discovery is done that you stop the SSDP discovery, if left on it can have adverse affects on your hub. The server side of SSDP discovery can be written in Python, for that there are plenty of examples.

With that said, you will still need to write a driver, to elaborate on what I meant by installing it as a virtual device above, is that you create the driver so that it has the attributes and commands you need as well as can parse the input you will send to it in the parse() method. Once you have your own driver, install it using the "Add Virtual Device" button on the Device page. You can then set the "Device Network ID" to your device IP and it is then going to receive traffic in the parse() method coming from that IP to port 39501. My Tasmota Universal Parent driver does all this if you need an example, albeit in a more complex way since it supports many different device types. I'm sure there are other easier to understand examples somewhere.

If you do write the SSDP discovery app (not easy to do in a correct way), instead of installing using "Add Virtual Device" you would install the device using your app and have the app set the correct "Device Network ID".

1 Like

I've written a very simple device driver which seems to work:

metadata{
definition(name: "Water Volume", namespace: "myfirstdriver", author: "Richard Brown") {
attribute "Volume", "number"
}
}

def parse(description) {

def msg = parseLanMessage(description)  //returns a map
def json = msg.json  
log.debug "parse data: $json"
Volume=json['Volume']
log.debug "parse data: $Volume"
sendEvent(name: "Volume", value: Volume, isStateChange: true)

}

It's "parent" is a virtual device driver that knows the Mac address of the Pi. It works - it receives attribute updates from the Pi and sends events.
The problem:
The Rule Machine app does not list my device, so I can't use it to make a rule.
HubiGraphs does not list my device, so I can't graph the Volume values.
But Dashboard Tiles do list my device.
Any ideas?

I've not gone too far into Hubitat's driver development, but my guess is that it's because you don't have any "Capability" set in your driver. Capabilities pretty much define what a device is or does, and determines where and how it can be used by Hubitat. You can find the list of available capabilities at:

https://docs.hubitat.com/index.php?title=Driver_Capability_List

However, as you'll see, and as mentioned above, there isn't something like a "water volume" capability, so I'm not sure what would be the best way to go about writing a driver for this use. However, if I personally wanted to accomplish what you want, I can think of a way to do it without any custom coding.

From what I can gather, you want a way for your Pi to send updates of water volume to Hubitat. Is this the extent of the interaction you need between the two? You don't need to send data or commands from the Hubitat to the Pi? If so, I'm not seeing the need to make your Pi discoverable. Your Hubitat can receive data (eg. through MakerAPI) without really needing to know anything about the sending device.

If I just wanted to get something like this working, here's one way to go about it. Note that, as mentioned earlier, Hubitat doesn't have any in-built understanding of something like "water volume," so I would use a sort of "hacky" way of storing the values into Hubitat. Basically, we want to create a virtual device that can hold the kind of values that we want to deal with. Looking through the built-in drivers, I see one called "Virtual Illuminance Sensor" and since I know that illuminance (lux) values could be anywhere from zero up to the thousands, I think this device type will work. (Another possibility might be Power Meter) So, we'd create a virtual device using this driver, and name it something like "My Water Tank Volume". After creating and saving, you'll see that this device has a single value (Lux), and you can set that manually from the device page if you wish.

Now, modify/create your MakerAPI app instance, and select the virtual device to make it controllable. After doing this, and checking the available commands for our device, I was able to see that the command we want is "setLux," and therefore the URL we will want the Pi to send to would be:

http://[Your Hub IP]/apps/api/[Your Maker API App ID]/devices/[Device ID]/setLux/[water volume value]?access_token=[Your Token]

Your Pi just has to call that URL and the "lux" value of your virtual device will be updated in Hubitat.

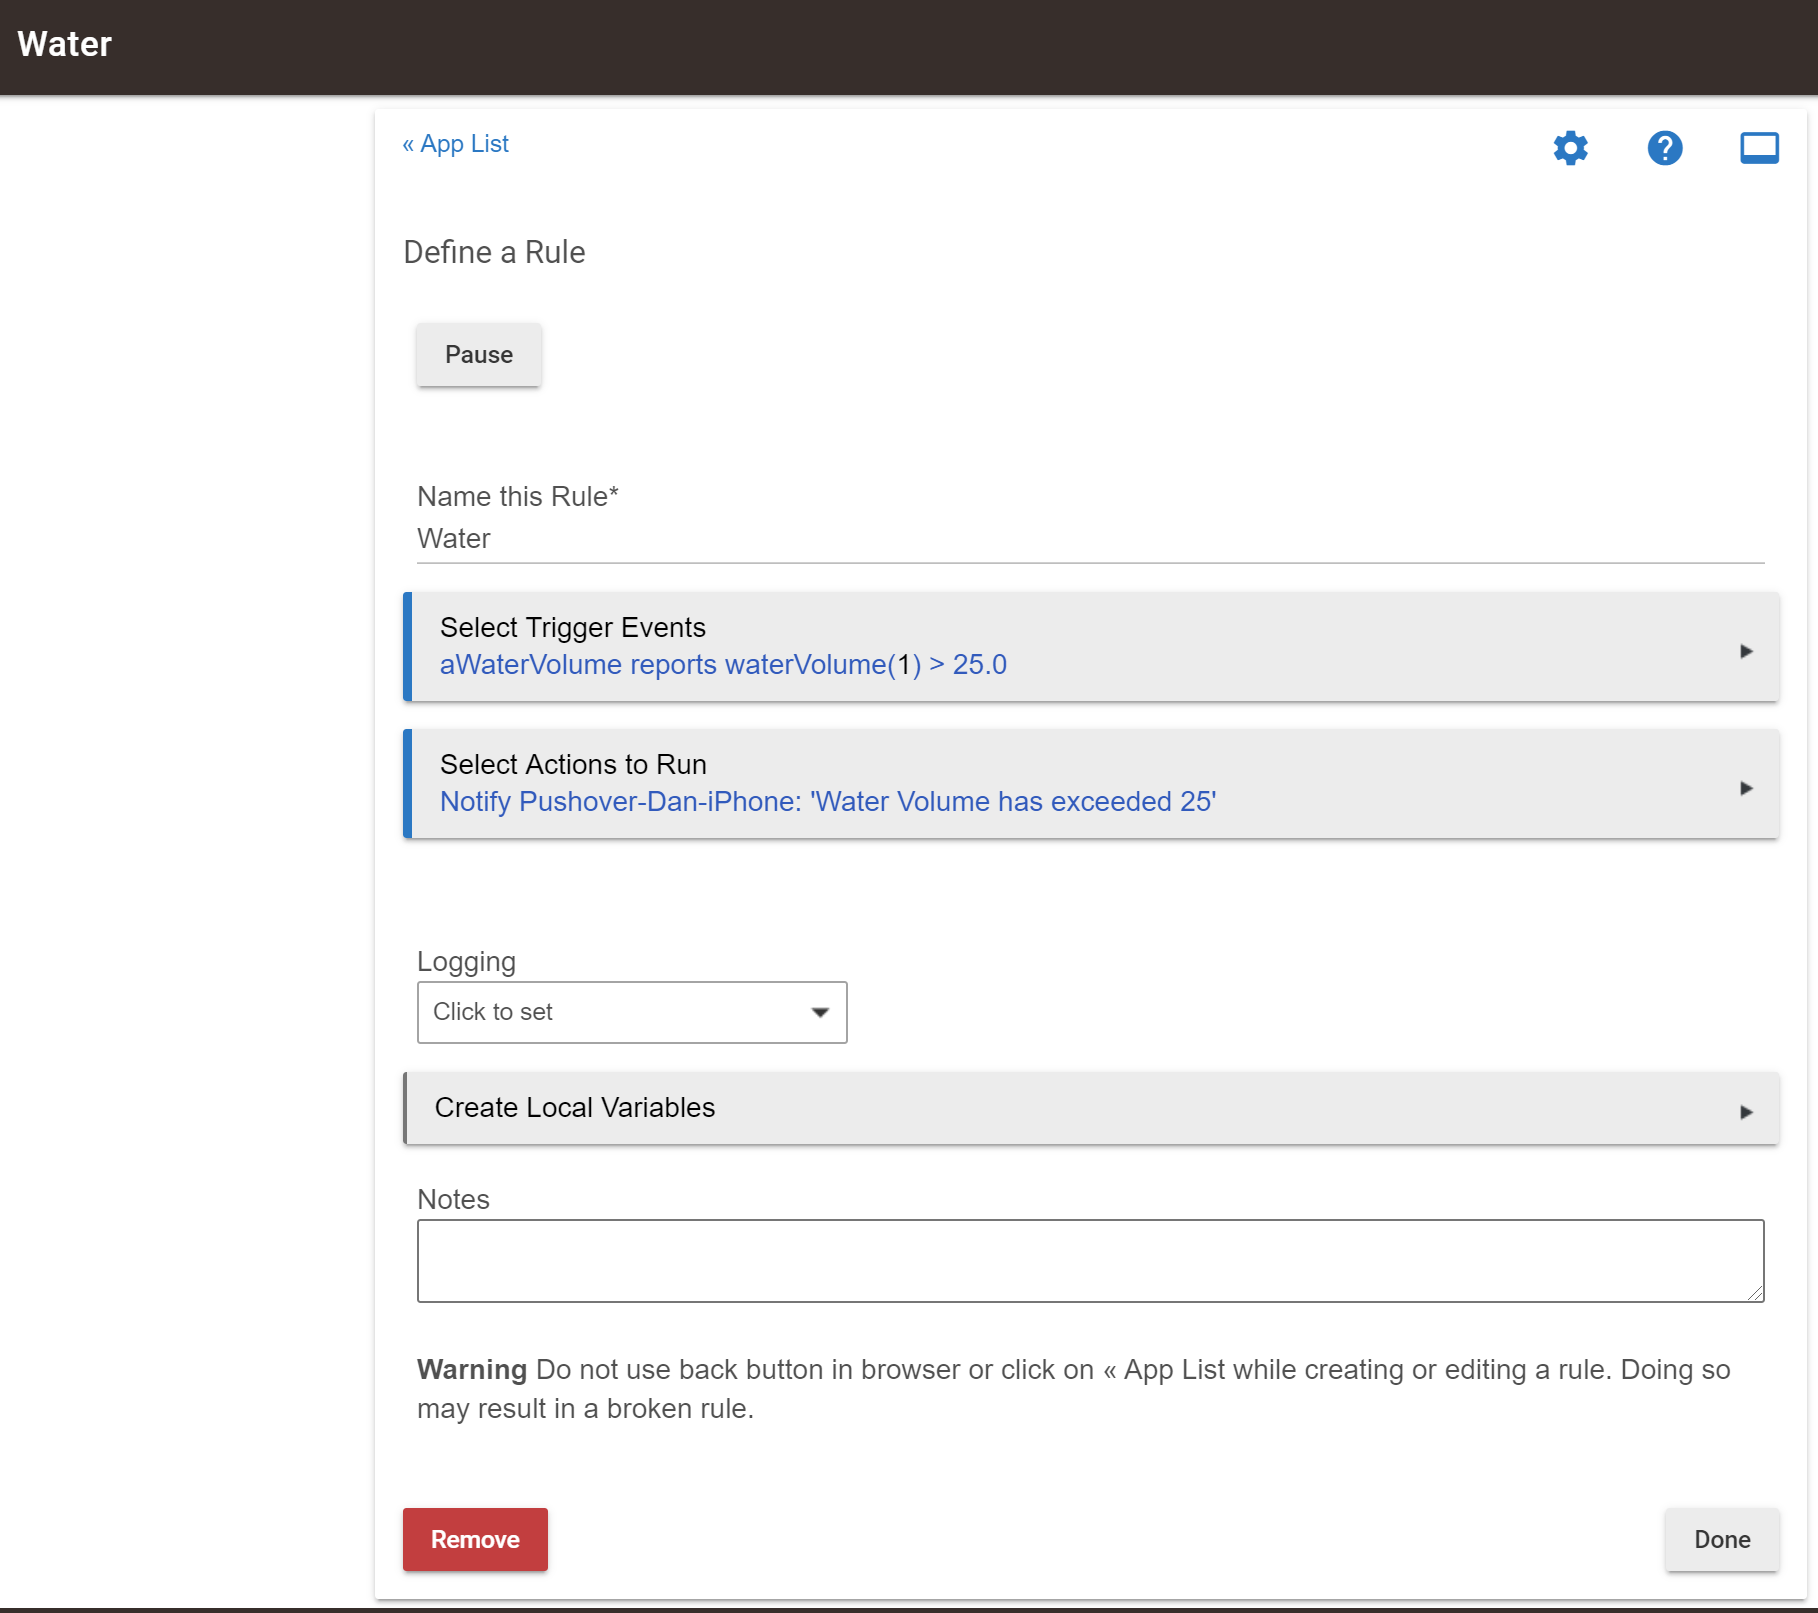
Now that we have the value in Hubitat, we can use it RM. You'll just have to look for the "Illuminance" capability, and you'll find it there.

I know that it's "hacky" because your water volume is being referred to as a lux level, but if all you're wanting is to be able to use the value to trigger automations, and to graph the values over time, this should do the trick.

1 Like

You could use a virtual Omni Sensor. It has all sorts of attributes to choose from like Luminance that @jason-lane mentioned, Power, and even one called Variable where you can store any kind of text that you want to send using an HTTP Post.

I use that for a multi-sensor that I built for temperature, humidity, & lux and I helped someone here in community to use that Variable attribute to use with status updates from a robot vacuum.

Did you withdraw your post because volume only goes from 0-100? I think that would still work for the OP.

And I learned a lot from your post, so i hope you would consider putting it back.

1 Like

I pulled it because I realized that I had not thoroughly read the OP's requirements. I saw "Volume" and assumed he meant audio volume, not Water Volume. Thus, to avoid confusion, I pulled it while I worked on some tweaks to his driver.

@richard-brown - I have made a few tweaks to your driver that may help. I added the "Sensor" Capability, which will help Rule Machine be able to 'see' your custom device, and its custom attribute which I renamed 'waterVolume' to avoid any confusion with audio volume. I also added a custom command to allow you to easily set the waterVolume attribute directly from the device details web page for this device. This will allow you to perform faster troubleshooting without needing the RPi to send data updates.

metadata{
    definition(name: "Water Volume", namespace: "myfirstdriver", author: "Richard Brown") {
        capability "Sensor"
        
        attribute "waterVolume", "number"
        
        command "setWaterVolume", [[name:"WaterVolume", type: "NUMBER", description: "Volume of Water", constraints: ["NUMBER"]]]
    }
}

def parse(description) {
    def msg = parseLanMessage(description)  //returns a map
    def json = msg.json  
    log.debug "parse data: $json"
    def Volume = json['Volume']
    log.debug "parse data: $Volume"
    sendEvent(name: "waterVolume", value: Volume)
}

def setWaterVolume(waterVolume) {
    sendEvent(name: "waterVolume", value: waterVolume)
}


def initialize() {
    //TODO: Add code to run each time Hub restarts (if desired)
}

def updated() {
    //TODO:  Add code to run each time users saves device settings (if desired)
}

def installed() {
    //TODO:  Add code to run when the device is initially installed on the hub (if desired)
}

def uninstalled() {
    //TODO:  Add code to run when the device is removed from the hub (if desired)
}

And here is a RM Rule that is triggered by the custom 'waterVolume' attribute. Hope this helps.

4 Likes

Thank you, I've learned something even better - the idea of using creating/using a custom attribute!

2 Likes

Thanks everyone.
It seems that your suggestions are based on the idea that my device should "pretend" to be some other kind of device, with a recognised capability. Am I wrong?
I would like to know why this is necessary - it seems like a shortcoming in the Hub design - but then again, I am a complete noob at all of this.
Hubitat allows me to design a 'custom' device handler, but does not want to handle the events it generates?
Can someone explain?

@ogiewon's suggestion was to use a custom attribute (waterVolume), which exactly matches that capability of your device. So I don't think that makes your device pretend to be anything else?