Unfortunately the correct Template is not applied, put the Template you have for your device in the Generic PM Plug driver and it should set up Tasmota correctly. Then look for "result: " statements with temperature/humidity" readings in them. You can also set the Update Frequency to 10 seconds. Can see that you did that. I see a No route to host, might have been a restart triggered by the module changing to 43 (default for this driver). With a Template set, the module will be set to 0 in order to activate it.
It is important to verify that you can see the temperature reading in the tasmota device webpage first, that way you know that part is done.
See the Tasmota docs for BME280.
I made an UNTESTED Generic Temperature & Humidity Device, it is in my GitHub repo. It will not set a Template on your device nor change Module on your device. If you have configured your Tasmota device correctly and you can see Temperature and Humidity there, this one should receive it. Please do provide the logs showing temperature and humidity from Insanely Verbose debug mode.
Okie dokie. I will get started on the driver. It'll probably be a bit cause I've never used child devices before. Well, time to learn something new!
My Tuya Switch driver is using child devices if you want an example. Good luck!
I believe it's working with the generic temp and humidity device you created but might just need a minor driver edit. Also on the Tasmota dashboard it's working fine.
dev:12402019-12-19 04:48:44.584 am errorgroovy.lang.MissingMethodException: No signature of method: user_driver_tasmota_Tasmota___UNTESTED_Generic_Temperature___Humidity_Device_1225.getAdjustedHumidity() is applicable for argument types: (java.math.BigDecimal) values: [31.5] on line 252 (parse)
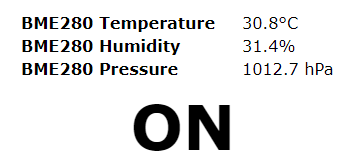
dev:12402019-12-19 04:48:44.533 am debugresult: [Time:2019-12-18T19:48:44, BME280:[Temperature:30.7, Humidity:31.5, Pressure:1012.7], PressureUnit:hPa, TempUnit:C]
This is great news! I had missed including that function in the generated code. I have no device to test this with, but hope it works. The documentation I based this on is not 100% clear, but at least it does look like I got it mostly right.
Thanks mate. I did have to disable it before I left for work this morning though because it was filling the logs over and over with the error I mentioned above and as such was not updating the temp details into HE. Any ideas? I'd imagine it must be an easy fix.
Yes, it was missing a function, the new version is in the repo. It should work now.
Excellent I will try that when I get home and let you know how I go. Thanks mate!
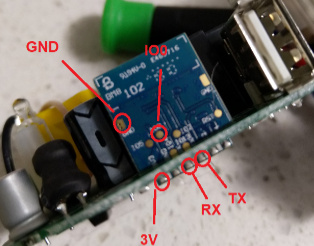
Do you have a photo of how you soldered the BME280 to your plug? I have an identical plug and found a BME280 in a drawer... If not, I'll figure it out, just thought I'd make it easier for myself... I'll just have to find GPIO1 and GPIO3
Absolutely, I always document my projects in detail so I can remember and also share the love 
EDIT: obviously it will have a much better driver now though thanks to you so I will aim to update this at some stage.
Thank you, now I just have to see how I best wire in that BME280:)
You'll be fine if you can solder smallish stuff ok, I just use the same wires shown in my example but you won't need the Io0 that's purely to flash it, once flashed you'll then only need v3.3, TX, RX and ground to plug into the BME280 and your good to go. You can still flash it using Tuya Convert 2.0 first if you don't have a flasher or to save messing about with soldering and grounding the Io0 pin.
Thanks, I already have it converted to Tasmota, I have a setup with pogo-plugs allowing me to do so with my TTL flasher without soldering anything. I can solder a bit, really not good at it, but practice makes perfect:)
Excellent you will be fine then. Also what my document doesnt capture is there is a GND pin on the bottom near the TX pin I just soldered from that the last time then drill a hole out the back of the plug and run the cables that way otherwise the GND pin I have listed above makes it a bit harder.
Yes, I did see that, soldering now...
All is up and working with the plug, I had a BMP280 sensor, so no humidity, just temperature and pressure. The driver has been updated with some minor changes, will be on Github shortly.
Nice work I will be sure to give this a go tonight. Pretty handy you had a temp sensor and a similar plug too 
EDIT: thanks @markus it's working great!! I will be sure to cut over more of my devices.
@markus it might be a good idea to add a temperature offset option in this driver. Alot of the temp drivers have this option as most usually need minor calibration.

EDIT: Just updated your drivers and merged firmware onto all of the devices I have and they are all working fine 
The driver you made specifically for the device works much more reliably than the other one I was using. It also doesn't trigger the 'forget' wifi.
If you have a chance, could you generate drivers for these 3 as well please?
https://templates.blakadder.com/ce_smart_home-WF500D.html
https://templates.blakadder.com/ce_smart_home_LA-2-W3.html
https://templates.blakadder.com/ce_smart_home_LQ-2-W3.html
Thanks!
Here are the ones I use:
https://templates.blakadder.com/hugoai_awp02l-n.html
https://templates.blakadder.com/cyyltd_bifans_J23.html
https://templates.blakadder.com/gosund_wp3.html
SK03 (this one has Power Monitoring)
Aoycocr X10S (this one has Power Monitoring)
Thanks!