Connecting to my Hikvision cameras……saying inactive

Hi there, I am a new user having just purchased a C8 Pro.

I am trying to connect my 4 Hikvision cameras. I have followed (hopefully) the advice in the topic: HIKVISION Devices | Hubitat Documentation

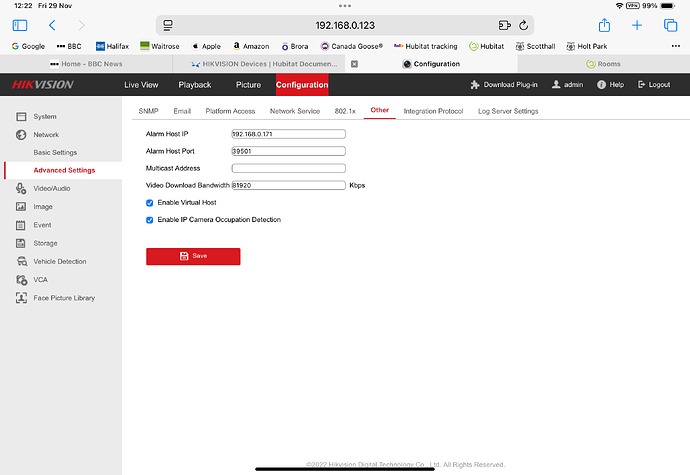
My cameras have connected to the Hubitat hub and appear in my devices. I have also added the Hubitat IP to my Hikvision alarm host IP and 39501 to the Hikvision alarm host port.

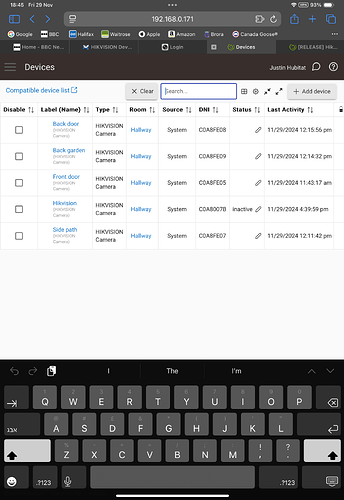
However my cameras are showing on the Hubitat hub as inactive.

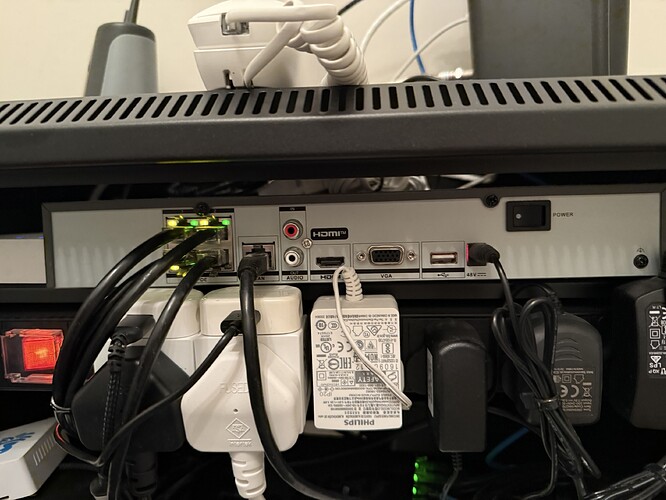
I am wondering if it is to do with my cameras connecting to a HIKVISION 4ch PoE 4K NVR 2TB HDD - this was fitted by a professional firm, not myself, so I don’t admit to being any type of expert- but I note the warning on Hubitat Hikvision advice:

  • The cameras must be connected to the same LAN as your Hubitat Elevation hub (in particular, note that HIKVISION NVRs may create a separate subnet that is not accessible to your hub) - as a non expert, is this the problem?

I have also added the NVR IP address to Hubitat as an extra device but no luck.

I attach some screenshots on Hubitat and Hikvision, and would really appreciate any thoughts.

Many thanks for any advice
Justin


It won’t work where cameras are connected to the PoE ports of an NVR. The required alarm server setting is on the camera itself and there is no such setting on the NVR (I’m sure I’ll have detailed this in the original thread). The NVR PoE ports are on a separate subnet (by default 192.168.254.xxx) so even when the alarm server is configured on them, the data won’t pass through to the LAN. You would have to:

  • Put a Poe switch adjacent the NVR
  • Connect the cameras to that
  • Take the existing LAN cable that connects to the NVR network port into the switch then link back to the NVR
  • Reconfigure the IP addresses on the cameras to match your LAN
  • Edit the NVR channels from plug and play to manual and enter the new IP addresses of the cameras

Once that’s done you can enter the Hubitat IP in each IP cameras config (not the NVR)

1 Like

Many thanks for your response - this sounds quite complicated (certainly for myself) and not sure exactly how to follow your instructions.

You refer to an original thread - do you have a link to that - does that have more details of what you set out.

Also, in terms of getting a PoE, with my 4 cameras, am I looking for at least 6 ports - 4 for the 4 cameras, 1 for the LAN to go into, and finally a port to go back to the NVR?

Regarding reconfiguring the IP addresses on the cameras to match my LAN, does the thread set out this in more detail, I don’t want to mess up my cameras completely!

As I say, my knowledge of networking etc is limited, but I can follow instructions!

It's not at all complicated as long as you do things in the correct order. This would be the best way to do it to avoid issues with cameras not reconnecting due to invalid addresses and credentials. The guide assumes you have the admin password for your recorder.

Before you start:

  • On the NVR click the settings icon (gear wheel) at the top of the screen and select the cameras page. You should have a list of your 4 cameras and their details.
  • Write down each IP address 'Cam 1 is 192.168.254.???' and so on. The likelihood is that if the cameras have only ever been plugged in once that they will be 192.168.254.2, .3, and .4 but write them down as you see them listed.
  • At the top of the same screen you will see a checkbox for 'Show passwords' or similar. Check the box and enter your NVR admin password. That will populate each camera entry with its password visible. Usually this will be the same as your NVR admin password but it can be different so write that down too.

Cameras:

  • Unplug the cameras from the NVR and connect them to your switch
  • Unplug the network connection from the NVR and connect to your switch

Important: don't patch between the switch and NVR yet!

We now need to reprogram the cameras network settings to match your LAN. This can be done either using a laptop plugged into the switch with its IP configured in the 192.168.254.xxx range and using a web browser to access each camera or using the Hikvision SADP tool which is free to download and easier

  • On a PC on your network run SADP tool. The page should show your 4 cameras with their existing IP addresses. From the list you made earlier, tick the box for the entry that corresponds to Camera 1.
  • In the panel on the right we need to change the IP address to match your network. It needs to be an address that's not in use. My preferred scheme is just to add 100 or 200 to the camera number. For example, on Virgin Media my network is 192.168.0.xxx where 192.168.0.1 is the gateway (router) address. So for Camera 1 I'll use 192.168.0.201, for Camera 2 I'll use 192.168.0.202 etc. Enter the IP address, enter your admin password (for the camera as noted earlier if it was different from the NVR) and click modify. You should see a pop up to tell you it was successful.
  • Repeat for the other cameras.

NVR:

We now need to modify the camera entries in the NVR to match the cameras

  • Go to the NVR Settings > Camera page on the local UI
  • For camera 1's entry click the edit icon. A pop up will appear
  • In that pop up change 'Plug and Play' to 'Manual', key in the new IP address, key in the camera admin password and click save.
  • Repeat for the other cameras
  • Your camera list should now reflect the cameras with their new IP addresses.

Finally now you can put a CAT5E patch cord between the PoE switch and the network port on the NVR. The NVR will reconnect to the cameras (may take a minute or so)

With your cameras reconfigured you can access each ones web page at 192.168.0.201, 202 etc, log in and locate the alarm server/http listening setting where you can enter the Hubitat IP as needed.

1 Like

That is really appreciated, thank you so much for your detailed instructions!

Something to follow with a cool head…..

1 Like

Hi there @johnwill1

I spent (quite a long) time today going through your instructions and couldn’t follow a few steps, and my access to the NVR seems to show different options and UI.

It starts from the first step, but maybe the the screen options have changed, or could I be accessing the NVR wrongly?

I am accessing the NVR using my laptop and simply typing the IP of the NVR, for my case 192.168.0.123 - should I access it another way?

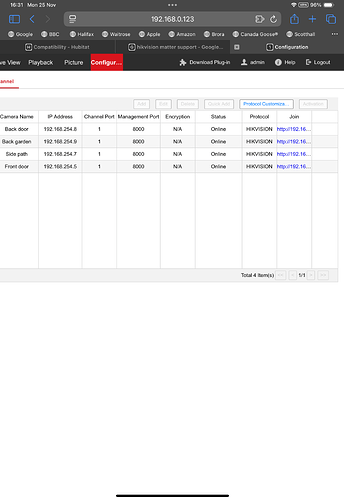
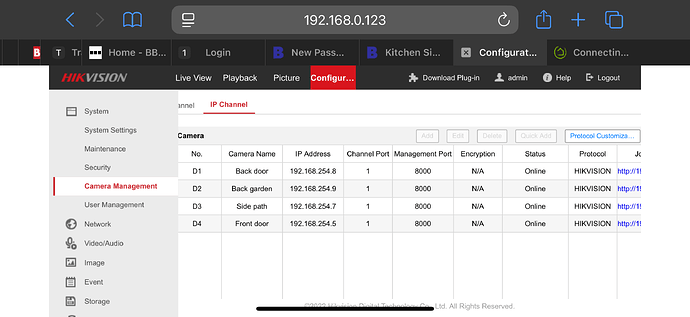
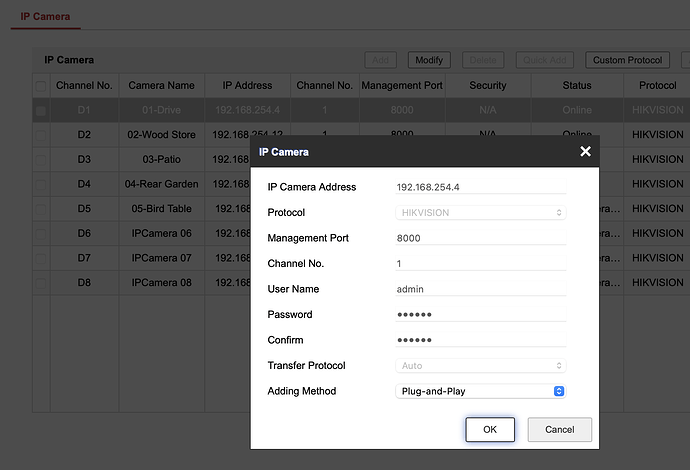
When I access, I do not see a gear wheel, but can see the IP addresses of the 4 cameras by going to configuration/system/camera management - attach a screen shot:

and are indeed 192.168.254.xxx - but there is no checkbox or other to “show passwords”. Should I be accessing the NVR in a different way?

I did go to the next steps however, and unplugged the cameras and network connection from the NVR and plug them into the switch. I then plugged my laptop into the switch. My laptop is a MacBook and unfortunately the SADP tool available for a Mac is not compatible with the latest OS.

My laptop only has usb-c ports, so am using a usbc to gigabit ethernet dongle to plug the laptop into the switch.

For info, the switch is a NETGEAR GS308EP PoE Switch @ 62W is this enough power?

So I tried your first option where you say “using a laptop plugged into the switch with its IP configured in the 192.168.254.xxx range and using a web browser to access each camera” - can you explain this, if I change the network IP of the laptop to 192.168.254.xxx, I seem to lose internet, and definitely cannot see the each camera if I type in say, 192.168.254.8 for the first camera, and no option to change the camera 1 to say 192.168.0.208.

For your last step for the NVR, I see no edit option on the camera page to change “plug and play “ to “manual” to change the camera IP address, if I could actually change them!

I am thinking I am missing something fundamental to have all these problems, any suggestions would be much appreciated. :pray:

Many thanks in advance, Justin.

The instructions I gave were for using the local UI, IE accessing the menu on a monitor connected to the NVR output.

As above using the local UI. However it can be done with just a web browser.

The option is not available to make the camera passwords visible when logged in to the NVR with. Web browser. However, they can be checked by logging in to the camera’s webpage using the NVR Virtual Host function. I can see from your screenshots that you've already enabled this. So in your web browser just go to 192.168.0.123:65001 to access camera 1, 192.168.0.123:65002 to access camera 2 and so on (or you use the links shown in the screenshot of your NVRs cameras page). At the log in page enter 'admin' and your NVR password. If the login works (on all cameras) then your cameras use the same password as your NVR and you're good to go. If the login (to the camera) fails, then you'll need to use the local UI to 'show password' as described.

It is compatible as it m also a Mac user. At install you need to override a security setting and use the ‘install anyway’ option.

Yes, most Hikvision fixed cameras only use about 6W PoE maximum. The power each uses is something else that can also be viewed on the local menus of the NVR.

You will lose internet as it’s no longer connected to your local network but it certainly works, I do this all the time on installations during set up etc. Setting the Mac IP to 192.168.254.100 while connected to the switch will put it in the same range as the cameras and allow connection by using Safari and typing http://192.168.254.8 for your camera 1. Perhaps you changed the IP for the wrong interface? SADP is easier, and can discover the cameras without needing to change the IP.

In the page showing your cameras, click the line for one of the cameras (not the tickbox, just highlight the line with all of the details on) The 'modify' button at the top becomes available, click it for the pop up:

The steps must be done in the order above if you’re going to do this, otherwise you risk the cameras becoming inaccessible.

Another quicker way of doing all of the above follows....

  1. Ensure you have 4 consecutive IP addresses available on your LAN before you start (192.168.0.201, 202, 203, 204 for example)

  2. Access camera 1 at 192.168.0.123:65001 and login using the admin password

  3. Go to Configuration > Network > Basic Settings > TCP/IP. You will see the existing IP address (192.168.254.8 in your case). Change it to the first of your block of 4 IP addresses (192.168.0.201) and click 'Save'. You may see a prompt to reboot the camera, if so click 'OK'

  4. STRAIGHT AWAY unplug Camera 1 from your NVR and connect to the switch ready for later - you shouldn't wait for it to reboot (if you don't disconnect it one of two things will happen. 1 - the NVR will fail repeatedly to access the camera due to the changed details and will temporarily block access or 2 - because the NVR and camera share an admin password and the channel is still set to plug and play at this point, the NVR will just undo the change you've just made and you'll be no further forward)

  5. Repeat steps 2 to 4 for each camera

  6. Access the NVR at 192.168.0.123, login and go to the camera config page.

  7. Highlight camera 1, click modify. In the resulting pop up change 'Plug and Play' to 'Manual', change the IP address at to match what you've used, enter the user name as admin (if not already populated), enter the password in the password and confirm boxes and click OK.

  8. Repeat for each camera entry

  9. Disconnect the network cable to the NVR and connect it to your PoE switch and connect a patch back from your switch to the NVR

Hi @johnwill1

That really helped, and think I am nearly there!

I now have the 4 cameras connected to the switch on 192.168.0.201, 202, 203, 204 and all 4 show up with a live video feed by putting 192.168.0.201 etc into a web browser. All without SADP or a monitor! I did try to download SADP - it’s not the privacy settings, which I went into to allow- the message was that SADP was not supported on the current latest Mac software - you might be ok if you already downloaded it, but be aware!

My last task is to modify the camera entries in the NVR. Before I changed the camera IPs, I did see on the NVR how to get the edit options, per your instructions - what I am unsure of is how to access the NVR settings now it is not connected to my network - it’s Ethernet lead now goes into the switch. And you have warned repeatedly about reconnecting the NVR to my network before I have amended the cameras details on the NVR to their new IPs.

The obvious solution is to plug in a monitor and mouse to the NVR - but here’s my issue! My monitor is an Apple studio display that only likes thunderbolt, and certainly won’t seem to entertain connecting to HDMI (with a USB-C dongle).

Can I access the NVR menu whilst not connected to my network without a monitor - I did actually order a very cheap portable monitor with HDMI from Amazon last night that is coming later today, but if there is another way of accessing the NVR configs, before I unwrap the Amazon monitor, it would be great if you could let me know, so I can send just send the Amazon one back - but ultimately it’s not the end of world to have a cheap portable monitor that isn’t fussy like Apple monitors!

Many thanks once again, you have been a star!

Rgds
Justin

That's good to know. I'll check what version I'm using

Just disconnect the network cable from your switch and reconnect it to your NVR temporarily then login and make those changes. Once you've done it remove it, put it back in the switch and patch the switch to the NVR. As long as the cameras and switch are not connected to the NVR until you've modified those camera channel settings you will be fine.

Many thanks for your wise suggestion - which now seems obvious - to unconnect the switch from my network, and plug into the NVR.

My cameras are all now on 192.168.020x and connecting perfectly to the NVR many thanks!

My current issue is my original query about connecting the cameras to Hubitat. Given that is a new topic, I’ll raise as a new query and tag you in for your thoughts

Much appreciate all your help to date

Regards
Justin

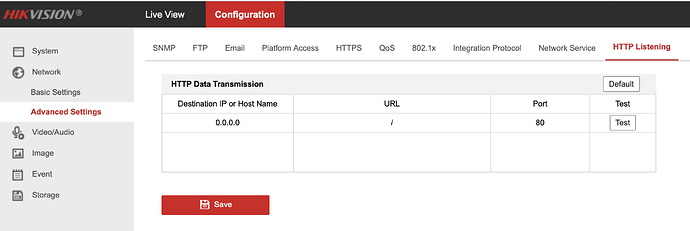
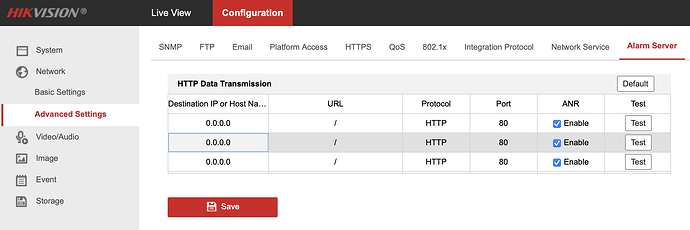
I'm not sure how far you got with the original setup that didn't work...You need to login to each individual camera and set it up in:

Configuration > Network > Advanced Settings > Http Listening:

Depending on model/firmware it may be called 'Alarm Server' rather than 'Http Listening' with 3 entries as below:

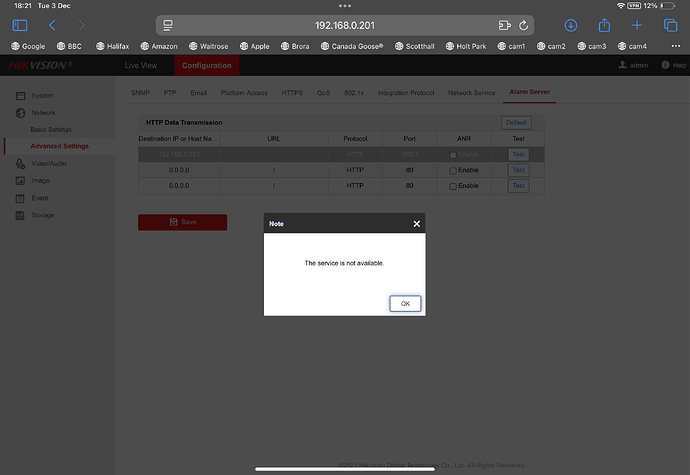
Hi there, this is what I entered for 3 of them, following what was set out in a Hubitat doc for Hikvision - HIKVISION Devices | Hubitat Documentation and getting “service not available”

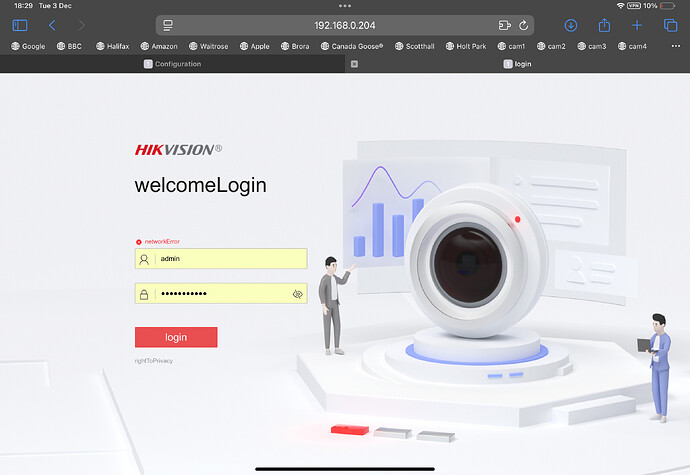
However, what is more worrying is that a camera with motion tracking has a different menu and I tried the code in I think HTTP and now I simply can’t log into it on 192.168.0.204, getting “network error “.

The camera is still connected and working on the NVR, but if I needed to reset it it’s worrying. Is there anything you can think of to access that camera by its IP?

I am worried about that more than anything

Justin

You have a VPN active looking at your second screenshot. Perhaps thats causing the 'network error'.

1 Like

Unfortunately not the VPN. I turned VPN off, and still couldn’t access the 4th cam, whilst no problems with the other three - same when I tried on my work PC which has all sorts of firewalls.

Maybe I messed the camera settings up when I put in HTTP settings as suggested in HIKVISION Devices | Hubitat Documentation.

But not sure why the NVP is showing that camera 192.168.0.204 fine - maybe it’s because it was already connected, but if there was a power cut would it reconnect is my concern ?

If the camera can be viewed on the NVR then it is streaming from that IP address and there would be no issue. The IP address you set in the camera is static and will be retained if it was powered down. You can prove this by simply dropping the power to your PoE Switch and reconnecting it. After around a minute the NVR will reconnect to the cameras when they've booted up.

Try clearing your browser history. There's no setting in the documentation linked that would cause the camera to lose connection,

That’s reassuring. I think I’ll not mess with anything for a bit!

Can I thank you once again for all your expertise :+1:

1 Like