The intention for this project was to create an automated AC Drain Line cleaning. But this happens to be an universal DIY Fluid Dispenser. It could be used to dispense any fluids, including hard chemicals.
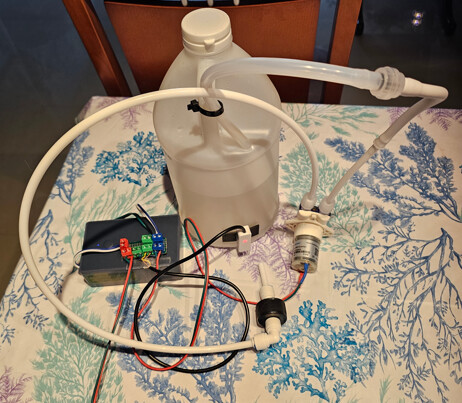
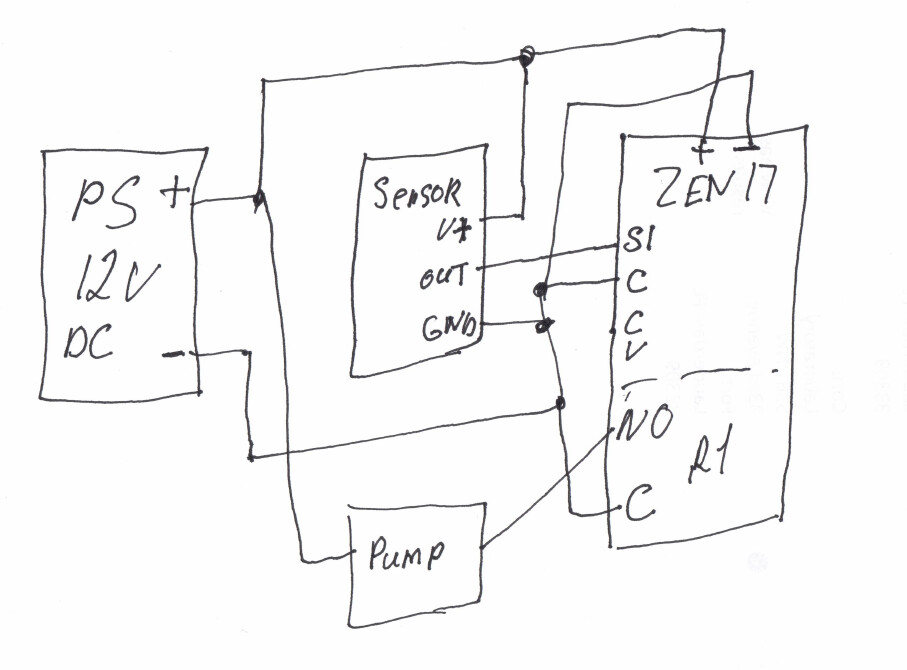
Everything is powered by 12V DC Power Supply.
ZEN-17 Relay-1 is used to turn pump On/Off. Sensor-1, configured as a Contact Sensor is used for Liquid Level Status reporting. For easy wiring I created a Custom Terminal Block (mainly for VCC and GND lines interconnect).
iFlo actually inspired myself for this project. I thought to buy iFlo but quickly realized I can't install it. It works on gravity which requires sizable spase which I don’t have (the available height is only 15 inches which is less than iFlo size itself). iFlo is using a proprietary reletively expensive solution and it is cloud-based which is no go in my case. But wait a minute - I got an idea, I can build a dispenser myself. After web research and advice from knowledgeable people it became clear cheap white distilled vinegar will/should do the job. Putting things together was an exiting job for the home automation enthusiast. And after few days (mainly waiting for parts to come) the project is complete.
Thanks for sharing that. Brilliant execution. I have an iFlo on one of our air handlers (lucky to have the attic space) and it seems to work well, but I don’t see any way to integrate it into HE. Plus they are $100 a pop, along with the solution on an ongoing basis. Ugh.
Your solution, assuming it stands the test of time, is both cheaper and of course way easier to integrate. Very curious to hear how it goes for you.
BTW, I put a sensor on my air handler’s float switch so I can see when the condensation buildup begins. You could use a sensor like that (if you’re not already) to trigger the vinegar on a just-in-time basis.
Primarily luck of space plus inability to integrate iFlo with HE was a show stopper.
Expensive proprietary solution is not exciting thing but somewhat tolerable.
There is a float swich. It will shut off the AC and notify me about elevated water level in a pan. This was done immediately after I moved into apartment.
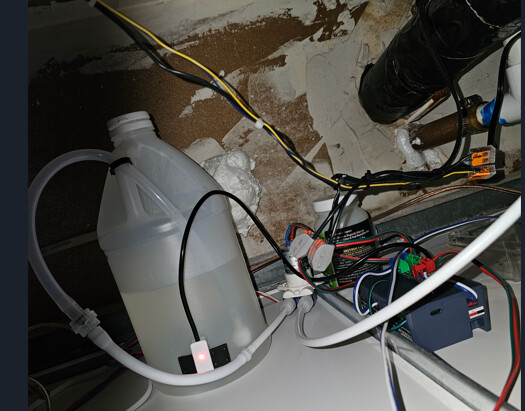
For the vinegar dispansing my current setup is around 5 mL daily. I believe, this is better than a cup every month. I hope this will work as expected. My always approach is to prevent a potential problem vs waiting for the problem to pop up and then fix it.
But I wonder if my float switch works differently than yours. It triggers intermittently before the line is fully blocked when condensation starts to form and before the HVAC is turned off (though it may go off for a moment or two). As a result, my float switch effectively operates as an early warning system, which explains why I thought about using it to trigger the liquid when needed.
Not instead of regular treatment, but in addition to. Coincidentally I’m using a Zen17 to run my float switch sensor, so could easily use it for your awesome solution as well.
I have never seen two stage single float switch. But yes, initially I tried to use 2 float switches installed on different height. This didn't work reliably because pan height is only around an inch. So, I ended up with a single switch which shutoff the AC all together.
No it’s definitely single stage, but in my setup it fires prematurely. And usually returns to untriggered state immediately unless/until of the condensation has buildup more. So I supposeit’s early warning not by design but in practice.
OK, my float switch is tripped when pan is about 2/3 full (this is a lowest possible location). But I decided to turn off AC completely. This is much safer than just a reporting status.
Once again, I strongly agree. But that’s the thing. In early condensation, my float switch will trigger (which turns off the HVAC) but then reactivates within a second or so. It operates tentatively like so for days-to-weeks. But then the disconnect period gets much much longer.
Recently, I was out-of-town for an extended period and noticed the pattern: It would tentatively trigger and unpower the HVAC a few times for subsecond periods, and then within a week or two, the disconnect periods increased until it went off “permanently” after ~8 weeks.
Now I wouldn’t depend on this pattern, but I’ll take it when it happens.
Could you walk me through how you wired this up or is there a video somewhere? Looks like I can power it with a USB C cable based on the amazon ad. We have sludge from our AC line and whole home humidifier (I'm in Michigan) so I am going to build something like this.
Edit: Looks like I'll need this power supply since the Zooz from what I've read doesn't convert AC to DC. 12 VDC Power Supply, 0.5 A, Black - The Smartest House (I've automated a ton, but this is my first time playing with a Zooz 17).
Pump polarity depend on desired flow direction. Peristaltic pumps usually powered by DC Motors and therefore they are by-directional (flow and motor polarity).
Make sure to use a Peristaltic Pump powered by DC Motor (not Stepper or AC).
Don't use Membrane or Impellent based pumps. These may leak and much harder to calibrate.
Automation that maintains & mitigates so that the manual chores of operating a facility (home or otherwise) are just done.
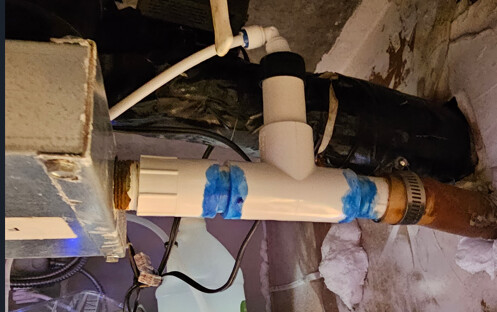
This particular one tends something that is often overlooked, or done ONCE pre-cooling season, and in some climates that's not enough to be safe from line clogs.
When I lived in Massachusetts 27 years I did not do any maintenance for AC drain line and believe or not did not have any single problem. Here in Florida (colling period is around the year) if you don't do anything clogged AC line guaranteed within 6-8 month period. In my big apartment complex (400 units) maintenance guy is cleaning 2-4 AC drain lines on a daily basis.
No. NPN Output from the Level Sensor is "Open Drain" which is electronic version of the Contact Sensor. ZEN17 S1 input should be configured for "Contact Sensor" application.
Awesome thanks. I am hitting the easy button and buying the products you suggested. Where did you find all the plumbing fittings for the tubing and such? Obviously the PVC fittings can be found at any store, but the 1/4 fittings seem hard to find. Thanks!