I created an app that controls the lighting in my house. It handled motion, buttons, lights, and scenes. It was getting very convoluted so I decided to get rid of the spaghetti code. I use the Zone Motion Controller but wanted a bit more. This app is the result of that.
I don't know if anybody would find this useful but it was a good introduction for me to child apps and devices. It is also the first project I've posted on GitHub so there were a lot of firsts here. Please feel free to add any comments if you believe I can improve the project.
The main app is very simple. It simply acts as a container for the child zones.

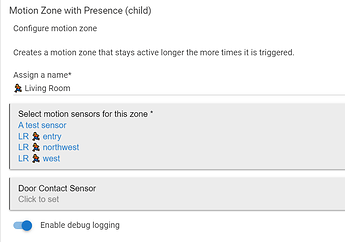
Likewise the child zones are rather simple.
The child app requires a name and one or more motion sensors. It will also accept an optional contact sensor. (More on that later.) The child app also creates a virtual device. This device is where most of the magic happens.
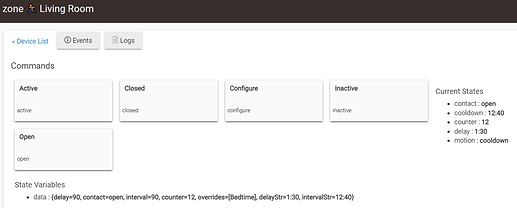
When created the new device uses the same name entered in the app child creation with "zone" prepended to it. It may be acted upon by either the motion sensors (active/inactive) or the contact sensor (open/closed).
There are a few options to manage how the zone behaves.
The idea behind the zone is that it the more the motion gets triggered the longer the lights will stay on. To manage this the device keeps a counter that increments every time there is a new "active" motion event and starts to decrement when it receives a "inactive" event. The counter maxes out at 12 so that it doesn't run away and create silly timeouts. This timeout is influenced by the counter, delay time, sensitivity, and mode.
The delay defaults to using the base duration field. This defaults to 60 seconds when the device is created. The formula changes based on the sensitivity selection. Low sensitivity times out faster than High.
For example:
Sensitivity   Base   Counter: 1     2     3     12
Low            60            1:00  1:06  1:12  2:06
Medium         60            1:00  2:02  2:38  4:43
High           60            1:00  3:04  4:17  8:27
What this cooldown value does is once the sensors go inactive it will wait that long until it decrements the counter. After the first delay it uses the base delay for each additional decrement of the counter. Once the counter reaches 0 the virtual sensor will go inactive.
So lookin at the example above, when triggered all three sensitivity settings will have the virtual sensor turn off one minute after the actual motion sensor. If the counter is maxed out this interval will range from 13:06 for Low to 19:27 for High. By adjusting the delay value and sensitivity you can get a variety of profiles.
The next feature to look at is the override modes and override delay. The modes list is a comma delimited list of modes that you would like to override the delay on. I typically set Bedtime mode to 0 so that the lights will turn off immediately after the motion sensors go inactive.
The optional contact sensor may be used to override the counter and cooldown. When the contact sensor is closed the counter will no longer respond to motion events from the physical sensors. When the contact sensor is open the countdown run normally.
The reason for this is that I wanted some rooms to behave differently when the door was closed. My main use case was for the bathrooms. When the door is closed the lights will not turn off. I have found bathrooms to be a bit more problematic especially around showers. This way I don't have to worry about a guest using the bathroom and suddenly finding themselves in the dark.
The contact sensor is optional and the zone will work with or without one.
The final feature of this driver that it adds a third state (active, cooldown, inactive) to the virtual motion device. This lets you know when the physical motion sensors are inactive but the virtual sensor is still active. I use this in my lighting controller to change the behavior of lights during special scenes like Theater. For example, the kitchen turn on some white lights when you enter. But when you leave it goes back to the theater setting when the sensors detect motion. Then once the cooldown is done they will turn out.
This is something that I wanted for my lighting controller. If you use this device driver the extra state may break other apps. For that reason you may toggle it off in the preferences. When this is off the virtual driver will only report active and inactive. It will stay active until the cooldown timeout finishes.
I am still working with the lighting controller that uses this. As a result there may be some changes as it progresses. There are some things that might not be handled in the best way and I'm open to any suggestions. I have not written any Hubitat child apps nor drivers before. I did have some issues with the scope when I tried to use Fields. I found that the device drivers were in the same scope when I would try to save some data. That is why I moved to state variables but may revisit it in the future.
You may find the files on : GitHub
There is a main app, a child app, and a virtual driver.


