[Beta] Flow Engine - A visual drag and drop rules engine - 100% Local

,

Introducing 'Flow Engine'!

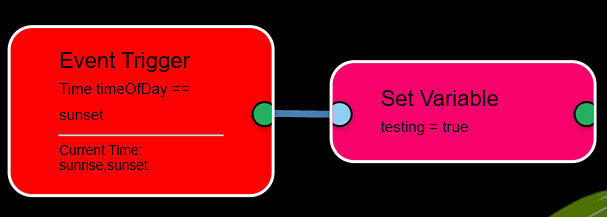
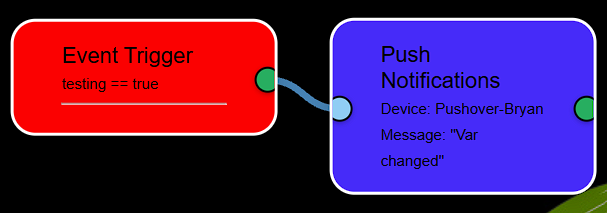
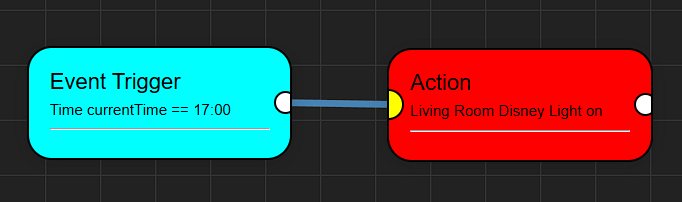
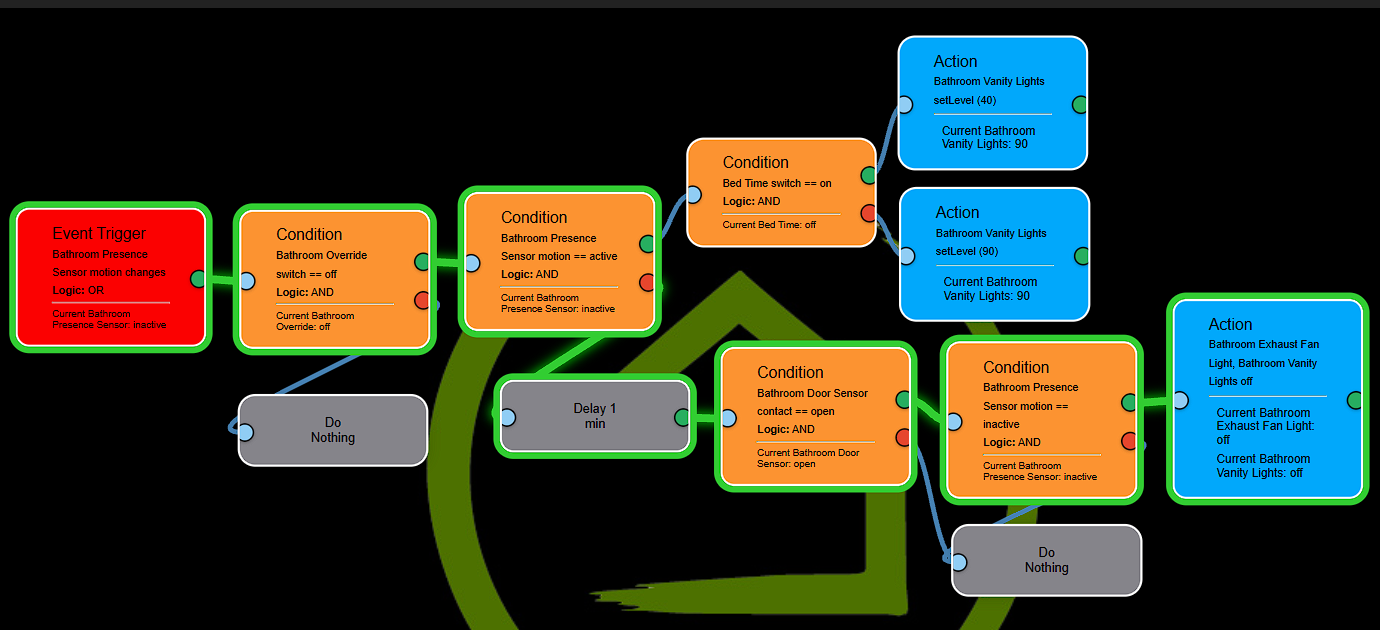
Flow Engine is a visual automation tool for Hubitat that lets users create, edit, and manage smart home automations through an intuitive drag-and-drop interface. Users can build complex logic flows by connecting event triggers, conditions, device actions, delays, and logic operators (AND, OR, NOT), all without writing code. Flow Engine supports direct integration with Hubitat devices, multi-device control, time-based scheduling, and real-time status monitoring—making it easy to design, run, and update advanced automations for your smart home.

Flow Engine was designed by BPTWorld with 90% of the code written by ChatGPT! Without ChatGPT, this project wouldn’t have been possible.

Apps can be found on my GitHub or in HPM

When reporting problems...

  • Be sure you are on the latest version. I won't troubleshoot an older version.
  • Turn on debug and screenshot the issue happening in the log. One line or just the error doesn't cut it. I need a log.
  • Post the screenshot of the log with an explanation of the problem.

Thanks

22 Likes

Okay, quick and dirty!

  • Use HPM to install Flow Engine
  • Go to 'Apps', 'Add user app'
  • Select "Flow Engine"
  • Open Flow Engine and then
  • hit 'Done'. This will finish the install.
  • Now scroll down to "Master Device List". Select the devices you want to use with FE or simply hit 'all'.
  • Scroll back up to where it says " Flow Engine Editor Information', you'll need the info you see here soon.
  • Click the blue 'Flow Engine Editor' button. The editor will open in a new window.
  • Enter the App ID from the FE parent app (where you click the blue words)
  • Enter in the token from the FE parent app (where you click the blue words)
  • REMEMBER - Don't give out this info to anyone. This is what allows other things to control your Hubitat.

Flow Engine Editor:

  • Enter the App ID from the FE parent app (where you click the blue words)
  • Enter in the token from the FE parent app (where you click the blue words)
  • REMEMBER - Don't give out this info to anyone. This is what allows other things to control your Hubitat.
  • Now click on 'Load Devices'
  • From here on, play around! When your ready, press 'Save Flow'. This will save the flow to the Hubitat File Manager.

Back in the FE App:

  1. Select 'Add a new 'Flow Engine' child
  2. Fill in the few fields and hit 'Done'
  3. Your Flow is now active! Go ahead and trip whatever Trigger you had setup and see it perform the actions!

Remember that this is just for the initial setup. Much easier after that!

Real Doc's will come later.

18 Likes

@bptworld is (back) in the house! :+1::grin:

18 Likes

Whoaaaaa….flow engine is the second most important topic in this thread.

The first? @bptworld is baaaaaack!

10 Likes

Where did he/ / / go? For a visit to home assistant island?

2 Likes

Sounds great, but I've always had a bit of a problem reading flows. In the first column the lines come out of the blue boxes but not the white dot each has. In the 2nd column (the "OR" box) they both come out of a white dot. But unlike the the 1st column lines that went directly to a yellow dot in the OR box, the 2 coming our of the OR box do just go to the Condition box, but do not connect to its yellow dot. And then there is a line going from a white dot on the right of the Condition box to a 2nd white dot in the same condition box. In that same Condition box there is yet another line coming out its middle bottom to the Delay 1 box.

Can you please tell me how to read all of this?

Maybe some pseudocode or even a RM rule. I am also having difficulty following the logic.

Updated the code so the lines always match the dots. If you already have it installed via HPM, simply do a 'Repair' to get the latest code.

For me RM has always been too cumbersome and frankly confusing. Which is why I made Event Engine. Then Hubitat added 'Visual Rules Builder' and I loved it until I asked for more. It was quickly made very clear that VRB is a basic app and that's all it ever will be. So i made one on steroids!

Thanks

6 Likes

Not using the correct terminology, but here goes some very basic, basics, until BPTWorld can put out documentation.

The white dots are outputs of/from that box. If it's a condition (if/elseif), the top white dot is true, the bottom one false. Yellow is input.

Take the two triggers. The triggers feed into the OR, and if there is an output (if one of the triggers is true), the condition is evaluated. If it's true, then 2 things happen (the top condition is evaluated and the bathroom light is also turned on), if false, then after a 1 minute delay, another condition is evaluated, and so on down the individual paths, or streams, or I guess, flows. :wink:

2 Likes

Definitely a 'He' and for a very short time, yes. :upside_down_face: Very powerful but an utter mess of a system! lol

5 Likes

Well shoot, I coulda told you that! :grin::wink:

3 Likes

Useless comments:

  • should the bubbles be green since it is for Hubitat?
  • What about "action" instead of "device" (devices are also used in trigger)

Sorry but I’m still confused. Why does the OR flow first to the Bathroom Presence Sensor Condition then to the Bathroom Door Sensor Condition? Also, why are there 3 outputs from the Bathroom Presence Sensor? Is that what is happening or is your screenshot not accurate and the OR is actually flowing to each Condition box?

I see the screenshot that is now in the thread isn’t the original one as the lines originally didn’t line up with only connecting white and yellow dots (which was my original question) and now they do.

I’m suspecting the problem is the screenshot. One of my big problems with flows is that they take up so much space that it is hard to have the boxes not cover parts of the flow making it very hard to follow. That is, perhaps the OR box is really going to each Condition box and there really isn’t 3 lines coming out of the Condition box.

I like the 'actions', will think about adding some green. :wink:

Edit: Green buttons in next update (see screenshot in first post!)

4 Likes

Like anything, start small, make sure it works and then add more logic.

flow - easy

In this example, At 17:00 (5:00pm) - turn on the light

I do my best for the screenshot to accurately show what the latest ver looks like.

Everything can be moved at anytime, move a single node or shift the whole flow - simply drag and drop. You can also zoom in and out by using + mouse wheel. Very flexible!

2 Likes

I see you now changed the screenshot to a much more simple example, and I can fully follow it, so thank you for that.

The one you had before, where it could be triggered by a motion sensor or contact sensor is one I’d really like to see fully. As I mentioned above, I think there may not have really been 3 lines coming out or looping back on itself and it was just a layout issue. If you can get them properly arranged so it would fit into 1 or 2 screenshots it would be really appreciated.

BTW, I like the term “trigger” as then a trigger could be a switch or something like the time of day. If one has to start with a device then a rule might be: “Switch changes”and the condition could be “And the time is “X…. But I think a lot of people will imagine the desired trigger as “Time X occurs” and then the condition is “Switch X is on or off”. It just seems that being able to set it up either way provides more flexibility making it easier for people to approach/build rules in a way that is most natural for them to think about it. So I like how you have it using “Triggers” (assuming I could set it up as in my 2nd example of starting with the time as the trigger)

25-05-30-3348

Minor issue...Flow Engine Editor UI has "Send Flow," rather than "Save Flow" as in instructions. I think "Save Flow" is clearer, so I'd suggest updating the Flow Engine Editor UI to "Save" to match current instructions. :slight_smile:

3 Likes

Welcome back, @bptworld — and congratulations on this incredible achievement!

Thank you for sharing Flow Engine with the community. As someone who’s a huge fan of visual automation tools, I really appreciate the work you've done here. This is a big step forward for users like me who value both power and accessibility in their home automation setups.

My journey into home automation started with Stringify (RIP) and Wink. That platform fundamentally changed how I thought about automation — it helped me see logic flows in a way that clicked. Since then, I’ve been chasing that same balance of power and clarity.

I’ve tried Hubitat’s Visual Rule Builder, but as a long-time webCoRE user, I found it a bit too limited in functionality. I’ve dipped into Rule Machine a few times, but it never quite resonated with me. I also explored Node-RED, but with my setup spread across multiple hubs (Bond, Caséta, Rollease, and more), adding yet another external platform felt like moving in the wrong direction.

That’s why I’m genuinely excited about Flow Engine. The fact that it runs locally on the Hubitat hub is a huge plus — it keeps things streamlined, integrated, and performant. I haven’t had a chance to dig in deeply yet, but just seeing what you’ve built is already inspiring.

Looking ahead, I know your to-do list is probably long (and growing fast!). But when the time comes, I’d love to see support for variables and expressions added to Flow Engine. In webCoRE, I rely heavily on variables — not just for storing data, but for triggering actions and making decisions. Adding that kind of flexibility would take Flow Engine to the next level.

Thank you again for your innovation, your generosity, and your continued commitment to making Hubitat even better. You're doing amazing work, and it’s very much appreciated.

Looking forward to what’s next!

5 Likes

Another (brilliant of course) suggestion... :wink:

In the Flow Engine Child screen you can enter a name for the flow...maybe I don't understand enough about this yet, but I think I'd typically like to have my Flow Engine Child named the same as it's flow JSON file name. Make sense, or am I missing something (happens all the time).

In any case, maybe an option (default?) to name the flow using the JSON file name?

I know I must be missing something really obvious and I'm going to get a 'DOH!!!' moment, but when I create a MakerAPI instance I don't see anywhere that gives me an option to 'Add Files'.
Sorry if I've missed something very simple......

1 Like