Can i get copy of your nood red example
Thanks
Here is a very simple example that dumps my pool pump watts reading into a Hubitat virtual omni sensor device named vOmni999 using the setPower command on the device.
Note that what you need to do in the change block to parse your MQTT message into something usable is MQTT message/message format dependent, and an exercise for you. As is determining what kind of virtual device makes sense for the value you are trying to write down.
The hubitat command node (and all other hubitat nodes in node-red) have very good online documentation in node-red, so if you aren't sure of the input names, look at the node help - they are all described there.
EDIT: In case you are wondering about the DELETEs in the change block, I have screwed myself up multiple times accidentally passing msg.deviceId, msg.arguments, or msg.command values to a Hubitat node unintentionally (typically from upstream logic). So now I just "sanitize" all messages for Hubitat input variables I'm not using before it goes to a Hubitat node.

Exported Flow
[
    {
        "id": "989fc48270b947c3",
        "type": "tab",
        "label": "Hubitat Example",
        "disabled": false,
        "info": "",
        "env": []
    },
    {
        "id": "332642c6bc91bef2",
        "type": "hubitat command",
        "z": "989fc48270b947c3",
        "deviceLabel": "vOmni999",
        "name": "",
        "server": "919f1e6a880ec538",
        "deviceId": "705",
        "command": "setPower",
        "commandArgs": "",
        "x": 710,
        "y": 120,
        "wires": [
            []
        ]
    },
    {
        "id": "dcbd6070a7df7c8e",
        "type": "change",
        "z": "989fc48270b947c3",
        "name": "",
        "rules": [
            {
                "t": "set",
                "p": "arguments",
                "pt": "msg",
                "to": "payload.watts",
                "tot": "msg"
            },
            {
                "t": "delete",
                "p": "payload",
                "pt": "msg"
            },
            {
                "t": "delete",
                "p": "command",
                "pt": "msg"
            },
            {
                "t": "delete",
                "p": "deviceId",
                "pt": "msg"
            }
        ],
        "action": "",
        "property": "",
        "from": "",
        "to": "",
        "reg": false,
        "x": 520,
        "y": 120,
        "wires": [
            [
                "332642c6bc91bef2"
            ]
        ]
    },
    {
        "id": "2387f834a2336ee3",
        "type": "debug",
        "z": "989fc48270b947c3",
        "name": "debug 5",
        "active": true,
        "tosidebar": true,
        "console": false,
        "tostatus": true,
        "complete": "payload",
        "targetType": "msg",
        "statusVal": "payload.watts",
        "statusType": "msg",
        "x": 500,
        "y": 180,
        "wires": []
    },
    {
        "id": "45d81daa0917eccf",
        "type": "mqtt in",
        "z": "989fc48270b947c3",
        "name": "",
        "topic": "easytouch2-8/state/pumps/1/intelliflovsf/watts",
        "qos": "2",
        "datatype": "auto-detect",
        "broker": "7f7e5343557e3a8c",
        "nl": false,
        "rap": true,
        "rh": 0,
        "inputs": 0,
        "x": 230,
        "y": 120,
        "wires": [
            [
                "dcbd6070a7df7c8e",
                "2387f834a2336ee3"
            ]
        ]
    },
    {
        "id": "919f1e6a880ec538",
        "type": "hubitat config",
        "name": "162",
        "usetls": false,
        "host": "192.168.2.162",
        "port": "80",
        "appId": "215",
        "nodeRedServer": "http://192.168.2.5:18880",
        "webhookPath": "/hubitat/webhook",
        "autoRefresh": true,
        "useWebsocket": false,
        "colorEnabled": false,
        "color": "#ace043"
    },
    {
        "id": "7f7e5343557e3a8c",
        "type": "mqtt-broker",
        "name": "",
        "broker": "192.168.2.165",
        "port": "1883",
        "clientid": "nrtest",
        "autoConnect": true,
        "usetls": false,
        "protocolVersion": "4",
        "keepalive": "60",
        "cleansession": true,
        "birthTopic": "",
        "birthQos": "0",
        "birthPayload": "",
        "birthMsg": {},
        "closeTopic": "",
        "closeQos": "0",
        "closePayload": "",
        "closeMsg": {},
        "willTopic": "",
        "willQos": "0",
        "willPayload": "",
        "willMsg": {},
        "userProps": "",
        "sessionExpiry": ""
    }
]
2 Likes
Ok thanks let me give it a try
@erktrek I have managed to bring in the Hubitat Nodes into Node-RED. There are 9 of them but there is no Config node to put in the info from Maker API.
Put any of the nodes on a flow and then double click it. The top entry will have a little pencil icon where you can set up the config.
1 Like
Thanks for the reply. I got the config done and got a green check mark when I selected Configure Webhook.
Now I am trying to create a flow using a remote to toggle a bulb on and off but when I try to select a device from the drop down nothing is there to select.
Did you add the desired device(s) to maker API on the hub? By default maker API doesn't expose any device, you have to tell it which ones are allowed.
2 Likes
Thanks, I forgot that. Ok the devices are showing up. I am trying to duplicate erktrek's example above of the remote and the bulb but I can't seem to get the remote and the bulb configured like he has.
You need two device nodes.
- For the remote. This node has "send events" turned on.
- For the bulb. This node has "send events" turned off.
1 Like
@aaiyar Ok, I see that and fixed. I have a feeling there is something missing in the server box for the remote. I am not seeing a way to set a button to push.
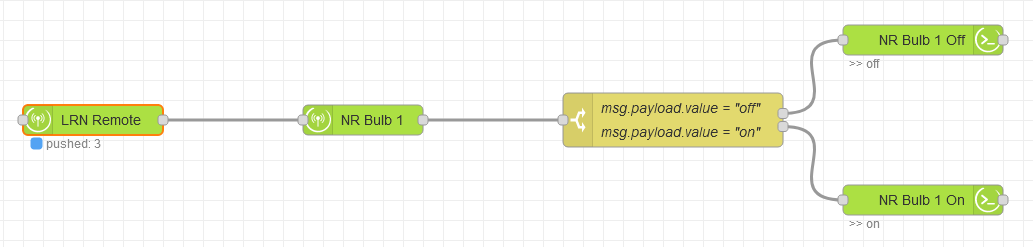
Sorry was out.. I'll send the example.
Can you post a pic of your current sequence? What attribute do you have your button device node set to? (should be "pushed" not "all")
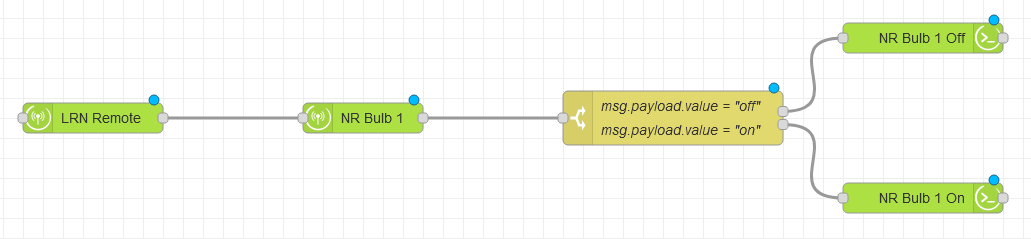
Cool - could you hit the "deploy" button in the upper right corner? That commits the changes and post another pic.
(I think you are real close..)
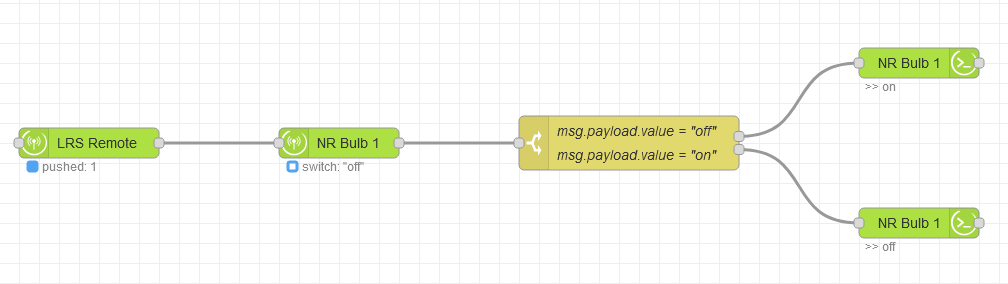
Okay so it looks like you need to configure your NR Bulb 1 node. Need to select switch attribute.. also make sure your "Send events" is NOT checked.
Yes, I just did that. It was on all but now switch.
1 Like
Okay so after hitting deploy what do you see? (send another pic?)
i tried your flow
i does work
my debug shows this
-
List item
[node: debug 6])Genmon/generator/Status/Engine/Battery Voltage/value : msg.payload : number13.7 -
List item
node: debug 4Genmon/generator/Status/External Temperature Sensors/External DS18B20 : msg.payload : string[7]
"17.38 C"
in hubitat i get a null message