A Node-Red Introduction for Hubitat Owners

Oh wow! Here is after deploy.

Okay so it looks like you need to configure your NR Bulb 1 node. Need to select switch attribute.. also make sure your "Send events" is NOT checked.

Yes, I just did that. It was on all but now switch.

1 Like

Okay so after hitting deploy what do you see? (send another pic?)

Here is latest. Do I have to select the button I will be pushing somewhere?

i tried your flow
i does work

my debug shows this

  • List item
    [node: debug 6])Genmon/generator/Status/Engine/Battery Voltage/value : msg.payload : number13.7

  • List item
    node: debug 4Genmon/generator/Status/External Temperature Sensors/External DS18B20 : msg.payload : string[7]
    "17.38 C"

in hubitat i get a null message

What kind of Hubitat device are you trying to send the data to?

Can you post your flow, so someone can try to debug it?

Finally, can you show what the data looks like in MQTT Explorer?

1 Like

Post your flow details, I'm not going to just guess what the issue is. :slight_smile:

Your debug lists 2 messages. You may not have the change node done right. Even worse 1 if the values is a string, so you will have to do an expression or a function node to parse that back into a number....

2 Likes

image

my test flow
[
{
"id": "8a35525e3001f95c",
"type": "debug",
"z": "b2105afad74b343b",
"name": "Mqtt Debug",
"active": true,
"tosidebar": true,
"console": true,
"tostatus": true,
"complete": "payload",
"targetType": "msg",
"statusVal": "payload",
"statusType": "auto",
"x": 600,
"y": 200,
"wires": []
},
{
"id": "3f5940419e90ef77",
"type": "debug",
"z": "b2105afad74b343b",
"name": "Hubitat debug 1",
"active": true,
"tosidebar": true,
"console": true,
"tostatus": true,
"complete": "payload 1",
"targetType": "msg",
"statusVal": "payload 1",
"statusType": "auto",
"x": 590,
"y": 400,
"wires": []
},
{
"id": "a33da5e371c1d777",
"type": "mqtt in",
"z": "b2105afad74b343b",
"name": "Genmon Ext DS18B20",
"topic": "Genmon/generator/Status/External Temperature Sensors/External DS18B20",
"qos": "2",
"datatype": "auto-detect",
"broker": "f38954d23281cc49",
"nl": false,
"rap": true,
"rh": 0,
"inputs": 0,
"x": 120,
"y": 200,
"wires": [
[
"8a35525e3001f95c",
"c6b3c120e65cbeed"
]
]
},
{
"id": "14d85da3f6bff9cf",
"type": "hubitat command",
"z": "b2105afad74b343b",
"deviceLabel": "test m",
"name": "",
"server": "b290bff93c0fbd72",
"deviceId": "1043",
"command": "setVariable",
"commandArgs": "",
"x": 710,
"y": 260,
"wires": [
[]
]
},
{
"id": "c6b3c120e65cbeed",
"type": "change",
"z": "b2105afad74b343b",
"name": "",
"rules": [
{
"t": "move",
"p": "payload",
"pt": "msg",
"to": "payload",
"tot": "msg"
}
],
"action": "",
"property": "",
"from": "",
"to": "",
"reg": false,
"x": 390,
"y": 240,
"wires": [
[
"3f5940419e90ef77",
"14d85da3f6bff9cf"
]
]
},
{
"id": "f38954d23281cc49",
"type": "mqtt-broker",
"name": "mqtt",
"broker": "localhost",
"port": "1883",
"tls": "",
"clientid": "",
"autoConnect": true,
"usetls": false,
"protocolVersion": "4",
"keepalive": "60",
"cleansession": true,
"birthTopic": "",
"birthQos": "0",
"birthPayload": "",
"birthMsg": {},
"closeTopic": "",
"closeQos": "0",
"closePayload": "",
"closeMsg": {},
"willTopic": "",
"willQos": "0",
"willPayload": "",
"willMsg": {},
"userProps": "",
"sessionExpiry": "",
"credentials": {
"user": "",
"password": ""
}
},
{
"id": "b290bff93c0fbd72",
"type": "hubitat config",
"name": "Hubitat",
"usetls": false,
"host": "192.168.20.150",
"port": "80",
"appId": "743",
"nodeRedServer": "http://192.168.20.3:1880",
"webhookPath": "/hubitat/webhook",
"autoRefresh": true,
"useWebsocket": false,
"colorEnabled": false,
"color": "#ace043",
"credentials": {}
}
]

I can't get that code to import (see note in next post on why).

My guess looking at the code you exported, though, is that it is in your change block. You need to move/copy the value you want to write down into msg.arguments, as that is where the hubitat node is looking for the value (if you don't know what I mean, look at the online help for the Hubitat command node - input section)...

This change node really doesn't seem to do anything? Looks like it moves msg.payload to msg.payload (aka nothing)?

{
"id": "c6b3c120e65cbeed",
"type": "change",
"z": "b2105afad74b343b",
"name": "",
"rules": [
{
"t": "move",
"p": "payload",
"pt": "msg",
"to": "payload",
"tot": "msg"
}

When you post a flow, you need to mark it as preformated text using the </> icon in the editor. Otherwise, there are characters stripped that make it impossible to import.

2 Likes
[
{
"id": "8a35525e3001f95c",
"type": "debug",
"z": "b2105afad74b343b",
"name": "Mqtt Debug",
"active": true,
"tosidebar": true,
"console": true,
"tostatus": true,
"complete": "payload",
"targetType": "msg",
"statusVal": "payload",
"statusType": "auto",
"x": 600,
"y": 200,
"wires": []
},
{
"id": "3f5940419e90ef77",
"type": "debug",
"z": "b2105afad74b343b",
"name": "Hubitat debug 1",
"active": true,
"tosidebar": true,
"console": true,
"tostatus": true,
"complete": "payload 1",
"targetType": "msg",
"statusVal": "payload 1",
"statusType": "auto",
"x": 590,
"y": 400,
"wires": []
},
{
"id": "a33da5e371c1d777",
"type": "mqtt in",
"z": "b2105afad74b343b",
"name": "Genmon Ext DS18B20",
"topic": "Genmon/generator/Status/External Temperature Sensors/External DS18B20",
"qos": "2",
"datatype": "auto-detect",
"broker": "f38954d23281cc49",
"nl": false,
"rap": true,
"rh": 0,
"inputs": 0,
"x": 120,
"y": 200,
"wires": [
[
"8a35525e3001f95c",
"c6b3c120e65cbeed"
]
]
},
{
"id": "14d85da3f6bff9cf",
"type": "hubitat command",
"z": "b2105afad74b343b",
"deviceLabel": "test m",
"name": "",
"server": "b290bff93c0fbd72",
"deviceId": "1043",
"command": "setVariable",
"commandArgs": "",
"x": 710,
"y": 260,
"wires": [
[]
]
},
{
"id": "c6b3c120e65cbeed",
"type": "change",
"z": "b2105afad74b343b",
"name": "",
"rules": [
{
"t": "move",
"p": "payload",
"pt": "msg",
"to": "payload",
"tot": "msg"
}
],
"action": "",
"property": "",
"from": "",
"to": "",
"reg": false,
"x": 390,
"y": 240,
"wires": [
[
"3f5940419e90ef77",
"14d85da3f6bff9cf"
]
]
},
{
"id": "f38954d23281cc49",
"type": "mqtt-broker",
"name": "mqtt",
"broker": "localhost",
"port": "1883",
"tls": "",
"clientid": "",
"autoConnect": true,
"usetls": false,
"protocolVersion": "4",
"keepalive": "60",
"cleansession": true,
"birthTopic": "",
"birthQos": "0",
"birthPayload": "",
"birthMsg": {},
"closeTopic": "",
"closeQos": "0",
"closePayload": "",
"closeMsg": {},
"willTopic": "",
"willQos": "0",
"willPayload": "",
"willMsg": {},
"userProps": "",
"sessionExpiry": "",
"credentials": {
"user": "",
"password": ""
}
},
{
"id": "b290bff93c0fbd72",
"type": "hubitat config",
"name": "Hubitat",
"usetls": false,
"host": "192.168.20.150",
"port": "80",
"appId": "743",
"nodeRedServer": "http://192.168.20.3:1880",
"webhookPath": "/hubitat/webhook",
"autoRefresh": true,
"useWebsocket": false,
"colorEnabled": false,
"color": "#ace043",
"credentials": {}
}
]


1 Like

Ok, got it to import. The problem is as I said above - your change node.

This doesn't work/do anything.

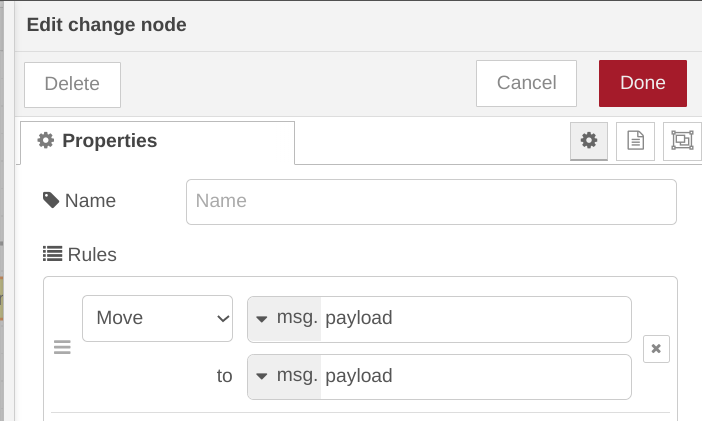
You need to put the value you want to write to hubitat into msg.arguments. Something like this:

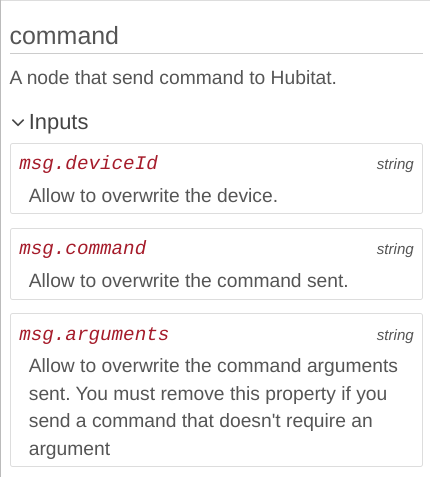
You really don't need to guess at these things, as it is all documented.

Per the online help for the hubitat command node, if you don't specify a static value for arguments in the config of the command node, you must specify it by passing the node a value in msg,arguments on the incoming msg.

Having something in msg.payload does nothing in this case, as the hubitat command node does not use msg.payload for anything (otherwise it would be listed in the INPUTS section of the node help).
image

Good luck!

3 Likes

thanks for you help it worked

3 Likes

Great! Glad to hear it!

1 Like

When the string get sent. is there a way that we can add a character behind the string

example

  • 120 but want it to show 120 V

Can do it with a change node using an expression.

You don't need a 2nd/separate change node, you can do that in the same change node you have as a 2nd entry.

Like this:
image

Or if you are feeling saucy, you could do both in 1 command:
image

Reference:

2 Likes

I am new to node-red. Thank you for this introduction. I have a basic question. I am setting up an RPi that will enable me to interface with some functions (e.g., turning lights on and off) remotely in my motorhome. This RPi to interface with the controls is running node-red in an OS called coachproxy (https://coachproxy.com/). All the flows in node-red have been configured. My question is: Is there a way to interface my Hubitat with this RPi as the node-red server to add automation functions that are lacking with the coachproxy alone? Thank you.

I’m a little confused by what you’re asking for.

Do you want to use Hubitat to run automations on devices that are currently only on CoachProxy?

Or do you want to add Hubitat paired devices to Node-Red?

1 Like

This topic was automatically closed 365 days after the last reply. New replies are no longer allowed.