As I'm looking at these pictures closer, while I see that bundle of white wires there, I don't see that any of them actually is connected to either switch? Why is that??or am I getting to far off into the weeds?
Because you're going from dumb (passive) switches to smart (active) switches.
a.k.a analog to digital.
1 Like
With my smart switches I insert the wires into the holes and tighten the screw really tight.
Dumb switches don’t need a neutral is main reason. But the white wires are important/required for all of the loads/lights/receptacles feeding from this switch box. Neutral is usually never switched, only the hot, which is why they are bundled and tucked away in the back of the box.
1 Like
I grew up learning home electrical from my grandfather, who was a master electrician. Why do I start with that? Before trying to tackle the Zooz switches, work to understand the basics of three way switches and basic house wiring, that will go a long way to helping you understand to figure out how your current wiring is set up, which will then help you figure out how to wire your Zooz switches. A long post, but hopefully it helps you and/or others.
Most modern wiring brings the power and load together in your switch boxes where all the connections are made. That means all boxes and by extension, lights, etc, have load/hot (black), neutral (white) and ground (bare) available.
Neutral is tied to the ground in your power panel. Think of it as the return side of your load (light). Hot (black) is always the switched side of the load. That's why in a typical light switch box, or outlet, etc. You'll find all white (neutral) wires tied together, and all bare ground wires tied together. There are some exceptions where white wires are used as hot, many times in wiring three-way switches. Those should be marked with black tape or black markings to note it is used as a hot vice neutral (one example is listed below). Red wires are a 2nd HOT wire used for 3 way switches, or for larger loads such as electric stoves/dryers/etc, 240V equipment.
Much older homes are wired quite differently where only the hot wires are wired to light switches, and the neutral only to the load. These are the "lack of neutral" cases that are referenced. While it works for operating lights (you only need to switch the hot side of the light), you need the neutral in the box to power the electronics in the switch itself. There are some switches that can be powered through the load or to the ground, but those are non-standard, my recommendation is have your home rewired by a professional up to current standards. You don't have to worry about that with a home built in 2020, and as evidenced by your photos.
SAFETY: As mentioned in many places, open the breaker and confirm it kills power to your switch with an AC detector or voltmeter testing voltage between a white and black wire on BOTH sides of the switch, and any other switches/black wires. Make sure the switches and various 3 way locations don't also include power from a separate source, should NOT be the case in a newer home, but you can never be too safe. Touching a live black wire will get you zapped. Touching a white wire usually ok, but you don't need to test it! Touching a live black wire to a white wire or ground (or to a metal case) will result in a large arc and trip the breaker (most likely), also not recommended!
FUNDIMENTALS of SINGLE and 3-WAY SWITCHES
Wires are strung together in ROMEX cables of normally 2 types. White are 14 gauge either 14/2 (meaning 2 conductors, black and white) or 14/3 (3 conductors, black/white/red). 14/3 are used for ceiling fan installations to separate the fan and light at the light switch box, which require a separate switch on each hot side (black and red) for the fan and the light. They are also used for 3 way / 4 way switch installations where red is called the traveler, more on that later. 14/2 is used for standard outlet wiring and single switch light wiring where a second (3-way) switch is not required.
If you happen to have yellow cables, those are 12 gauge (thicker) wires used for 20 amp circuits for heavier appliance outlets, sometimes in the bathroom, etc. The rest is all the same (12/2, 12/3, etc).
In a standard single gang switch box (meaning 1 switch) which controls a single light, you'll normally have 2 or 3 cables coming into the box. One will go to the power source, either another box on the same circuit, or the circuit breaker panel. One will go to the light. If you have a 3rd cable it will go to provide power to another switch on the same circuit. In either case all white wires will be wired together, and if 3 cables, then 2 black wires will be wired together. The two black wires will have a 3rd wire going to the switch, and the 3rd cable will have the black wire going to the other side of the switch.
The black wires tied together are almost always the power source. The single black wire only going to the cable is almost always the load. You can verify by extending the switch from the box, making sure nothing is shorted or touching, then restoring power to the circuit. With the switch off, one black wire will be hot, and one cold. With an AC voltmeter, you'll read 120V AC across white and one black, and 0V AC to the other black. The hot wire is your power, the 'cold' wire goes to your load/light.

3 way switches are more complex and may be wired several different ways. First, however, understand how the circuit fundamentally works.
Rather than opening or closing a circuit, the three way switch switches the power coming in between the LOAD (light) and the TRAVELER (red wire). So when the load is off, the power is fed to the 2nd 3-way switch. The simplest installation is where power comes into one box, and the light is fed from the 2nd box:
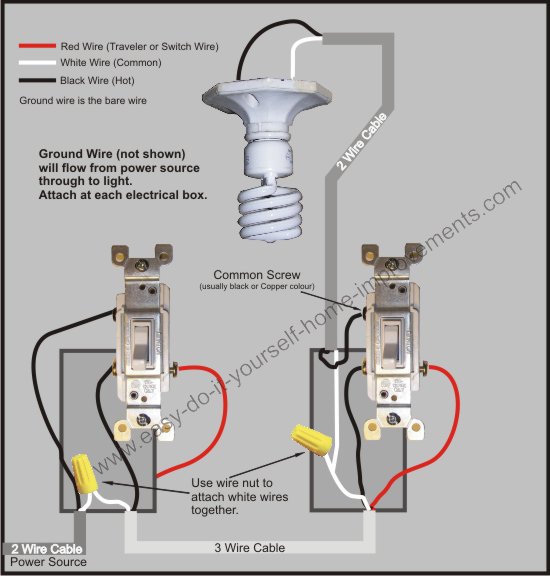
The top screw on each switch is switched between either side of the bottom screw. In both cases, they feed power to one side or the other of the 2nd switch, which feeds to the load. So when the light is ON, either switch will break the circuit by switching to the opposite side. With the switch OFF, either switch will switch power back through the light.
A second common configuration is where the load and power come into the same box, and a separate 3 conductor (14/3) is fed to the 2nd switch. In this case the black wire is used to carry the power to the 2nd switch, and the white/neutral wire is used as a 2nd load to carry the load along with the red back to the main box. In this case the white is marked with a black mark or tape to indicate it is acting as a load wire and not a neutral.

4 way switches work similarly, (for 3 switch control) but more complex in that they require 2 travelers (one for each separate switch), therefore the switches have 4 contacts.
Now the complex task of finding the switch and load. Following same safety precautions, open both switch boxes and unscrew/pull out the switches. If one of the boxes has additional switches, and you find a bundle of black wires tied together, you probably found the power. You can confirm by doing a voltage check as above. Regardless of how either switch is switched, that black wire will always have power.
One cable will go to the second box. This can be more difficult to identify, but is usually the cable with the red traveler.
Finally - one cable will go to the load/light, and will normally come off the top of the switch in one of the two boxes. This again will go to a separate cable not tied to anything else.
OTHER METHODS: If all else fails, WITH THE POWER OFF, you can do continuity checks by unhooking, then shorting black/white or white/red wires together and measuring with meter set to continuity.
You can also CAREFULLY measure power at the black wires with the circuit on. The black wire to the top of the switch (single screw) that is always live will go to the power. The top (single screw) that is switched live/off goes to the load.
Once you have mapped out your configuration, you can proceed with wiring your switches using one of the included diagrams.
Z-WAVE SWITCH WIRING
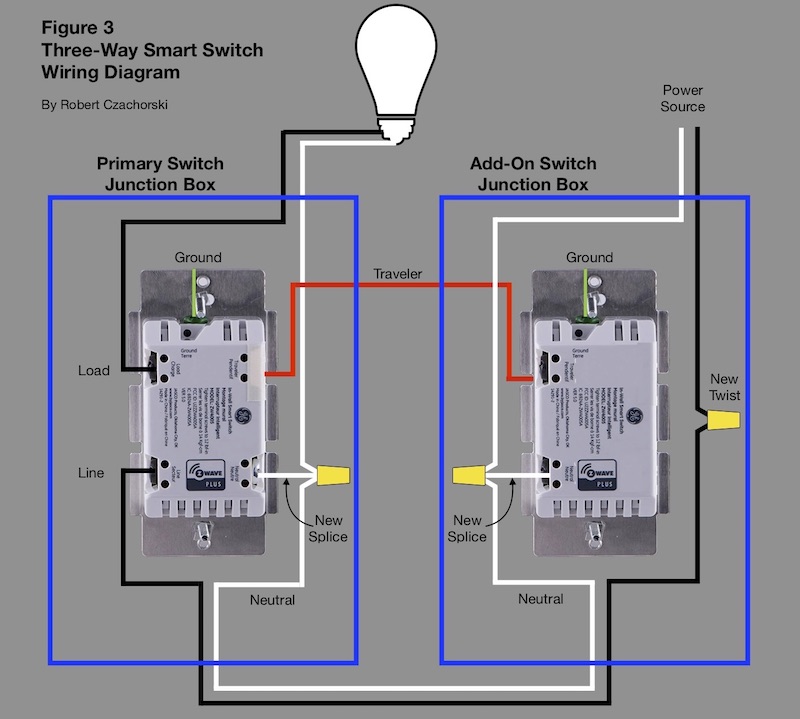
Without going into the details of how the Zooz switches work, let me instead explain why (as others have said) you need to locate the switch and the load using an example of GE/JASCO z-wave switches I have used.
In my cases, each switch required a black (hot) and white (neutral) wire as I described before to power the switch. These switches use a master z-wave control switch or dimmer, and any number of additional auxiliary switches for 3 or 4 (or more) -way control. Unlike conventional switches, the traveler is unpowered, and rather just sends a signal to control the master switch. Therefore you bring the main power and load back together where you install the master switch, and the red/traveler is not tied to any source. Rather it just connects the two switches together through the traveler.
These type of switches have tape over the contact and are clearly labeled they are not connected to live power. Newer versions automatically sense which is the load and which is the line (hot) and those can be reversed on either black (hot) side at the master switch. You only need to worry about bringing the load and line together in the same box, then wiring the traveler to the 2nd box.
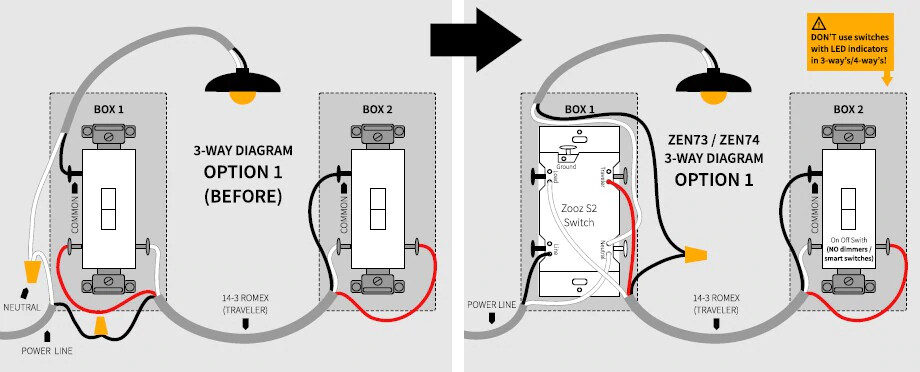
Where ever you install the master switch depends on which box is easier to bring both together. If your installation is like 3-way #1 (above) then you use a black line on the traveler wire to bring the power (or vice versa the load) back to the 2nd box to make it like #2 above.
The diagram below shows how the power from box 2 is brought back to box 1 through the black wire, and the red/white wires are used as the hot and traveler wires.
In the end, understanding how to figure out:
1 - how the circuit fundamentally works will help you
2 - figure out how your home is wired which will lead to
3 - how to install the z-wave switch.
Do a couple of these and they will become easy! Some online searches will also help identify diagrams for other possible wiring diagrams, but many of these are from older style homes.
2 Likes
It looks like the new Zen74 doesn't need to use a special aux switch. Just swap it in the main switch box and you're done.
Which is kind of handy. ![]()
But you still need to find that main switch box.
2 Likes
Those are neutral. They complete the loop to the fixtures (this is a simple explanation). To give you an idea, you can touch a hot wire safely if you are not grounded as you will be the same potential as the wire you are touching. The moment neutral or ground enters the picture your electrical potential changes and you get zapped. (again this is a very simple explanation)
Just another guy's opinion, but I am pretty much done with wire nuts. I hate un-doing the rat's nest. I hate trying to squeeze a rope of 5 twisted wires behind a new smart dimmer. I hate looking at the chart to figure out which one to use if I add a 14-gauge pigtail to a bundle of 4 x 12-gauge wires. One wasn't stripped properly? Untwist that garbage heap and try getting wire strippers in there.
I tried out a Wago 221 variety pack last year and now use them on all of my DIY projects. Maybe I spend $1 more per electrical box update. The end result is cleaner, easy to validate (tug test), easier to trace, easier to update later, doesn't fatigue or chew-up the ends of each wire.
3 Likes
I stayed away from the Zooz switches for 3-way/4-way/5-way switches as I wasn't comfortable doing the wiring of a smart switch into dumb switches.
For 3-way/4-way setups, I use GE/Jasco or Inovelli switches for the switch or dimmer.
GE/Jasco has an "add on" switch that works with both GE/Jasco and Inovelli for the "remote" switches. These are unpowered, and take on the "personality" of the main smart switch (either dimmer or switch).
You wire the powered switch into the main drop from the circuit breaker box:
- First, you disconnect wires from all switches in the 3-way/4-way/5-way
- Take pictures of the wiring first in case you mess up
- Now, with the wires "dangling" in air, you turn the breaker switch back on and CAREFULLY use a multimeter to find which hot (usually a black wire in the US) has 120 VAC
- This is your main power drop...you wire the smart switch in here
- Verify that this switch turns the light on/off
- Now, if you use the GE/Jasco add-on switches, you simply connect the traveler (usually a RED wire in the US) and neutral at each additional switch location
Make sure you are turning off the power to the breaker box before doing any wiring or handling any wires.
The extra switches will be connected in a "daisy chain" fashion off the main drop from the breaker box. You will have to figure out what is what. You most likely will have to wire nut 2 or more "black wires" that you disconnected from the additional switches to have the power flow through (the add-on switches don't switch any power, they just send a signal to the main switch to turn on/off.)
You keep following this process, one add-on switch at a time, cycling breaker power, and verifying that you have things wired correctly.
If you are methodical, you can figure it out.
Again, if you are not comfortable, hire an electrician...they should charge you approximately $50 per switch.
1 Like
Get some Wago lever-nuts instead of using wire nuts -- you'll thank me later.
I do all of my own electrical work, and I'll never use a wire nut again after discovering these Wagos years ago - IMHO, Wagos are worth their weight in gold for residential wiring.
If you have Menards stores in your area, they stock 10-packs locally. Otherwise, order from Amazon BUT beware cheap chinese knock-offs on Amazon -- make sure they are genuine Wago brand. I've ordered several times from this vendor before (Peppy Products), and they are solid.
The "221" series is most common (and most useful for residential) -- those can handle any wire sizes between #12 - #24 -- that spread covers you from 20-amp circuits (#12 wire) all the way down small low-voltage wires (and they do work great with small wires too -- I had my doubts with some #22 wires I had on one project, but the Wagos "bite" even those tightly).
Get a healthy mix of 2-port, 3-port, and 5-ports. Unfortunately, they don't make a 4-port version.
ETA - perhaps unfortunate they don't make a 6+ -port version too, but it's easy to make pigtailed wago packages when necessary - just bend a short piece of wire in a small "U" and you can put 2 wagos tightly together when dealing with a 6+ wire grouping
1 Like
I am with you and started using them in recent years too but for new installs. Removing 3-6+ wires from an existing wire nut bundle is a huge pain if only adding one more wire.
I have seen many people sing the praises of wegos. It is definitely something I am considering.
Wouldnt that mean I would then have to undo the bundles that are in there?
I asked about this a few weeks ago and the overwhelming responce then was yes, these switches will fit in that box (still have my doubts). Will there still be room for these wegos with all the wound wires?
I wish. Havent seen a Menards since we moved out of Chicago. In north Texas we only have Red, Orange or Blue.
1 Like
Oh, and using the.wegos, when I unwind that bundle of wires, does it mater the order that they go into the wego?
No reason to take apart an existing nut group if you don't have too, but a switch-box neutral or ground nut grouping is a common thing you need to "break in to" when dealing with a smart switch (as dumb switches don't ever use a neutral and may or may not have their ground wire connected).
In those cases, I do the biggest wire groupings (usually grounds and neutrals) first and push those groups as far back in the box as I can to clear space for working with the line/load hots.
2 Likes
Doesn't matter a bit. But do make sure you take pics or label wires as you disassemble -- it's very tempting to think "yeah, I got this -- I totally know which wire is which" and then you'll be shocked at how it all somehow looks completely different when you look away to futz with something and look back again (ask me how I know!! ![]() )
)
ETA - My wife laughs at me cuz all of the pics in my phone's camera roll are of wiring projects in various states of disarray lol
ETA2 -- if you do wagos, you don't need to use every "port" either -- it's OK to leave empty ports (e.g. if you have 4 wires, you'd use a 5-port wago and one port will be empty - no problem)
2 Likes
Sorry - one final thought promoting Wagos vs nuts... The benefits of Wagos may not be evident at first install -- in fact, they may be equally hard to deal with since you may need to futz around straightening wires that were twisted in a nut or even cutting them back to get at cleaner wire, but they really shine for the next time you're in that box...
You may think you'll never touch/replace that shiny new fancy switch ever again, but I promise you will sooner or later... And that's when Wagos really shine -- you'll be grateful then you used Wagos 
1 Like
I'm sure the following is fully understood by rlithgow, and I agree with the statement above. However, 'if you are not grounded' is an important detail. There is high likelihood that sweat/moisture or other factors will create some conductivity and allow the hot potential find a path to ground through you causing at least a slight 'tingle'.
If you inadvertently touch metal, it is likely to be grounded which will then close the electrical path causing a shock. There probably aren't many electricians (or do-it-yourselfers) who haven't been 'bit' at one point or another. Just something to consider.
Complex explanation to above
House wiring is 3 phase where each of the three legs generates a 60hz sine wave 120 deg out of phase with each of the other two. One of the phases, the neutral phase, is also tied to ground (earth ground - a copper rod driven into the ground near your service entrance, often tied to metal plumbing in older homes). That is also why white (neutral) is safe to touch in common grounded house wiring, because it is already tied to ground.
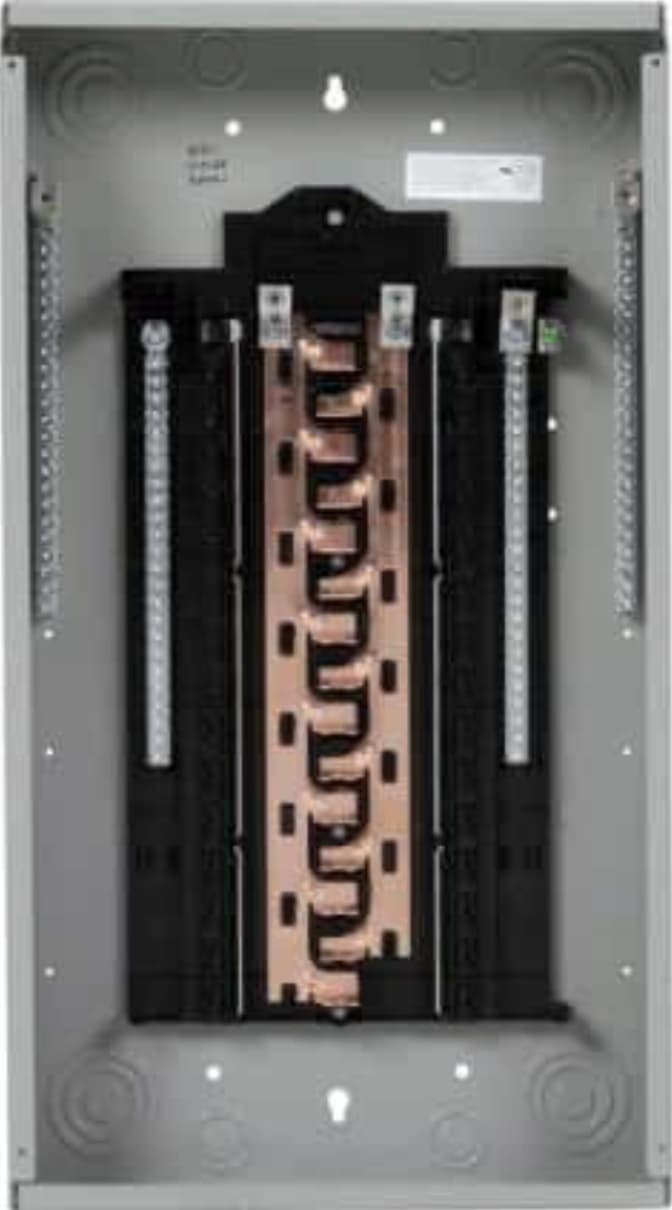
The other two phases form 'hot' sides of your home wiring. In your breaker box, all three phases come in at the top. One will be white or marked with white tape and connected to a bus-bar running down the right or left side of the box (both sides are tied together internal to the box). The other two (black or black and red) will be tied to the middle, or through a main breaker at the top middle.

The ground (bare) and neutral (white) wires are tied together on the bus bar running down either the left/right side of the main breakers. These both go to the neutral phase.
The hot leads (black) are tied through individual breakers to either of the two hot phases.
While it appears the left side of the box is tied to the 'left' hot phase, the the right side of the box is tied to the 'right' hot phase, in fact they alternate down each side of the panel. This shows an empty box which illustrates how the bus bars alternate between each side.
They alternate so that heavy duty appliances, '240 V' such as HVAC units, electric stoves/dryers/etc, that require both "hot" phases, run off of a single 'dual' breaker that is one on top of the other. Two hot wires, one black, one red, is connected one to each breaker, to bring power from both hot phases to that equipment, through a 4 conductor (W/B/R/Green), or 3 conductor 'wg - with ground' (W/B/R/bare) cable.
Power is measured between any 2 of the 3 phases, typically around 120V. Power is wired to your home circuits between any one of the hot phases, and the neutral, through the associated breaker on the hot side. 240V circuits to both hot phases and neutral as described above.
Touching any single phase is inherently safe as long as you don't complete a circuit to any other phase or neutral/ground. This is how linemen work on high voltage tension lines, or more commonly how birds are able to land on high voltage wires.
Linemen will attached a clamp connection to the line under maintenance to bring the bucket and vehicle to the same 'potential' as that line. Heavy electrical safe matting is placed over adjacent lines (phases) to prevent inadvertent contact which would complete the circuit and cause severe electrical burns or worse.
Last comment, many may be familiar with older style electrical equipment such as fans, old electric clocks, or console radios that had two prong, non-polarized plugs. Newer polarized plugs are designed where the left side, neutral, is slightly wider than the right side hot. This prevents the plug from being reversed, so the neutral remains connected to the side of the device which is designed to be part of the ground.
In these older devices, if you plugged it in reversed, you often felt a slight electric shock if you touched the cabinet, this was solved by rotating the plug over. This was because one side of the device was powered through the neutral which was also tied to the ground in the device itself. When you reversed the plug, you also brought any metal parts of the case to 'hot' potential, which caused the shock.
Many electronic devices, particularly small transformers, are not polarized, meaning they can be reversed. This is normally because those devices are connected to a transformer which also serves to isolate the external AC voltage from the rest of the device. Additionally neither side is tied to a device ground, not to mention they are normally plastic/non-conductive.
3 Likes
Here's a good video on Wago vs wire nuts and other connectors you might find interesting:

1 Like
I've bumped a 200 amp buzz bar before.... that was not fun.....
Yeah, I was just trying to be simple. I understand most "general" electrical theory and I always council people to be careful AF... So to make it simple, DO NOT TOUCH HOT & Neutral/ground AT THE SAME TIME! DO NOT WIRE NEUTRAL TO GROUND OR VICE VERSA. TURN OFF POWER! ![]()
Also never believe the person you are working with that he discharged the CRT you are working on before checking yourself or you're likely to get hurt as well... (happened a long time ago)
2 Likes
So an update of sorts. Thanks to all the great advice I've gotten, and some guidance from @agnes.zooz I am going to be trying this myself (well the first one anyway). Based on a recommendation from an earlier semi-related post I ordered This book.. I am also considering ording this book Basic Electricity (that's the title). Could one of the more knowledgeable memeber take a quick look at that second one and advise if it might be too much? I also ordered that assortment of wagos listed above. With the projects I have on tap I think it will help my sanity.
As stated in the op, there are about 4 projects of increasing complexity. It is my hope that as I work through each one, I will build better knowledge and confidence. Thank you everyone for the tips and advice, I hope as these gets more complex you will stay with me and help me build more knowledge.
2 Likes
This maybe a really dumb question, but how do you ground youself?

