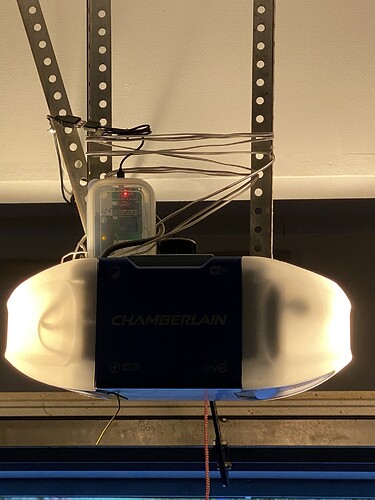
Zooz Zen16 Multirelay to New Garage Opener

If you really zoom in on the pic, the button is indeed yellow (I didn't zoom enough in my first couple attempts), so the Garadget will be needed to get around the MyQ 2.0 Security+ stuff. :+1:

Thanks.

So now I need to buy this Garadget and attach it next to the current "button" on the wall? Is there any way to attach this on the Garage Door Opener (Out of sight?) - Why won't the Zooz Zen 16 work anymore?

Yes the button is "yellow" which now I assume is a bad thing for me.

Yellow is bad, but if you are willing to solder wires to one of your remotes you can hide the whole assembly out of site. Just link to the above listed links and get the instructions. I did mine this way with the same relay.

better to get the button so you don't have to worry about batteries

1 Like

Not at all.

Here's a sort of explanation, full of errors and half truths. :wink:

You've gone from an Analog system.
Close a circuit between connectors on the back of your garage door opener with a pushbutton switch.
Simple with a Z-Wave relay: close the contacts.

To a new and improved Digital system.
Supply a special code to the connector on the back of your garage door opener.
Still pretty simple with a Z-Wave relay, just a bit more work as you also have to generate the correct code when you close the contacts.
With a wireless remote this can be located anywhere the signal will reach your garage door opener. Using a sacrificial button it can be located anywhere you want to run the wire.

1 Like

I have the button/display that came with opener on wall beside the kitchen door. I added the new button I mentioned above and placed it in a protective box along with the relay on top of my opener. Out of sight :+1:

1 Like

@HubMe The reason is Security 2.0 which has been around 10 years. Prior to that a simple contact (using lets say a doorbell switch) would be fine and the relay would work directly. With the digital encryption that Security 2.0 uses, straight dry contact doesn't work anymore. So the button above allows you to use the drycontact (the zen-16) to activate the security 2.0 mechanism. You wire the piece to the terminals behind your existing garage door button or replace your existing garage door button all together. Then wire the dry contact wires to the zen-16. Optionally you can mount everything above the garage door opener itself and tie the contact to the terminals where your existing garage door button is connected to. should be plenty of room for both sets of wires. The last thing you will need is a garage door tilt sensor (I recommend the ecolink) as the my q sensor will not work.

2 Likes

No, you can attach it at the GDO opener itself like many of us have done. If you wanted to, you could get a remote control instead of wall button (I think Garadget sells those too), and you could literally locate it anywhere in your house.

Now, there is a good recent thread that goes over all of the options here.

2 Likes

Is there a diagram showing exactly how to wire up a ZEN16, a Garadget Security+ 2.0 Wired Dry Contact Adapter, so that the existing wall switch will continue to work. I need a little handholding here.

Bonus question, is it possible to independently control the garage opener light via the ZEN16, too?

yes. you will put it in parallel (both buttons connected at the same time) on the motor

yes. on the garage door button, there's a side button to control the light. you'll need to solder into that button and connect that to a second relay on the ZEN16

Sometimes a picture helps. Here are the areas you need to solder the wires to:

Soldering is probably too advanced for me right now. Thanks for the info. Is there a similar photo or diagram showing exactly how to wire to the GDO?

Dry contact side of the garadget button to r1 terminals, (or r2 or r3 if you have more than 1 garage door. Each set is a seperate relay) security 2.0 side to either where the terminals are on back of your OEM switch or extend the wires directly to the back of the garage door opener at those terminals (leave existing wires in place). Power either on the +- input or usb jack (reccomend usb jack). For wiring use bell wire. It's rated properly, it's thin, and easy to mount to wall with retainers. You can use the zooz garage door app for easy control. Make sure you have a tilt sensor on the door.

1 Like

Thank you!. I’m up and running!

3 Likes

do you have photos you could share for how to install the Garadget device? I want to put mine on top of the Garagedoor Opener box out of site - will just be used with Hubitat.

Thanks!

@HubMe i responded to your same question back in Sept with a picture:

Worth noting since that post in Sept I was finding my preexisting wall button was shorting out from time to time and time display resetting. I had originally shoved the Garadget wires into the opener terminals along with that button’s wires. I changed this to use Wago connectors instead where a short wire goes from the Wago to the opener terminals and then the wall button and Garadget wires into the others and all has worked well since then.

1 Like

Yep, I'm a big fan of the Wago-pigtail route... Just easier to deal with overall, plus it makes future equipment swaps easier (like when I had to replace my opener this past spring). Good stuff!

1 Like

fyi.. the zooz zen17 relay (700 series zwave) also works like a champ. Make sure you connect to no1 or 2 and the corresponding "C" .. not both to NO1 and NO2 at the same time :slight_smile:

Thread saved my life. Here's my work of art:

3 Likes

Wow, between trying to decipher the Zooz ZEN17 User Manual, Garadget Dry Contact Adapter instructions, and Zooz' instructions on using a ZEN16 for a garage door opener, this was way more complicated than it needed to be... Red and white wires from the Garadget adapter plug into the red and white terminals on the GDO, other 2 wires from the Garadget adapter plug into R1 C and R1 NO, and plug in the ZEN17 (I used a Tradfri signal repeater to boost my Zigbee signal in the garage). Then following Zooz' instructions for the driver/app code/setup worked well. That's it. Ignore everything else about S1 and C, etc. Hope this saves someone else hours of confusion.


1 Like