Weather tile help

Anyone know where I can source weather tile with similar feature to the one below? This one is from an ActionTile dashboard.

bf9f07c9800a7b2e2d77ea6d67a92bbf8152770e

There are many options. There is a built-in weather component in Hubitat, Open Weather if you get an API key is pretty easy to add. You just add a Virtual Device, Weather, then paste an API key and check your location. It is fairly basic but it works good.

Another option I like is btpworld's Weather.Gov app. It has tons of options and features like alerts and pollen count and much prettier images in the dashboard. This isn't Brian's fault, but I have found the weather service (the data source itself) much less reliable, there seems to be lots of down time on their server. But when it works, it is excellent. I would suggest using Hubitat Package Manager to install this or any of his apps, it makes things much easier.

There are other weather apps, but be aware that many of them are using data that is/can be shut down or are in the process of making users pay for the data. That is why I suggest these over others.

3 Likes

Thanks. I found the openweather one but the output is too small for the same tile position I had before. I will explore the other ones you linked too.

This is the one I get out of openweather... I wish there were more options on what to show,

Capture1

Yea, it is pretty basic. But you also can add a few things to a new tile, go to the dashboard, select Weather device again, but this time instead of Weather in the template section, (middle column) choose Attribute.

In the Attribute there is a pulldown where you can choose particular items. There are a couple things in there that don't show in the large main tile. Still probably not what you want.

2 Likes

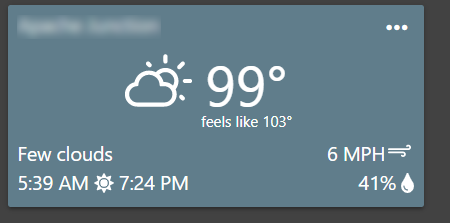
I was able to use the OpenWeatherMap-NWS-Alerts-Weather-Driver driver which produced almost the same icon I had on ActionTiles. In case some other folks look for information regarding Sharptools dashboard and OpenWeather.

image

3 Likes

Other tiles available in this driver:
image
image
image
image

2 Likes

How do you get to these other tiles? New to Hubitat so still learning the ropes.

Thanks!

I copied this from another thread, but the concept is the same.

  1. Select the device,
  2. then 'attribute' then the attribute you want to show. (If it is an 'optional' attribute make sure you have it turned 'on' in the device preferences). The tile attributes are:
    image image image

image
The attributes show in the list as alertTile, myTile, threedayfsctTile and weatherSummary.

3 Likes

Your post inspired me to take a look at this. I have added the capability of a weather tile to HubiGraphs. I will be developing more features and options in coming weeks. Here is a link:

2 Likes

How did you get your tile to look this way?
Thanks!

@jake.breish, I have been learning and hobbying during the past four months playing with graphs, html etc. My wife has some very specific design ideas and my job is to realize them.

To answer your question, I created an app that creates a custom iframe which can be installed as an attribute on the dashboard tile. I try to make them as customizable as possible and not require extra hardware or software to be useful. The above tile, for example only requires an OpenWeather API key. You can modify the font sizes, icons colors, background, etc. All from the app. (I am working on modifying location of elements in the tile now). At this point, I have created Graph, Weather, Forecast, and Radar Tiles. See the HubiGraph thread for more.

I do not see the same thing in my title: Clearly my setup is not allowing for the icons or maybe I do not understand the concepts. Clearly I only see one attribute but I never see a icon or picture (you can see the tile to the left.)

Ah; you are selecting the API. You should select the tile device (the one created by the toggle).

How do you get rid of the title header and footer though?

image

For any dashboard:

To hide the title (header) .... on the dashboard click the gear icon at the top right, click 'Options', then check the ' Hide Tile Template Names' box.

To hide the device name (footer) .... on the dashboard click the gear icon at the top right, click 'Advanced', click 'CSS', then add this line '.tile-title { visibility: hidden; }', then click 'Save CSS'.

Oh perfect, you are quite literally THE MAN

Is there any way to alter the CSS part for just some tiles? Like I want the footer on the other buttons because it tells me which light or door they are. But on the weather one it just overlaps stuff

I believe there is. I am not a CSS expert, so I will not guess how to do that. Suggest you search the forum for those discussions.

Each tile can be referenced individually in the CSS section using #tile-xx. Good starting point on CSS:

1 Like

I want to turn off the footer for the 3 day forecast which right now is showing what I called the device, i.e. "OpenWeather Virtual Device". I went into the Settings, (gear icon), clicked Advanced, then clicked on CSS and pasted this into the window and clicked the Save CSS button but nothing happened.

'.threedayfcstTile{ visibility: hidden; }'

BTW, I tried it with and without the single quotes and also with and without a space between threedayfcstTile and the {. None of those removed the footer.

Can you please tell me what I'm doing wrong?

Here is the tile (with the header showing so you can see the tile's title)

Here is the CSS code (in this shot I had removed the single quotes ''):
Screen Shot 2021-02-04 at 11.18.45 AM

One other question: I don't want the PoP on the 3 day forecast, but do what the wind info. I tried to turn off PoP items in the device's preferences and turn on the wind items, but it didn't change the tile. Is the 3 day forecast tile adjustable or is it fixed as is? If so, is there a way I can create a custom to tile to make those desired changes?