Making some progress with this (by heavily leveraging @bptworld's work, namely parent/child layout and nice formatting). Trust this is ok and of course noted in the code. So now a child can be created for each camera. Use the URL generated for the webhook in tinyCam with the form:
http://hub_ip/apps/api/app_number_generated_by_child_app/?access_token=your_oauth_token_generated_by_the_child_app&motion=%MOTION_TYPE%
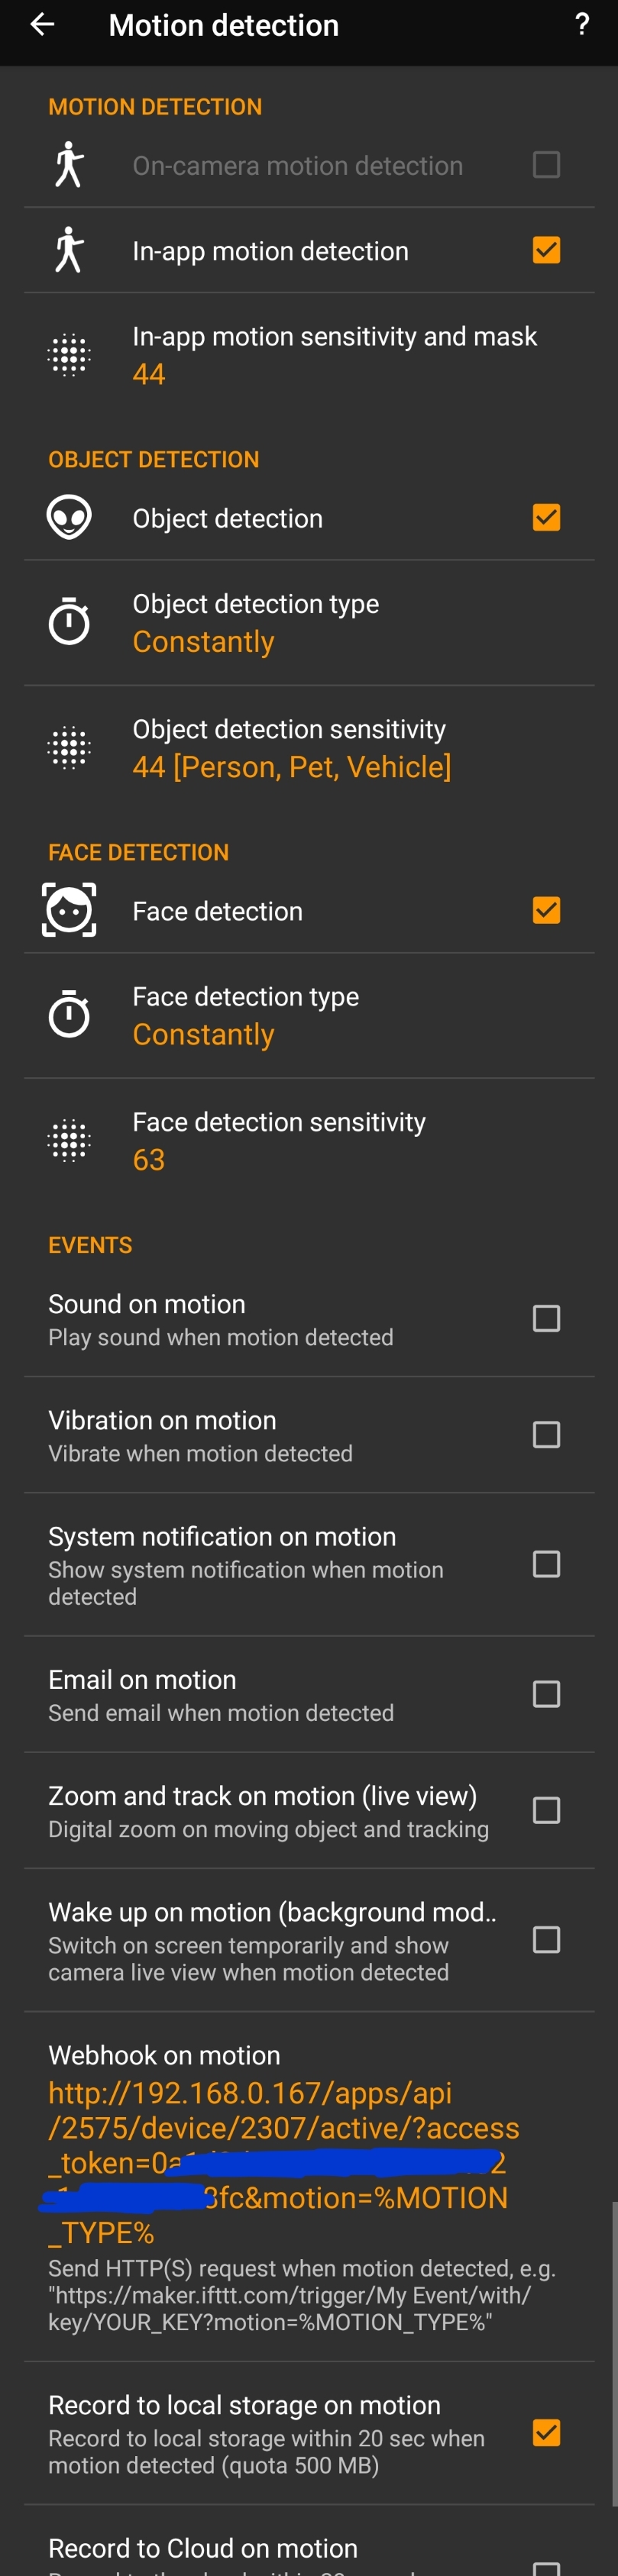
tinyCam will put the appropriate motion type into %MOTION_TYPE% for you (eg. Motion, Person, Vehicle, Pet, Face) and the child app will identify that and activate the selected virtual motion sensor for you (to use in whatever RM rule you want).
To do still:
- automatically create the virtual motion devices (although in a way its nicer I think to allow the user to select whichever devices they want (not all are necessarily necessary if the various AI-motion types are not all needed for a specific camera))
- put into HPM
Parent App:
/**
 *  ****************  tinyCam Connector  ****************
 *
 *  Description:
 *  Manage child apps which enable webhooks from tinyCam to drive virtual motion sensors in Hubitat.
 *
 *  Copyright 2020-> Angus Marshall (@Angus_M)
 *
 *  Thanks to Markus (@markus) for the original code and Bryan (@bptworld) for much of the code layout and child/parent structure
 *
 *  This App is free.  If you like and use this app, please be sure to mention it on the Hubitat forums!  Thanks.
 *
 *-------------------------------------------------------------------------------------------------------------------
 *  Licensed under the Apache License, Version 2.0 (the "License"); you may not use this file except
 *  in compliance with the License. You may obtain a copy of the License at:
 *
 *      http://www.apache.org/licenses/LICENSE-2.0
 *
 *  Unless required by applicable law or agreed to in writing, software distributed under the License is distributed
 *  on an "AS IS" BASIS, WITHOUT WARRANTIES OR CONDITIONS OF ANY KIND, either express or implied. See the License
 *  for the specific language governing permissions and limitations under the License.
 *
 * ------------------------------------------------------------------------------------------------------------------------------
 *
 *  If modifying this project, please keep the above header intact and add your comments/credits below - Thank you! -  @Angus_M
 *
 * ------------------------------------------------------------------------------------------------------------------------------
 *
 *  Changes:
 *
 *  0.0.1 - 27th June 2020 - Initial alpha release - Angus Marshall
 *
 */

def setVersion(){
    state.name = "tinyCam Connector"
	state.version = "0.0.1"
}

definition(
	name: "tinyCam Connector",
	namespace: "Angus_M",
	author: "Angus Marshall",
	description: "Manage child apps which enable webhooks from tinyCam to drive virtual motion sensors in Hubitat.",
	category: "Convenience",
	iconUrl: "",
	iconX2Url: "",
	iconX3Url: "",
)

preferences {
     page name: "mainPage", title: "", install: true, uninstall: true
}

def installed() {
    log.debug "Installed with settings: ${settings}"
    initialize()
}

def updated() {
    log.debug "Updated with settings: ${settings}"
    unsubscribe()
    initialize()
}

def initialize() {
    log.info "There are ${childApps.size()} child apps"
    childApps.each {child ->
    log.info "Child app: ${child.label}"
    }
}

def mainPage() {
    dynamicPage(name: "mainPage") {
    	installCheck()
		if(state.appInstalled == 'COMPLETE'){
			section("Instructions:", hideable: true, hidden: true) {
				paragraph "<b>Notes:</b>"
				paragraph "This app manages child apps, each of which can connect to a specific camera in tinyCam using the webhook generated by tinyCam."
                paragraph "Each child app will provide a url containing a unique oauth code. Put the url into the webhook for the camera, in the motion settings in tinyCam."
			}
  			section(getFormat("header-blue", "Child Apps")) {
				app(name: "anyOpenApp", appName: "tinyCam Connector Child", namespace: "Angus_M", title: "<b>Add a new 'tinyCam Connector' child</b>", multiple: true)
			}

			section(getFormat("header-blue", "General")) {
       			label title: "Enter a name for parent app (optional to change)", required: false
 			}
			display2()
		}
	}
}

def installCheck(){
    display()
	state.appInstalled = app.getInstallationState()
	if(state.appInstalled != 'COMPLETE'){
		section{paragraph "Please hit 'Done' to install '${app.label}' parent app "}
  	}
  	else{
    	log.info "Parent Installed OK"
  	}
}

def getFormat(type, myText="") {			// Modified from @Stephack Code
	if(type == "header-blue") return "<div style='color:#ffffff;font-weight: bold;background-color:#5da2c2;border: 1px solid;box-shadow: 2px 3px 5px 5px #5da2c2'>${myText}</div>"
    if(type == "line") return "<hr style='background-color:#5da2c2; height: 1px; border: 0;'>"
    if(type == "title") return "<h2 style='color:#5da2c2;font-weight: bold'>${myText}</h2>"
}

def display() {
    setVersion()
    getHeaderAndFooter()
    theName = app.label
    if(theName == null || theName == "") theName = "New Child App"
    section (getFormat("title", "${state.name} (${theName})")) {
        paragraph "${state.headerMessage}"
		paragraph getFormat("line")
	}
}

def display2() {
	section() {
		paragraph getFormat("line")
		paragraph "<div style='color:#5da2c2;text-align:center;font-size:20px;font-weight:bold'>${state.name} - ${state.version}</div>"
        paragraph "${state.footerMessage}"
	}
}

def getHeaderAndFooter() {
    if(logEnable) log.debug "In getHeaderAndFooter (${state.version})"
    def params = [
		timeout: 30
	]

    try {
        def result = null
        httpGet(params) { resp ->
            state.headerMessage = resp.data.headerMessage
            state.footerMessage = resp.data.footerMessage
        }
        if(logEnable) log.debug "In getHeaderAndFooter - headerMessage: ${state.headerMessage}"
        if(logEnable) log.debug "In getHeaderAndFooter - footerMessage: ${state.footerMessage}"
    }
    catch (e) {
        state.headerMessage = "<div style='color:#5da2c2'>@Angus_M Apps and Drivers</div>"
        state.footerMessage = "<div style='color:#5da2c2;text-align:center'>Angus Marshall<br><a href='https://paypal.me/angusmarshall' target='_blank'><img src='https://www.paypalobjects.com/webstatic/mktg/logo/pp_cc_mark_37x23.jpg' border='0' alt='PayPal Logo'><br>Paypal contributions welcome!</a></div>"
    }
}
Child App:
/**
Hubitat App to allow ip/web cameras in tinyCam to drive Hubitat Virtual Motion Sensors
tinyCam is an Androidapp that can discriminate between different types of motion:
- motion
- person
- pet
- vehicle
- face (non specific/personal)
Set-Up:
In tinyCam:
- install the tinyCam Monitor Pro app (there is a free add-supported version)
- add your cameras
- in camera settings, motion detection, enable all the motion types
- add a webhook http://[your_hub_ip/apps/api/XXXX/?access_token=YYYY&motion=%MOTION_TYPE%
(where XXXX is the ID of this app once installed and YYYY is the access code reported in this app (remember to activate oath when installing)
In Hubitat:
- simply set-up virtual motion sensor devices (1 for each motion type)
- then select these when you run the app
- you can also use an html tile in a dashboard to view the live webcam (if you activate the webserver function in tinyCam)
-----------------------------------------------------------------------------------------------------------------------------
Licensed under the Apache License, Version 2.0 (the "License"); you may not use this file except
in compliance with the License. You may obtain a copy of the License at:
http://www.apache.org/licenses/LICENSE-2.0
Unless required by applicable law or agreed to in writing, software distributed under the License is distributed
on an "AS IS" BASIS, WITHOUT WARRANTIES OR CONDITIONS OF ANY KIND, either express or implied. See the License
for the specific language governing permissions and limitations under the License.
------------------------------------------------------------------------------------------------------------------------------
If modifying this project, please keep the above header intact and add your comments/credits below - Thank you!
------------------------------------------------------------------------------------------------------------------------------
Changes:
0.0.3 - 27th June 2020 - Set up parent/child structure (heavily leveraging @bptworld's great work - thank you!) [Angus Marshall]
0.0.2 - 20th June 2020 - Added selection of virtual motion sensors, simplified url/params, code to activate motion sensors,
code to rename the app [Angus Marshall]
0.0.1 - 18th June 2020 - Initial code [Markus Liljergren]
**/
def setVersion(){
state.name = "tinyCam Connector"
state.version = "0.0.3"
}
definition(
name: "tinyCam Connector Child",
namespace: "Angus_M",
author: "Angus Marshall (Angus_M)",
description: "set virtual motion sensors to active when http received from tinyCam (or other similar webcam app)",
category: "Convenience",
parent: "Angus_M:tinyCam Connector",
iconUrl: "",
iconX2Url: "",
iconX3Url: "",
documentationLink: ""
) {
}
preferences {
page(name: "pageMain", title: "Main Page", install: true, uninstall: true)
page(name: "pageEnableAPI")
page(name: "pageDisableAPI")
mappings {
path("/") {
action: [
GET: "getDevice"
]
}
}
}
void installed() {
display()
log.debug "Installed with settings: ${settings}"
initializeAPIEndpoint()
}
def updated() {
display()
log.debug "Updated with settings: ${settings}"
unsubscribe()
initializeAPIEndpoint()
}
String initializeAPIEndpoint() {
if(!state.accessToken) {
if(createAccessToken() != null) {
state.endpoint = getApiServerUrl()
state.localAPIEndpoint = getFullLocalApiServerUrl()
state.remoteAPIEndpoint = getFullApiServerUrl()
}
}
return state.accessToken
}
/* Pages */
Map pageDisableAPI() {
dynamicPage(name: "pageDisableAPI") {
display()
section() {
if (state.accessToken != null) {
state.accessToken = null
state.endpoint = null
paragraph("SUCCESS: API Access Token REVOKED! Tap Done to continue")
}
}
}
}
Map pageEnableAPI() {
dynamicPage(name: "pageEnableAPI", title: "") {
display()
section() {
if(state.accessToken == null) {
initializeAPIEndpoint()
}
if (state.accessToken == null){
paragraph("FAILURE: API NOT Initialized!")
} else {
paragraph("SUCCESS: API Initialized! Tap Done to continue")
}
}
}
}
Map pageMain() {
dynamicPage(name: "pageMain") {
display()
section() {
if(state.accessToken == null) {
paragraph("API is not yet Initialized!")
href(name: "hrefPageEnableAPI", title: "Enable API", description: "", page: "pageEnableAPI")
} else {
section("Instructions:", hideable: true, hidden: true) {
paragraph("Put the following URL into the tinyCam webhook for motion on the selected camera. This app will read the webhook when transmitted by tinyCam and activate the virtual motion sensor selected below depending on the motion type (eg. simple motion, or AI-identified motion from Person, Vehicle, Pet, or (non-personal) face).")
}
section(getFormat("header-blue", "URLs")) {
String localURL = "${state.localAPIEndpoint}/?access_token=${state.accessToken}&motion=%MOTION_TYPE%"
String remoteURL = "${state.remoteAPIEndpoint}/?access_token=${state.accessToken}&motion=%MOTION_TYPE%"
paragraph("LOCAL API (devices): <a href=\"$localURL\" target=\"_blank\">$localURL</a>")
paragraph("REMOTE API: <a href=\"$remoteURL\" target=\"_blank\">$remoteURL</a>")
}
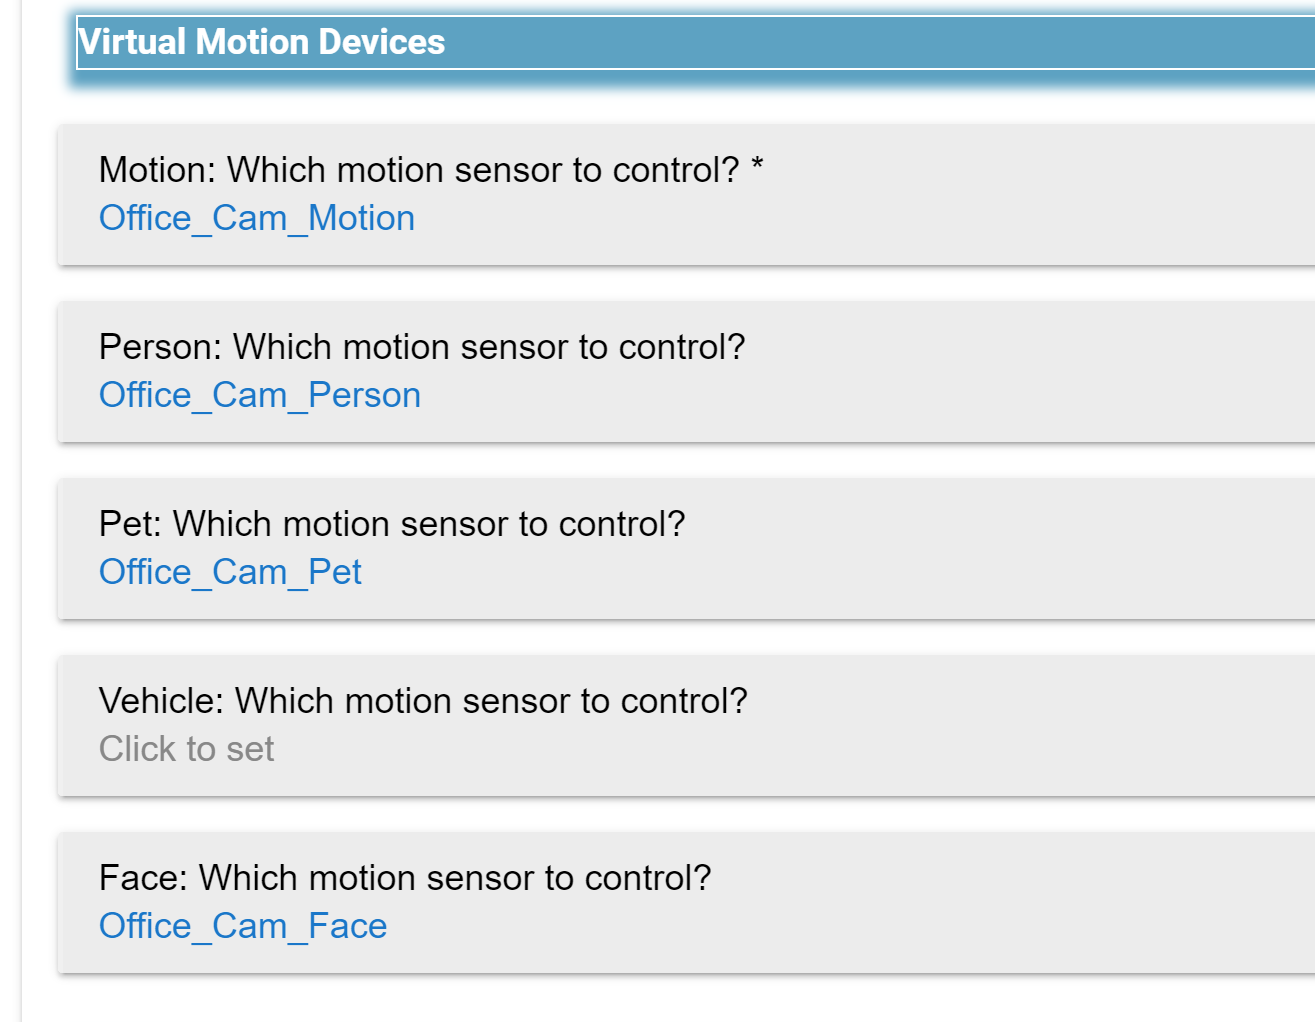
section(getFormat("header-blue", "Virtual Motion Devices")) {
input "motionDevice", "capability.motionSensor", title: "Motion: Which motion sensor to control?", multiple: false, required: true
input "personDevice", "capability.motionSensor", title: "Person: Which motion sensor to control?", multiple: false
input "petDevice", "capability.motionSensor", title: "Pet: Which motion sensor to control?", multiple: false
input "vehicleDevice", "capability.motionSensor", title: "Vehicle: Which motion sensor to control?", multiple: false
input "faceDevice", "capability.motionSensor", title: "Face: Which motion sensor to control?", multiple: false
}
section(getFormat("header-blue", "Child App name (optional to change)")) {
label title: "Enter a name for this app", required: false
}
}
}
display2()
}
}
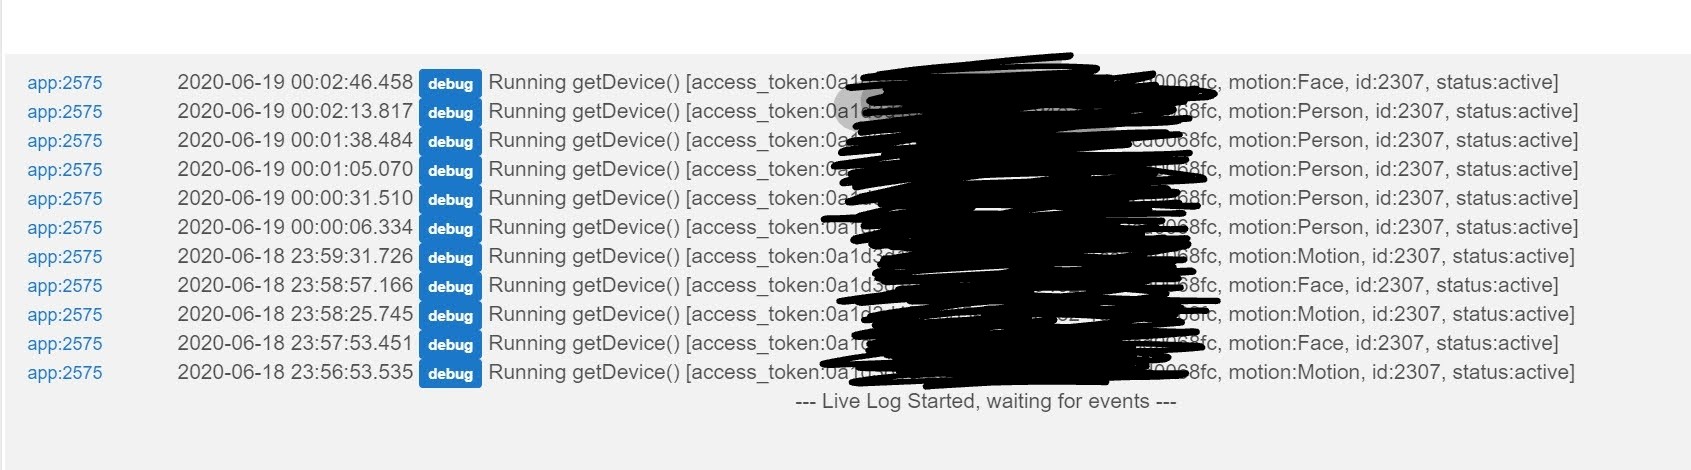
void getDevice() {
log.debug("Running getDevice() $params")
if (params.motion == "Motion") {
motionDevice.active()
} else if (params.motion == "Person") {
personDevice.active()
} else if (params.motion == "Pet") {
petDevice.active()
} else if (params.motion == "Vehicle") {
vehicleDevice.active()
} else if (params.motion == "Face") {
faceDevice.active()
}
}
def getFormat(type, myText="") { // Modified from @Stephack Code
if(type == "header-blue") return "<div style='color:#ffffff;font-weight: bold;background-color:#5da2c2;border: 1px solid;box-shadow: 2px 3px 5px 5px #5da2c2'>${myText}</div>"
if(type == "line") return "<hr style='background-color:#5da2c2; height: 1px; border: 0;'>"
if(type == "title") return "<h2 style='color:#5da2c2;font-weight: bold'>${myText}</h2>"
}
def display() {
setVersion()
getHeaderAndFooter()
theName = app.label
if(theName == null || theName == "") theName = "New Child App"
section (getFormat("title", "${state.name} (${theName})")) {
paragraph "${state.headerMessage}"
paragraph getFormat("line")
}
}
def display2() {
section() {
paragraph getFormat("line")
paragraph "<div style='color:#5da2c2;text-align:center;font-size:20px;font-weight:bold'>${state.name} - ${state.version}</div>"
paragraph "${state.footerMessage}"
}
}
def getHeaderAndFooter() {
if(logEnable) log.debug "In getHeaderAndFooter (${state.version})"
def params = [
timeout: 30
]
try {
def result = null
httpGet(params) { resp ->
state.headerMessage = resp.data.headerMessage
state.footerMessage = resp.data.footerMessage
}
if(logEnable) log.debug "In getHeaderAndFooter - headerMessage: ${state.headerMessage}"
if(logEnable) log.debug "In getHeaderAndFooter - footerMessage: ${state.footerMessage}"
}
catch (e) {
state.headerMessage = "<div style='color:#5da2c2'>@Angus_M Apps and Drivers</div>"
state.footerMessage = "<div style='color:#5da2c2;text-align:center'>Angus Marshall<br><a href='https://paypal.me/angusmarshall' target='_blank'><img src='https://www.paypalobjects.com/webstatic/mktg/logo/pp_cc_mark_37x23.jpg' border='0' alt='PayPal Logo'><br>Paypal contributions welcome!</a></div>"
}
}
Tip: I've found it best to set up the virtual motion sensors with an auto timeout - of, say, 30 seconds. tinyCam will continue to monitor for motion/objects and will retrigger every 30 seconds as needed. This means you can sit in a room, as an example use case, without moving and have the virtual motion sensor retrigger your lights as the AI finds a "person" or "face" (eg. in your rule, add the virtual motion sensor(s) to cancel auto-off lighting). It works!
(Please note I'm learning on this and by no means a coder, so proceed with caution and any feedback is very welcome  )
)
Enjoy!

 etc)
etc)