Yea, this isn't an issue, some of these types of delays are handled by the device, some are completed using delayBetween, delayBetween is handeled directly in the hub command queues, so neither of these count against your limits.
Using pause in a driver or an app will count against your 120 second run time.
To be honest, there shouldn't be any need to use pause in an app or driver anyway, when you have runin.
now that you brought it up ![]() …
…
… originally rooms didnt use any pausing between issuing setlevel and off commands. what would happen is when there were a group of 2 or more lights … sometimes either the setlevel or the off command would be missed.
introducing a 10 ms pause between issuing those commands fixed the issue. maybe a zigbee network issue more than a HE issue though.
but i have never used long pauses like more than a few ms … thats when i use runin.
another question: while there is a long running set level if a new command is issued to the device … does that:
- execute the new command and cancel the set level?
- execute the new command and continue the set level?
- the new command is put in the device queue and waits for the set level to complete first?
thank you.
The second command will cancel the first on the device, that's what I have observed anyway.
I beleive that's what the spec says it should do as well.
In this situation, its possible we may receive to level reports, one of which could be an intermediate value.
Thanks for all the insight all, and thanks mike for making the best of a rather unique bulb. @SmartHomePrimer - that is amazing that it can be controlled from an in-wall dimmer, and it just so happens I have mine on a GE dimmer. Automating the on/off of the dimmer incredibly turns this sow's ear into a silk road. 
My goal for this bulb was to use it in combination with andyhawk's circadian lighting piston in a central stairwell to just light the way temporarily as people pass by. 3 different motion sensors fade it on while going up/down the steps, and it fades off about 30 seconds after motion stops. The circadian piston sets the dynamic light level at the bulb, as well as the color temperature throughout the day.
I discovered a better way to do this in case not everyone can put them on an in-wall dimmer.
Use HE's Groups app. Put the Sengled Plus bulbs in as a single group. Then use the group device instead. This allows you to use setLevel 0% = Off. The group device will show an Off state, while the individual bulb device state will appear unchanged. Then just use the group device for all automations.
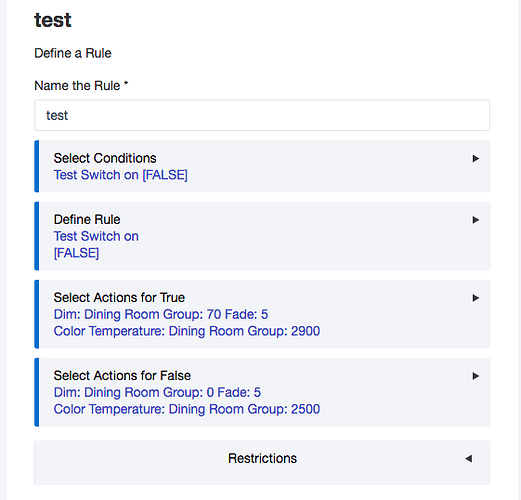
I'm not able to get the lights to follow the same smooth dimming I get when I use my individual rules that control each bulb vs control via a group. When I use the group, they just jump on to 70% and jump to OFF. I don't get a slow fade up and down.
You are using setLevel and not on/off?
yes - Set level 70, fade 5, same as my rules. Also tried fade 25, but result was unchanged.
That's very strange. I can click setlevel with 100, and, providing the bulbs are in the On state at 0%, they will dim up smoothly to 100%
Do you have any rules that might be interfering?
Only rules tied to those bulbs are two I posted above. They wouldn't interfere because they won't be true if the virtual switches are not triggered.
Maybe you have a newer revision to the bulb than I have? Mine won't get updated because I don't have a Sengled bridge, and it could also be a difference in the build components between our bulbs.
Could be. Is there a way to view this info? I do not have a Sengled controller.
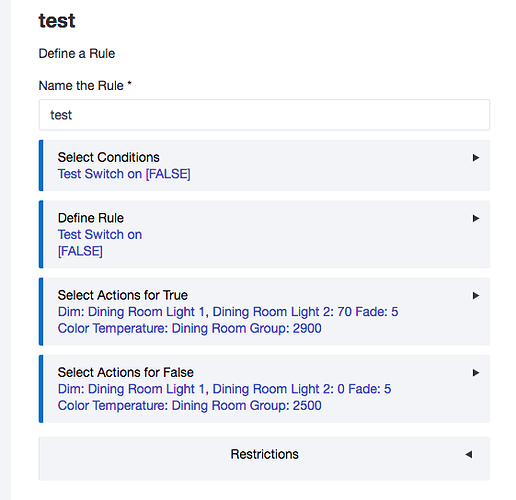
Turns out the issue was that I wasn't defining the color temperature, which I did do in my previous rules. When I do that it works, but the groups seems to address one bulb and then the other, so they don't dim up and down together.
However, when I assigned the dim level to both bulbs instead of a group (as I had done in my previous rules) they dim evenly together.
While it is possible to control them on and off (with smooth dimming) in a single rule by triggering a virtual switch, in messing around with this again, I remembered why I chose to split up the rules. If my wife turns on the lamps by turning the dimmer off and then on again (it's a Lutron auto fade up/down dimmer) then in order to turn the lights off via Alexa or Pico, she would then need to ask Alexa to turn the lights on and then turn them off or cycle them on and then off from the Pico. When these bulb were controlled outside of Hubitat via a conventional dimmer, their state will not match the virtual switch. Separating the rules means we only need to ask Alexa to turn the light off or press the off button on the Pico, and no matter what the current state is in Hubitat, they will turn off.
Strange, two of mine come on together, and the third a second later. Same behavior with groups or singles. I wonder if they are paired to two different repeaters.
They are oddball bulbs, that's for sure.
How did you end up adding the lights? I tried added 'Generic Zigbee Bulb' but no sure what device network id will be?
I have 4 downlights and the sengled hub.
If you have these bulbs currently 'paired' to the Sengled Hub, you will first need to remove/un-pair them from the Sengled Hub. Afterwards, you will no longer need the Sengled Hub and the Sengled App on your phone will become useless.
Only then, will Hubitat be able to discover these bulbs. If needed, you can also manually reset the Sengled Bulbs by turning power to the bulbs on and off ~8 times. Check the Sengled web site for details on resetting these bulbs.
You do NOT ever need to manually set a Device Network ID (DNI) for Zigbee or Z-Wave devices. When these devices are 'discovered' and 'paired' with the hub, their DNI will be set.
there is one other potential here. there is a
startLevelChangecommand for these drivers. this currently only accept an enum …'up'or'down'. if you can convince @mike.maxwell to add another parameterdurationand handle the level change up or down over that duration … then this command would do exactly what you want.
Can you explain what this command does? I am able to achieve a smoother transition using startLevelChange, but I am unsure how to use it in a RM automation. Is this the same as "Adjust level" ?
I don't believe these commands have been added to our built in apps yet.
So to use them currently you'll need to create three custom commands
startLevelChange("up")
startLevelChange("down")
and stopLevelChange()
As an Example in BC using a two button controller you would then implement the following:
button 1 pushed [light xyz] on
button 1 held [light xyz] startLevelChange("up")
button 1 released [light xyz] stopLevelChange()
for button 2 you go the other direction
button 1 pushed [light xyz] off
button 1 held [light xyz] startLevelChange("down")
button 1 released [light xyz] stopLevelChange()


