As far as I know, this one only operates on 802.11 b/g/n wifi. So it's a completely different monster than anything ZigBee based, and I'd expect only works with Xiaomi's (Chinese-language-only) app. Probably way outside my realm of knowledge on how to get it cooperating with the Hubitat in any manner.
I just saw this, this AM.
Perhaps it can be ported over....
1 Like
If it could I would buy a couple of them now! 
Harmony hubs are too expensive here (UK) to buy loads of them
Zapals lists the Xiaomi IR Remote for $12.50 US:
I am going to order one. Probably will take some weeks to arrive.
EDIT: Use code honeyza08 for $1 off.
NOTE: The KuKu Mi SmartThings device handler requires a Docker Daemon app to run continuously on a computer on your local network. Of course that computer must always be on.
I think Xiaomi is great for cost sensitive smart home stuff. I wouldn’t use it as a professional installer or really trust long term reliability but for setting up budget friendly systems it seems good enough. I also buy 3 if I need 2 just in case one is defective. 
1 Like
[RELEASE] v0.2 of Xiaomi Aqara Button (model WXKG11LM) Device Driver
Created by @brianspranger - thanks!!
EDIT: PLEASE NOTE THIS DEVICE HANDLER HAS SINCE BEEN UPDATED
Please see this post for more information.
For convenience please copy the driver code from this direct link.
The Aqara model WXKG11LM button is different from the Xiaomi “original” Button in that no message is sent when the button is released. However it does support multi-clicks up to a quadruple-click. So when set to Momentary mode in the preference settings, @brianspranger has included a countdown timer that, after a user-set delay, will automatically send a pushed - button 0 event to emulate a button “released” event. This should theoretically be usable in WebCoRE to capture single-clicks.
Here’s a chart of what happens with each kind button press:
Aqara Button model WXKG11LM
| Action | Hubitat button event(s) |
|---|---|
| Single click | button 1 pushed , then button 0 pushed after user-set delay |
| Double-click | button 2 pushed
|
| Triple-click | button 3 pushed
|
| Quadruple-click | button 4 pushed
|
| Hold | Not supported (same behavior as single-click) |
Other Features:
- The Hubitat hub should correctly select this custom device driver when pairing.
The date/time of the most recent opening of the contact is stored aslastPressed(human readable) andlastPressedDate(java format).- Battery replacement date tracking, stored in
batteryLastReplacedstate - Commands / Preferences include:
• A preference to set how many seconds until single press is cleared with abutton 0“released” event
•A Toggle / Momentary mode setting
• A Reset Battery Replaced Date command to track battery life
•Date / 24-hour clock settings for display oflastCheckin
• Min/Max voltage values used to calculate the battery percentage
• Display log message toggle setting. EDIT: in newest version of device handler there are two toggles settings for display ofinformational and/ordebuglog messages
Notes / Limitations:
- This device driver is not final, and some features or preferences may be added / removed
-
There is a new version of the Aqara Button (model WXKG12LM) with more features which was released late last year. Currently this device driver will not work with it. I have ordered a couple of the new Aqara button model and plan to update this driver after they arrive.
EDIT: The device driver has been updated with support for model WXKG12LM
2 Likes
Thnanks for all your work on the driver! I’m really grateful to know that the 11LM version supports multi-tap. Are you just listening to single press events and using the minimum timer simulate this or does the button send a unique value for each press type?
Additionally, what event gets fired off for each button press? I’m aiming to use this w/ the event -> mqtt bridge: hubitat-mqtt-bridge/hubitat-mqtt-bridge-app.groovy at master · jeubanks/hubitat-mqtt-bridge · GitHub and i’m wondering what additional capabilities/events that app needs to listen for to catch events from the button?
@brianspranger came up with this latest device driver, but as I've looked at his code I can tell you that the hardware natively supports multi-taps with unique messages for 2, 3, & 4 multi-taps.
Exactly what I posted above. All events are name: 'pushed' with value: button #
Looking at that code - it appears that the capability / subscription for button events may be incorrect. The author should refer to this forum thread about Hubitat's button capability implementation. Note that they plan to modify this implementation in future, so watch for any announcements on that.
Thanks for the ref to the Button implementation! I’ll start digging…
Thanks for your work on porting all of these! And thanks to Hubitat for modifying their ZigBee stack to, apparently, now work with these devices (haven’t had any fall off since that update).
With regard to the buttons, has anyone figured out how to use them? Neither the unofficial Hubitat port of webCoRE nor Rule Machine seem to work with them: if there’s a “button” capability in RM, I can’t find it, and these don’t show up as buttons at all in webCoRE. (I’m using one as a doorbell and want LANnouncer to chime and speak, so there are probably other ways to do this, which I would also be interested in, but I don’t want to hijack this thread for my specific use and am just curious in general if/how people are able to actually use these.)
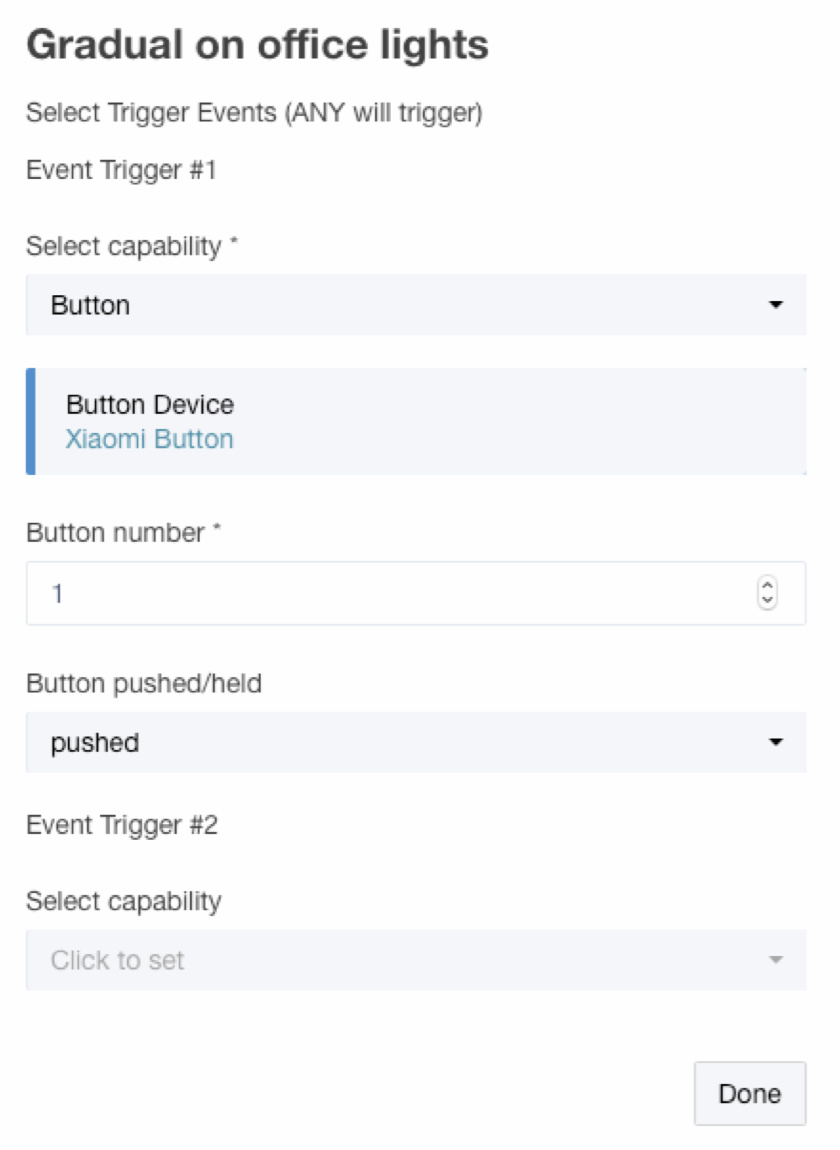
I only have an "original" (round) Xiaomi Button, and it's working just fine in both Rule Machine and also Button Controller. Here's where I see it available in Rule Machine, when I'm in the Select Tigger Events menu:
As for WebCoRE - keeping in mind that it is not "officially" working on Hubitat yet - I don't use it personally, but @ajayjohnm confirmed that the latest beta of the "original" Xiaomi Button device driver is working for him in WebCoRE, and so I've pushed that new beta version through on GitHub so it can be copied from the link for the "original" Xiaomi Button device driver code (found up in the very first post of this thread.)
The Xiaomi Aqara Button device driver was just finished by @brianspranger, and although I don't have one of them, it should also work just great with Rule Machine, WebCoRE, etc.
Does that help?
This isn’t pretty but it works for a button trigger in WebCoRE; pushed and buttonPressed will show up for the Xiaomi button; here is an example for triggering off of button ‘2’ (a double click):
if
Xiaomi Button 1’s pushed is equal to 2
and
Xiaomi Button 1’s buttonPressed changes
then…
It does make sense, and that's what I'd expect, but I don't have "Button" as a capability in Rule Machine at all:

I do in webCoRE, but neither my square nor round buttons show up (but a different button does). This isn't as surprising to me since I know Hubitat's button model is different from ST's and I'm not sure what this unofficial webCoRE fork supports. Maybe I should ask support about my Rule Machine problem, however, unless I'm missing something obvious. (I should add that I'm using the latest drivers I can find on Github.)
Hubitat implements buttons differently from ST...
Since @brianspranger discovered that a pushed - button 0 event is valid, I realize I could yet again rework the "original" Xiaomi Button driver to use button 0 as a "released" state that always happens when the button is released or immediately after a multi-click. Would that be a "prettier" way of doing it for WebCoRE use?
Maybe @ajayjohnm could chime in here, because my latest code revision is working for him. I really need to get WebCoRE installed to fully understand the interaction because it's clearly not the same as what Rule Machine, Button Controller, and other apps are using for button events.
Yes, it seems you are missing something. ![]() You cannot use a button as a
You cannot use a button as a Condition in Rule Machine. You need to use it as a Trigger Event (as seen in my above screenshot.) Let us know if that works for you.
Oh, sweet baby clam juice, I just don’t know how to use Rule Machine.  Thanks for catching my mistake! (I never used RM on ST because CoRE and very soon webCoRE was “the thing” by the time I got tired of writing custom SmartApps every time, so you’ll have to excuse my new-ness to RM here.) Thanks!
Sorry if I wasn’t clear, it is working for me in WebCoRE. The Xiaomi button does show up (it does need to be added to the ‘enabled devices’ list in the WebCoRE app on Hubitat, but that is expected). I’m fine with the driver as is; now that I’ve worked out which states change and which are static between button presses it’s easy to use with WebCoRE as it is currently implemented.
I have to say this driver works really well with the Xiaomi button on Hubitat. I still have yet to experience a single missed click, unlike every other button device I’ve used with ST (including the minimote and the Xiaomis I’ve used on ST). It never seems to require a redundant wakeup click no matter how long its been since I’ve last used it. If I can manage to change the battery without destroying the device when it eventually wears out , it will have been the best $6 I smart thing I ever purchased.
2 Likes
Since @brianspranger discovered that a
pushed - button 0event is valid, I realize I could yet again rework the “original” Xiaomi Button driver to usebutton 0as a “released” state that always happens when the button is released or immediately after a multi-click. Would that be a “prettier” way of doing it for WebCoRE use?
@veeceeoh I think that would be a more cleaner way of reporting clicks, but I also have doubts on whether it would continue to be possible to use all the events that you opened up for us, once the pushed value starts getting reset to 0. I think some testing would be needed there and I'd be glad to help.
Maybe @ajayjohnm could chime in here, because my latest code revision is working for him. I really need to get WebCoRE installed to fully understand the interaction because it’s clearly not the same as what Rule Machine, Button Controller, and other apps are using for button events.
@bertabcd1234 In webCoRE, buttons only show up in the 'Holdable Buttons', 'Sensors' and 'Battery Powered Devices' sections. If you are currently looking into the 'Buttons' section of the Available Devices menu, then you won't see your button there.
As for using button clicks as triggers, you always need to use a combination of conditions to pin-point what action took place. For e.g. to use a single button click trigger, use...
If buttonReleased changes
and
If buttonHeld did not change
and
If pushed = 1
Lastly, @veeceeoh, if you want to get started with webCoRE, @ogiewon has done all of us a big favor and posted all the fixes and modifications needed to the webCoRE code, to make it run on Hubitat,
1 Like
In that case, I think I'll wait until I get webCoRE set up on my Hubitat, and then do some testing myself. I've been keeping tabs on the thread with all the fixes needed to get it working, so I'll start with that, thanks!
1 Like
[RELEASE] v0.5 of Xiaomi Aqara Smart Dual Button Light Switch Device Driver
(Only for the wireless 2 button model WXKG02LM)
This device driver was crafted by @gn0st1c (on Github - not sure of his username on here!)
For convenience please copy the driver code from this direct link.
The Aqara Smart Dual Button Light Switch model WXKG02LM is a battery-powered, wall-surface two-button ZigBee device. The hardware supports unique messages for pressing the left button, right button, and both buttons at the same time, but does not have momentary ("hold") or multi-click support.
Here's what it looks like: 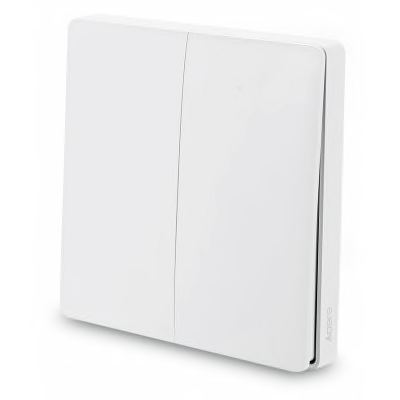
And here's what happens with each kind button press:
| Type of press | Button Event(s) |
|---|---|
| Left button press | button 1 |
| Right button press | button 2 |
| Both pressed | button 3 |
| Multi-click | Not supported* |
| Hold | Not supported (same behavior as single press) |
*Note: a 6-press multi-click appears to generate a status message resulting in the battery voltage being updated
Other Features:
- The date/time of the most recent button is sent as a
lastPressed(human readable) andlastPressedDate(java format) which should help with WebCoRE use - Battery replacement date tracking, stored in
batteryLastReplacedstate - Commands / Preferences include:
• A Reset Battery Replaced Date command to track battery life
• Date / 24-hour clock settings for display oflastCheckin
• Min/Max voltage values used to calculate the battery percentage
• Display log message toggle setting
Notes / Limitations:
- I have had great difficulty pairing this device, and the pairing initialization process has only completed twice out of dozens of attempts. However, there are a couple of ways I have found it can be added "manually". Please see the special pairing instructions below.
- This device driver is not final, and some features or preferences may be added / removed
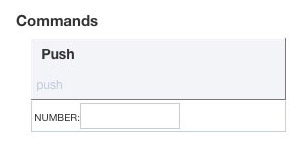
- When viewing the device details page in the Hubitat web interface, there is a push command which is not used in this driver, so clicking it has no effect. Here's what it looks like:
Special Pairing Instructions:
- In your web browser, open up two tabs, one displaying your Hubitat's Device list, and the other with the ZigBee Logging page (in Settings --> Zigbee Information --> Zigbee Logging)
- Start "Discover Devices" in the tab with your Hubitat's Device list.
- Hold down either button of the Xiaomi Smart Light Switch, until the LED flashes.
- The LED will flash, then a pause, and either flash consecutively 3 times, or flash once. Unlike all other Xiaomi devices, a single flash seems to indicate a successful connection. Either way, the best way to know is by then short-pressing either button. If the LED flashes just once as you press a button, then it's connected, but if it flashes twice, then go back to step 3 (hold a button until LED flashes).
- In the Device page, when the Hubitat recognizes the switch, it will display its Zigbee ID. Make sure to copy or write down this ID.
- In the ZigBee Logging page, look for log entries that start with a 4-digit hexadecimal number. It will also list that hexadecimal number above the log entries as well. The way to be sure you've got the right number is that log entries should be added if you press a button. Copy or write down this number also.
- Back in the Device page, if the switch hasn't finished initializing, there are two things to try:
- Click the Add Virtual Device button, but don't enter in any information. Just click the << Device List link near the top. If you're lucky, the hub secretly added the switch to your device list. In my case it was recognized as a Xiaomi Temperature Humidity Sensor. If you do see a new device, then view its Device Details by clicking on its name in the left column. Then you can change the device Type to "Xiaomi Aqara Dual Button Light Switch" using the pop-up list in the lower right corner of the page. Click the save button on the lower right, and then the switch can be used.
- If the hub didn't secretly add the switch to your device list, you can add it manually. Go back to the Device List page, and click the Add Virtual Device button. Enter a name for the switch, the Zigbee ID you wrote down, and type the hexadecimal number into the Device Network Id field. Finally select the device Type: "Xiaomi Aqara Dual Button Light Switch", and click the save button to add the switch to your devices list.
- Whew! You did it! I can post screenshots if people hae trouble with this.
2 Likes

