I didn’t realize that this button supported multi-click too and that ST was the culprit there.
I am glad that you are considering these minor user experience related aspects around holding the button and getting immediate feedback.
Given the amount of thought and effort you are putting in and considering that the Xiaomi devices are working quite well with Hubitat now, you might have just made the prospect of buying these cheap sensors a lot more attractive!
BTW, your newly release contact sensor handler also works perfectly! The lastopen timestamp is a nice and useful addition. Thanks again!
Only if the dropped connection issue can be resolved, of course. It would be really great, because these contact sensors are a no-brainer at $7-9 each.
Actually the lastOpen state was already in the bspranger/Xiaomi SmartThings device handlers, but thanks.
A bit of an update on my findings with the "original" Door/Window contact sensors maintaining a connection.
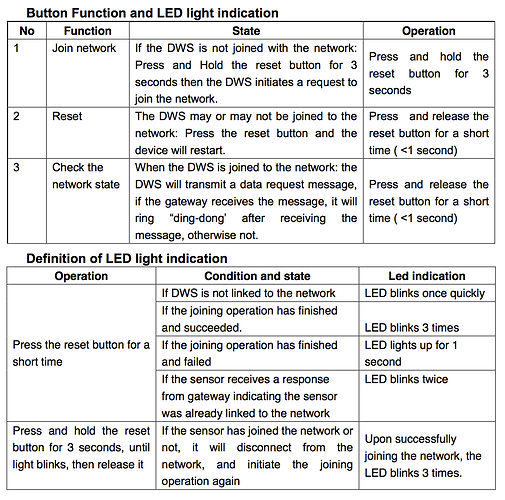
One of mine stayed connected for over an hour, and dutifully reported open/close events, but I saw no battery reports. When I short-pressed its reset button (which is supposed to "check the network state" according to Xiaomi, as seen below), it immediately dropped its connection after sending a "status message".) Only after going through the reset button LONG-press steps I outlined above did the report with battery information arrive.
My guess is there's some kind of authentication or negotiation step that needs to happen, centering around the status message that contains the battery data. That information isn't given in the Hubitat logs or elsewhere, so I'd need to get a ZigBee sniffer device to see exactly what's happening.
I found this some time ago and haven't shared it here on the Hubitat forumes yet, but this is Xiaomi's explanation of the functions of the reset button and meaning of the LED flashes when the reset button is long-/short-pushed in different situations:
Nearly all Xiaomi sensors follow these same behaviors, or are very similar.
[RELEASE] v0.5 of Xiaomi Aqara Leak sensor Device Driver
For convenience please copy the device driver code from this direct link.
Features:
The Hubitat hub should correctly select this custom device driver when paired.
The date/time of the most recent detection of water is stored as lastWet (human readable) and lastWetDate (java format).
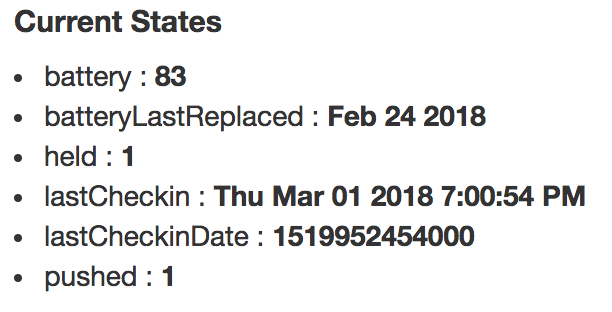
The date/time of the most recent report of any kind is stored as lastCheckin (human readable) and lastCheckinDate (java format). This may be useful in determining whether the sensor is still connected, since a status report including battery voltage is sent every 50-60 minutes.
Battery replacement date tracking, stored in batteryLastReplaced state
Commands / Preferences include:
• A Reset Battery Replaced Date command to track battery life
• Reset To Dry & Reset to Wet commands to manually override an wet / dry event
• Date / 24-hour clock settings for display of lastCheckin
• Min/Max voltage values used to calculate the battery percentage
Notes:
This device driver is not final, and some features or preferences may be added / removed
The Aqara Leak sensor is like the Aqara Door/Window sensor in that you do not have to wait 50 minutes for the first battery report. After it is paired, just short-press the top of the sensor, and the battery level will be reported.
Special Pairing Instructions
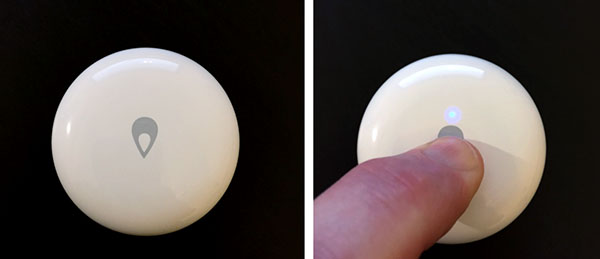
The Aqara Leak sensor is (supposedly) watertight, so there is no hole or reset button. The reset button is just underneath the center of the top shell of the sensor itself. When pairing, I recommend orientating the droplet icon upside-down to view the LED more easily, like this:
The pairing for the Leak sensor works a little differently from all the others:
To put in pairing mode, hold down the center of the top of the sensor.
Release when the LED flashes. After a pause, the LED will flash again.
If you see 3 quick flashes continue with the next step. Otherwise, start over at step 1.
Repeatedly short-press the top of the sensor to keep it awake during initialization.
You can stop short-pressing when it appears on screen ready to rename.
[ANNOUNCEMENT] Progress towards resolving the dropped connection issue!
Earlier today, Hub update 698 was announced, which lists “Upgrades to Zigbee functionality” as one of the improvements.
I applied the update, deleted and re-paired over a dozen of my Xiaomi devices to see if they would maintain their connection to my Hubitat hub.
I am pleased to report that all of my Temp/Humidity sensors (both models) made it past the 60-minute mark and sent their “status” reports that include the battery data for the device driver to generate a battery level event! That’s the longest I’ve seen them stay connected, and the first time I’ve seen a battery report without having to reconnect them.
Meanwhile, my “Original” & Aqara Door/Window contact sensors, Aqara Leak sensor, Aqara Motion sensor, “Original” button, and 2-panel wall-mount switch have remained connected for more than 60 minutes, still sending reports, but just not the “status” report with the battery data, unfortunately. I’m going to leave everything just as it is overnight and see if they’re still connected and reporting.
Either way, this is great news and some real progress towards resolving the connectivity issues with the previous hub version. Hats off to the engineers!
UPDATE:
After the two hour mark from pairing, ALL of my Xioami devices were sending “status reports” which is evidenced by battery level events every 50 minutes for Aqara models and 60 minutes for the Xiaomi “original” models. They’ve all been connected for 12 hours now, which is great!
[WORK IN PROGRESS] Xiaomi "Original" (round) Button - Seeking feedback
So I've done a bunch of testing with the Xiaomi round button, and I’m hoping to get other user’s input on what they’d like from the device driver before I sit down to complete it.
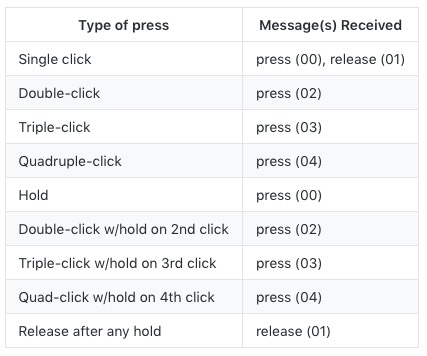
This is because the button’s hardware supports multi-clicks, and sends unique messages for double to quadruple-clicks.
Here's a handy chart (with some oversimplification of the messages received):
Observations during testing
None of the multi-clicks return the "release (01)" message unless the button is held down on the last click
If the button is multi-clicked too slowly then the "release (01)" message is not sent between clicks, only once, after the last click. For example, if I Quadruple-click slowly, I see four consecutive "press (00)" messages followed by a single "release (01)" message. This behavior is something that users will have to be aware of, and discover for themselves what the best speed is for multi-clicks to be properly registered.
Here's the catch, though: The button capability is handled differently on the Hubitat than in SmartThings, as explained in this forum thread. Capabilities are what shows up in apps (like Rule Machine) for a particular device that allows things to happen when the device's state changes in the capability.
For buttons, there are three options to work with:
Capability PushableButton, with the state name pushed, and a numerical state value for the button number
Capability HoldableButton, with the state name held, and a numerical state value for the button number
Capability DoubleTapableButton, with the name doubleTapped, and a numerical state value for the button number
Although there isn't a named state released, the "release (01)" message from the button could still be used, for example, with a timer as a way to decide whether the button press should be considered pushed (a 'click' as called in my above table) or held, so that an app can take different actions based on either of those.
So, what I need to decide is how best to map the different behaviors from my chart above to the three available states (keeping in mind each button number value can correspond to a different action). Then I can finish work on the round Xiaomi "original" button device driver.
Any feedback or thoughts would be greatly appreciated.
Can you just set it up as a virtual 4 button-button? So button 1 = one click, button 2 = double click, button 3 - triple etc.
Then for the hold, set a variable for the clicks, then output the hold to that button equivalent? IE if you click 3 and hold the last, it’ll count the 3 clicks, put to a variable, then read the (01) and output the hold3? Does that make sense?
Yes, that was my first thought. But then there's potential for user confusion.
There's no way to know if the button was held or just clicked until the "release (01)" message is received, and multi-clicks without hold never generate that "release (01)" message like the single click does.
This means a countdown timer (using runIn() in Groovy) is needed to decide whether the button was held or not. So when a "press(xx)" message is received, the countdown timer is started. Meanwhile, if a "release(01)" message is received, a button released flag is set. When the countdown timer is finished, it checks if the button released flag is set, and if it's not set, then the driver sets the "held" state for the button number that corresponds to the number of clicks.
This can be a user-set preference, of course, but what messes things up is if the button is clicked or multi-clicked several times before the countdown timer is finished. I can imagine people complaining and being confused about the strange behavior that would occur in this situation, and there wouldn't be any way to change it that I can think of.
So as long as people stick to clicking or holding the button within the countdown delay they have set, then it should (in theory) work properly. Call it a limitation of what would be a very multi-functional button driver, I guess.
The other option is to have a settings switch for complex and simple. The simple only allows hold on single click. The complex has the multiclick + hold for advanced users.
[BETA] v0.5b of Xiaomi “Original” (round) Button Device Driver
For convenience please copy the beta round button driver code from this direct link.
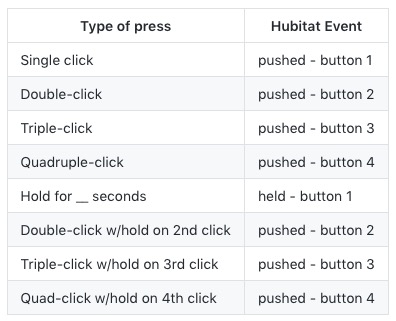
So I realized that a "hold" feature is only possible for single press, because normal multi-clicks are not immediately followed by a "release" message from the button. That mean's there's no way for the code to know whether the button is being held on the last press of a multi-click.
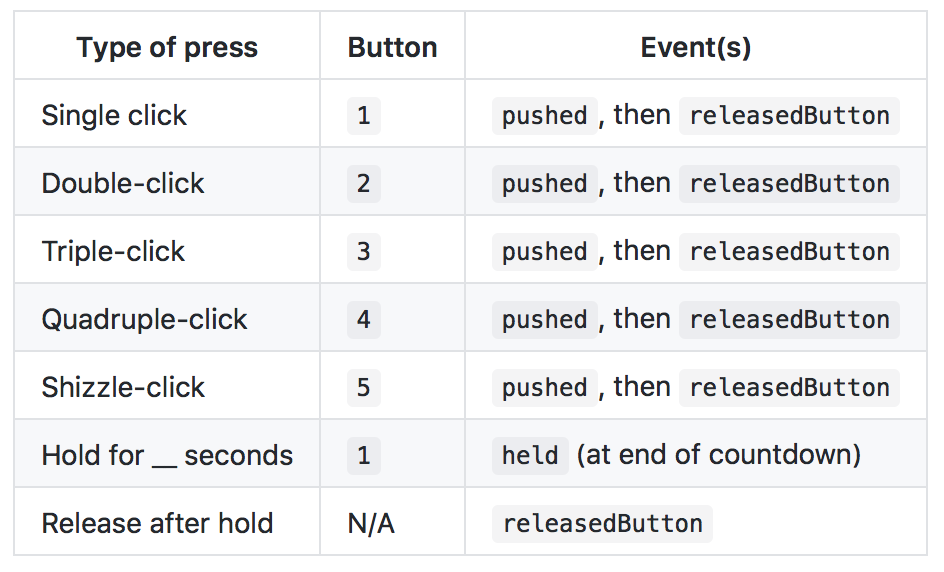
Here's a chart of what happens with each kind button press: EDIT: Multi-click over 4 --> pushed - button 5(Added in v0.6b)
("click" means press & release quickly, same as computer mouse)
Other Features:
The Hubitat hub should correctly select this custom device driver when pairing.
The date/time of the most recent opening of the contact is stored as lastopen (human readable) and lastOpenDate (java format).
Battery replacement date tracking, stored in batteryLastReplaced state
Commands / Preferences include:
• A preference to set how many seconds to wait until "held" event is sent
• A Reset Battery Replaced Date command to track battery life
• Date / 24-hour clock settings for display of lastCheckin
• Min/Max voltage values used to calculate the battery percentage
Notes / Limitations:
This device driver is BETA, so some aspects of the driver may not work, and some features or preferences may be added / removed
I am hoping people can test this device driver in use with Rule Machine and some switchable devices such as lights, to give feedback on the responsiveness and reliability of the driver in normal use conditions.
Possible enhancement
Since the button generates a released message after a held button is released, if anyone believes it could be useful to link that to a Hubitat event, I could add that to the code. Options include linking the release to doubleTapped - button 1, or pushed - button 5, as a couple of examples.
That’s good news, looking forward to trying this out later tonight! My button has remained connected; reporting hourly for several days now, even reconnecting after the hub had been power cycled for some equipment re-arranging.
I installed this and find it to be working great so far. Buttons register the expected click action reliably; great to see battery % and voltage appear in the log instead of hex numbers.
I set up a couple of buttons with a half dozen Simple Lighting rules to support a button mounted at each of the sliding doors at the ends of my deck; I set it up so that a single click toggles the nearest outside light, a double click turns off both near and far lights, and triple click turns on both lights. Easy to remember and convenient to use.
I verified that Rule Machine works for triggers; but its only toggle function “Toggle Dimmer” is not useful for me. This isn’t a fault of the driver (“Toggle Dimmer” only turns on my GE Z-Wave dimmer but won’t turn it off; I suspect this is another Lutron-only supported feature).
Thank you for this. Its great to have support for a button that looks good on the wall and has great tactile feedback; multi-click support is a welcome bonus.
Thank you for reporting back on how the driver's working for you. I will have a chance to do some investigating into using Rule Machine or another App to set up toggle actions for dimmers, since I have a few (including the GE Z-Wave Plus Dimmer) myself.
On a slightly-related note, I have just learned that there is now an "upgraded" model of the Aqara button, which has four functions: click, double-click, hold/release, and shake. The model number on the box and back of the button itself is WXKG12LM. It's so new that it will be difficult to ensure that is the model being shipped when buying from direct-from-China resellers like GearBest, etc. I am going to try to secure a couple because the messages they send are completely different and it will need a separate device driver.
[UPDATE] v0.6b of Xiaomi “Original” (round) Button Device Driver
For convenience please copy the updated beta round button driver code from this direct link.
New Feature!
I discovered the button sends the hub one additional type of unique message for any multi-click over 4. So for any multi-click of 5 times or greater, a pushed - button 6 event is sent. I am calling this the “shizzle-click.” This is definitely my 7 year-old daughter’s favorite type of multi-click.
Other Changes
Added code to handle Push and Hold commands (part of the current implementation of the PushableButton and HoldableButton capabilities). The commands won’t do anything, however, because this button is non-controllable. See my note below for more information.
Added required numberOfButtons event to be sent to the hub when the button is paired, configured, or updated (i.e., when preferences are saved). This lets Apps know how many buttons are available to use.
Added a preference setting to toggle the display of debug log messages, with a default of OFF.
Notes:
Although the current Hubitat button implementation automatically adds commands that allow a button to be controlled, the Push and Hold commands aren’t used by this device driver, because the Xiaomi “Original” button is only a trigger (actuator) device, and cannot be controlled. Please make sure not to select the Xiaomi “Original” button as a “controllable” device in any App as nothing will happen. It should only be used as a “trigger” device. As I understand it, the Push and Hold commands for physical buttons will be changed or removed in a future update of the Hubitat button implementation.
Just because this device driver maps different types of clicks to 5 different button trigger events doesn’t mean they all must be used. Any type of press / multi-click to mapped buttons that are not used by any App are simply ignored.
I have tested this Device Handler with both Rule Machine and also the Button Controllers App. Everything is working as expected, and simple toggle or on/off switch actions based on different button press/click types are very responsive. I am leaving the beta status on this device driver for another week or so, hopefully to get more user feedback, and finalize the code.
I haven’t updated to the latest version of your button code yet, but until now it has worked perfectly via Rule Machine. Thanks a ton!
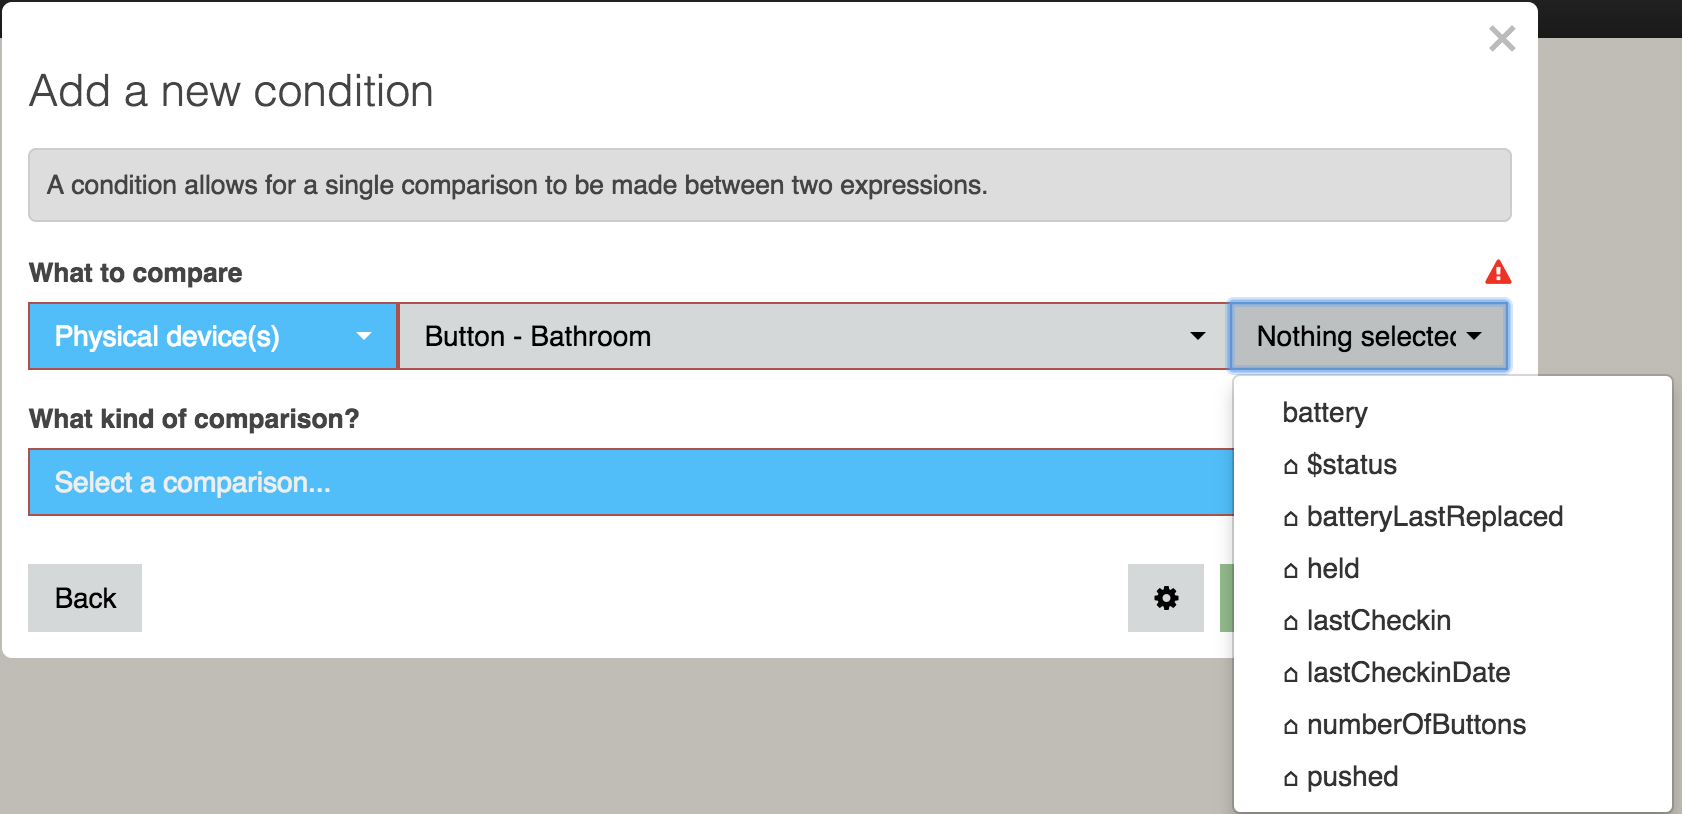
There is just one issue though, I somehow couldn’t get the device to show the right attributes on webCoRE.
I am not sure if this is an issue with the driver or the way Hubitat implements buttons. The button is only shown under the Holdable Buttons list on the page where I select devices to make visible to webCoRE.
On the webCoRE piston edit page, I just can’t seem to be able to use a button press event because the event generated is an attribute called ‘pressed’ whose value could be 1, 2, 3, 4, 5 or 80 depending on how many presses were made. Now this value does not change after the press and remains the same until a different number of presses are made the next time. There is no ‘lastPressed’ attribute either.
Am unsure if I am doing something wrong or if this is an incompatibility with webCoRE since RM handles button presses well. Could you please guide me on what could be going wrong?
Very likely the latter. And we're talking about webCoRE running on Hubitat, right? All the issues of porting it over haven't been worked out, from what I've read here in the forums.
I don't use webCoRE myself, but there can't be any attribute or event named pressed because there's nothing in the code with that name. Did you mean pushed?
The value of 80 is strange because that corresponds to what I named the sizzle-click, a multi-click of over 4. The device driver is supposed to change that 80 to 5, the button number assigned to that type of click. But really, I think the issue has to do with the difference in the Habitat button implementation. SmartThings expects a button event with a value of pushed or held while the Hubitat expects a pushed or held event with a value corresponding to the button number. I would have to attempt installing webCoRE on my Hubitat to find out how to get that implementation working.
As for lastPressed, I removed it, unaware that it's needed or useful for webCoRE. How does it get used?
I can certainly put lastPressed back in, but I need to know in the case when the button is held, whether a lastPressed date/time event should happen at the start of holding the button, or when the button has been held long enough to match the user set countdown.
For example, in the native Hubitat system, using the Rule Machine or Button Controller App, I set up my Button to turn on a group of lights on Button 1 pushed, and to turn them off on Button 1 held. When I click the button once, the device driver immediately generates a pushed event with a value of 1 (for Button #1) because it sees a pressed message from the button followed directly by a "released" message, well before the held countdown timer is finished. But when I hold the button, even though the button sends a "pressed" message, no action is taken until the countdown times finishes, and only then does the device driver generate a held event with a value of 1 . So when the button is held, I could have the device driver either generate the lastPressed when the "pressed" message is received from the button, or at the same time that the device driver generates the held event.
Very likely the latter. And we’re talking about webCoRE running on Hubitat, right? All the issues of porting it over haven’t been worked out, from what I’ve read here in the forums.
Yes, webCoRE running on Hubitat. I realize that all the issues haven't been worked out yet but I do have almost all my other devices and pistons working fine at this point, so I assumed this wouldn't be a related issue.
I don’t use webCoRE myself, but there can’t be any attribute or event named pressed because there’s nothing in the code with that name. Did you mean pushed ?
My apologies, I wrote my earlier message at work only to come back home and realize that the attribute is indeed called 'pushed' as you pointed out.
SmartThings expects a button event with a value of pushed or held while the Hubitat expects a pushed or held event with a value corresponding to the button number.
That might probably be why I find these options missing. Did not know that.
I can certainly put lastPressed back in, but I need to know in the case when the button is held, whether a lastPressed date/time event should happen at the start of holding the button, or when the button has been held long enough to match the user set countdown.
The use-case here is that since for my button press logic, I need some MOMENTARY event that I can use to trigger actions. Unfortunately, the Xiaomi button on Hubitat, currently changes only two attributes from what I can understand... The 'lastCheckIn/lastCheckInDate' and the 'pushed/held' number. Unfortunately, if I press the same button number (say 1 click) in two consecutive instances, even the 'pushed' value remains the same (1). Thus I have no event to track in webCoRE that can help me trigger an action.
The options I can suggest with my limited knowledge of device drivers are...
Make 'pushed' act as a momentary value with the default unpushed state having a value 0 (basically clear the variable)
Have the 'lastpushed/lastpressed' attribute change every time a push is registered, so that that value compounded with the 'pushed' number can be used to trigger actions.
The Aeon minimote, with its native Hubitat driver, doesn’t work with WebCoRE on Hubitat either. No ‘button’ is selectable. I posted that observation a few days ago in the ‘WebCore on Hubitat’ topic; this was Mikes’ reply:
So if the Hubitat minimote driver doesn’t work with WebCoRE, I wouldn’t expect your Xiaomi driver to work either. I think the concept of “WebCoRE is running on Hubitat” is a bit overstated
By momentary event, I assume you mean that webCoRE needs to see both a "pressed" and "released" state. If true, then because the Hubitat button implementation only provides "pushed", "held", and "doubleTapped" events, and does not provide built-in support for a "released" event, the device driver will have to "fake" a released event. The good news is that, based on your screenshot, webCoRE can use the status any kind of event state (e.g., lastPressed, as was used in a4refillpad's button device handler for SmartThings), regardless of whether it's an officially supported one or not.
You're right, this is unfortunate, because all of the Apps I've tried on Hubitat recognize every instance of events, even if the same state is repeated.
Since in the Hubitat button implementation the value corresponds to button number I'm not sure that using button 0 will work or is a good idea. Since other Hubitat Apps don't need a default "released" state, it would be better to use a custom event just for use with webCoRE, whenever it has finally been tweaked work fully with Hubitat.
So since driver already has a built-in held button function, my idea is to add a buttonReleased event state, which will happen when the button is actually released, like this:
Note that I simply won't be able to support a hold at the end of a multi-click, because of the way the hardware itself sends messages in those cases.
So with my implementation, webCoRE could use the releasedButton Event as a way to make a comparison to all of the types of button presses. Just know that for any click types, the releasedButton event would be sent immediately after the pushed event. If that will work, then I'll add that code and we'll take the driver to v0.7b).