[RELEASE] Tasmota Sync - Native and Real-time Synchronization between Hubitat and Tasmota 11 or later

Here is what I did and what I got;

Set Teleperiod to 15 secs
Couldn´t find any line beginning with TSYNC, but here is what I got in the console

And after Log level 3:

BTW, I´m on Tasmota 12.1.0

Looking at the bottom of your 2nd screenshot Tasmota is reporting:
SWITCH1 - 1
POWER - 0
VOLTAGE - 126
CURRENT - 0.000

So the driver is accurately reporting is the data that Tasmota is sending it which tells me that the issue is the Tasmota device. My guess is somewhere in your efforts to tune the WVA parameters something went awry. I'd recheck those and if you can't figure it out do a reset 5 and start over.

See commands - reset.
https://tasmota.github.io/docs/Commands/#management

Thanks for your help.

Will do so, and see how it comes.

Edit:
Solved!

Here is what was wrong on my side;
VoltageSet=126 (Ok)
PowerSet=45 (Ok) (I´m using a 50W bulb, and using what is shown on the Kill-a-Watt)
CurrentSet=0.36 (WRONG!)

I´ve should have used the value shown by my Kill-a-Watt, and then MULTIPLIED by 1000!

So the right value should have been;
CurrentSet=360 (MilliAmps, and NOT Amps)

Thank you very much Gary for your help and your great drivers!

1 Like

Regarding this other "error" reported by me (Missing "in Use By" information), I just want to express that I suspect that this was NOT an error by the code, but an error by me. Maybe I was referring to the wrong device! (the original one, and not the new one created according to Gary´s instructions)

Big thanks!!!

I have released a new version of the sensor driver, call the Universal Multi Sensor. You can read more about it here
It's a pretty big upgrade in terms of capabilities. Please read the docs referenced in the other thread before posting issues.

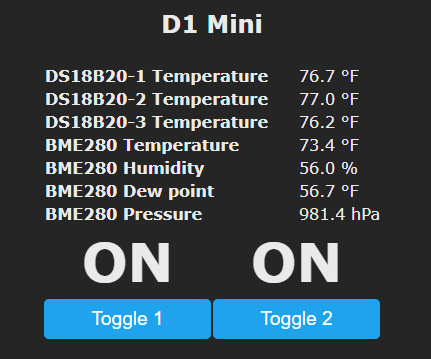
Try the new Universal Sensor Driver, it will handle all 3 of your temperature sensors. You can find more info here. As you have a switch\relay attached you would use the option with a single relay.

I have a similar configuration to your's and it's working perfectly.
image

Thanks very much @garyjmilne
Will give it a try this evening.

@GraphicHealer and @garyjmilne I also have the dual fan/dimmer treatlife switch (DS03) that I've been using a node-red / MQTT / Virtual Switches to accommodate all this time. I upgraded the switch to Tasmota 11, which seemed to dump the wifi config and I lost connection. I did this while I was remote-desktop-ing my way into my house, so trying to connect to the switch to connect it to my wifi resulting in me shutting myself out of my connection. I'm home now and will tinker until I have to go to bed and will report back. (Thus far I seem to be struggling with setting the fan speed, but I'm sure my tasmota config is messed up at the moment)

Not sure of your Tasmota experience but if the device went into a complete reset it will be broadcasting an SSID like Tasmota-123456. If you connect to it and then point your browser to 192.168.4.1 you will get the config screen.

Out of curiosity what version did you upgrade from?

I've since got it hooked back into the home wifi. Came up from Markus's 8.5.3 8.5.1 per your guide. The jump to 12 from 9 did the reset.

In the past I used a script to help find the links between the DPID and FNId or whatever it is, then linked them with the TuyaMCU command. Doing that with 12 has the two toggles (light power and fan power) showing on the home page, along with a slider for the light dimmer. But I can't get the 0,1,2,3 buttons to show for the fan speeds Enum setting. EDIT: Turns out I could get those buttons to appear on the main page on 8.5.1 (still don't remember how), but they never worked. Apparently there was a bug in 8.5.1 that didn't translate those GUI buttons to the correct commands, so they basically did nothing. Thus, I had to use node-red to pre-format the TuyaSend commands so that Tasmota would receive and react, even though the GUI could not.

My old setup I basically had Node-red sending the TuyaSend commands with whatever speed the hubitat virtual switch sent to Node-red, convert it to MQTT, then send that to Tasmota. Did alright, but it's clunky and the Node-red server going down created a nightmare for my automations.

Unfortunately, it's bed time. Don't really have any new info to report. I'm not very good at debugging, but it seems that the "fan" section of the driver isn't lined up with how the TuyaMCU interprets fan stuff on this device. The "on" and "off" commands that should control the light are triggering the fan power. The SetLevel button does impact the dimmer level, and setting it to 0 will turn it off. I am getting the following error while setting the level though:

groovy.lang.MissingMethodException: No signature of method: user_driver_garyjmilne_Tasmota_Sync___Fan_with_Dimmer_1188.isValidInteger() is applicable for argument types: (java.lang.String) values: [10] on line 390 (method parse)

where the value is whatever I sent to Tasmota from the device page. Despite the error, the switch does respond accordingly.

Pressing the "FanOff" produces the following in the logs and Tasmota console:

FanOff Screenshots

image

Pressing the "Off" button produces the following:

Off Screenshots


I hope this helps. Admittedly, just sort of "buckshot" some info in hopes that it helps with something while I'm snoozing. I'll check back first chance I get this evening with anything I should test, as best I can while remoting into the house from work. Otherwise any further testing and such will have to wait about 20ish hours until I'm home again.

Thank you for writing this and giving your time to helping us tweak it to our specific devices and set ups! :slight_smile:

Let's break down the problem a little bit. The Tasmota Sync drivers send the same commands that you would type in on the console to achieve the same thing.

The image shows the key commands that the Driver sends.

Switch
Power On
Power Off

Fan
FanSpeed 0
FanSpeed 1
FanSpeed 2
FanSpeed 3

Dimmer
Dimmer XX where XX is a number between 0 and 100
Speed XX where XX is in the range 0 - 40 and affects the time which a dimmer operation takes to complete.

Please try these out and let me know if they are working as expected.

I was able to produce the error that you reported. It is a bit of a quirk of the interface really. If you enter a level and then tab to the Duration field and don't enter anything but click on Set Level it would generate this error. Unless you press enter, tab out or select another field then whatever you enter in duration is not being applied and is instead sending null.

image

I've got a maintenance release to do in the next couple of days and will include the fix for this as it would potentially apply to all dimming devices including bulbs.

Got to work and was able to remote in for a bit, but I can't see the ceiling fan from the camera, so I can't confirm anything about changing speeds.

image
This is what the main page of my device looks like. Toggle 1 controls the power to the fan, either on or off. Toggle 2 is the light. (This was prior to my relay swap I mention later; my config at this moment is the other way around now) The slider is the light brightness. There is a second "integer" value that the tuyamcu script (also outlined below) finds that appears to be dimmer range. I set that to 200 via that script and don't bother "programming" it to be accessible otherwise since anything below 200 dims the bulb to the point that it's basically off anyway. Point being, I'm not sure what I'm doing wrong to not get the fan controls to show up on the main page, and might be why the FanSpeed 0-3 command isn't doing anything.

The power on and off commands toggles "toggle 1" which turns the fan on and off. The dimmer [#] command responds as it should with the light coming on to the appropriate brightness when that is filled, and the light turning off when dimmer 0 is used. Speed [#] appears to be recognized by the console, but doesn't seem to make a change in the function of the light from what I could tell via my remote setup. Whether I put 10 or 40 in there, the light seems to change instantly from one dimmer level to the next regardless.

image
As was touched on above, the FanSpeed command isn't being recognized. I presume this is an issue with my Tasmota setup, but I'm not sure what to do to fix it considering using the template setup and TuyaMCU guide in the "blakadder repository of devices" doesn't seem to communicate with the fan stuff as it should, and actually goes into a lengthy slew of MQTT commands in order to get it to talk to home assistant properly (not what I'm using, obviously, but shows that the "guide" isn't accurately setting up the fan portion) (what I'm referring to can be found here: Blakadder Template for DS03 Fan/Dimmer Switch). I set up something similar to this to use the MQTT commands to go to Node-red, that "converted" them to Hubitat commands, that controlled a virtual fan in hubitat. It got the job done, but it's clunky.

The "script" I've been mentioning is the Tuya Helper bookmarklet that is linked on the TuyaMCU page in the tasmota github docs (link to the bookmarklet github here: Tuya Helper Bookmarklet). When using this bookmarklet on the console, it will present the DpIDs and their mapped FnIDs in a table, as seen here:

(Just did this while writing the post) Swapping the FnId positions of the relays changes the power on and power off commands to interact with the light now (relay 2 / FnId 12 is in DpId 1, relay 1 / FnId 11 is in DpId 9), so that's one piece of the puzzle in place. As I'm writing this I just realized something... Is the driver written out in such a way that the "switch" is meant to be like a toggle switch on a wall that allows power to both the fan and the light together? Sort of like how you need to have the switch on to allow the light AND the fan to be controlled with pull chains? Because I have mine wired up so that they use two lines, one for the fan and another for the light, but both lines go to the same Tasmota device, which does have separate lines for the light and the fan, thus the two relays / toggles. Perhaps that's mucking things up?

Anyway, the other thing to mention with the table is that the fan speed is controlled by DpId 3 using the Enum values. Here's the kicker with that. These fans actually have 4 speed settings. 0 is not "off," since it's actually more like an "extremely low." I've basically been using low, medium, medium-high, and high all this time, with medium-low being mapped to the low enum value via the node-red intervention. The actual "fan off" position is controlled via the FnId 11 "relay 1" position of being toggled on or off, since speed 0 is that very-low speed. Sending a different value in the enum field changes the value with the following console output:


When I was sitting at home playing with this, doing that would change the fan speed, assuming it was already on. If it was off, it changes the value of the fan speed and would be on that speed whenever the fan was eventually turned on. Changing the enum value via that script does not show any changes in the hubitat logs (but it doesn't seem like any command from there does, so I presume my changes via the script table are circumventing the rules that send and receive from hubitat?). Further playing with these values, now sending the "Dimmer [#]" in the console results in the fan relay (relay 1, FnId 11) turning on and off. The dimmer integer value updates (as seen via the console script) and the fan's relay turns on. Dimmer 0 turns the fan's relay off and sets the dimmer integer to the minimum value. Adding to this, the "SetLevel" command on the device page now also controls the fan relay (presumably because of my "relay swap" mentioned earlier). While I can't see the fan, it makes a very audible click when that part of the physical switch changes, be it speeds or simply turning on and off, so I know that the fan turns on when the dimmer level is set with the "SetLevel" button, but I can see from the console script table that the dimmer integer value is updated accordingly. Obviously I can swap the relays back so the "SetLevel" responds to the light relay, but then the "Power on / Off" commands would be back to controlling the fan relay.

I'm wrapping up, I promise. Going off of all of that, is it safe to say that my tasmota configuration is kinda jacked, and that's what's complicating all of this? Would you have any suggestions to getting it back on track? I wouldn't be surprised if this is just an outlier as well, I recall Markus's drivers had special options and/or setups for certain "Tuya" devices as well. I know your device setup guides assume a properly set-up Tasmota device, and so I understand if this situation is sort of "out of your jurisdiction," but if you have any thoughts like, "Oh, you just need to do XYZ," I'm all ears. Otherwise I'll continue to tinker as I have time (my time at home is in the ballpark of literally 3-4 hours per day that I'm not sleeping when I'm on a work week cycle, thus I'm at work and remoting in to write this now). I won't be off a work cycle til Thursday afternoon, and by then this will be competing with the accumulated honey-do list.

Thank you again for the time you put in to write the driver and work with everyone in the thread thus far! I know I get long winded and the time you've committed to this is very much appreciated! I hope I've at least been able to provide ample information to unpack this a bit more.

This!

1 Like

This is how my iFan04 looks.


and this is the configuration.

I believe that you are right and until you get the TUYAMCU mapping options correct the display will not render as it should.

Did this device used to work with Markus' drivers?
This is the config for the only Treatlife device I could find in Markus' code which is just a dimmer. But notice the TuyaMCU command which I presume is for the dimmer.


Looking at the Tasmota config for the DS03 it is exactly the same which makes sense if all the commands are being sent via the TuyaMCU command.
{"NAME":"DS03 Fan/Light","GPIO":[0,107,0,108,0,0,0,0,0,0,0,0,0],"FLAG":0,"BASE":54}

Here is a config for a seperate Fan device that also uses TuyaMCU. Perhaps it will give you some clues for the TuyaMCU mappings.
[typeId: 'tuyamcu-lucci-connect-remote-as-switches',

  •    name: 'TuyaMCU Lucci Connect Remote',*
    
  •    template: '{"NAME":"Lucci Fan","GPIO":[0,0,0,0,0,0,0,0,0,108,0,107,0],"FLAG":0,"BASE":54}',*
    
  •    installCommands: [["TuyaMCU", "11,102"], ["TuyaMCU", "12,1"], ["TuyaMCU", "13,0"], *
    
  •                      ["TuyaMCU", "14,0"], ["TuyaMCU", "15,0"], ["TuyaMCU", "21,50"], *
    
  •                      ["Rule1", "on TuyaReceived#Data=55AA00070005020400010012 do dimmer 1 endon on TuyaReceived#Data=55AA00070005020400010113 do dimmer 2 endon on TuyaReceived#Data=55AA00070005020400010214 do dimmer 3 endon on Dimmer#State=1 do TuyaSend4 2,0 endon on Dimmer#State=2 do TuyaSend4 2,1 endon on Dimmer#State=3 do TuyaSend4 2,2 endon"], *
    
  •                      ["Rule1", "1"]],*
    
  •    deviceLink: 'https://templates.blakadder.com/luci-connect-remote-control.html'],*
    

Yes, my drivers assume that your device is already responding to the necessary commands. I don't have any device that require the use of the TuyaMCU commands so I don't have any experience to draw on and help you.

You have probably already done this but Reddit has some pretty knowledgeable people. Ragardless of the underlying platform they are using whatever settings they use to get the Tasmota UI to display correctly should still apply to you so don't be put off because its a Home Assistant thread.

This thread looked quite promising IMO.

module 54
backlog so97 1 ; tuyamcu 11,1 ; tuyamcu 12,9 ; tuyamcu 21,10 backlog ledtable 0 ; dimmerrange 10,1000 ; so59 1 ; so68 0
Rule1 on TuyaReceived#Data=55AA03070005030400010016 do publish2 stat/%topic%/speed 0 endon on TuyaReceived#Data=55AA03070005030400010117 do publish2 stat/%topic%/speed 1 endon on TuyaReceived#Data=55AA03070005030400010218 do publish2 stat/%topic%/speed 2 endon on TuyaReceived#Data=55AA03070005030400010319 do publish2 stat/%topic%/speed 3 endon
Rule1 1

Let me know how things go.

P.S. In the worst case you could always buy an iFan04 from [[Aliexpress] for less than $10.(https://www.aliexpress.com/item/3256804014350687.html?spm=a2g0o.ppclist.product.2.59e0IDmgIDmgqc&pdp_npi=2%40dis!USD!US%20%2413.52!US%20%248.79!!!!!%402101d1c316617782566418370e197a!12000028358622116!btf&_t=pvid:e286fa16-c55c-4d20-b259-9ba38569f250&afTraceInfo=1005004200665439__pc__pcBridgePPC__xxxxxx__1661778256)] but I totally understand your perseverance\stubbornness, I'm the same way.

Thanks for the insight! No, the device never worked with Markus's drivers. That's why these devices, despite having his version of Tasmota installed, all communicated via the Node-red server. I remember setting up those rules stating that when TuyaReceived a fan speed via the slew of numbers and letter, to publish the MQTT, that was received by Node-red, sent to hubitat. Essentially the tuyaMCU communicated with the Tasmota chip via those serial commands, and the rules within Tasmota reacted accordingly, despite it never being properly set up to reflect having the fan, the gui showing it, etc.

I'll peruse the info when I get home and see if I can make sense of how to set this thing up and get back to you.

Thank you again!

Could you share the commands that your node-red device sent to Tasmota to get the fan working? Would be helpful to me to see these.

Apologize for the delay, had a busy 4 hour window at home yesterday and just saw this while at work on my phone. Remoted in and got some screenshots of my node-red stuff.

Screenshot_20220830-083541_AnyDesk

Screenshot_20220830-083551_AnyDesk

All of these are hubitat going to the device, basically formatted to take the hubitat virtual device change and chop it up into a message formatted in a way that Tasmota gets a TuyaSend# command and parameter. I have a separate flow for each device, thus a subflow that is the same for all, but different input and output depending on the fan in which room.

The difference between TuyaSend1 vs 4 is 1 is used to change boolean values (the fan power toggle on or off) and 4 to change Enum values, the fan speed. When the fan speed is changed in hubitat, Tasmota gets both a speed change and a power change. If the speed is anything but off, node-red sends an "on" command and a second command with the associated speed to Tasmota. The "3,3" would equate to the DpId 3 (which is the fan speed Enum value), and 3 is the value to apply.

These two are the reverse direction, where it receives the TuyaSend commands and parameters, reorganizes it into a SetSpeed command, then outputs it to the virtual device in hubitat.

Sorry for the poor organization. Doing anything on a phone vs computer is always miserable, but figured I'd work with what I have. I can edit and clean it up later if need be.

Is this an accurate summary?
TuyaSend1 Toggle Power On/Off
TuyaSend4 3,0 - Fan Speed Low
TuyaSend4 3,1 - Fan Speed med-low
TuyaSend4 3,2 - Fan Speed med
TuyaSend4 3,3 - Fan Speed med-high
TuyaSend4 3,4 - Fan Speed High

Bearing in mind I may not fully understand your environment, you could try this.
Add additional relays to your device, doesn't matter that they are not connected to anything.

Rename the buttons with this command.
WebButton2 Fan Power
WebButton3 Low
WebButton4 Med
WebButton5 High

Interlock the fan speeds so only one can be active at a time.
Interlock 3,4,5
Interlock on

Install a rule that will send the necessary Tuya commands when the relays are activated.
rule1 ON Power2#State=0 DO Backlog TuyaSend1 0 ; Power3 Off; Power4 Off; Power5 Off ENDON ON Power2#State=1 DO TuyaSend1 1 ENDON ON Power3#State=1 DO TuyaSend4 3,0 ENDON ON Power4#State=1 DO TuyaSend4 3,2 ENDON ON Power5#State=1 DO TuyaSend4 3,4 ENDON
rule1 ON

Turning on relay 4 (Med) will send the TuyaSend4 3,2 command for example.

I may be wrong on the specifics but I think this approach would work. Does not give you the full fan interface but sounds like you never had that anyway.

In this scenario you would use the Multi-Relay driver and not the Fan with Dimmer. I could make a N Relay driver with Dimmer for you that would work but I won't maintain it going forward as it's just too niche.

Hope this helps.

Gary,

It is very interesting your new approach at installing AND using Tasmota at it´s full potential.

I´ve been doing some tests with a specific device I bought for a specific purpose, but havent´been successful at my trials.

I bought a Sonoff POW Elite 16A switch, and after some struggling I was able to flash it with Tasmota 12.1.1.

It is working as expected, but there is some functionality I can´t make to work;

If I define a Rule where I want something to happen (turn on a switch, send a notification, register date/time, etc.) when a device starts working (Power > 0) the trigger would not work. (Important, the switch is already On, but the device connected into it turns on and off depending on other conditions).

I have noticed that when I manually switch such device with your drivers, I can see a change on the switch status (on/off), but the power would not change unless I do a Refresh.

Any ideas? Am I doing something wrong?

Thanks