This is an awesome integration and I was able to get it running and turn on and off a pixelblaze controller / light strip but I am having trouble figuring out how to call "Next Pattern" by using Button Controller or Rule Machine. Is there a way to do this or do I need to do some programming? For reference I am using a scene controller, Zooz ZEN32. I can use the basic functions fines and can use the devices page on the PIxelblaze to go to Next Pattern or Random Pattern, just wondering if I can easily do this with Button Controller or Rule Machine. Sorry if I'm missing something basic.
I don't think you missed anything. This is one of those things about RM that's a little on the non-obvious side. Here's how you make it work:
When you're setting up actions for your rule, select "Run Custom Action"
Choose "Actuator" in the "Select capability of action device" list, then choose your device.
You should then see a "Select custom command" drop down list, from which you can see all the things the driver can do. previousPattern/nextPattern etc, will be in there somewhere. Select the one you want, and click the "Done" button to move to the next RM page.
First and foremost, this driver is awesome - I got my Pixelblaze and some strips all set up over the weekend and they're working great.
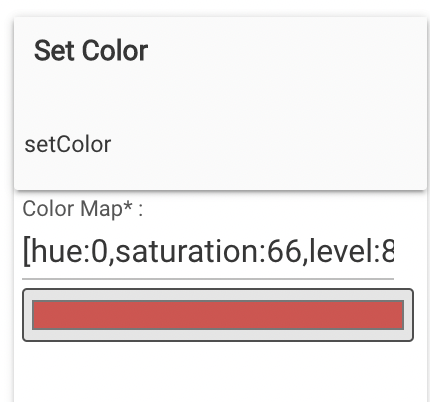
One thing I'm noticing is that I can't pick a static color if a pattern is active. I can't seem to force it to just a plain color unless I reboot the PB. Is there a command to say "Stop the pattern, switch to color X" and I'm missing the pattern stop part?
A quick explanation, just to make sure we're on the same page: The Pixelblaze is an extremely programmable device, which can be blessing or curse, depending on what you have in mind. It doesn't have a default single color mode, or really, any default mode at all. It's always running a user-configurable pattern of some sort.
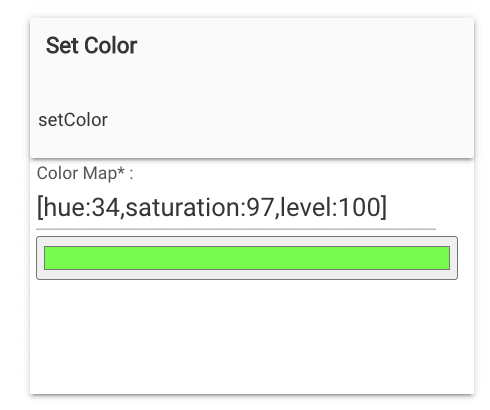
The active pattern has total control of the lights, including what controls are available to external programs. The Hubitat driver can only control color if the pattern has support for doing that in the form of an RGB or HSV color picker. Not all the built-in patterns do.
So, to use your strip as a single color light, you need to switch to a pattern that allows you to do that. If you don't already have one, below is the code for a single color pattern that you can paste into the webUI editor and save. Then, when you switch to this pattern, you should be able to control your strips like a "normal" light bulb.
// Single color pattern for Pixelblaze
// Sets all connected LEDs to the selected color.

// default to sort of warm white
var hue = 0.06;
var sat = 0.4;
var bri = 0.75;


// color control UI
export function hsvPickerColor(h,s,v) {
  hue = h;
  sat = s;
  bri = v;
}

// set all pixels to the selected color
export function render(index) {
  hsv(hue, sat, bri)
}
which works like 50% of the time. It seems like somehow it gets into a mode where a pattern isn't being used, and then that picker will let me choose a static color. I can't seem to figure out why it works sometimes but not others, and my running theory is it gets "out" of pattern mode somehow - but perhaps that's completely wrong
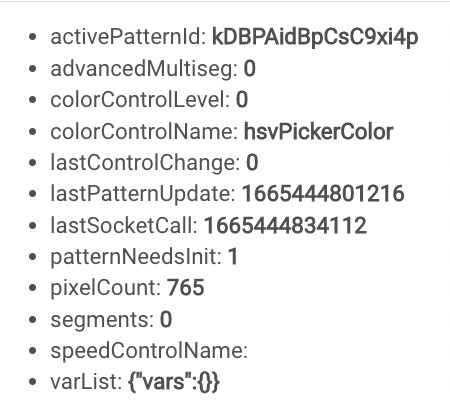
It looks like it's running a pattern which has a color control, but you might want to press the "Initialize" button on the devices page to refresh your pattern list and make sure everything's being reported correctly. Can you change colors from the devices page?
If so, you can switch to this pattern whenever you want the strip to be a single color. The easiest way, which will also work from rule machine, is by using setEffect to set the effect number this pattern's effect number (from the list in lightEffects).
So, if I pick this pattern, I can then use the color picker in the Hubitat device to change it to any color I want. If I use the pattern you provided, it doesn't work. I changed it to turn on to this pattern so that I can then use various Room Lighting settings to pick static colors, but that meant I had to create a "black" pattern for when I turn it off because "off" doesn't funciton in that mode.
//Colour Picker 1
export function hsvPickerColour1(h, s, v) {
  hue1 = h
  saturation1 = s
  value1 = v
}


export var depth1
export function sliderDepth1(v) {
  depth1 = floor(v * pixelCount );
}


export function render(index) {
   {
    hue = hue1
    saturation = saturation1
    value = value1
  }
  hsv(hue, saturation, value)
}
When you add and save new patterns to the Pixelblaze, they may not immediately picked up by the Hubitat. Because the pattern list can be quite large, and tends to change only infrequently, to minimize hub load, it is normally refreshed about every 10 minutes.
After creating and saving a new pattern via the Pixelblaze WebUI, you can trigger an immediate pattern list refresh on the hub by pressing "Get Patterns" on the device page. The new pattern should then show up in the list under "Current States". At that point, you should be able to select it from the Hub, and the controls should all work as usual.
Been reading a few hours both here and the electromage site, and not sure about a solution path. Hope someone can point me to the best way to put this project together. I want to put addressable leds, prob apa102's, under every eave of our house. The eves are not contiguous and each one has an outside xmas light receptacle box. I'd like to have them do the basic patterns like twinkling, etc. but also want to be sure they are connected in a way I can have a chase pattern make them look like they are all one continuous string. I think the obvious way is to use extra wire and just wire them all together with one PB and one large enough PS. But, is that the "best" way to do this? I'd prefer to have the same ability but, perhaps, manage them individually under each eave. (They each have their own PB and PS) I think 30leds/m is fine for this purpose. Any thoughts before I buy? Thanks, Tom
Well, I did something like this a while ago, and can tell you from experience that it's some work to get a big setup going, but it is definitely worth it in the end. (In case you haven't read that far back, here's a link to pictures of my setup from earlier in the thread. I've had this running trouble free for going on four years now)
Here's what I did:
I used strings of a few hundred super bright 12v WS2812-type LEDs spaced about every 4 inches apart. It's bright enough to light the whole yard for outdoor activities.
it's driven by a single Pixelblaze, connected to an output expander, and powered by two 12v, 20amp power supplies at the corners. The output expander's signal conditioning makes it OK to run quite long data/ground lines between segments. My longest connecting line (made with waterproof, low voltage outdoor lighting wire) is about 35 feet from expander to the first LED.
the power boxes contain zwave relays, which my Hubitat drives to turn everything as completely off as possible.
In your situation, I would consider using GS8208 LEDs instead of APA102s. Here's the relevant thread on the Pixelblaze forums They're less expensive, easier to wire, and importantly, they're 12v, which will give you a lot less voltage drop trouble over long runs. I can't overemphasize this -- the voltage in a 5v LED setup drops really, really quickly along a run, which means more power supplies, more wiring, more headache. 12v is better. (And 24v might be better still, but there's a much more limited selection of LEDs available.)
How many Pixelblazes kind of depends on your physical setup. I would not try to drive them as a single connected run of LEDs. Unless the wires connecting your eaves are short, signal problems are very likely. If there's a convenient more-or-less central location available, you can put a Pixelblaze/Output Expander combo there like I did, and drive all your LEDs from that.
If not, check out the new "Sync" feature in the latest Pixelblaze firmware. This will let you put as many Pixelblazes as you want, whereever is most convienent, and will keep them synced via wifi. There's a little more software complexity along that route, explained in the thread, but it's a really nice option if you've got decent wifi signal in all the places you want to set up a controller.
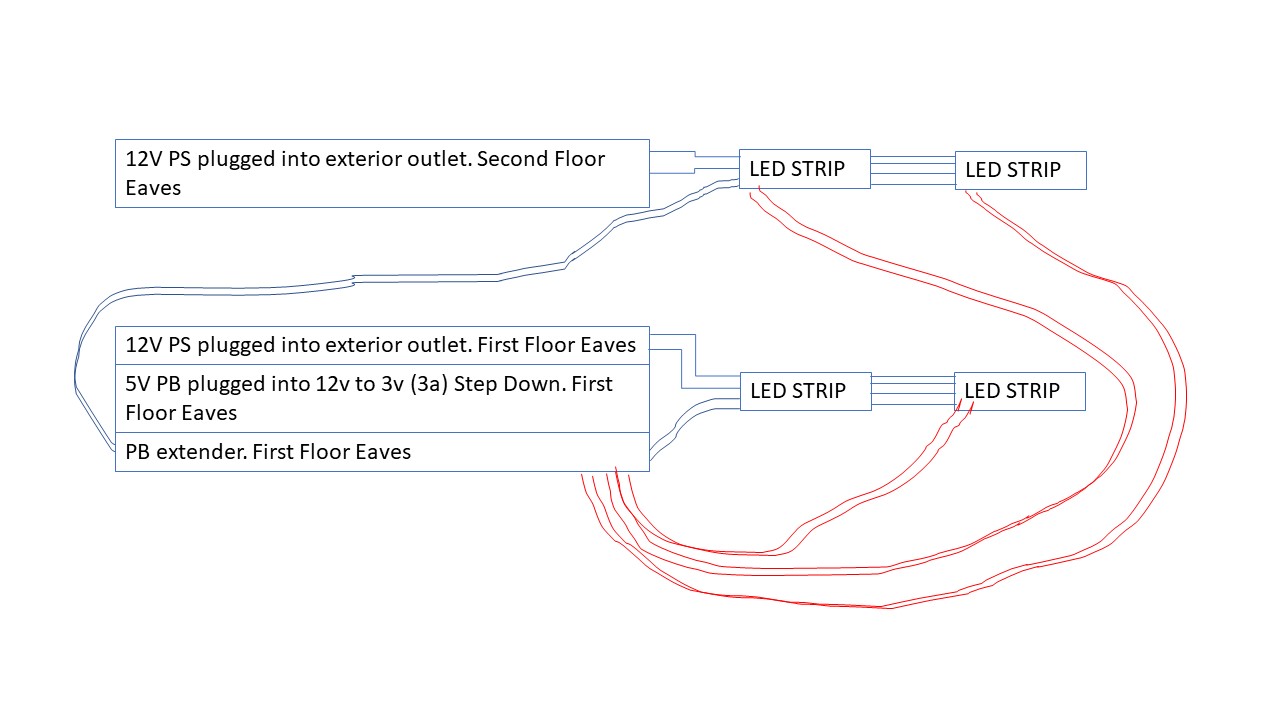
Thanks for the great insight, zranger1. Particularly the 12v vs 5v issue. I'll have to go measure things out to see how much spacing I have between LED strips before I finalize, but it looks like I have lots of flexibility. The diagram, below, is what I took from this including the optional (in red) spoke wheel config. Two questions: Why did you use a relay to turn off power. Don't you always want the PB's to be powered to avoid any connectivity issues, etc. and always waiting for a command. Guessing the PB CAN turn the leds off. Second, the 35' length span was data from the expander, yes? Thanks again.
Your diagram is just about perfect! Given the way my house is laid out though, I'm only using two data/ground channels on the output expander. One for the upstairs strips and one for downstairs. My main box is mounted on a beam under the downstairs porch ceiling, and 35 foot run goes from the expander, through the balcony floor, to the corner of the upstairs eaves.
(The maximum frame rate is somewhat dependent on how many LEDs you use per channel. I aim for no more than about 500 per channel. On the house, I'm nowhere near that.)
On the power relays: It's to save wear and tear on power supplies and Pixelblazes and... basically everything. The Pixelblaze actually can't turn the LEDs off. In its "off" state, it is still sending black pixels, which means the power supply is on, the PB is drawing current according to the pattern it's running, and the LEDs continue to draw at least their base idle current.
Also it is fantastically, unbelievably HOT here (southern Arizona) in the summer, and I like to keep my equipment, in its sealed boxes, as cool as possible. And there's the whole summer monsoon thing, with its lightning, extreme winds and the like. The relay, when off, provides just a little more isolation.
Since turning the outside lights on is pretty much a once per day operation, I'm ok with it taking a couple of seconds. I've never had a connectivity problem. "Off" is, of course, instant.
The Pixelblaze doesn't support that functionality in firmware, so it'd have to be implemented on the hub, in the driver. That means polling the device and sending messages several times a second (say, 10 or so, to be smooth-ish) while the button is down which, in my experience isn't something the Hubitat driver model handles terribly well. (Maybe it's better recently though? Been a while since I've tried anything that needed fast polling. )
I’ve just updated the driver (now v2.0.5) to give the option of using the Pixelblaze discovery service to find Pixelblaze IP address by device name instead of requiring a static IP address. This should make it a little easier to set up, especially if you use mostly dynamic addressing on your network.
To use the discovery service:
update your Pixelblaze driver to the latest version
set the device name in the hub’s Device Information section to match the Pixelblaze's name in the web UI Settings tab. (don’t forget to press the “Save Device” button on your hub)
enable the new “Use Pixelblaze discovery service” option in device preferences on your hub. You can leave the IP address blank, or enter your birthday, or whatever. It’ll be replaced on first connection with the “real” IP from the discovery service.
save device preferences on your hub
The Pixelblaze driver will then retrieve the IP address from the discovery service as needed when connecting, and you will (hopefully) never have to worry about the IP address changing again!
(Note that the discovery service does require your hub to have access to the internet. Also, if you should want or need to switch to a static address, just disable "Use PIxelblaze discovery service", enter the IP address in the proper field and save your preferences.)
Thanks for the update! I actually stopped chasing the IP address changes but i made this update and it found the latest IP address and my lightsare working again.
Thanks for adding thisfeature, writing it up and sharing.